Excellent customer service and communication. Could not recommend them more - 2/14/2023
Shant Aharonian
Cad-ray has to be the best company to work with when it comes to digital dentistry solutions. Here are the reasons why:
1. Experience. Everyone in the company has extensive experience in dentistry. They have used all digital platforms and offer cust...read moreCad-ray has to be the best company to work with when it comes to digital dentistry solutions. Here are the reasons why:
1. Experience. Everyone in the company has extensive experience in dentistry. They have used all digital platforms and offer customers first hand experience.
2. Honesty. Based on their experience they share all the good/bad of different systems. They work with you to find a solution that works best for you. Not sell you the piece of the equipment that gives them the biggest commission.
3. Support. Cad-ray offers the missing piece of the dentist/digital manufacturer puzzle. Many other distributors sell you a piece of equipment but don’t have true day-to-day experience with that equipment. Cad-ray’s team openly share their expertise to help customers optimize their workflows with great technology.
4. Passion. The Cad-ray team is extremely passionate about their craft. They truly believe in what they have to offer.
I took Armen Mirzayan’s course on intraoral scanning and it was truly mind blowing. Armen’s insights will help any dentist optimize their craft. I purchased the full sprintray 3d printing ecosystem the help of Frank. I plan to purchase more equipment from cad-ray.
Also, Jesse is a genius in regards to all aspect of digital workflows. I’m truly grateful for this company and everyone who I’ve worked with so far.read less - 10/07/2022
Matt St George
I had 3 Cerec machines and switched to medit. It’s awesome and do not regret the switch one bit. This is the place to buy it bc Armen and Frank are a wealth of knowledge and Frank is awesome with support. He’s always there whenever I need him! - 10/10/2019
Perfectly Placed Implant course in San Diego was very good. Armen and Brian are excellent lecturers and educators. A lot of practical tips and pearls of wisdom for those getting into cone beam and guided surgery. Would recommend this course highly. ...read morePerfectly Placed Implant course in San Diego was very good. Armen and Brian are excellent lecturers and educators. A lot of practical tips and pearls of wisdom for those getting into cone beam and guided surgery. Would recommend this course highly. Looking forward to other courses that they offerread less - 2/18/2017
Samir Rana
Ive had the medit since 2018. One of the best decisions in dentistry ive made. I met some of the great trend setters in digital dentistry(armen, jonathan ab and others through social media platforms). Medit Has changed The way i practice, live and ...read moreIve had the medit since 2018. One of the best decisions in dentistry ive made. I met some of the great trend setters in digital dentistry(armen, jonathan ab and others through social media platforms). Medit Has changed The way i practice, live and think! Happy not to have a monthly fee as i did for years. Support is always a message or call away. Would be glad
To further share my experience with you if u need.read less - 6/16/2020
STAR DENTAL CLINIC
This has changed my way of doing things forever. I can’t live without my Medit scanner. I promote it to all my friends like crazy. Support with Cad ray is awesome. They return calls within seconds. The price for scanner is ridiculously good and the ...read moreThis has changed my way of doing things forever. I can’t live without my Medit scanner. I promote it to all my friends like crazy. Support with Cad ray is awesome. They return calls within seconds. The price for scanner is ridiculously good and the quality of images is amazing. Their website has soo many educational videos. It doesn’t end. I love the ability to mobilize it from one off to another until I buy a second one. I’m can’t wait u til I have the time to learn all the other cool technology cad ray has. It’s amazing.read less - 7/24/2020
Angelique Freking
I recently purchased the Medit i500 and am in love. I've used all the other scanners in my career, but this is my favorite hands down. I had a very easy, great purchasing experience and would happily refer anyone to this company and this particular s...read moreI recently purchased the Medit i500 and am in love. I've used all the other scanners in my career, but this is my favorite hands down. I had a very easy, great purchasing experience and would happily refer anyone to this company and this particular scanner.read less - 6/19/2020
Rusty Fitton
Super happy with our purchase of the Medit i500 from Cad Ray. Overall its a work horse scanner that has handled anything weve thrown at it. The key to success with it is definitely taking the time to actually learn how to use it after purchase. Ca...read moreSuper happy with our purchase of the Medit i500 from Cad Ray. Overall its a work horse scanner that has handled anything weve thrown at it. The key to success with it is definitely taking the time to actually learn how to use it after purchase. Cad Ray has an immense library of straight forward education videos that are updated basically daily. I havent done the 2 day course but that is also included in the purchase. You really cant find that sort of service and education with any of the other scanners on the market. Id recommend them to anyone.read less - 6/26/2020
Kelly Betts
Customer service has always been top-notch! I personally worked with Wayne Glassoff and he has been super helpful getting our office up and running with 3D printing and has always been a great resource and highly responsive whenever I need anything o...read moreCustomer service has always been top-notch! I personally worked with Wayne Glassoff and he has been super helpful getting our office up and running with 3D printing and has always been a great resource and highly responsive whenever I need anything or have any questions.read less - 9/24/2022
David Stall
These guys are great. Always available and helpful. My scanning issues were dealt with quickly and courteously. - 10/01/2021
Micah Bickel
Great products, training and support - 11/01/2021
Bob D
Just got my Medit i700 from CAD-Ray and experienced what everyone raves about, the level of customer service by CAD-Ray. As you know you can buy this scanner from a lot of places but they won't offer you help and support. They called my cell and conn...read moreJust got my Medit i700 from CAD-Ray and experienced what everyone raves about, the level of customer service by CAD-Ray. As you know you can buy this scanner from a lot of places but they won't offer you help and support. They called my cell and connected to my laptop and configured everything at 7 PM.. Great great experience.read less - 12/08/2021
Jaspreet Ghuman
Shout out to Nick, Frank and Armen ! Cheers . Great customer service by Nick and Frank. Too early to make a comment about the scanner but these guys are awesome. - 9/19/2020
Steven Polasek
The cad ray team is the best! Jon and Nick offer first class service! I ordered a medit i500 from another supplier and had to cancel my order after it had not arrived within 3 weeks. Placed my order with Jon and Nick, had the scanner to me within 24 ...read moreThe cad ray team is the best! Jon and Nick offer first class service! I ordered a medit i500 from another supplier and had to cancel my order after it had not arrived within 3 weeks. Placed my order with Jon and Nick, had the scanner to me within 24 hours of purchase. I love my medit! Best scanner on the market!read less - 6/15/2020
Implant Planning Services Review I Am VERY experienced with "another system" but thought I would give CAD-Ray a try. At at LEAST 1/3 the fee, why not?
VERY happy. Fit GREAT, surgery was uneventful (the best kind) and I am a believer! This is a great company and great PEOPLE to...read moreI Am VERY experienced with "another system" but thought I would give CAD-Ray a try. At at LEAST 1/3 the fee, why not?
VERY happy. Fit GREAT, surgery was uneventful (the best kind) and I am a believer! This is a great company and great PEOPLE too! 5 stars aren't enough. Just like the Burj Al Arab, this is 7 star!read less - 3/03/2015
Marc Prince
We’ve been using the Medit i700 in our office for approximately a year now. It has been a game changer and hard to remember what it’s like without using the intra-oral scanner. The Cad-Ray support team has been remarkable as well! - 9/11/2022
carlos Santos
I would like to let you know that Kaila Larson is excellent communicator, personable, professional and knowledgeableI have had the opportunity to talk to her 3 times and it has always been awesome.Regards,Dr Carlos santos - 4/08/2022
Carter Weber
I had a great experience with CAD RAY. I was lucky enough to have Frank DeLuca come down to my office to demo the Medit I700. Needless to say, we were in love with the technology and the great hands on demo. CAD RAY overnighted me the scanner and we ...read moreI had a great experience with CAD RAY. I was lucky enough to have Frank DeLuca come down to my office to demo the Medit I700. Needless to say, we were in love with the technology and the great hands on demo. CAD RAY overnighted me the scanner and we were off to the races. Any time we have had a technical question, Frank has personal helped me or put me in touch with one of his colleagues if he wasn’t available. All around, it was as 5 star experience!read less - 12/16/2021
Jacob Rogers
I love this scanner. Seriously, how can you fit so much quality into the scanner, software and support and such a low price? Magic?!?! Probably. But, for real, we really like using this scanner and it produces great results. Best dental purchas...read moreI love this scanner. Seriously, how can you fit so much quality into the scanner, software and support and such a low price? Magic?!?! Probably. But, for real, we really like using this scanner and it produces great results. Best dental purchase I've ever made!read less - 10/09/2019
Jonathan and Nick have been a great tremendous help. They went out of their ways to help me upgrade my Medit i500 even though I didn’t purchase my Medit i500 scanner from them. They are the largest Medit scanner distributor and they have the custome...read moreJonathan and Nick have been a great tremendous help. They went out of their ways to help me upgrade my Medit i500 even though I didn’t purchase my Medit i500 scanner from them. They are the largest Medit scanner distributor and they have the customers’ interest at heart. They are super responsive to phone calls, emails, and Facebook messages. I highly recommend their servicesread less - 9/01/2021
Nancy Hartrick
I am absolutely in love with my MEDIT i700, as is my entire staff. The Medit i700 is reliable, fast, easy to use and the software is incredibly intuitive. I couldn't be happier with the team at CAD-Ray. They are true professionals, and very hands and...read moreI am absolutely in love with my MEDIT i700, as is my entire staff. The Medit i700 is reliable, fast, easy to use and the software is incredibly intuitive. I couldn't be happier with the team at CAD-Ray. They are true professionals, and very hands and responsive in terms of their support and training. Thank you to the entire team.read less - 8/24/2021
I always rely on Frank to help with any questions or concerns regarding our printer. The best in tampa. - 1/25/2023
Aaron LaRock
Dentist here. Bought a scanner, mill and 3d printer with Cad-Ray. I don't know what I'd do if I bought these items without their support. They've helped me so much and are awesome. I felt I had to repay by writing them this nice review. You won't reg...read moreDentist here. Bought a scanner, mill and 3d printer with Cad-Ray. I don't know what I'd do if I bought these items without their support. They've helped me so much and are awesome. I felt I had to repay by writing them this nice review. You won't regret getting whatever you need through Cad Ray.read less - 3/15/2024
Anu Isaac
I am a new user of Medit i500. My rep Andy was very good with the training & very detailed & patient with the whole process. The online support is one of the best. I ordered it from CADRay. The purchasing process was quick & easy. Install...read moreI am a new user of Medit i500. My rep Andy was very good with the training & very detailed & patient with the whole process. The online support is one of the best. I ordered it from CADRay. The purchasing process was quick & easy. Installation was also fairly straightforward. The staff is excited about the purchase. Can't wait to use it. Highly recommend purchasing it. Good practice booster.read less - 12/25/2021
If you are looking to buy a Medit, you shouldn't look anywhere else to buy it. My Medit i700 was having issues on a Friday and I was able to get Heather from Cad-Ray to troubleshoot the issue. She remoted into my computer to try and troubleshoot the ...read moreIf you are looking to buy a Medit, you shouldn't look anywhere else to buy it. My Medit i700 was having issues on a Friday and I was able to get Heather from Cad-Ray to troubleshoot the issue. She remoted into my computer to try and troubleshoot the issue and helped with getting Medit on board as well. Once it was confirmed it was a hardware issue, I got sent a BRAND NEW Medit i700 OVERNIGHT.Can you believe that? Service and warranty that Cad-Ray offers is really TOP NOTCH.Highly Recommend Cad-Ray for all things MEDIT. Thank you Heather from Cad-Ray for all your help!!!read less - 2/02/2022
Paul Crespo
Cad-Ray has been instrumental in implementing and supporting our experience with scanning. Having scanned previously with other services I can truly say that Cad-Ray takes their clients very seriously and will not leave you hanging. They set the ba...read moreCad-Ray has been instrumental in implementing and supporting our experience with scanning. Having scanned previously with other services I can truly say that Cad-Ray takes their clients very seriously and will not leave you hanging. They set the bar very high. Cad-Ray all the way!read less - 12/09/2021
Armen Mirzayan
Are you happy with the support and training you have received with our team at CAD-Ray.com?
Our business grows much like yours, with referrals and recommendations. We would greatly appreciate a quick review / testimonial
NOTE: ...read moreAre you happy with the support and training you have received with our team at CAD-Ray.com?
Our business grows much like yours, with referrals and recommendations. We would greatly appreciate a quick review / testimonial
NOTE: All testimonials are submitted by verified owners.read less - 5/08/2021
One of the best companies to work with for dental tech needs. They have a vast video training library that makes the transition easy to digital dentistry. I’ve recommended a few of my colleagues purchase the medit through them. It’s been a great year...read moreOne of the best companies to work with for dental tech needs. They have a vast video training library that makes the transition easy to digital dentistry. I’ve recommended a few of my colleagues purchase the medit through them. It’s been a great year!read less - 6/16/2020
Jordan Bower
Frank helped me out when 3dbiocad could not help me with my trios issue. Thank you cad-ray. - 9/15/2024
Harrison MacKenzie
Purchased Medit i700 from Frank/CAD-Ray and everything has been absolutely top-notch! Great service, quick responses, great training. Very happy with CAD-Ray and our i700! - 10/20/2022
Chirag Vaid
I ordered my Medit scanner from them in Feb 2020, so far no issues with support or the product. They are a great company with great support. Disclosure: they did promise me a scanner tip for this review, but in all honestly I was meaning to give it t...read moreI ordered my Medit scanner from them in Feb 2020, so far no issues with support or the product. They are a great company with great support. Disclosure: they did promise me a scanner tip for this review, but in all honestly I was meaning to give it to them anyway.... if you are looking to buy, this is a great way to go about it.read less - 7/19/2020
Evan Bedell
Laura has always been so helpful with the medit when we needed assistance or resources. The training she provided the office was invaluable! She is quick to respond whenever we reach out. 13/10 - would recommend her to anyone looking to get a medit ...read moreLaura has always been so helpful with the medit when we needed assistance or resources. The training she provided the office was invaluable! She is quick to respond whenever we reach out. 13/10 - would recommend her to anyone looking to get a medit scanner.read less - 12/16/2021
Mark Geddes
Love my medit! Cad-ray has been awesome to work with and very educational in learning all things digital . Was doing a study club with 4 other dr's showing off the medit and the cerec dr who had just bought the newest kept saying, "mine doesn't do...read moreLove my medit! Cad-ray has been awesome to work with and very educational in learning all things digital . Was doing a study club with 4 other dr's showing off the medit and the cerec dr who had just bought the newest kept saying, "mine doesn't do that. No way! I wish mine could do that. For real? I paid 4 times as much."
Needless to say the medit is awesome.read less - 6/18/2020
Fantastic support and customer service! This is an awesome company. They aren't big box and actually know how to use, trouble shoot and ball out with the products they sell. They only will sell and endorse a good product. They are selective. Whatever...read moreFantastic support and customer service! This is an awesome company. They aren't big box and actually know how to use, trouble shoot and ball out with the products they sell. They only will sell and endorse a good product. They are selective. Whatever they sell they back. And they have your back too. Their support, service and training is industry leading. Also Laura from CadRay is a beast. She's wizardread less - 4/23/2022
Nolan Andrews
They all go absolutely above and beyond in all aspects. Whether it's tech support, products, CE, everything. Everyone I have dealt with has been wonderful. Love these guys! - 6/19/2020
Trident Dental
Great help when you need it. Frank, Armen and team will take care of you. - 12/10/2021
blakesherrick-q6S
The Medit i700 is a game changer in speed and overall comfort for patients. I find it much smaller than other brands and have done almost 50 appliances/aligner cases the past 2 months with no fit issues from my lab. Love this scanner!
Dr. Sherric...read moreThe Medit i700 is a game changer in speed and overall comfort for patients. I find it much smaller than other brands and have done almost 50 appliances/aligner cases the past 2 months with no fit issues from my lab. Love this scanner!
Dr. Sherrick
Auburn Lakes Orthodonticsread less - 8/24/2021
I bought my Medit I-500 from them. Everything has been been first class, from the training to the customer support. I highly recommend buying through CAD RAY. - 6/16/2020
Spark Dental
Just had a new i700 scanner.Service so far is great.Andy did our training, he was great in answering all our questions .loving the scanner so far .😊 - 9/01/2022
Stephen S
Choosing an digital intraoral scanner these days can be quite a daunting task. When I reached out to CAD-Ray, as was recommended by many colleagues, I was connected to Frank DeLuca, and he made my decision-making process very simple. Upon receiving...read moreChoosing an digital intraoral scanner these days can be quite a daunting task. When I reached out to CAD-Ray, as was recommended by many colleagues, I was connected to Frank DeLuca, and he made my decision-making process very simple. Upon receiving my 3shape Trios 4 scanner, Frank and the entire tech support team/customer service were very helpful every step of the way. Frank makes himself available when he can in order to address all of the questions I have regarding the digital workflow. I highly recommend CAD-Ray. It will make your transition to digital scanning a positive experience.read less - 1/24/2023
Diana Teverbaugh
What can I say ! I have been extremely pleased with my scanner ! I recommend it to all my colleagues ! The support is the best , I bought the extended warranty and my scanner hada small crack and within one day they shipped my a new one ! I can’t wo...read moreWhat can I say ! I have been extremely pleased with my scanner ! I recommend it to all my colleagues ! The support is the best , I bought the extended warranty and my scanner hada small crack and within one day they shipped my a new one ! I can’t work without it ! Thank you !read less - 2/09/2022
Yu Gan
Great company. Pioneer in digital dentistry. Armen knows his stuff. Hands down the go to scanner reseller in the US. Support and training courses are incredible. - 10/02/2022
Inna Vinnikov
Frank was fantastic in helping me obtain my medit scanner. He answered all of my questions in detail. After the purchase of the scanner, he continued to follow up with me and presently remains a tremendous support with any concerns that may arise. Wa...read moreFrank was fantastic in helping me obtain my medit scanner. He answered all of my questions in detail. After the purchase of the scanner, he continued to follow up with me and presently remains a tremendous support with any concerns that may arise. Was a great experience overall from transitioning my practice into a digital world!read less - 1/25/2023
Jonathan Acker
Awesome people who care about their clients. - 7/09/2021
David Paquette
Cad-Ray has been super-efficient and very easy to work with! Highly recommend them for Medit sales and support! - 11/09/2021
Frank and the Cad Ray team have been nothing short of amazing. I continue to purchase digital equipment from Cad Ray because their support is unlike any in the dental industry. Frank has been instrumental in helping my team get the most out of our pr...read moreFrank and the Cad Ray team have been nothing short of amazing. I continue to purchase digital equipment from Cad Ray because their support is unlike any in the dental industry. Frank has been instrumental in helping my team get the most out of our products.read less - 1/25/2023
Rafael Dimayuga
Have been chatting with the CADRAY group for at least a year now even though I did not buy anything from them. They are very receptive, prompt and helpful. Finally bit the bullet and received my Medit yesterday! Now my Bluecam has a new buddy!! - 7/17/2020
John Pobanz
We had an outstanding experience purchasing two Medit scanners. The delivery was timely . The onboarding clean. Laura was dazzling with her acumen and quick solutions . We highly recommend the investment in Cad Ray .Pobanz Orthodontics , Ogden Utah :...read moreWe had an outstanding experience purchasing two Medit scanners. The delivery was timely . The onboarding clean. Laura was dazzling with her acumen and quick solutions . We highly recommend the investment in Cad Ray .Pobanz Orthodontics , Ogden Utah :)read less - 12/10/2021
Dong Lim
One of the best investments I’ve made for my office. A fraction of the cost compared to cerec. No monthly club fee. Easy maintenance. Saving a ton on lab costs. Milling and designing crowns is honestly my favorite things to do now. - 6/29/2020
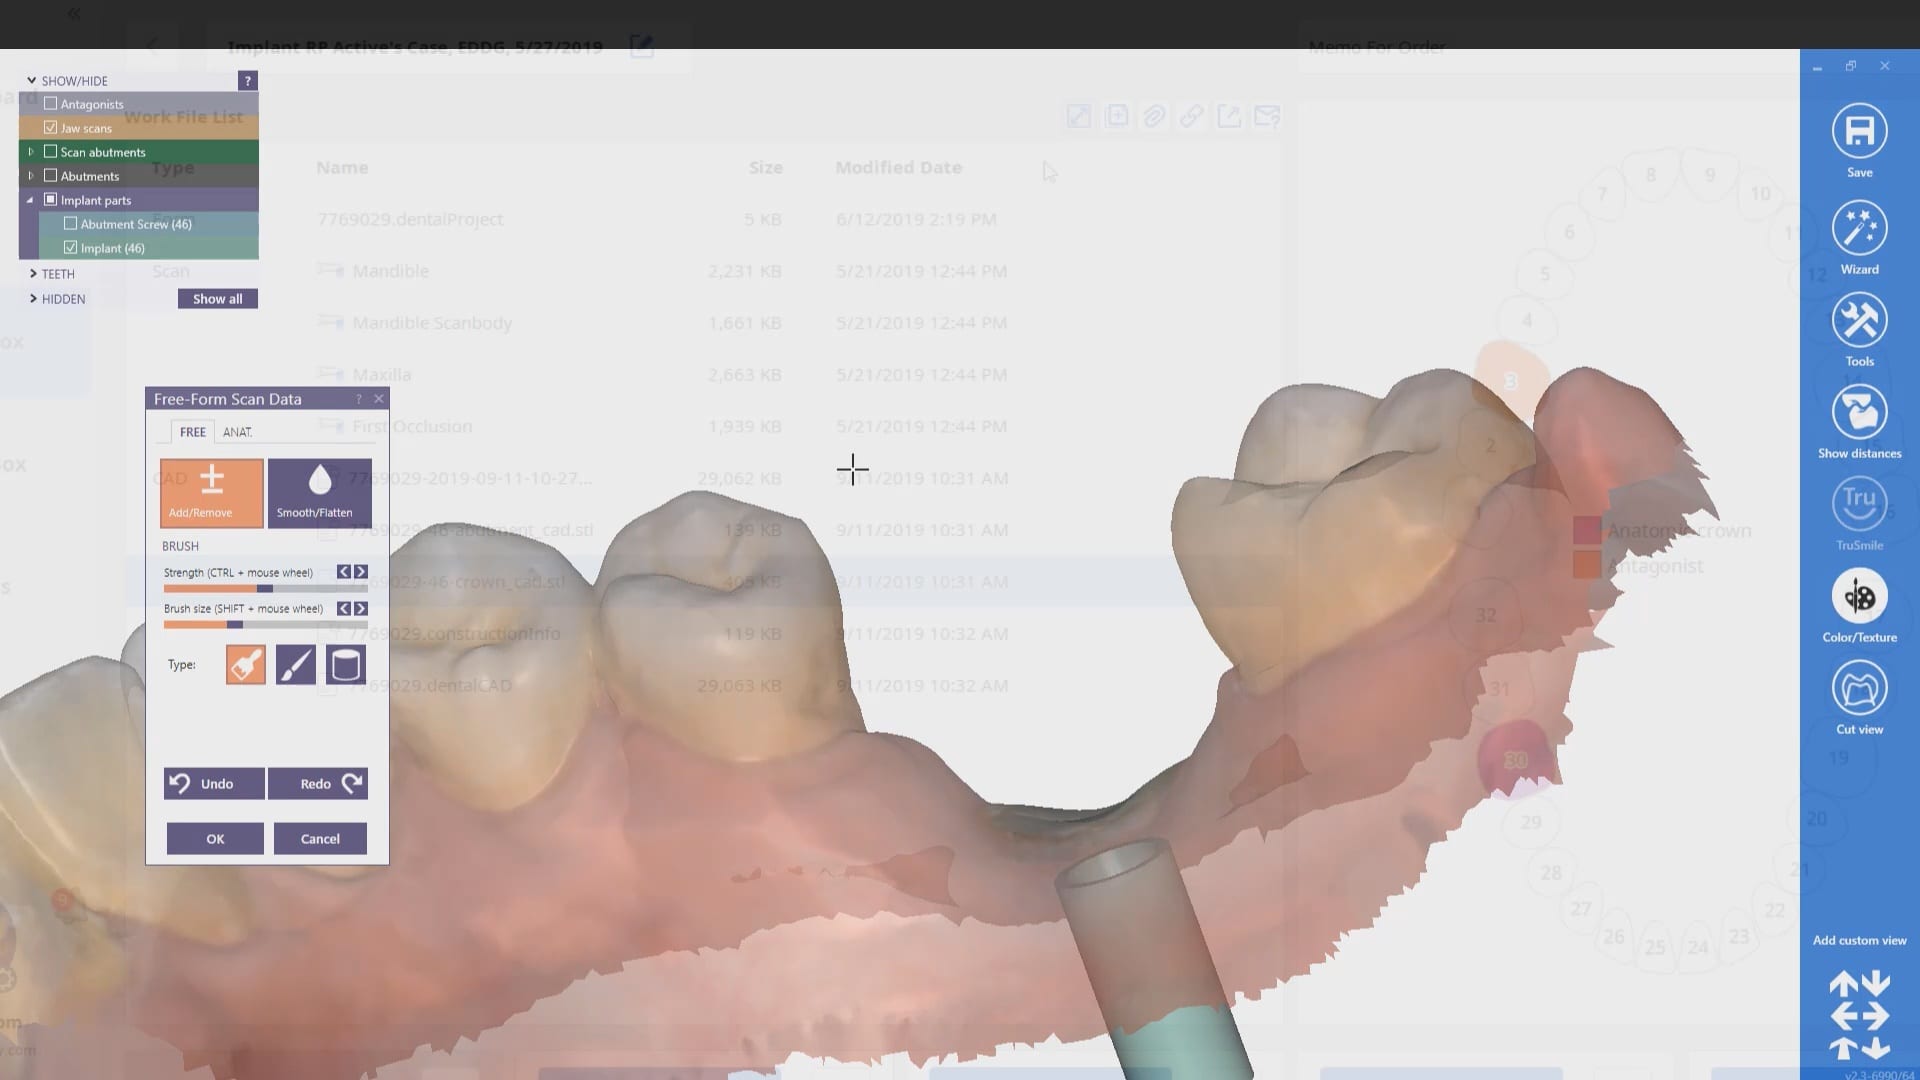
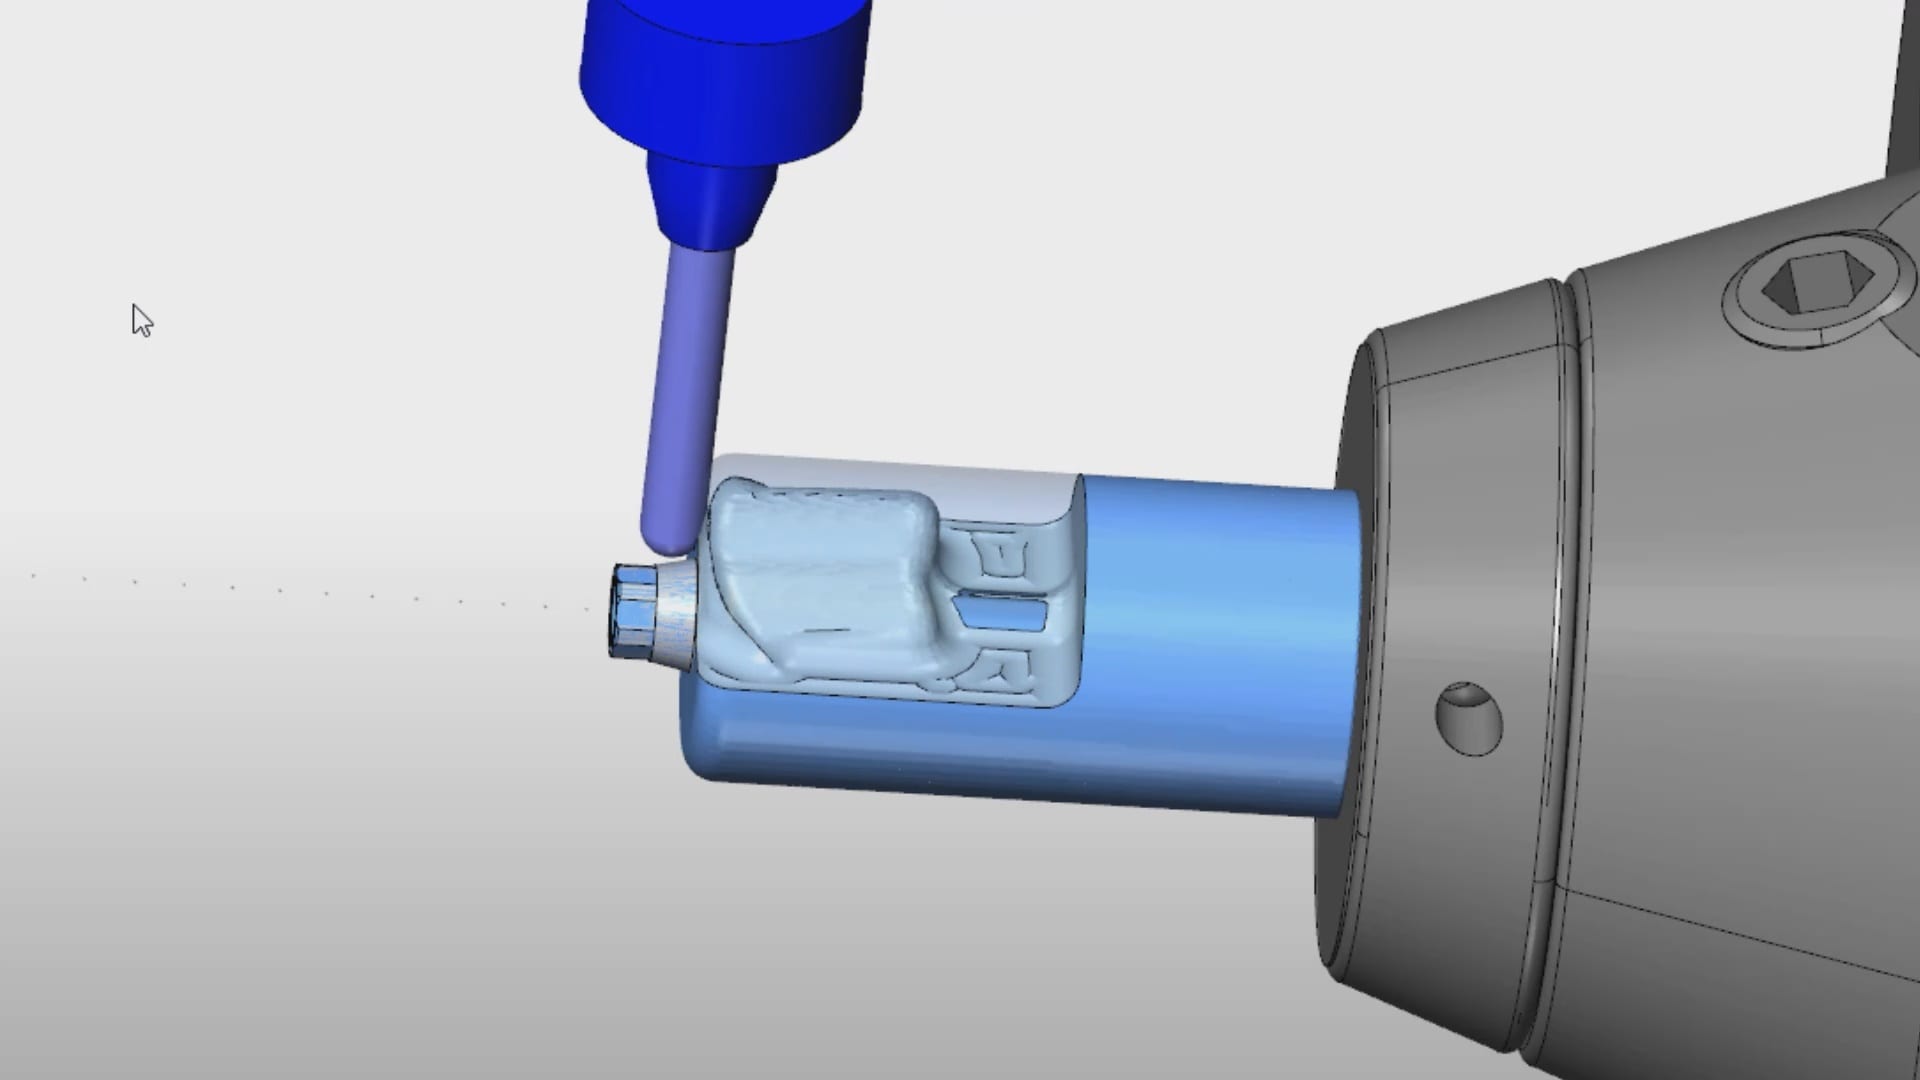
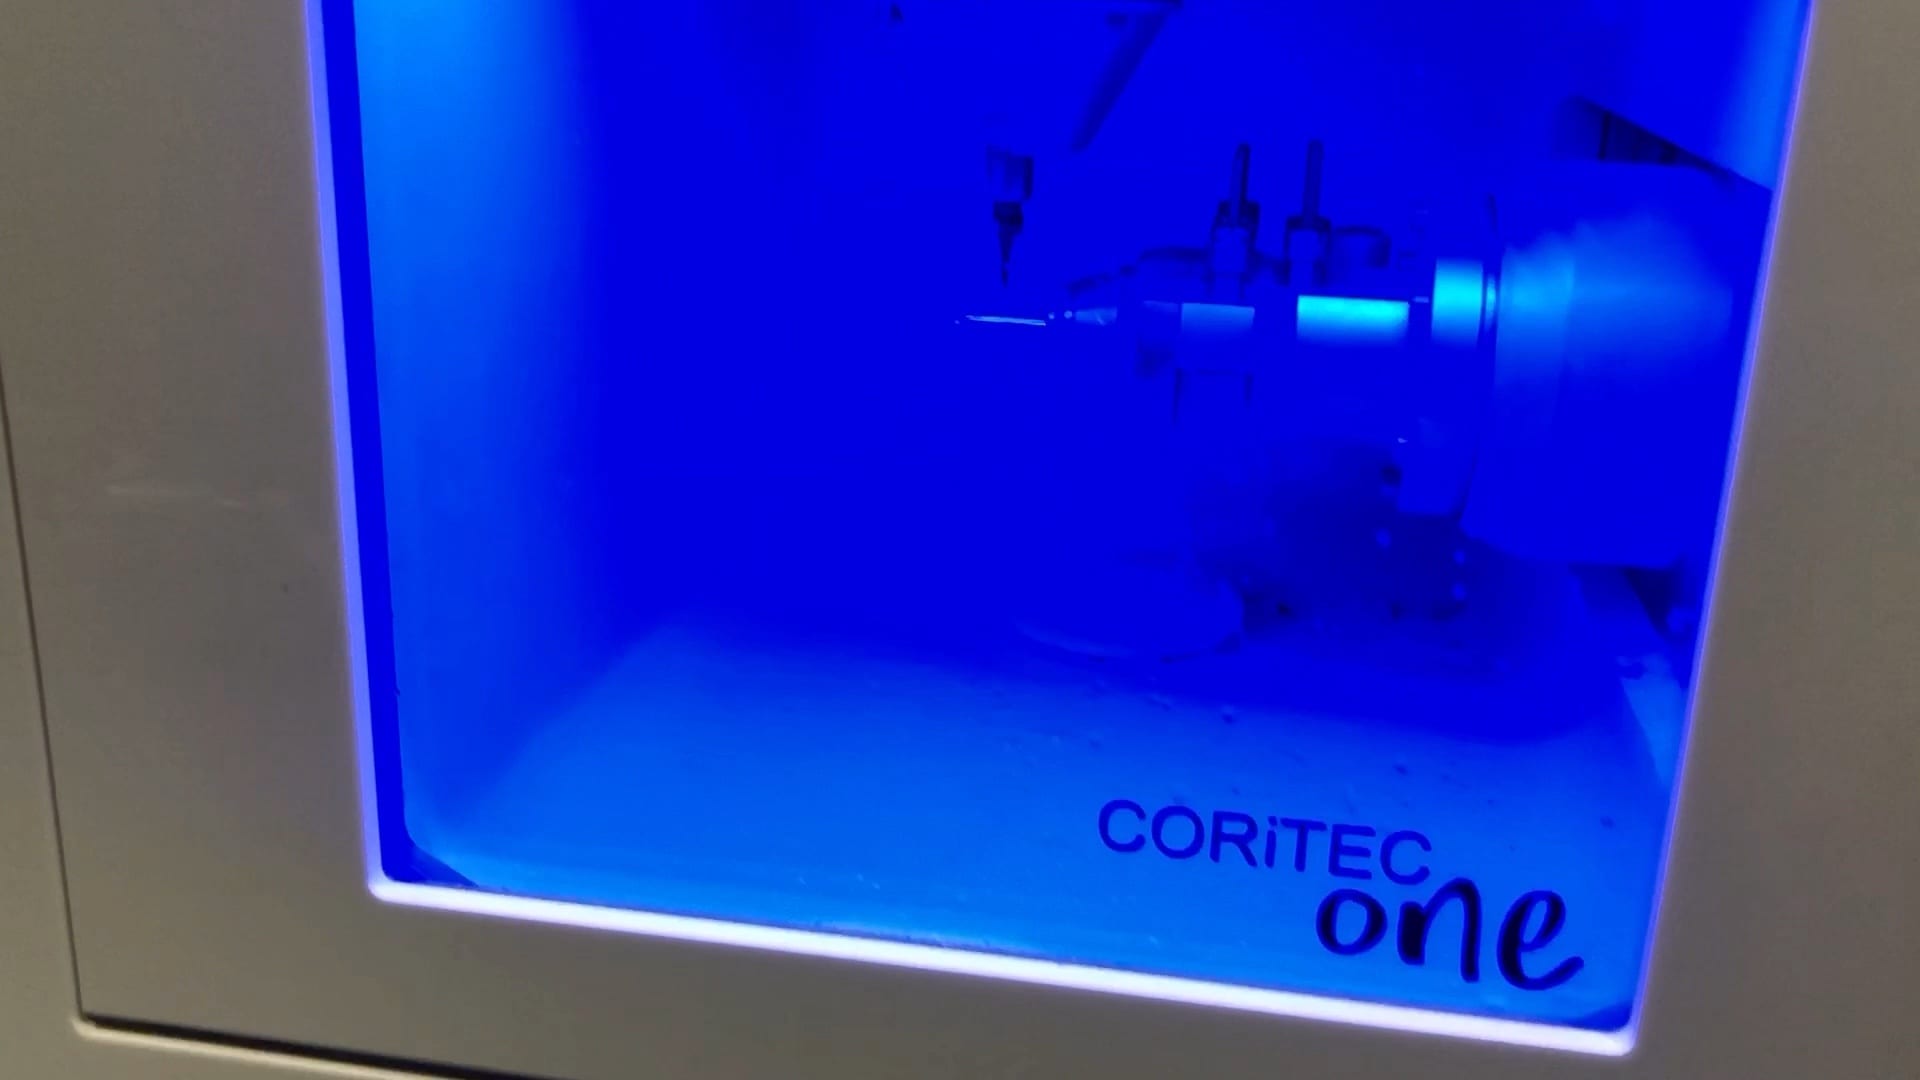
We are very pleased with millbox and the imes icore coritec one for a chairside milling solution. We’ve been testing it for a long time and its CAM (millbox) is very intuitive and the results are always predictable. It can mill titanium abutments, emax, and zirconia blocks.
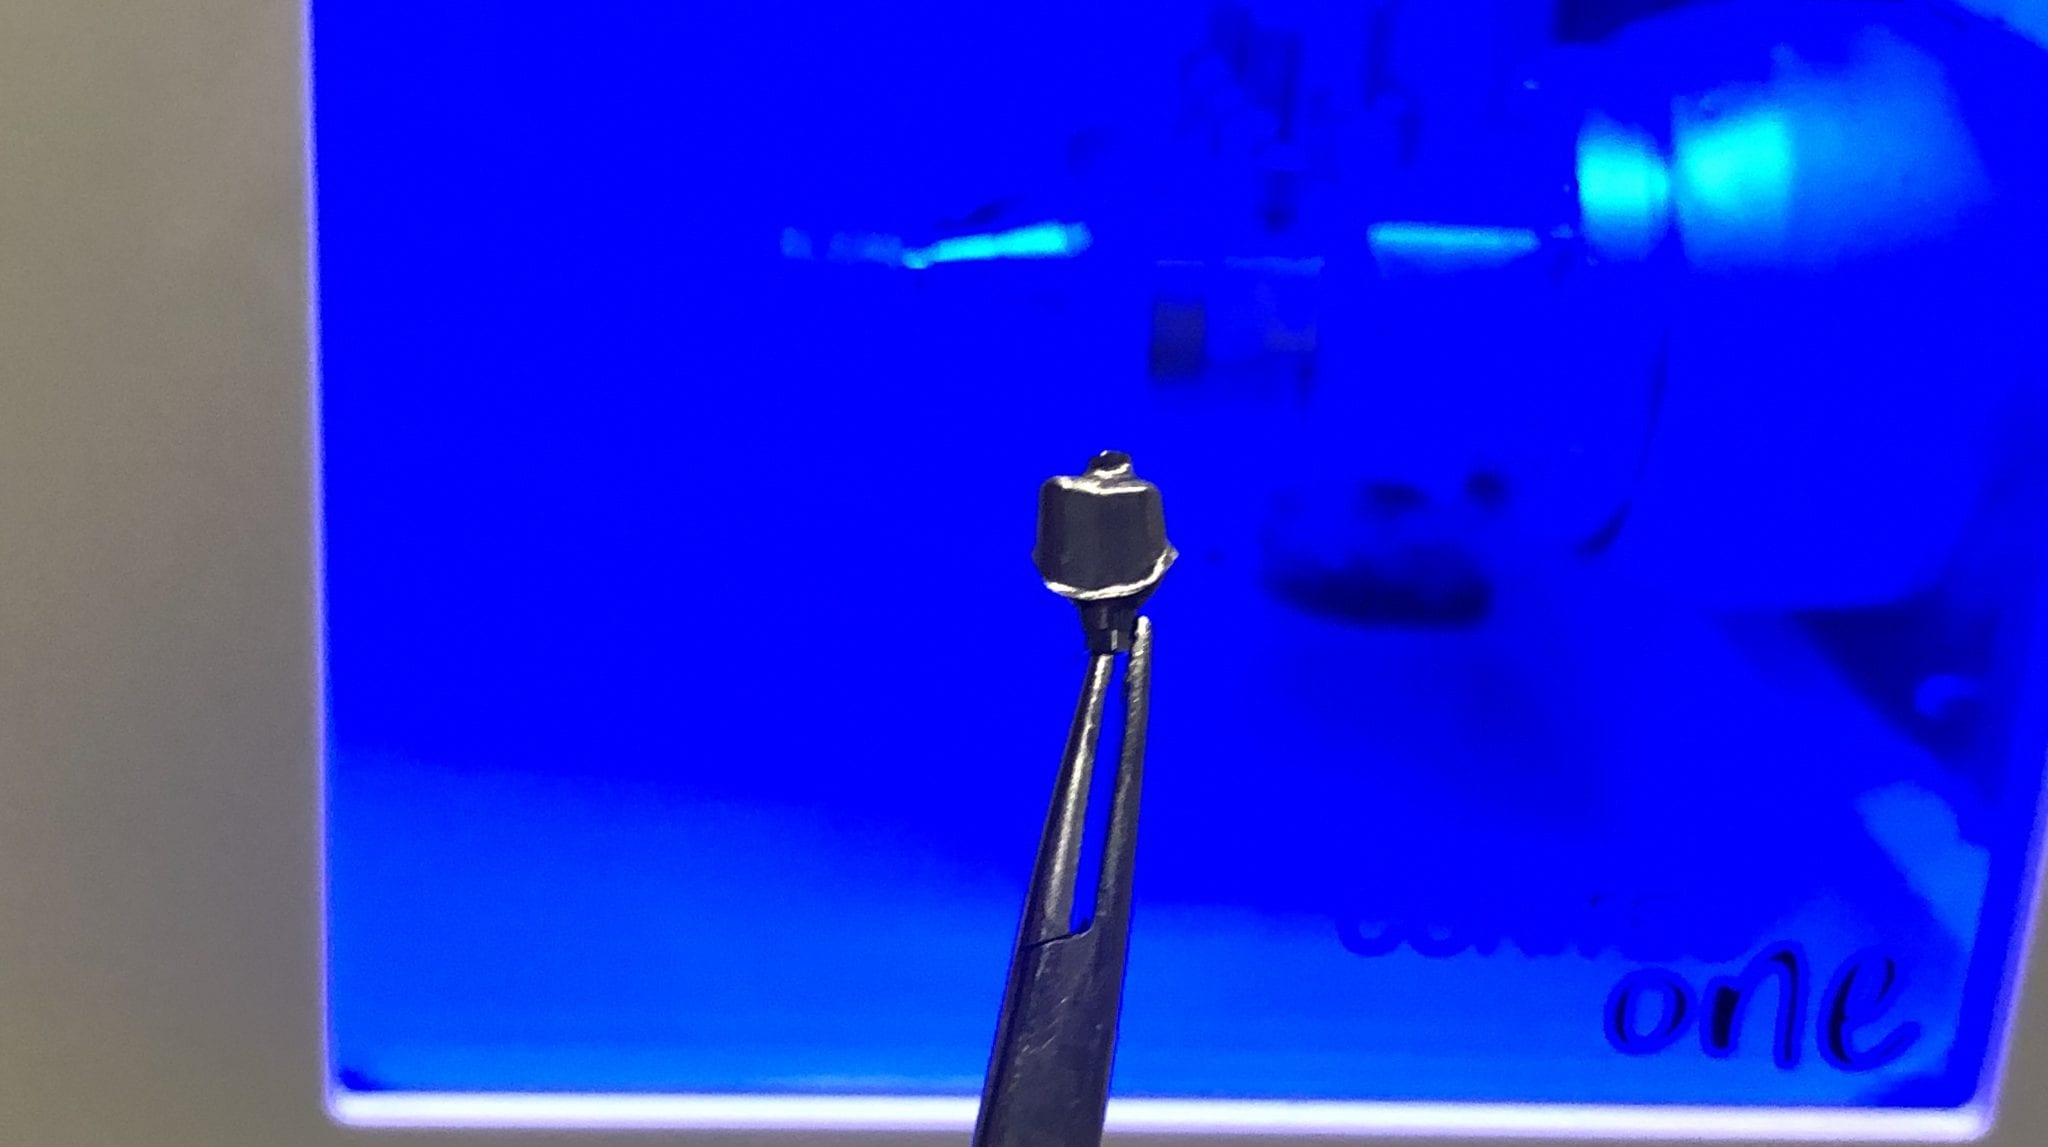
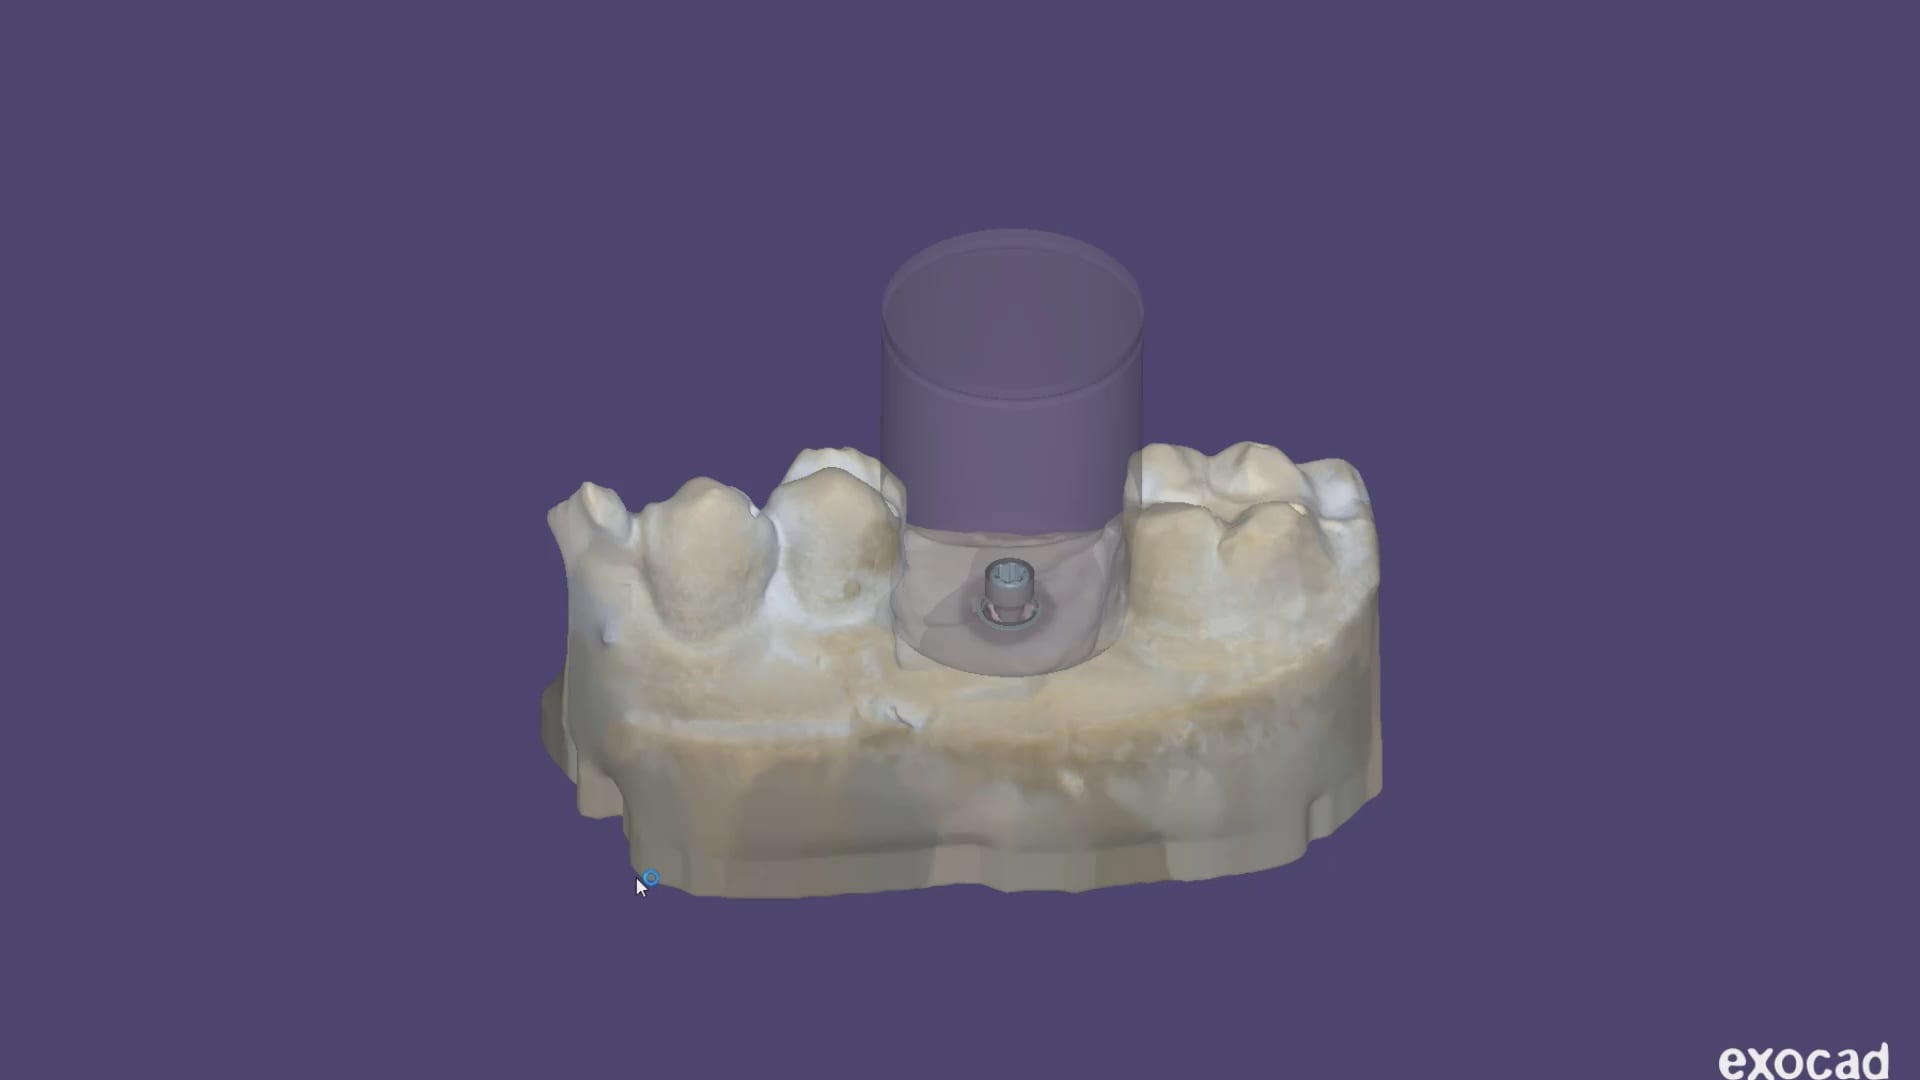
The following videos illustrate how you can image a scanbody intra-orally and then design it in cad software. Here we used exocad to identify the biomax RP implant and designed both the custom titanium abutment and the suprastructure, both of which were milled with the CORiTEC ONE
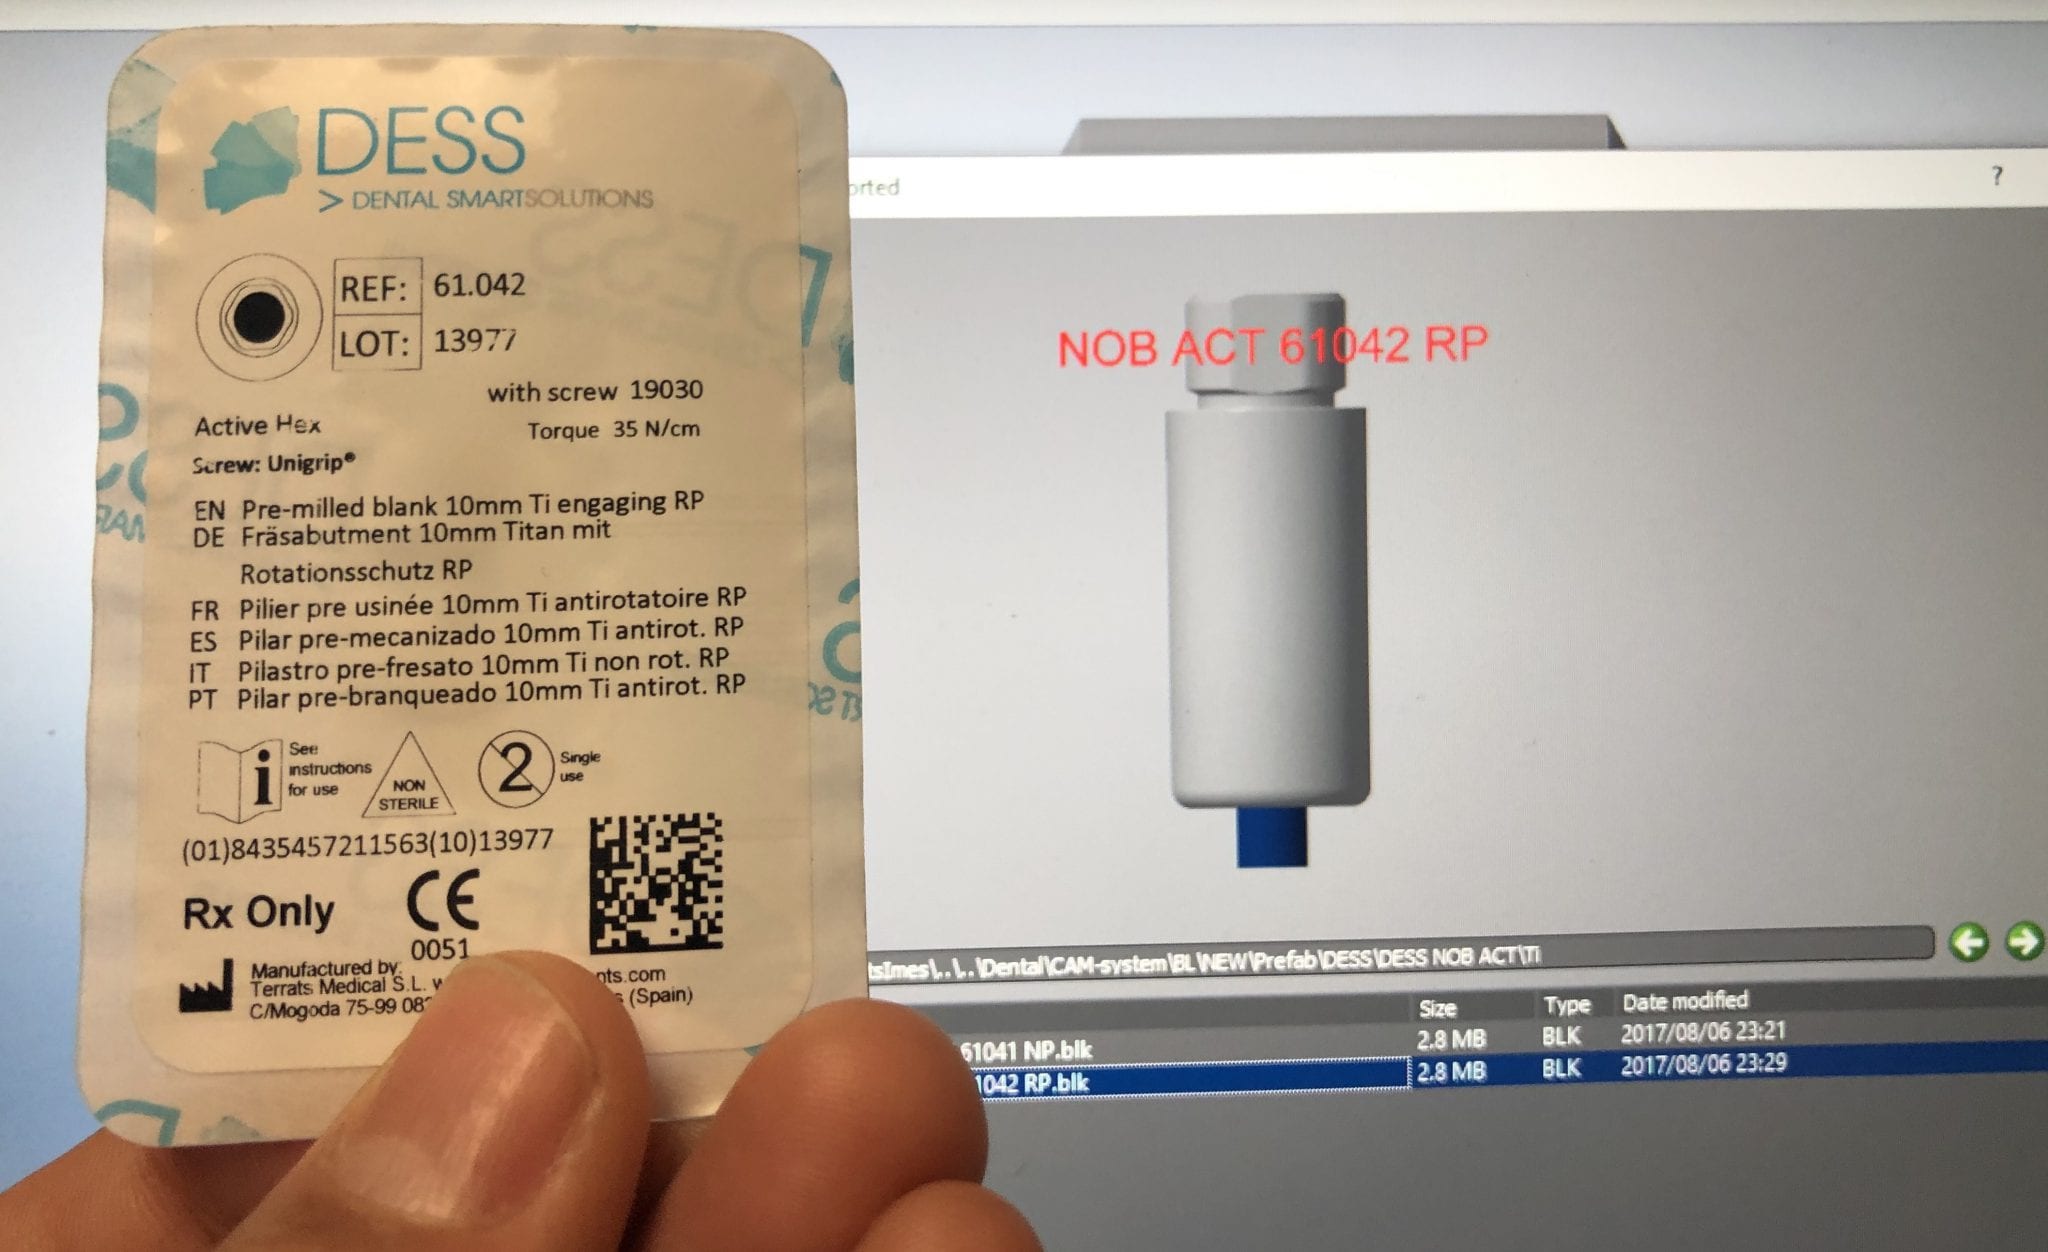
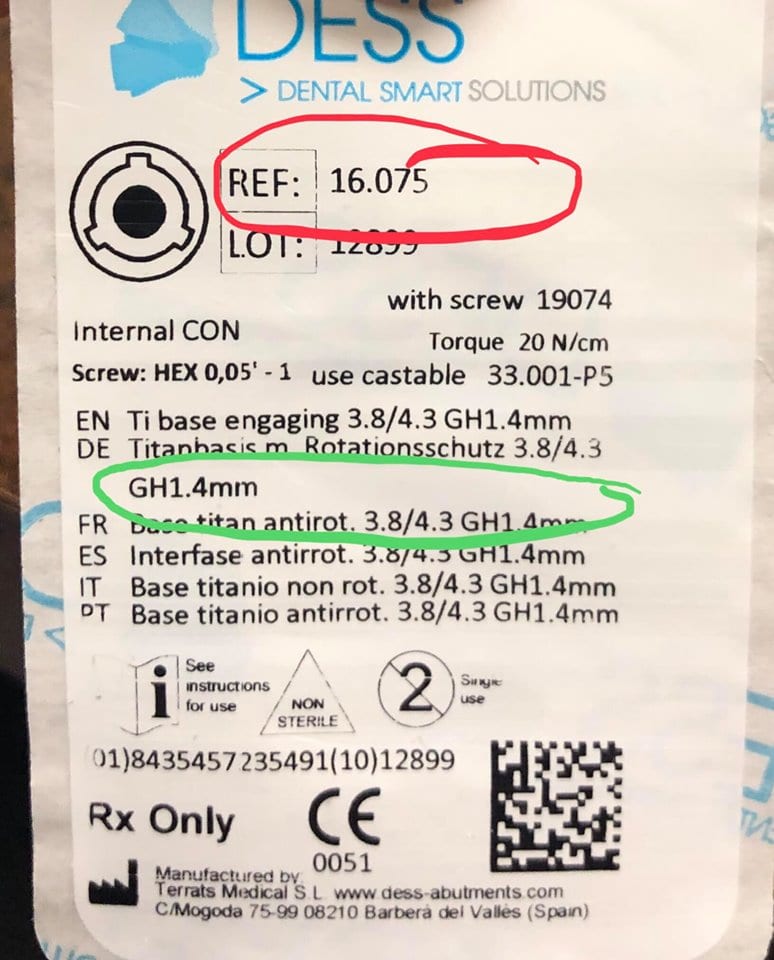
There are so many implant and component libraries in cad/cam dentistry which can lead to a lot of confusion. What we highly recommend is that you visually compare the part numbers that you will be using with the part numbers displayed on the millbox software. One letter or number difference and the mistakes will have a profound impact on the bottom line of a dental practice
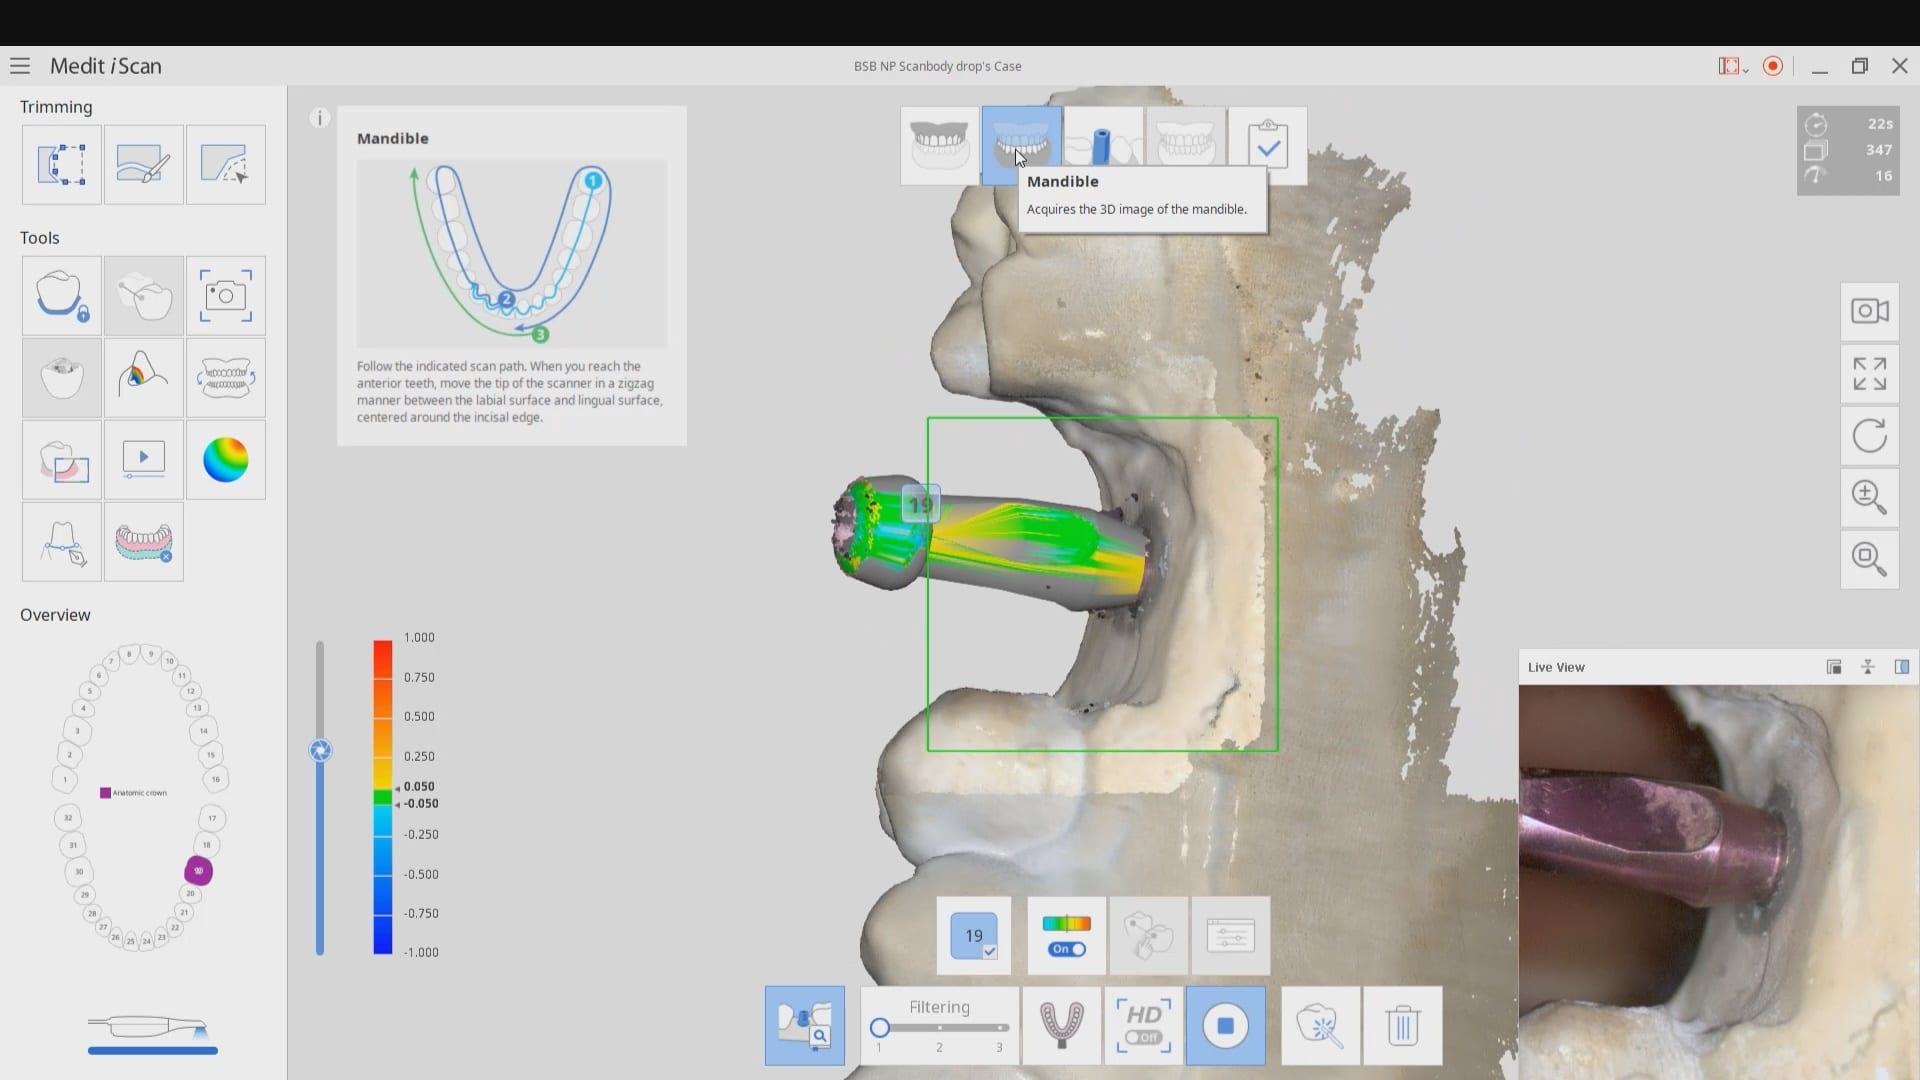
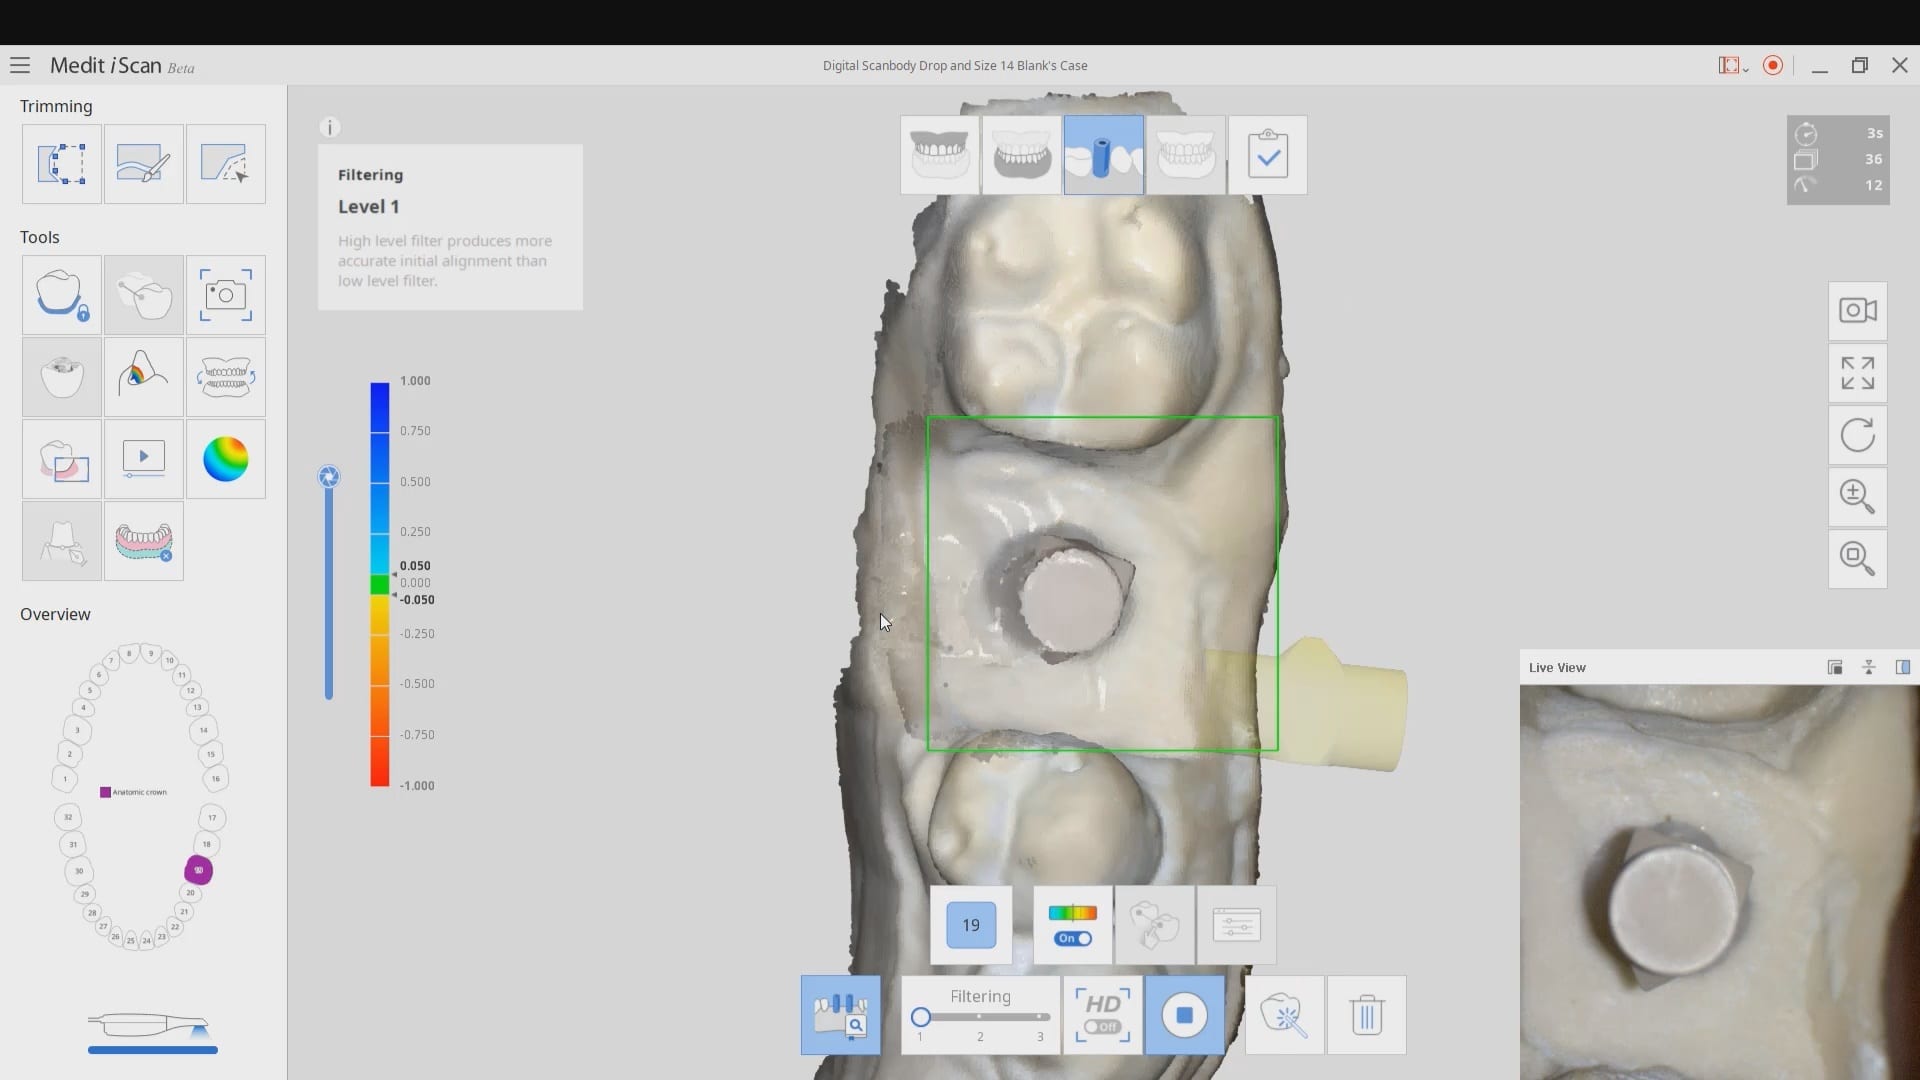
Medit has launched a software that is the greatest advancements in digital dentistry in more than a decade! With artificial intelligence, you can identify the scanbody during intra-oral digital scans. This has many implications for accurate scan captures and skipping multiple steps in the design process in CAD software like exocad.
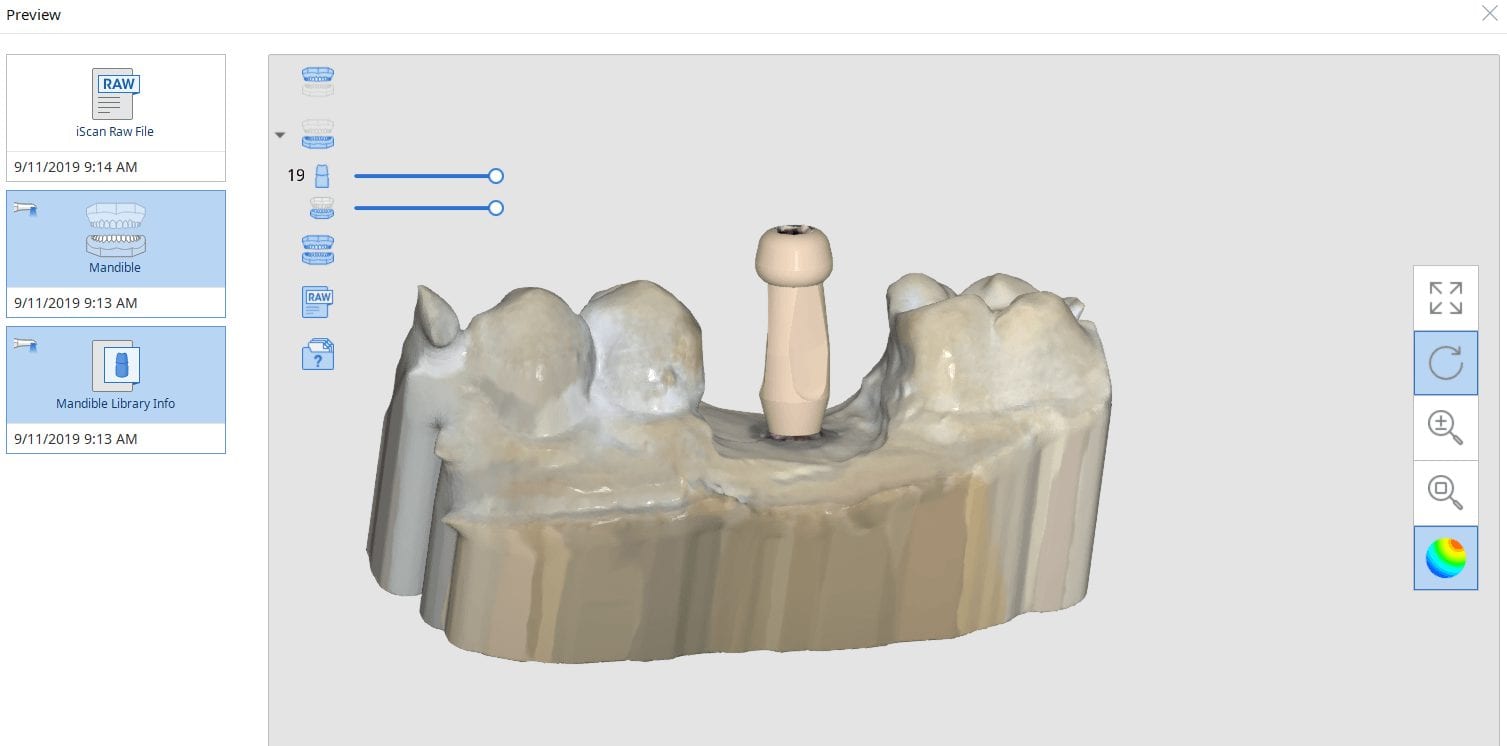
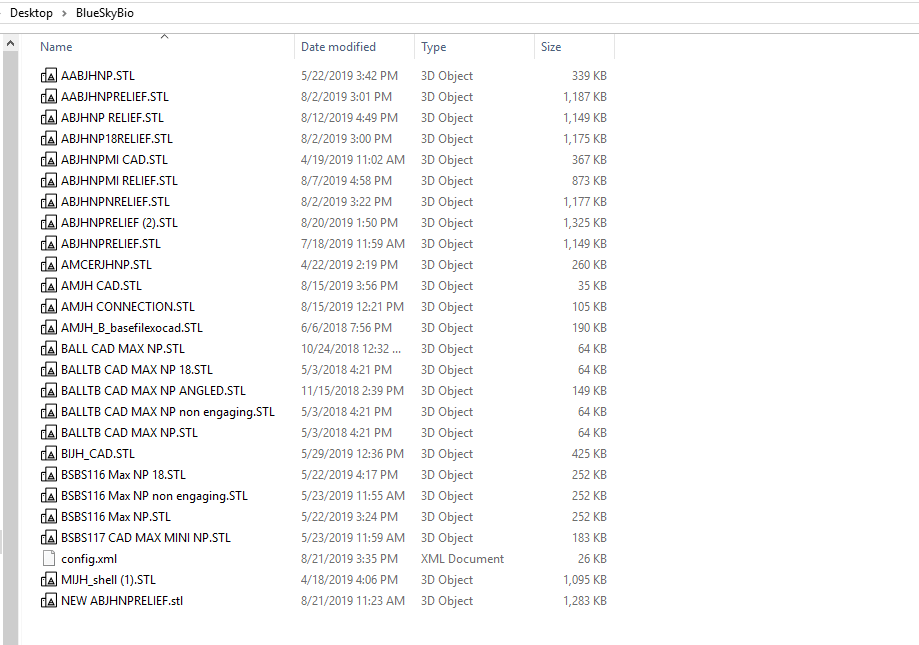
But there is more! This will knock your socks off. You can build your own custom library for scanbodies or you can use geometries of abutment libraries from your favorite implant line. In this article we show how to import the stl file for a physical impression abutment (Closed Tray- Blueskybio Part #MIJH) and use it as a scanbody. Just watch the following videos
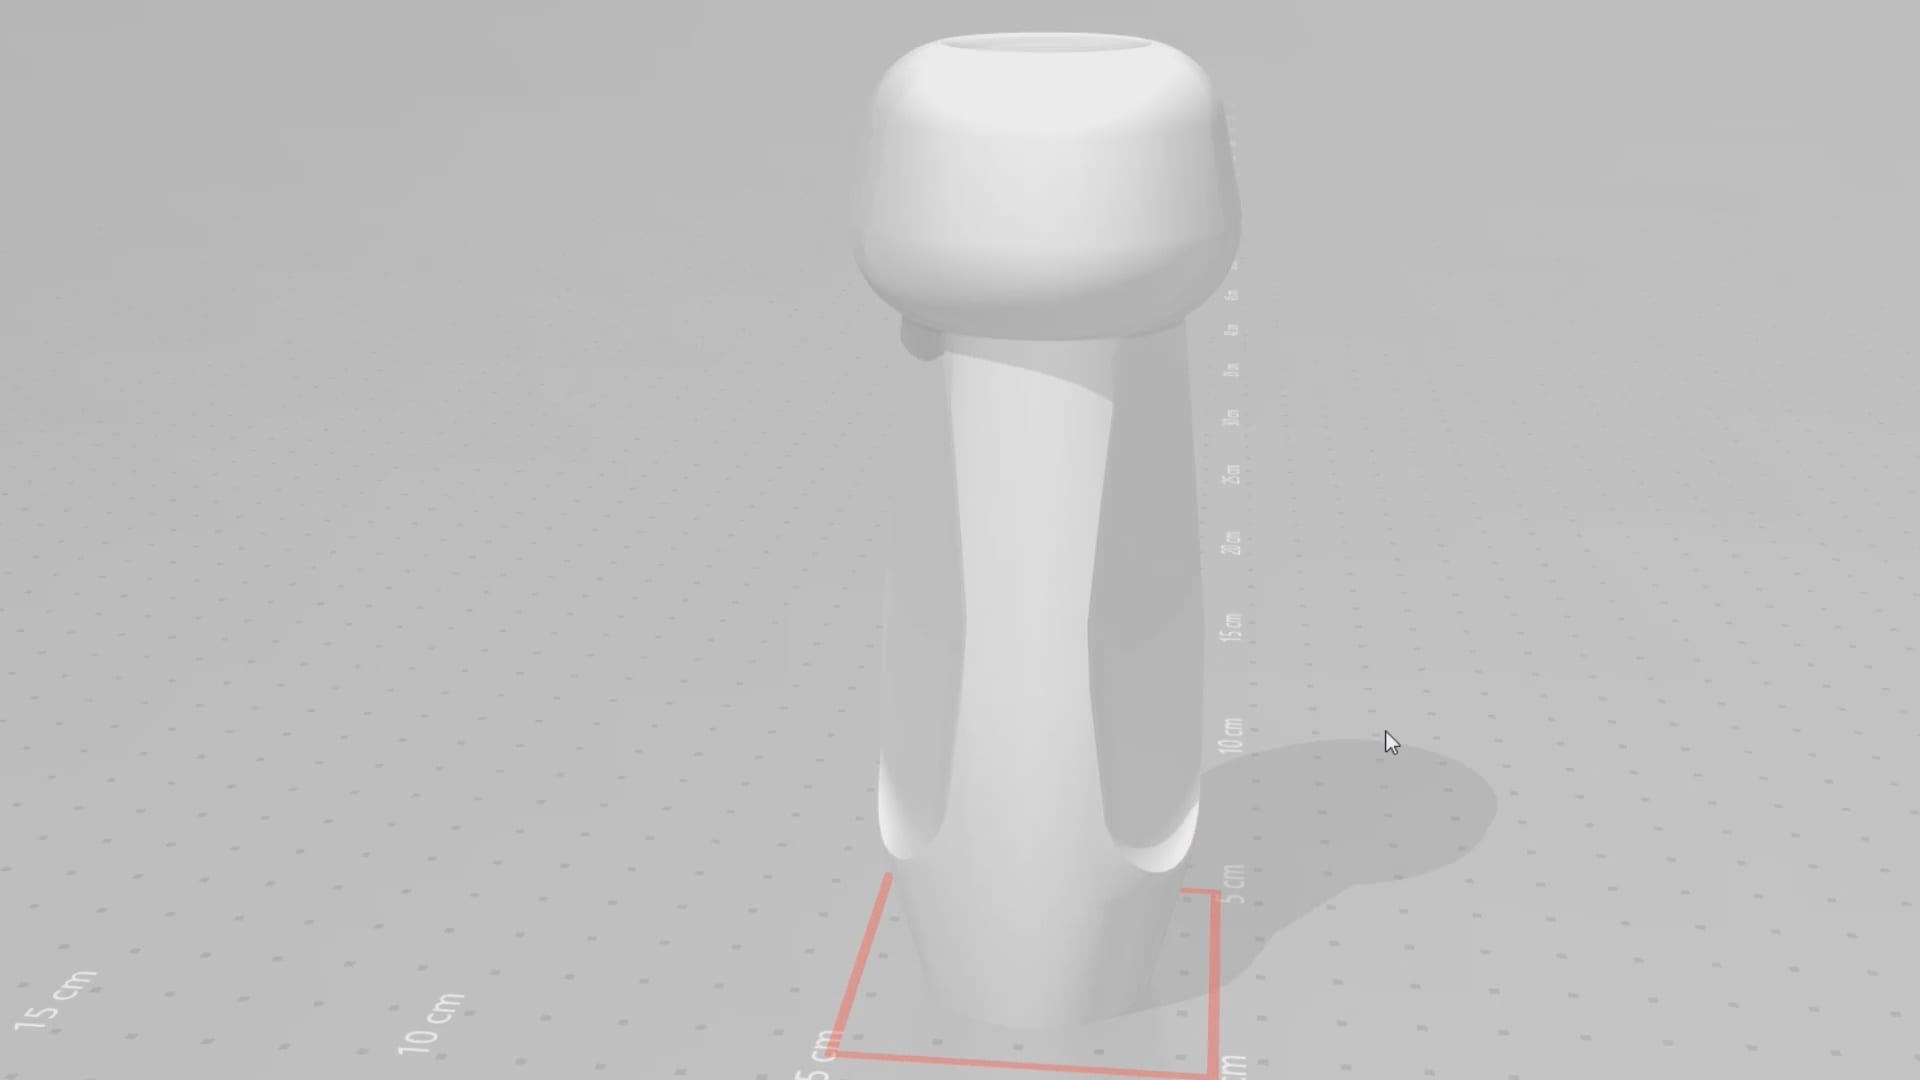
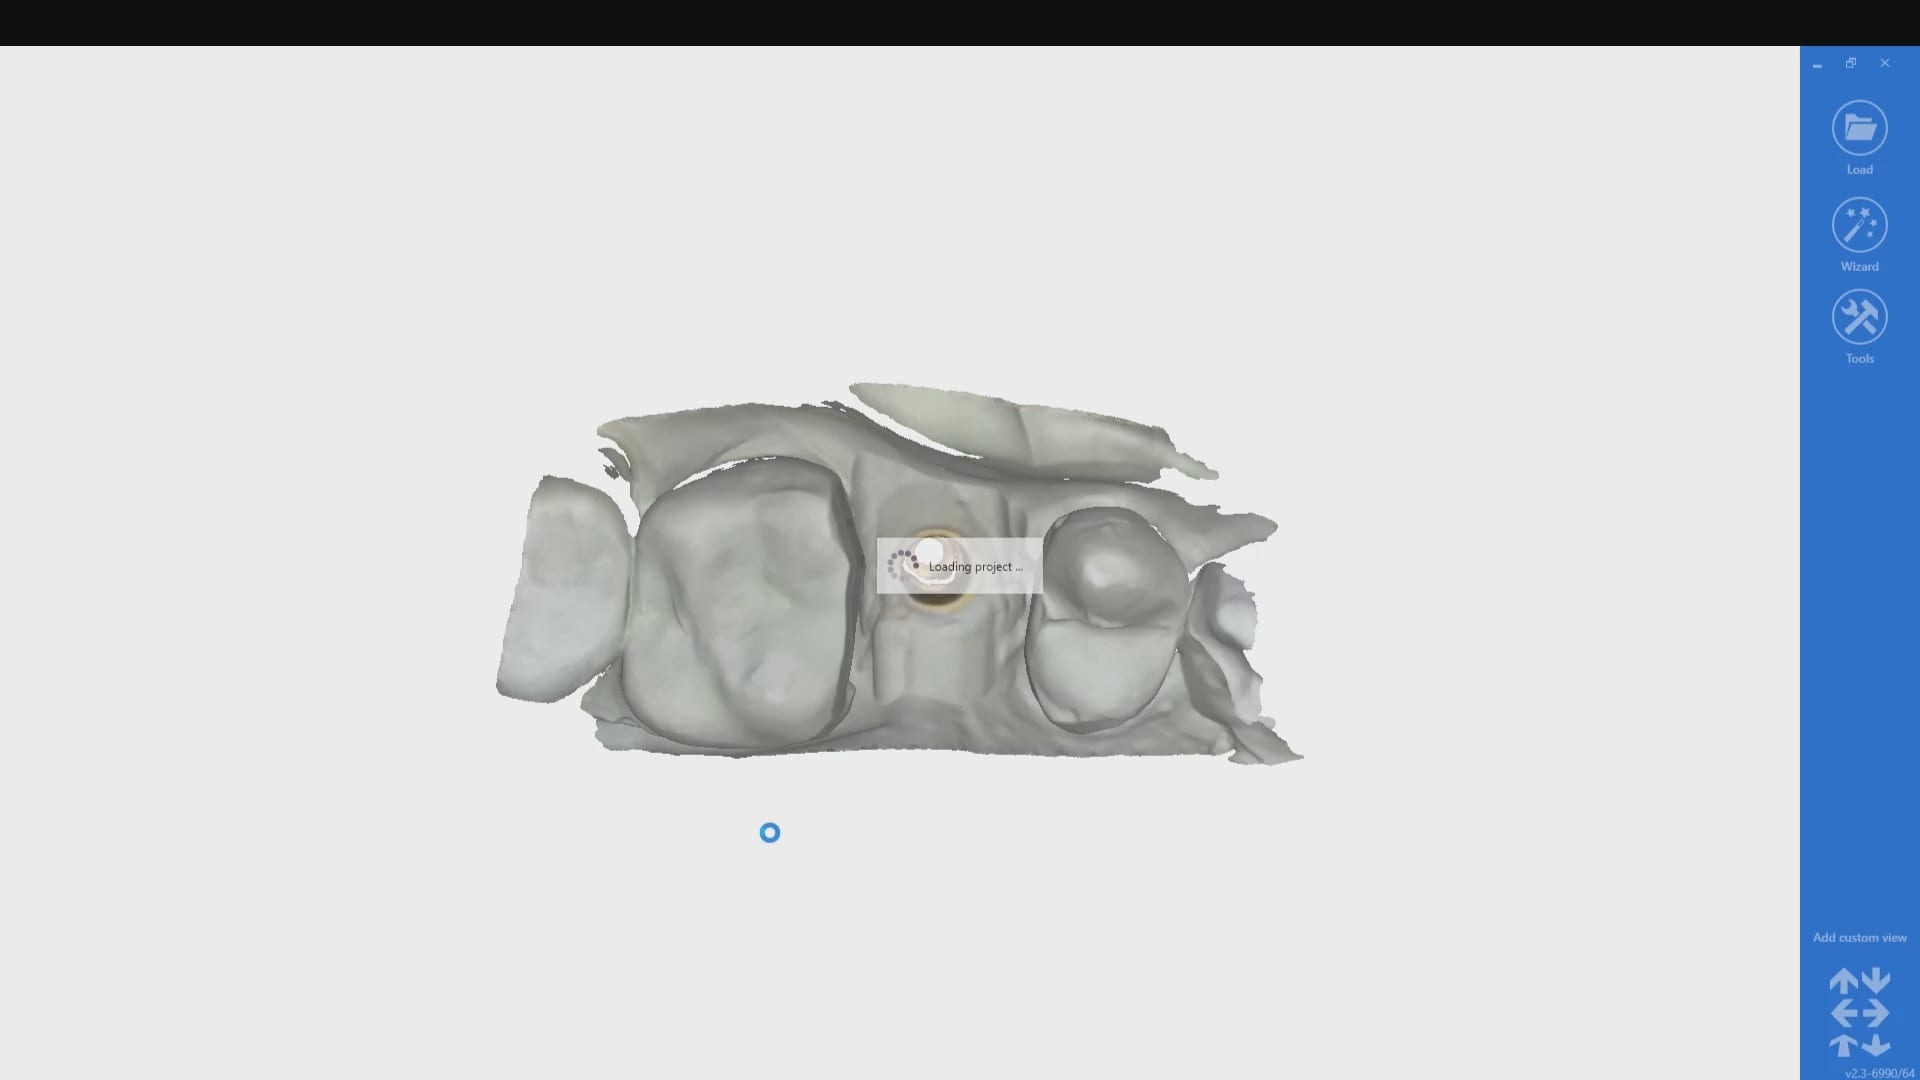
A lot of implant manufacturers will readily distribute their libraries of abutments and scanbodies. Here, we just chose the MIJH impression abutment and previewed it in one of the many free 3D viewer programs included in windows 10.
Once the data is imported into the library, you can preview it and incorporated into your own library of abutment. Please note that the abutment libraries are stored in the arch catalog boxes while the scanbody libraries are stored in the scanbdoy library, which means the abutment itself may be taken into consideration when capturing the buccal bite.
load digital abutment and identify physical abutment
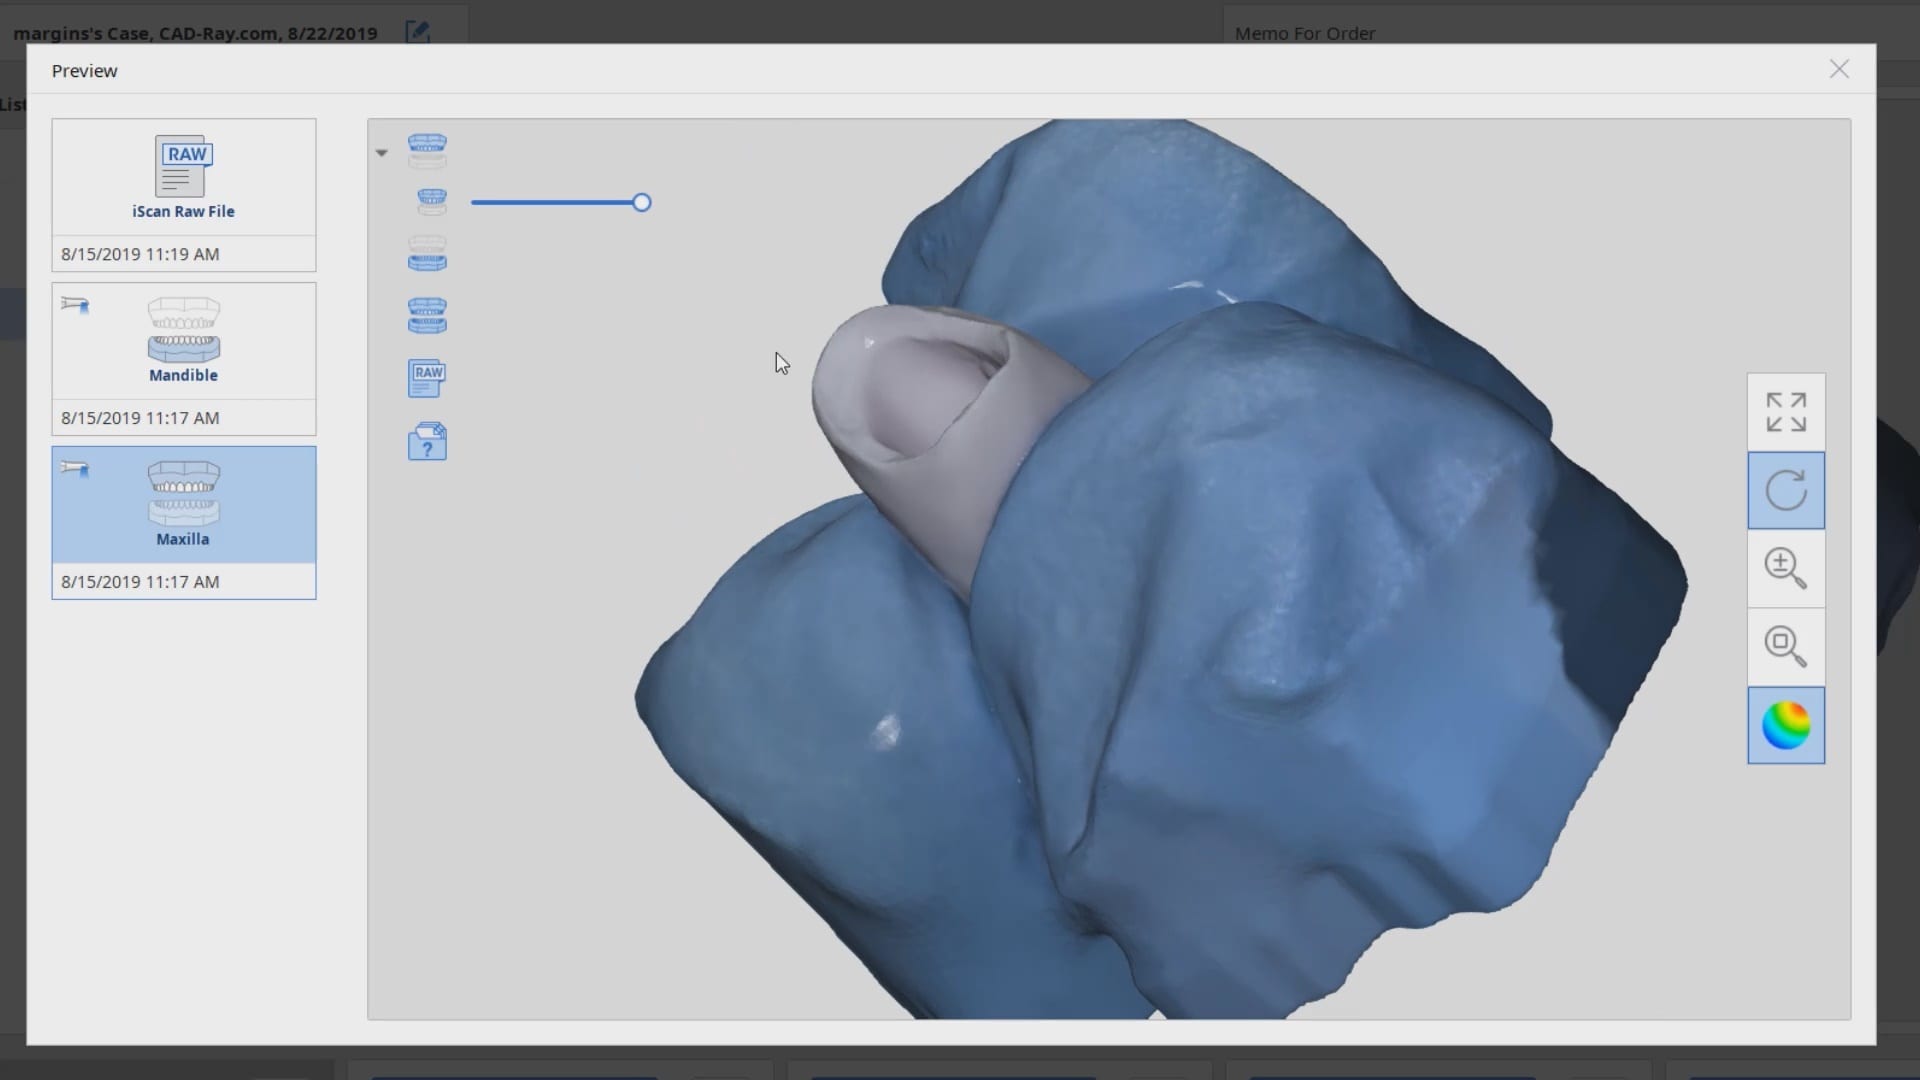
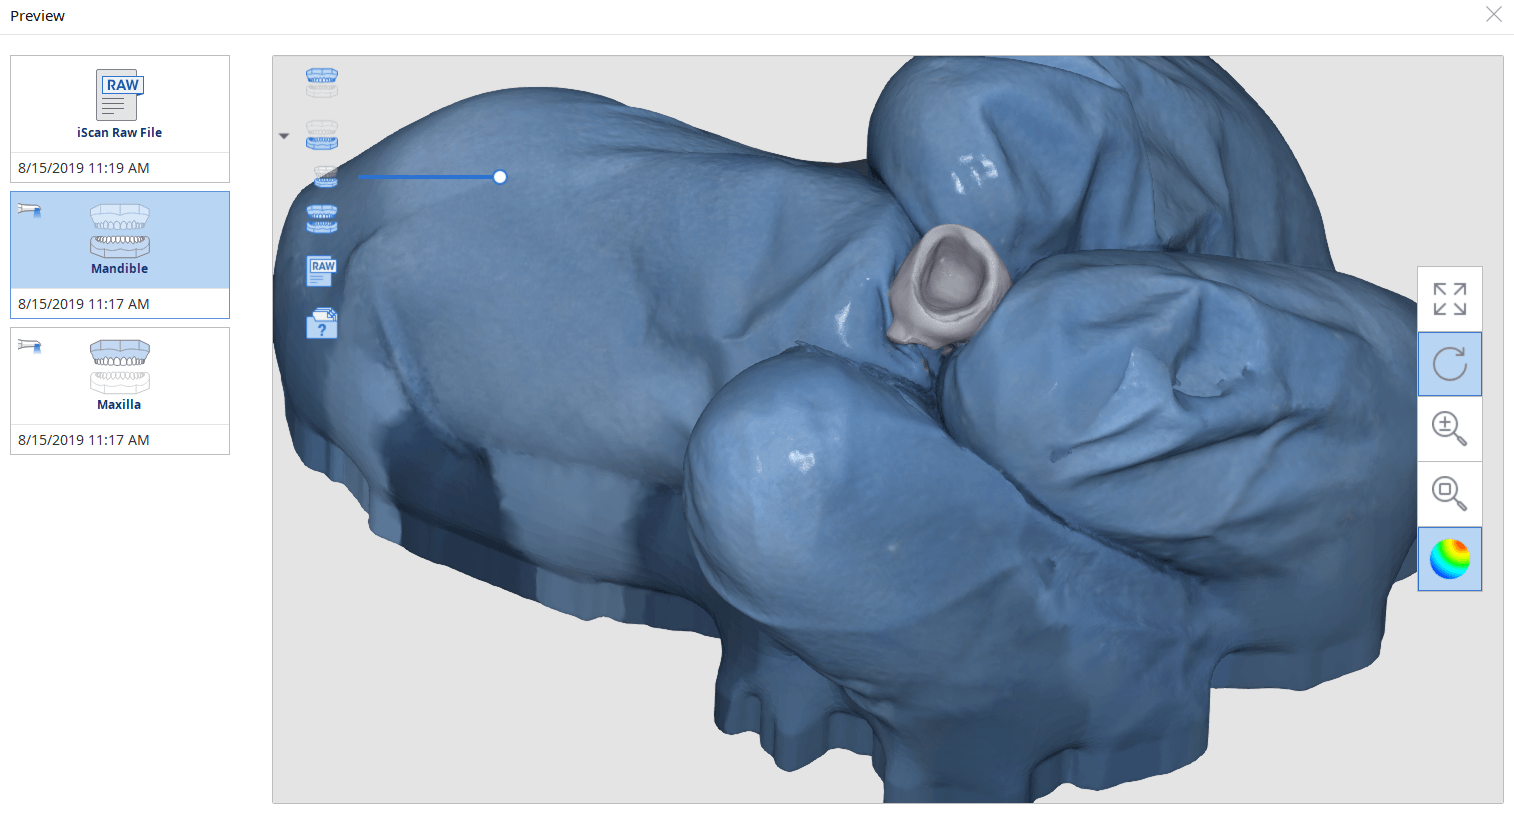
Once the abutment is identified in Medit it is directly transferred into cad software like exocad to proceed with design. Note in this footage how little of the physical abutment impression was brought into cad software. This greatly reduces errors and your imaging time intra-orally. You can also place a stock abutment and scan it in the same manner and be able to find margins with great ease without having to reach hemostasis or good tissue retraction
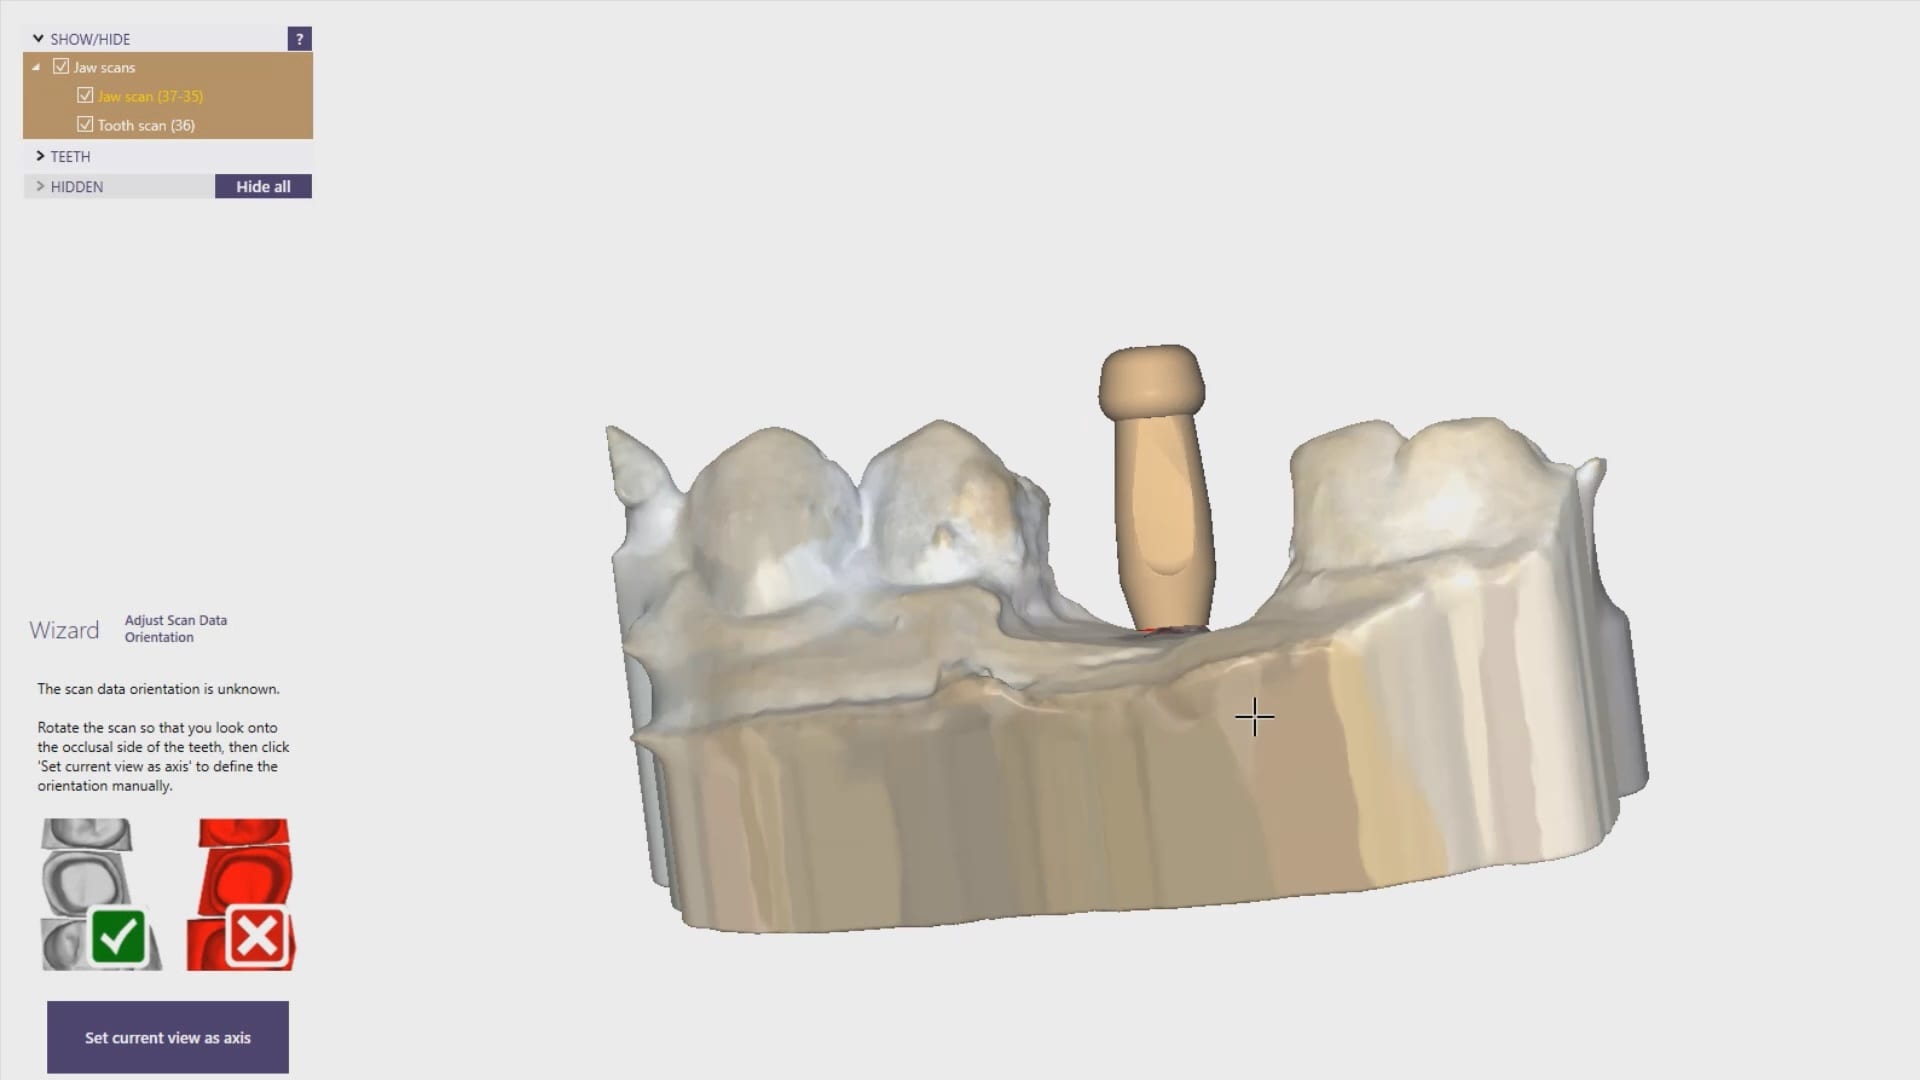
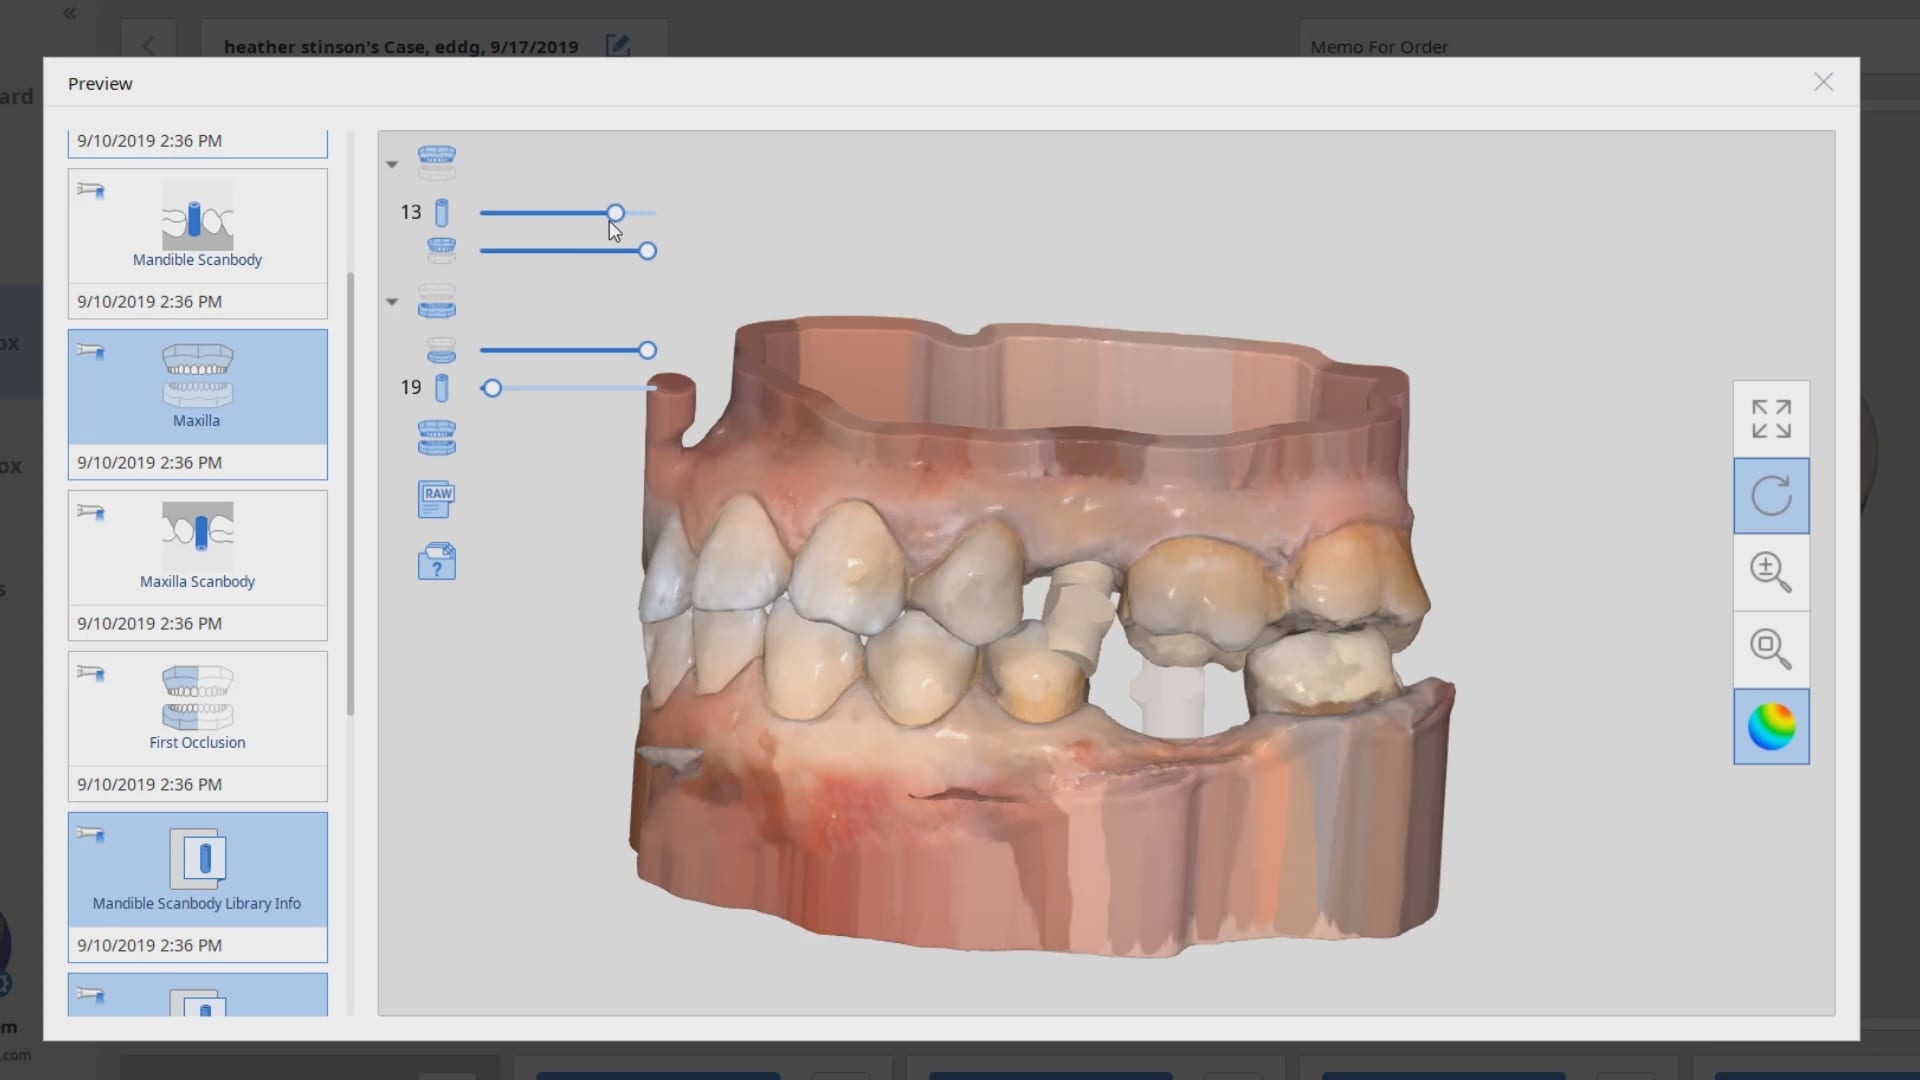
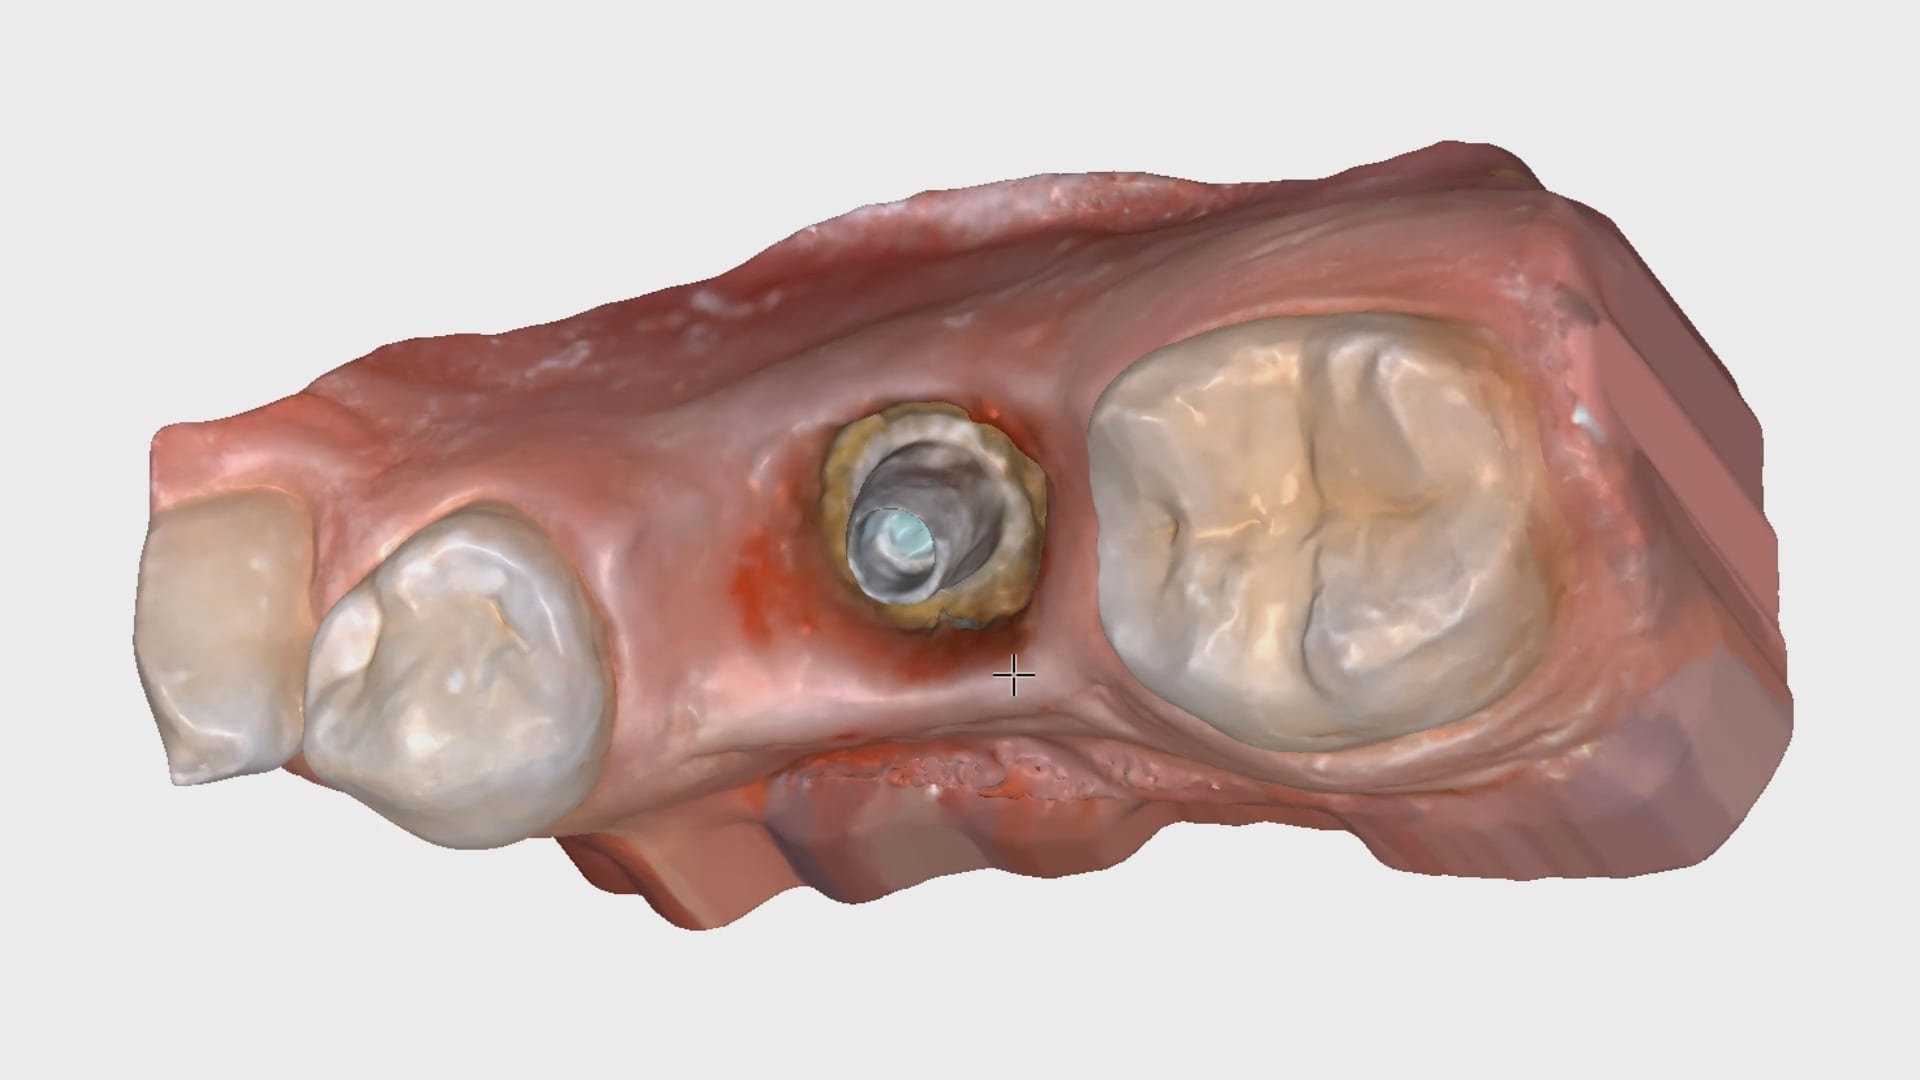
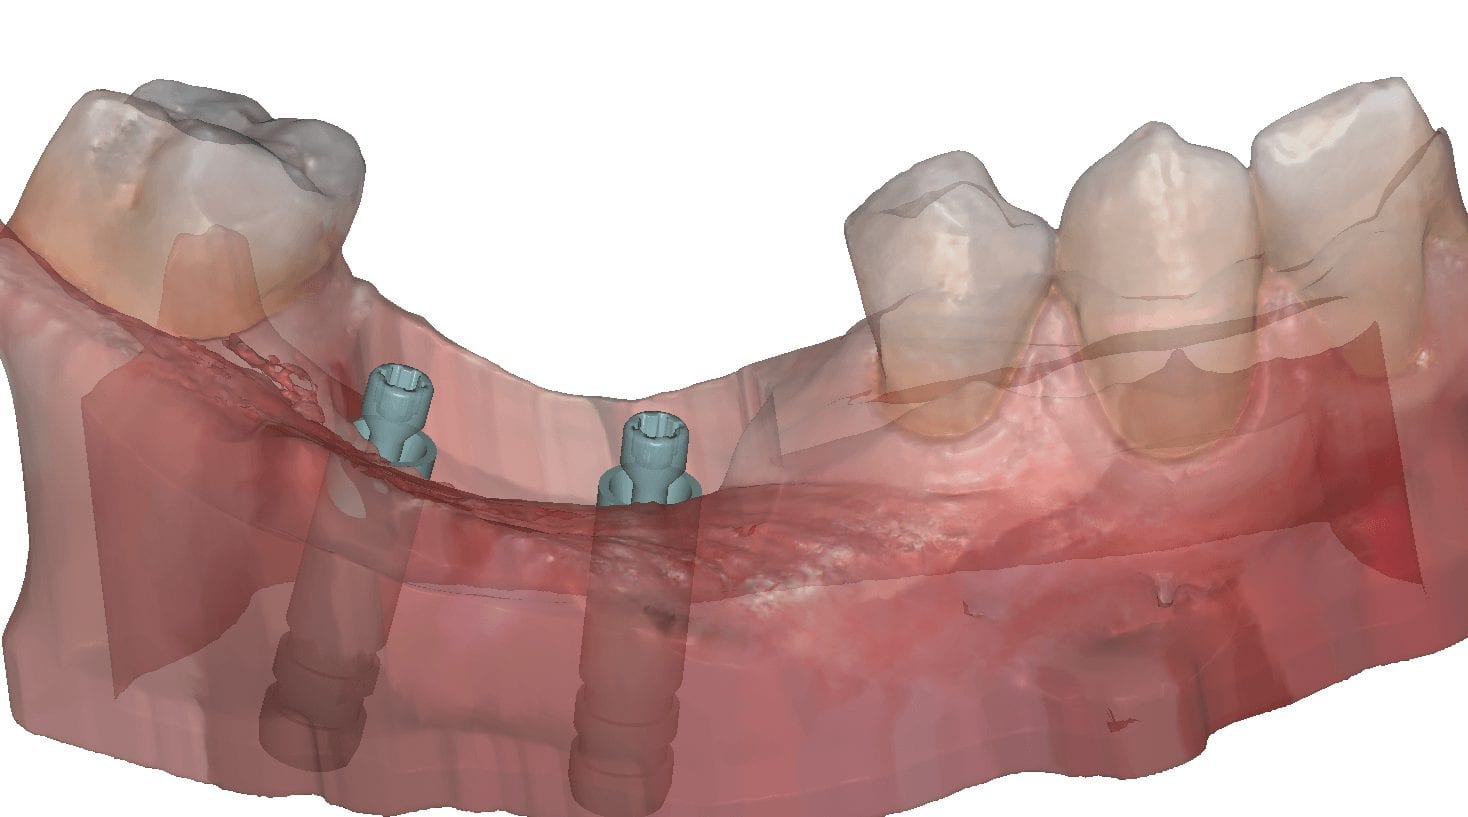
In this article we demonstrate how two separate implants are placed with guided surgery and then scanbodies are used immediately after placement to capture the location of the fixtures. While the patient is healing for the next 4-5 months, an upper tibase restoration will be fabricated with a lower custom titanium abutment. Digital impressions were taken with the Medit i500 for implant planning and Blueskybio software was used for the two surgical stents. Two 4.3 mm biomax implants were placed
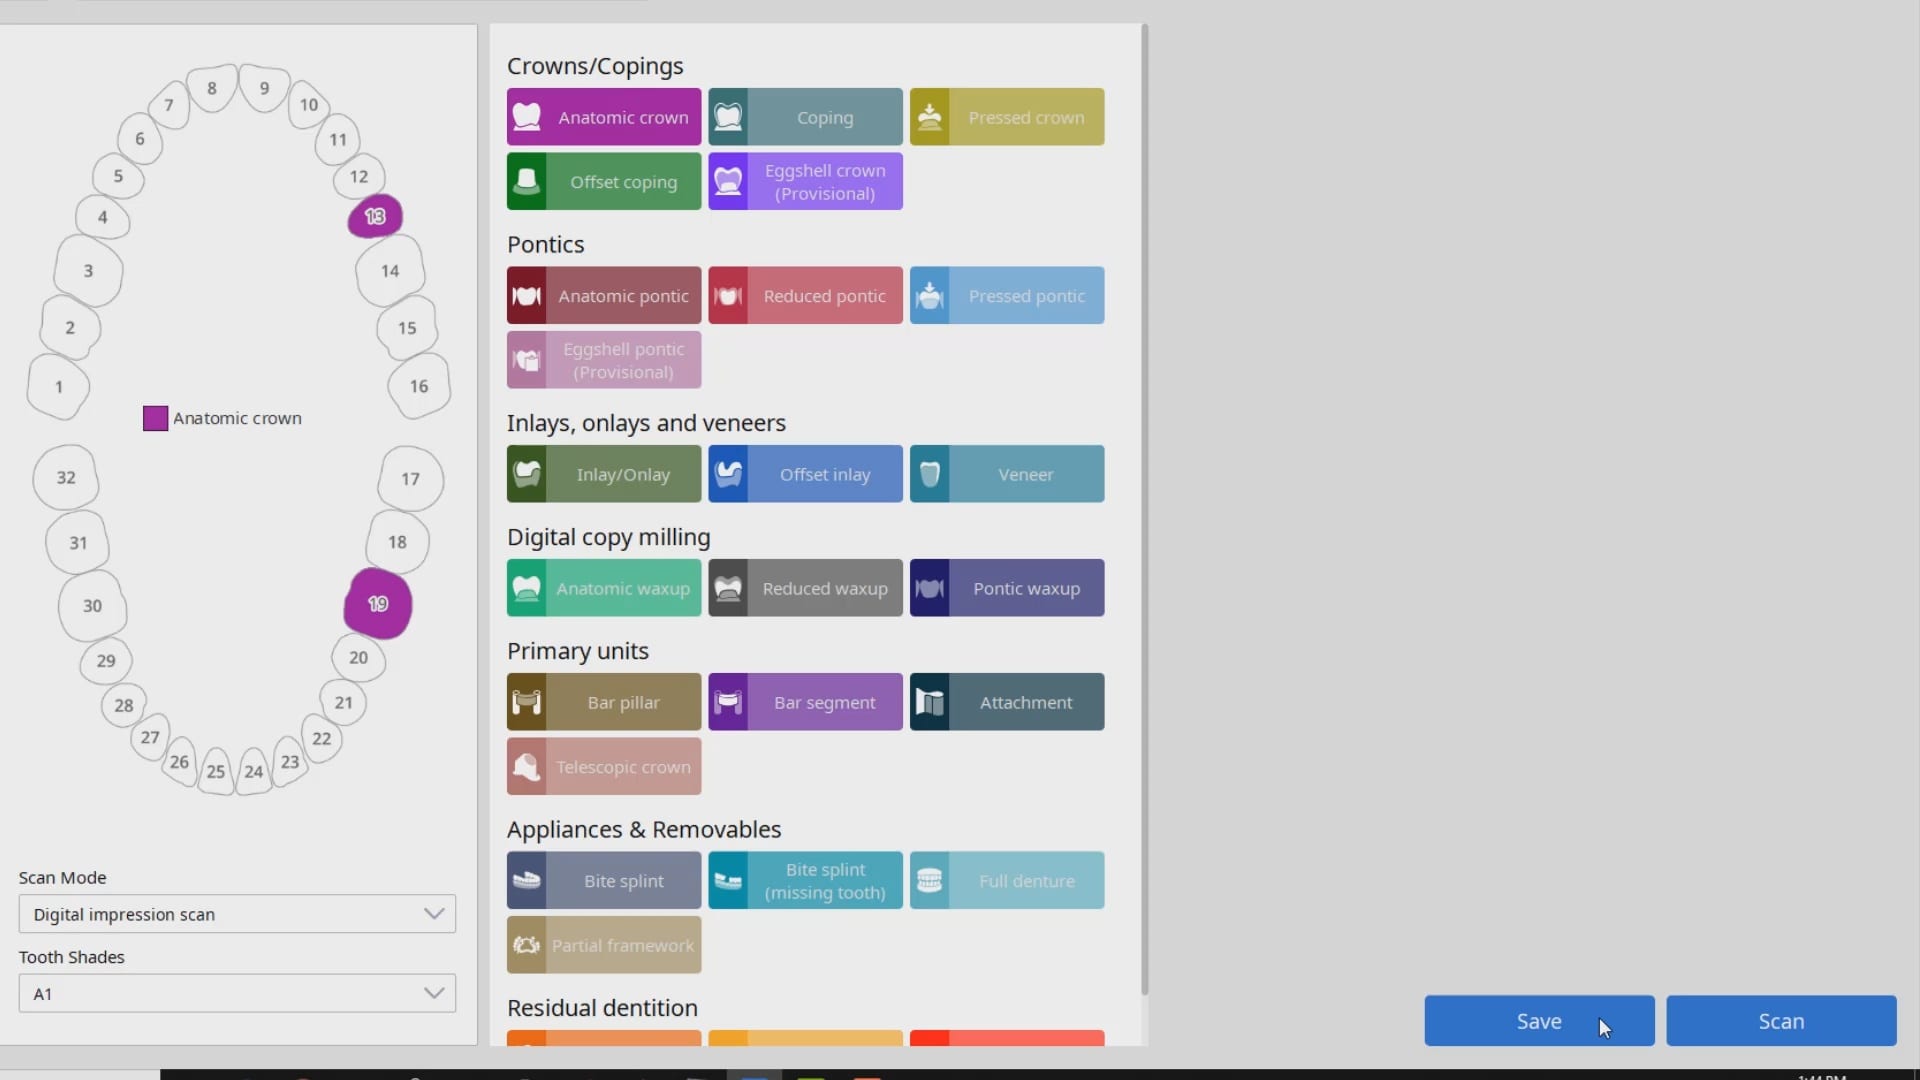
To start the case, the job is defined for an upper tibase and a lower implant restoration. Proper labeling here is important so that the cad software, exocad, can launch the appropriate design components
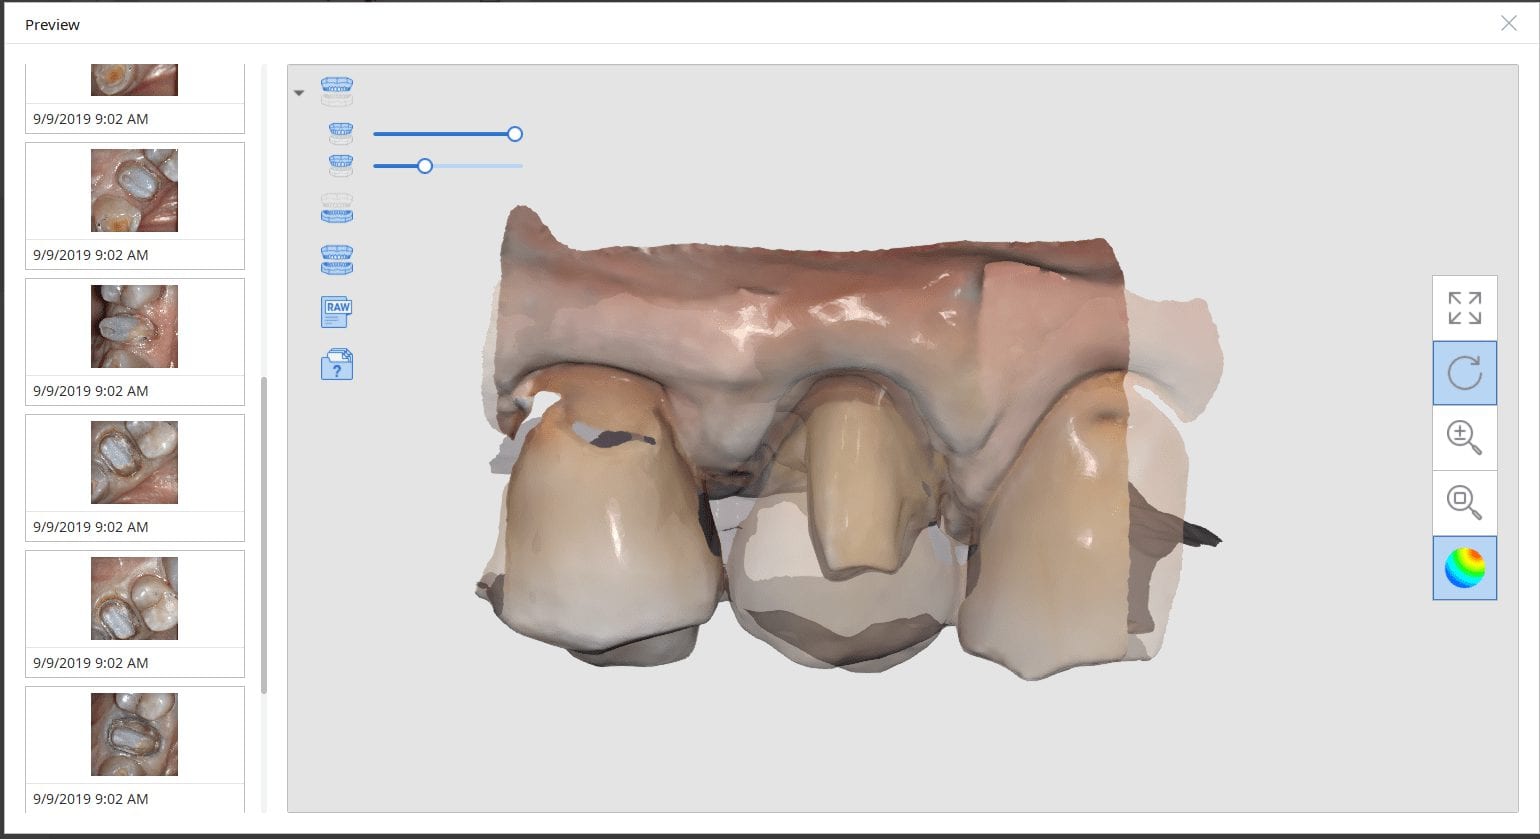
While the patient was anesthetized, the edentulous arches on the patient’s left side were imaged. The bite was also taken, which ignores any information that is present in the scanbody catalogs. It is important to understand this as a new user because usually, the scanbodies are taller than the occlusal heights of the adjacent teeth. If these were captured in the wrong catalog boxes, the upper and lower jaw alignment could be mal-aligned
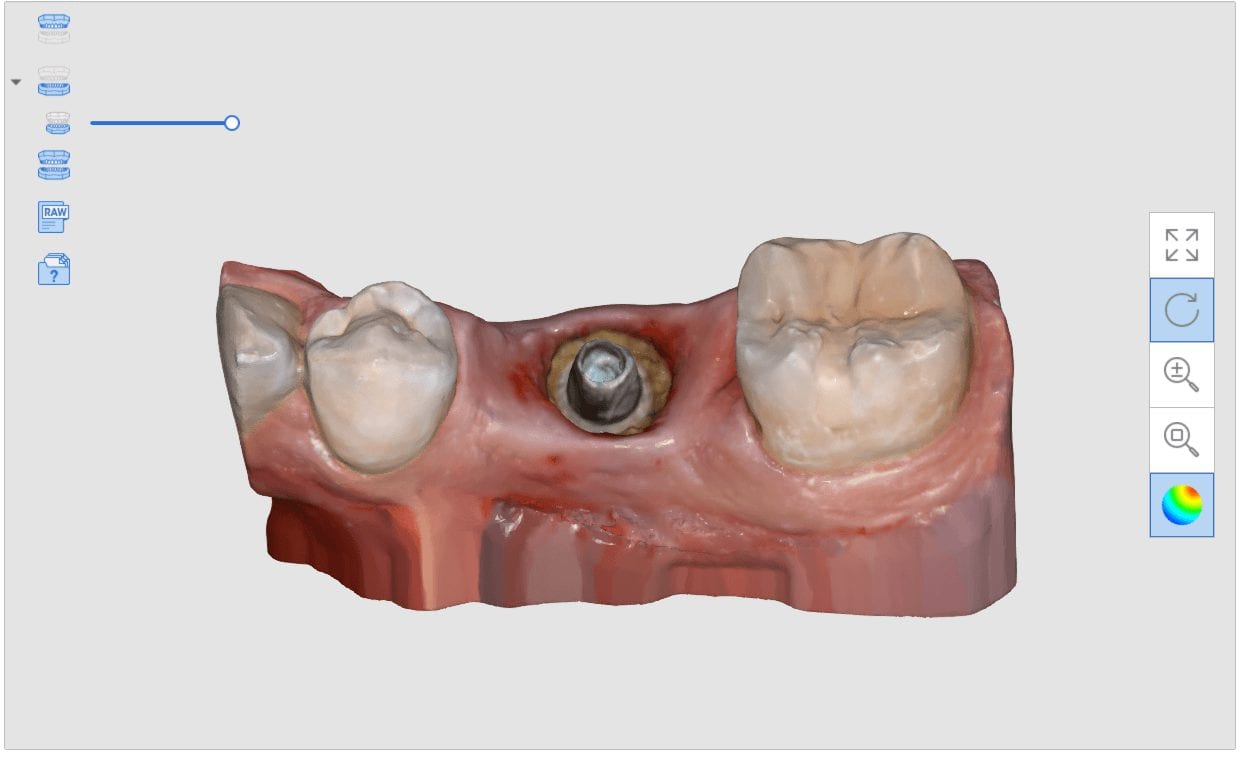
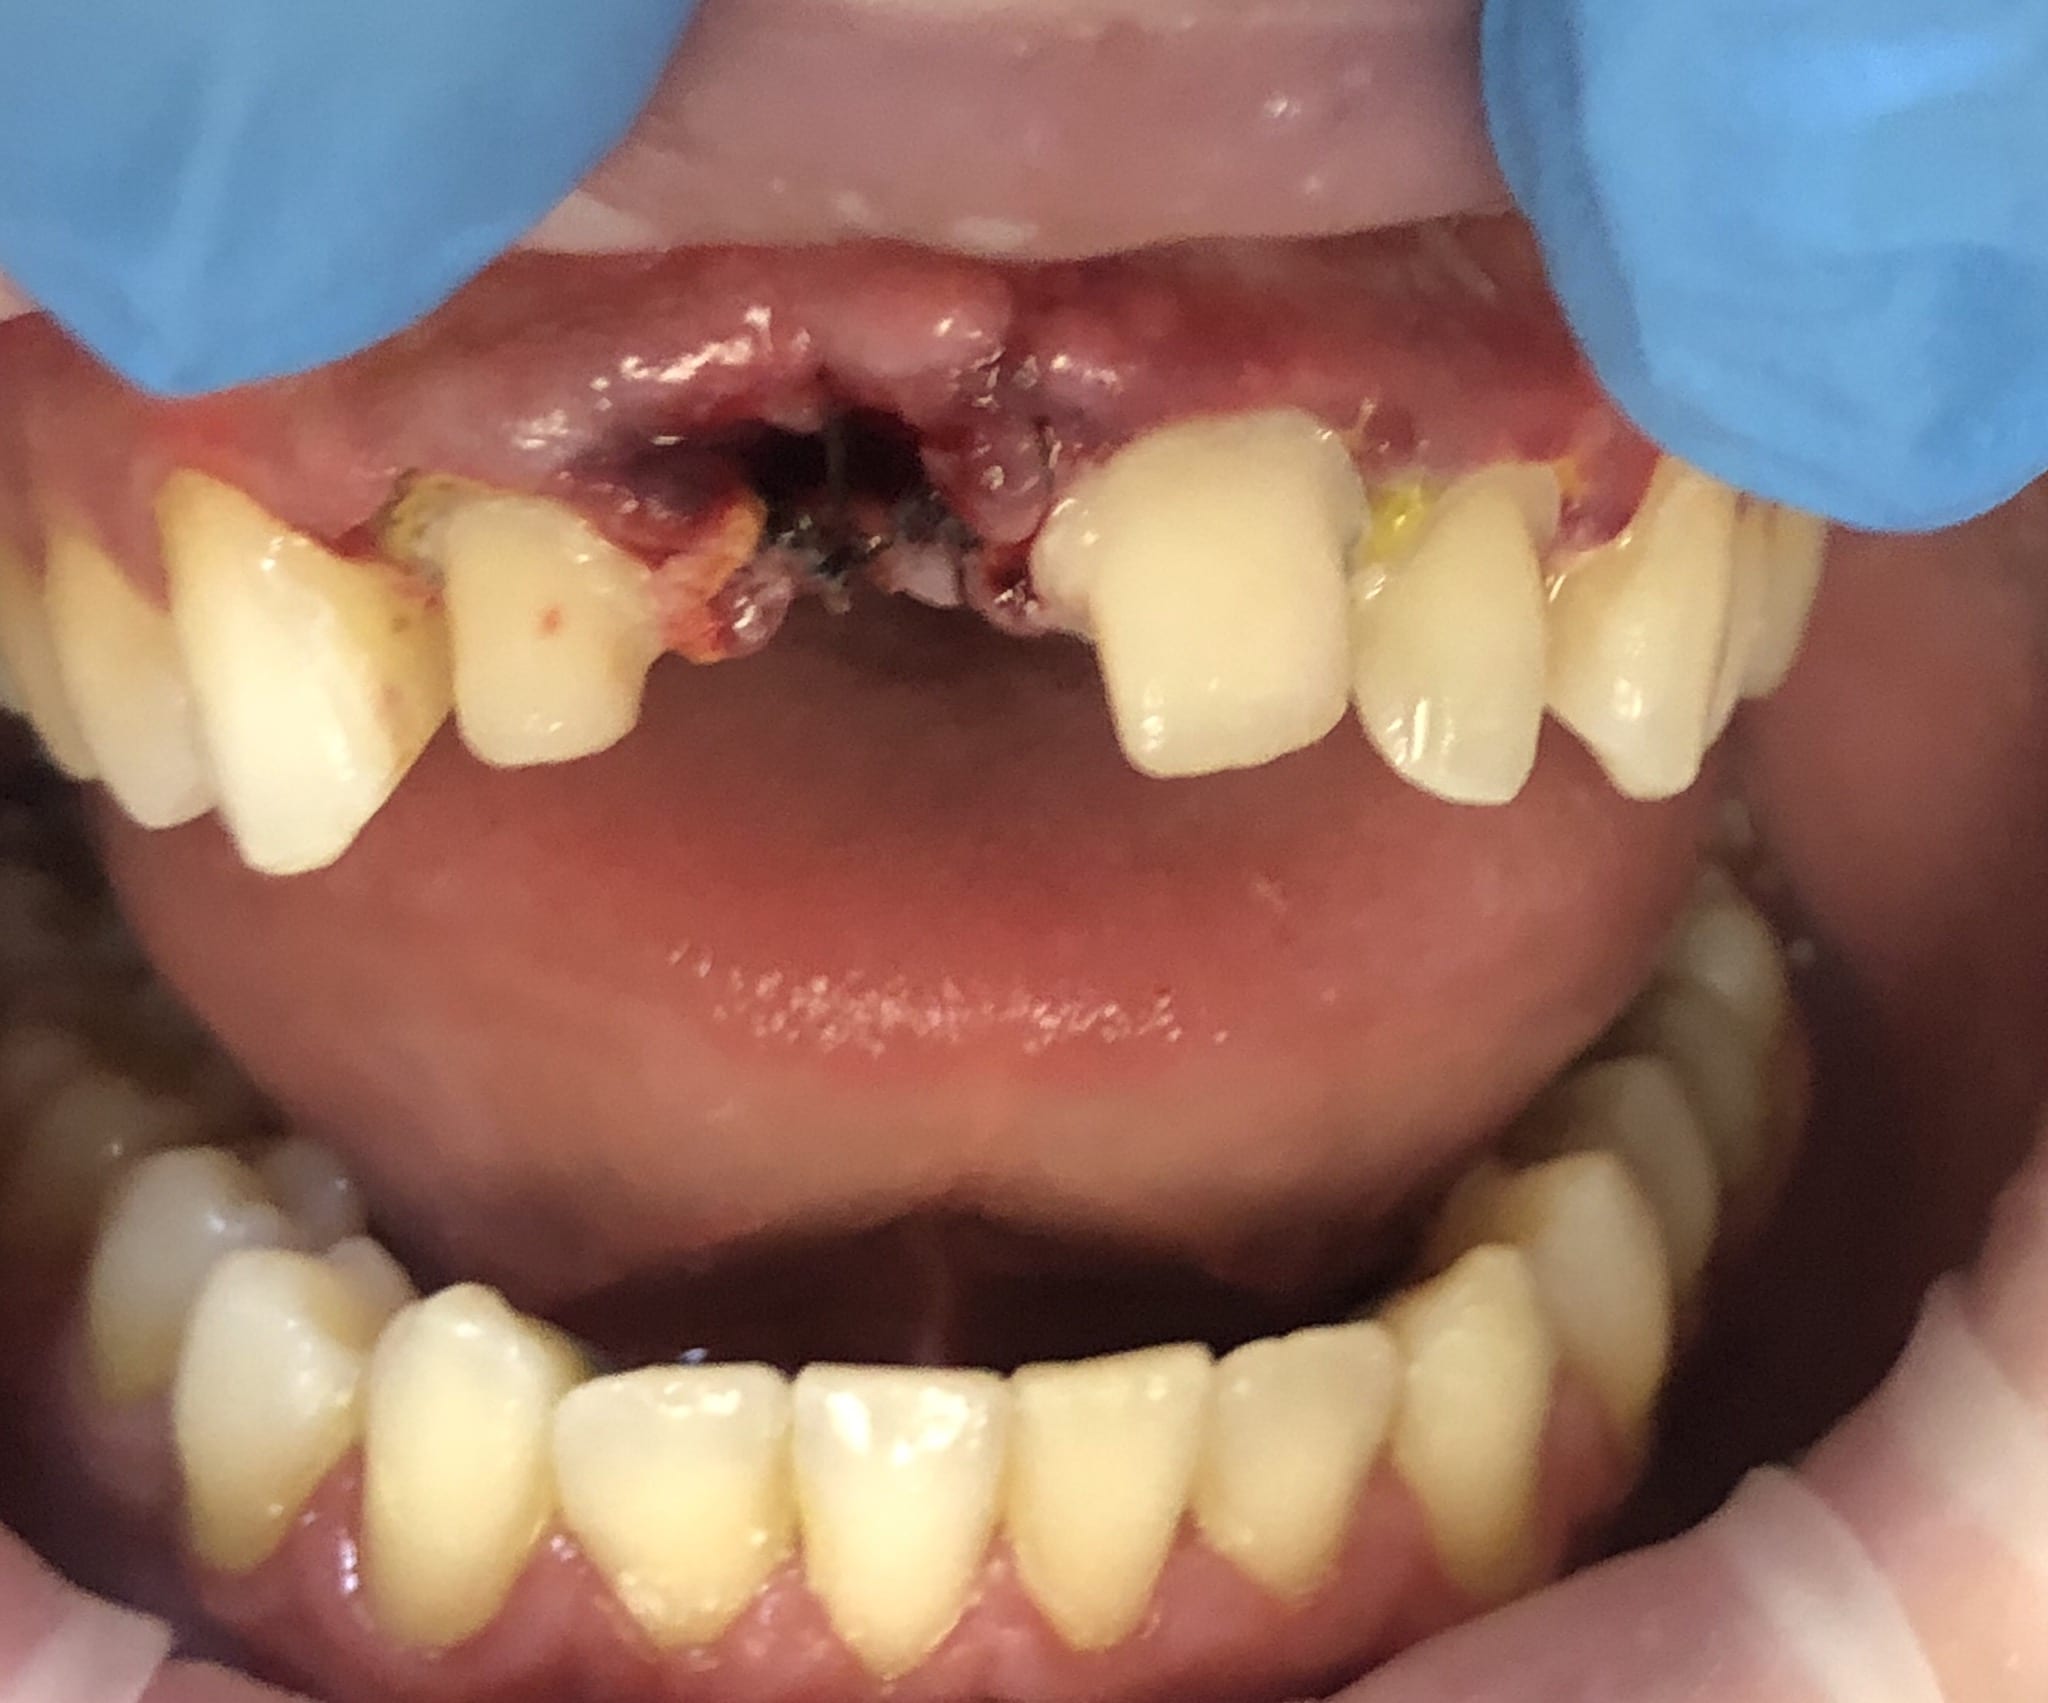
After sufficient anesthesia is achieved, the two surgical stents were seated and verified for fit. It is up to the clinician’s discretion to either lay a flap to access the area or to do the surgery flapless. Since the implant designs showed ample bone, and the fixtures were going to be placed sub-crestal, a tissue punch technique was used here as the area will granulate in. At uncovery, a flap can be used to advance the tissue to the buccal to enhance keratinized tissue appearance
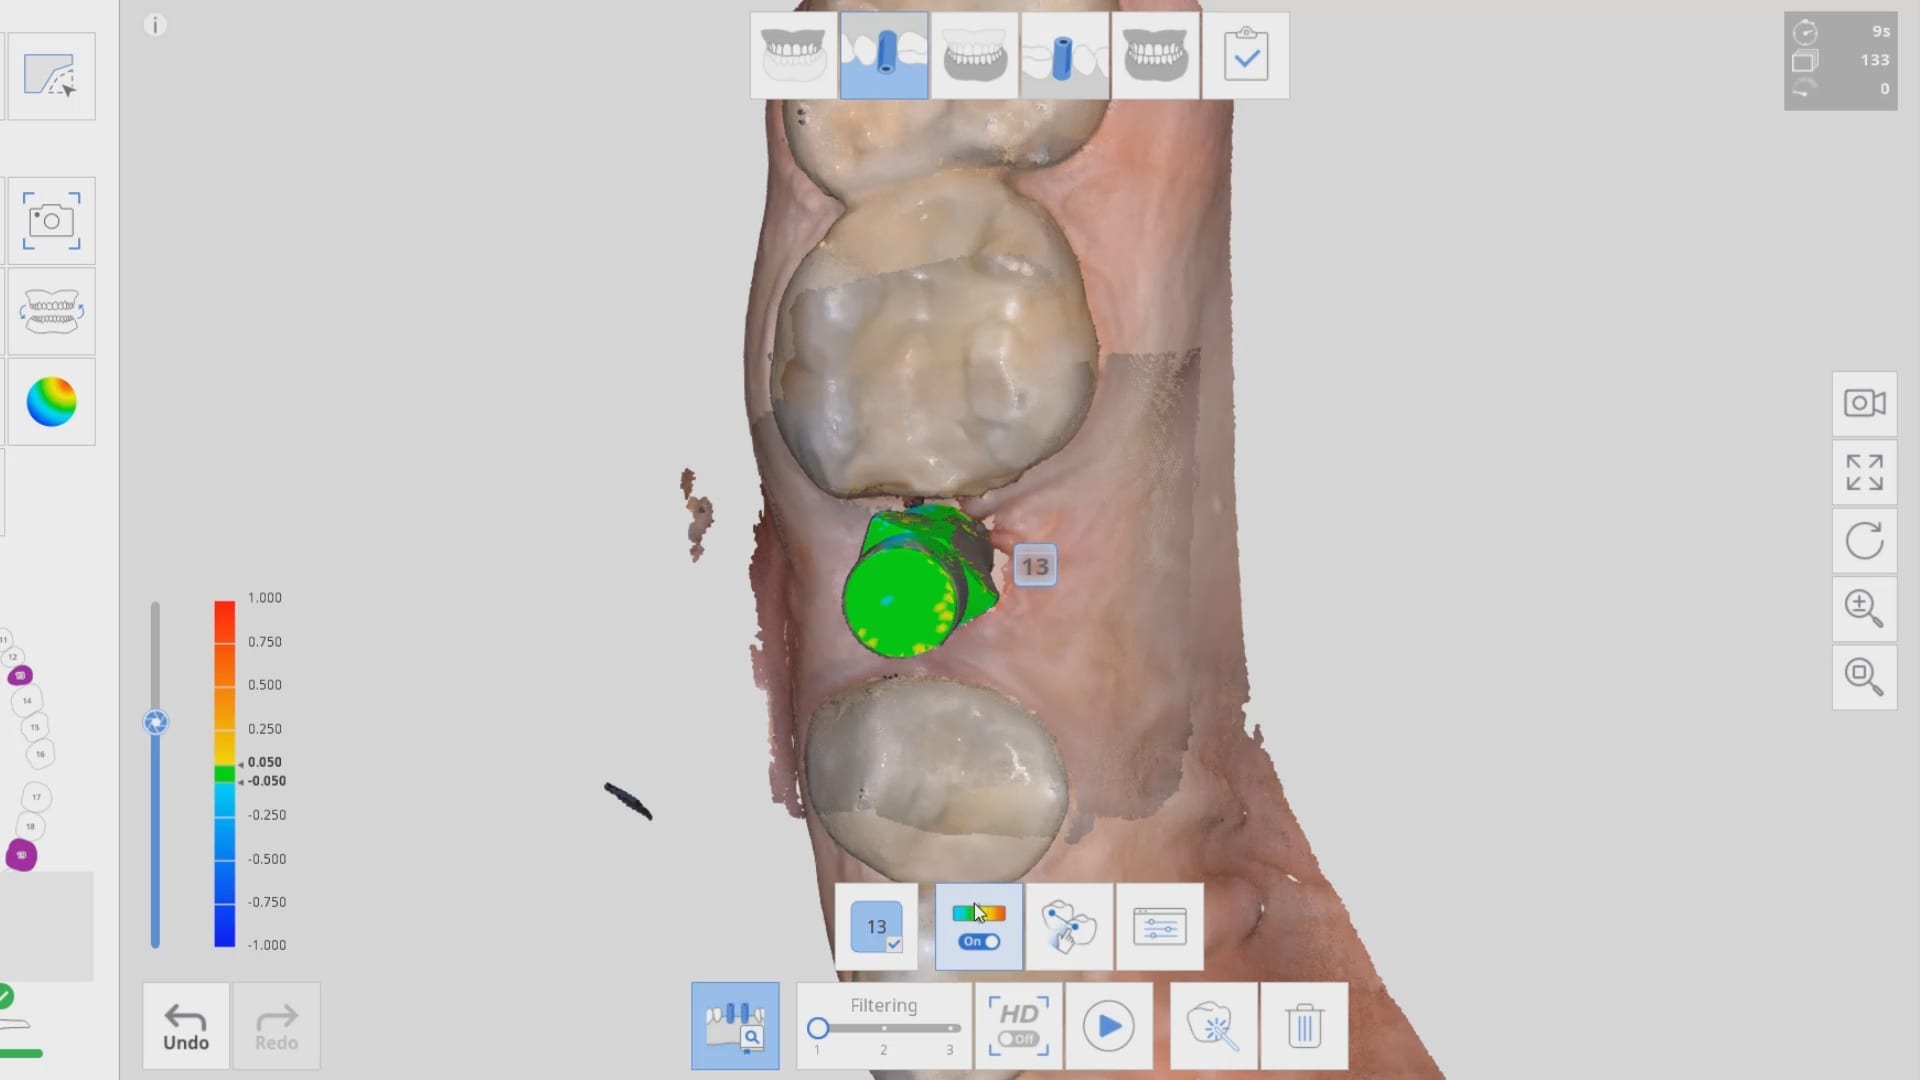
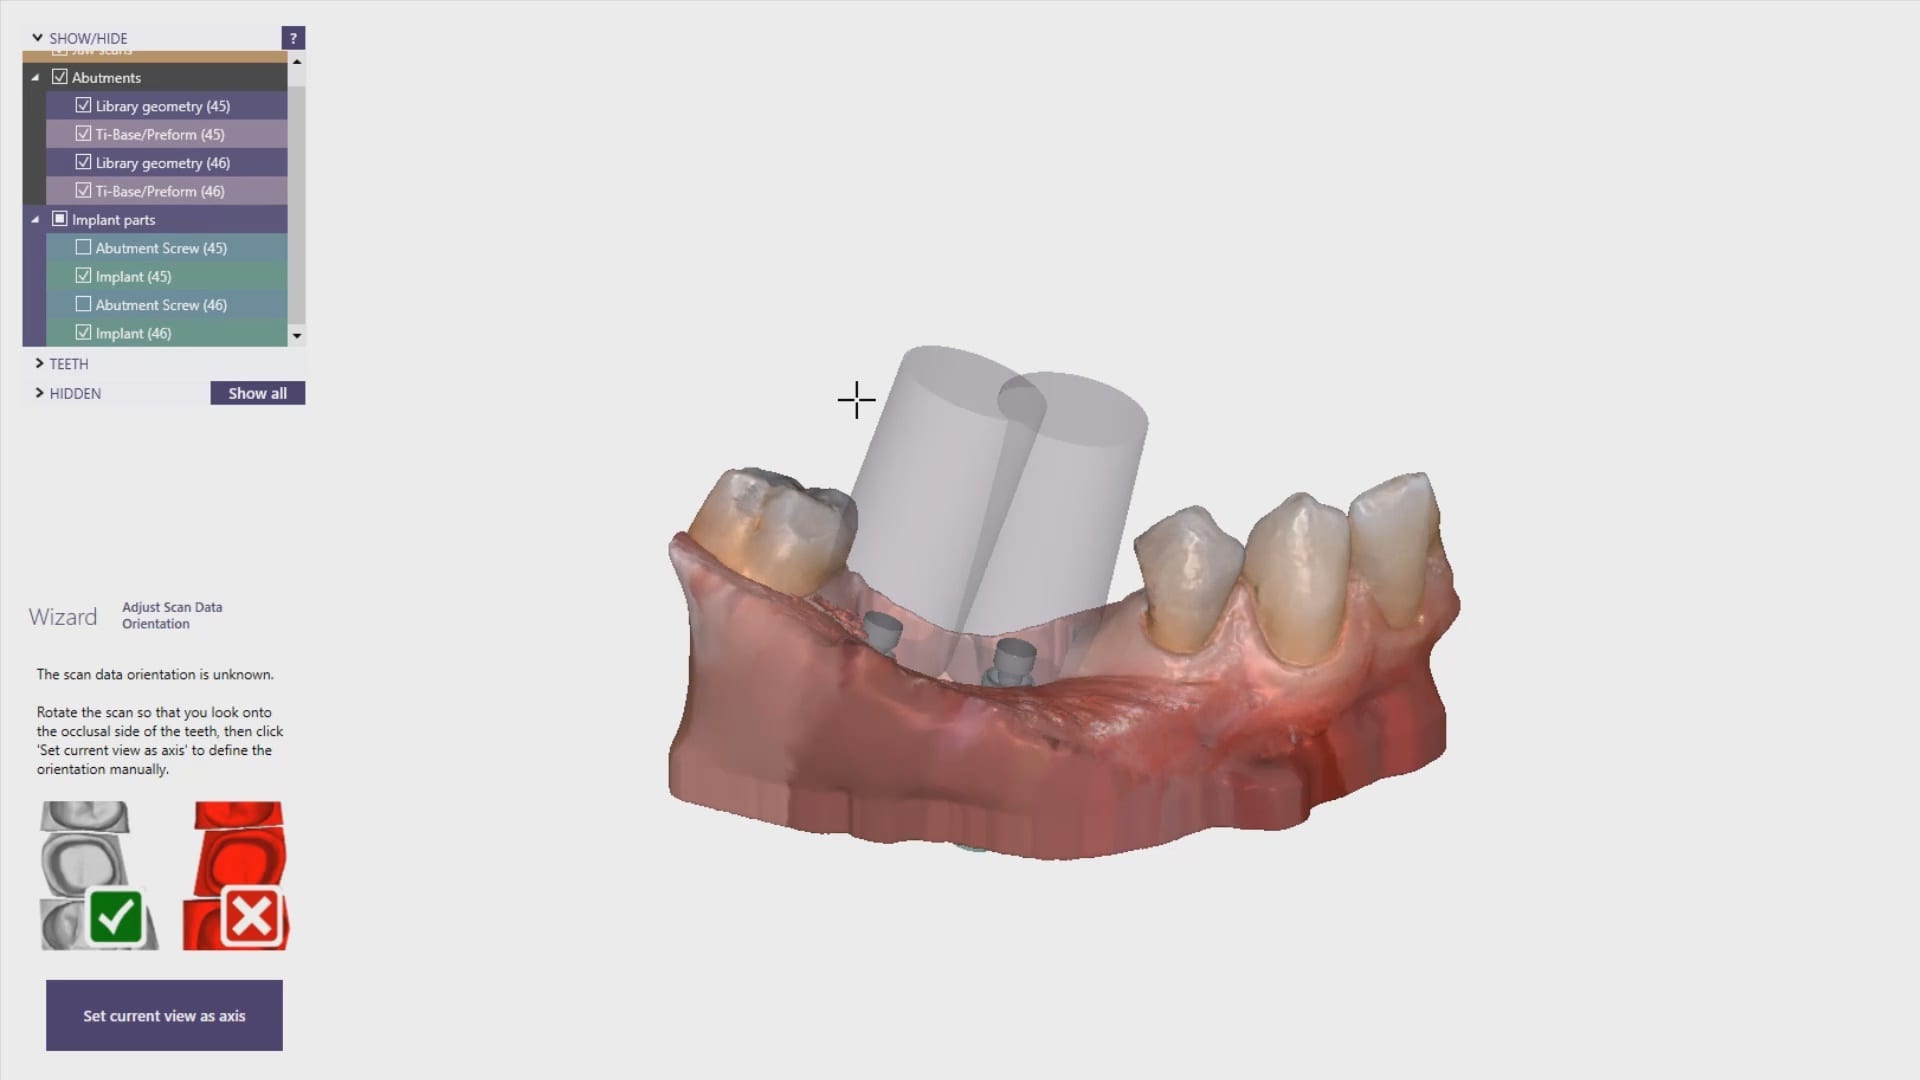
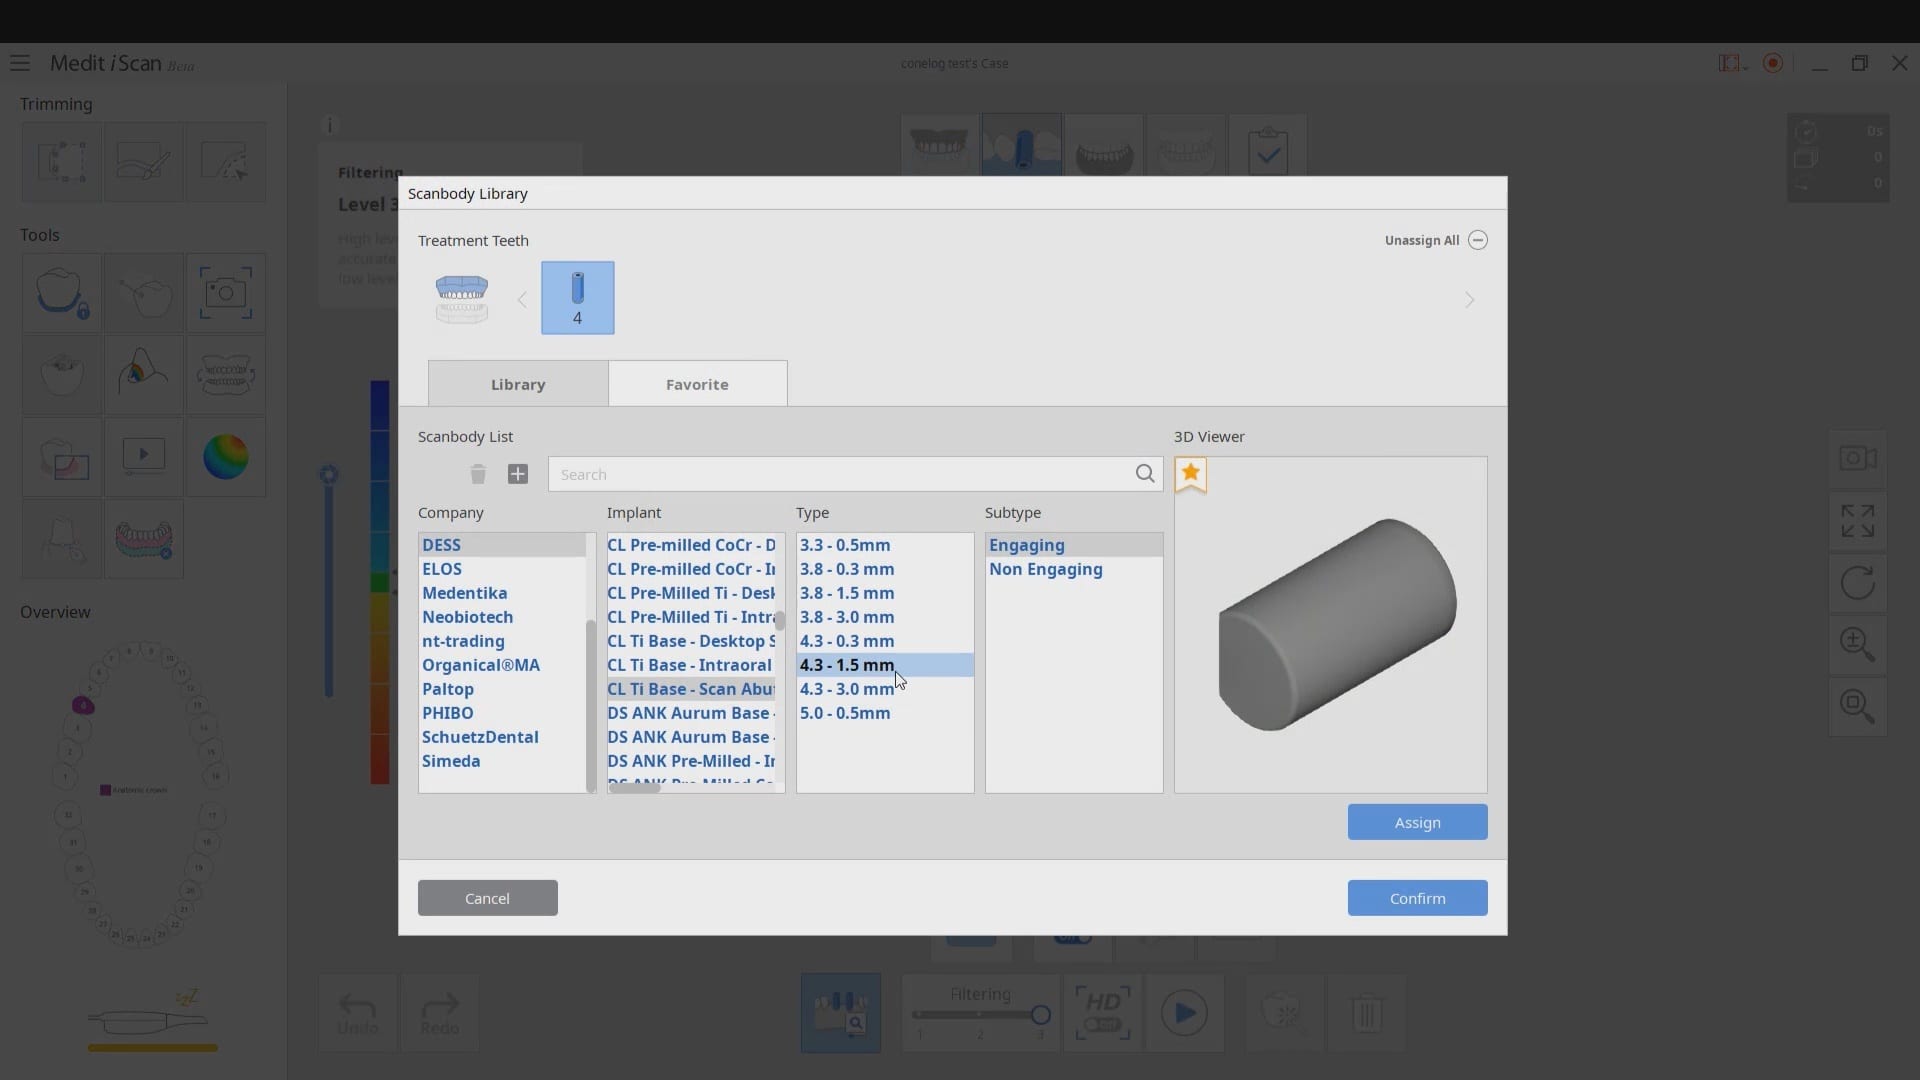
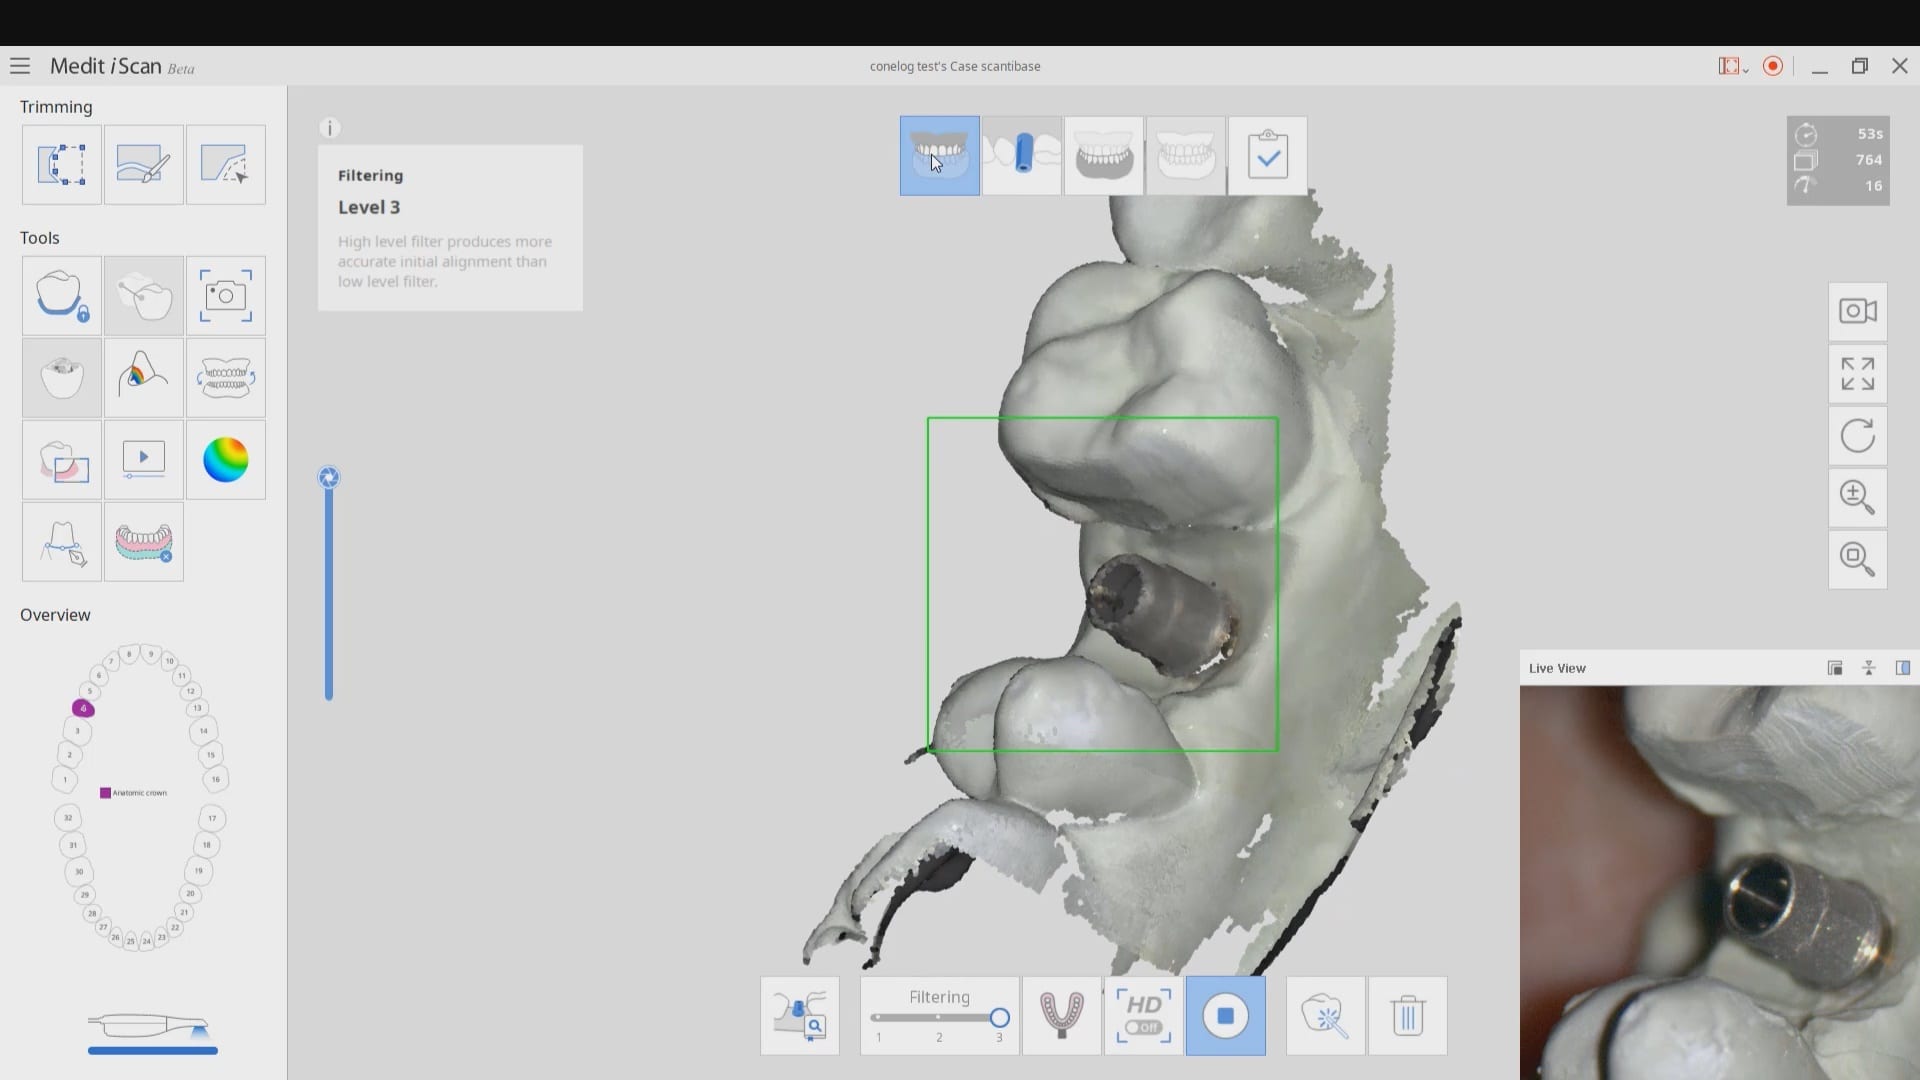
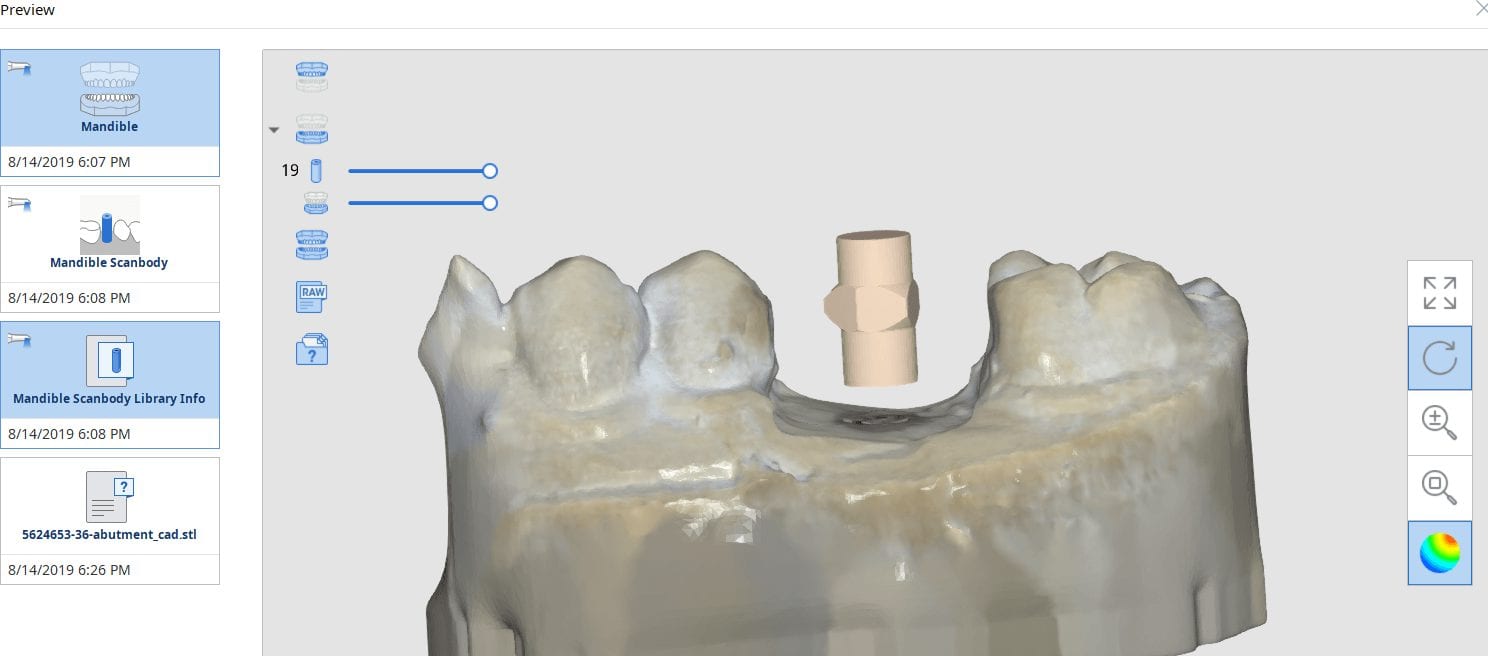
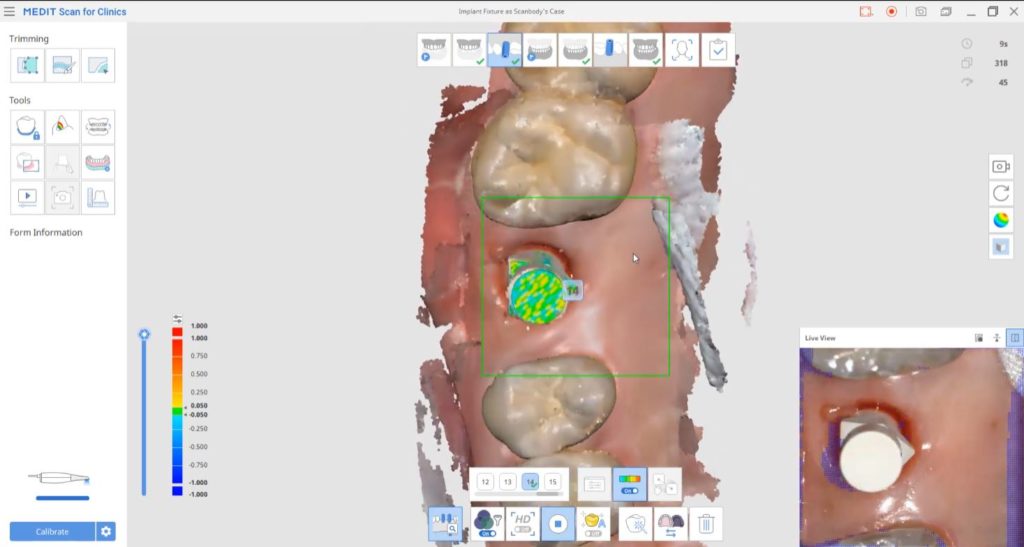
One of the greatest benefits of digital dentistry is that you can capture parts of a model independent of time and sequence. In this particular situation, we opted to capture the scanbody for the upper arch even before the lower arch received the implant.
We utilized Medit i500’s Artificial Intelligence to spot and mark the scanbodies. Once these data points are plotted and synchronize with what appears intra-oral, you no longer have to worry about distortion or artifact in the scanbody itself. Color coding is a good indication of an accurate identification of the DESS scanbodies.
The significance of these identified scanbodies is that you can directly import them into the cad software and the fixture locations are readily identified and the design process can proceed.
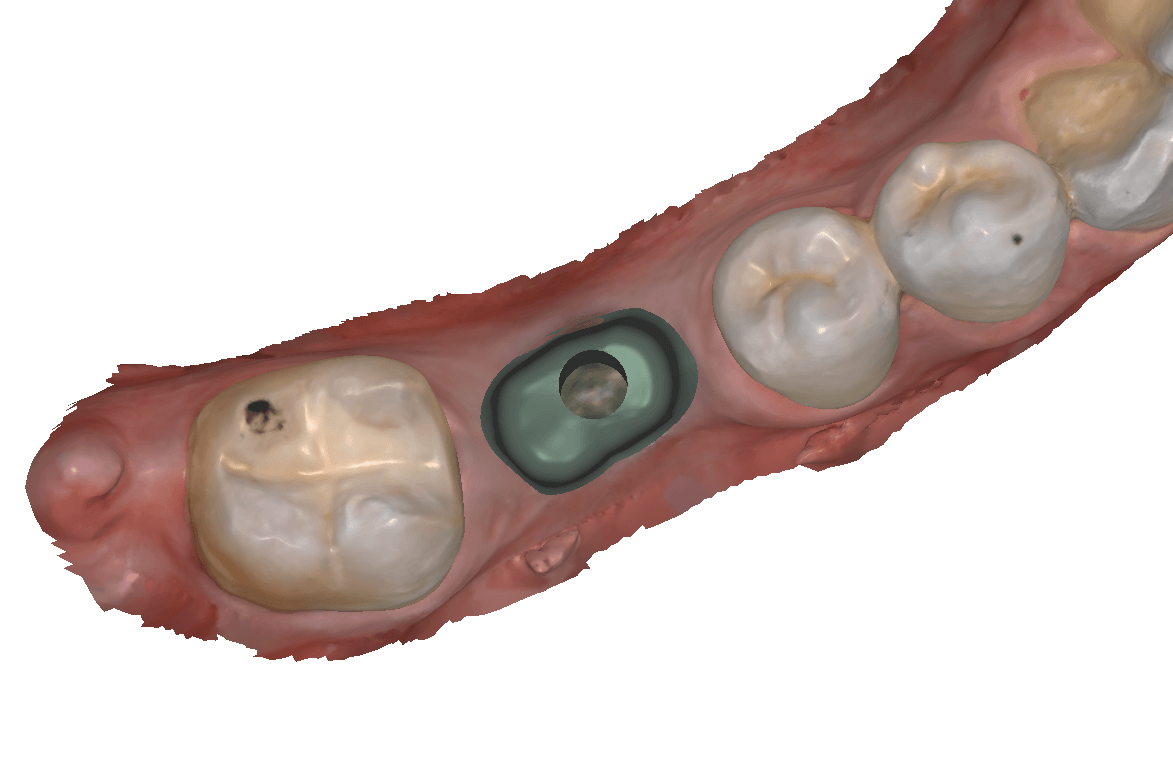
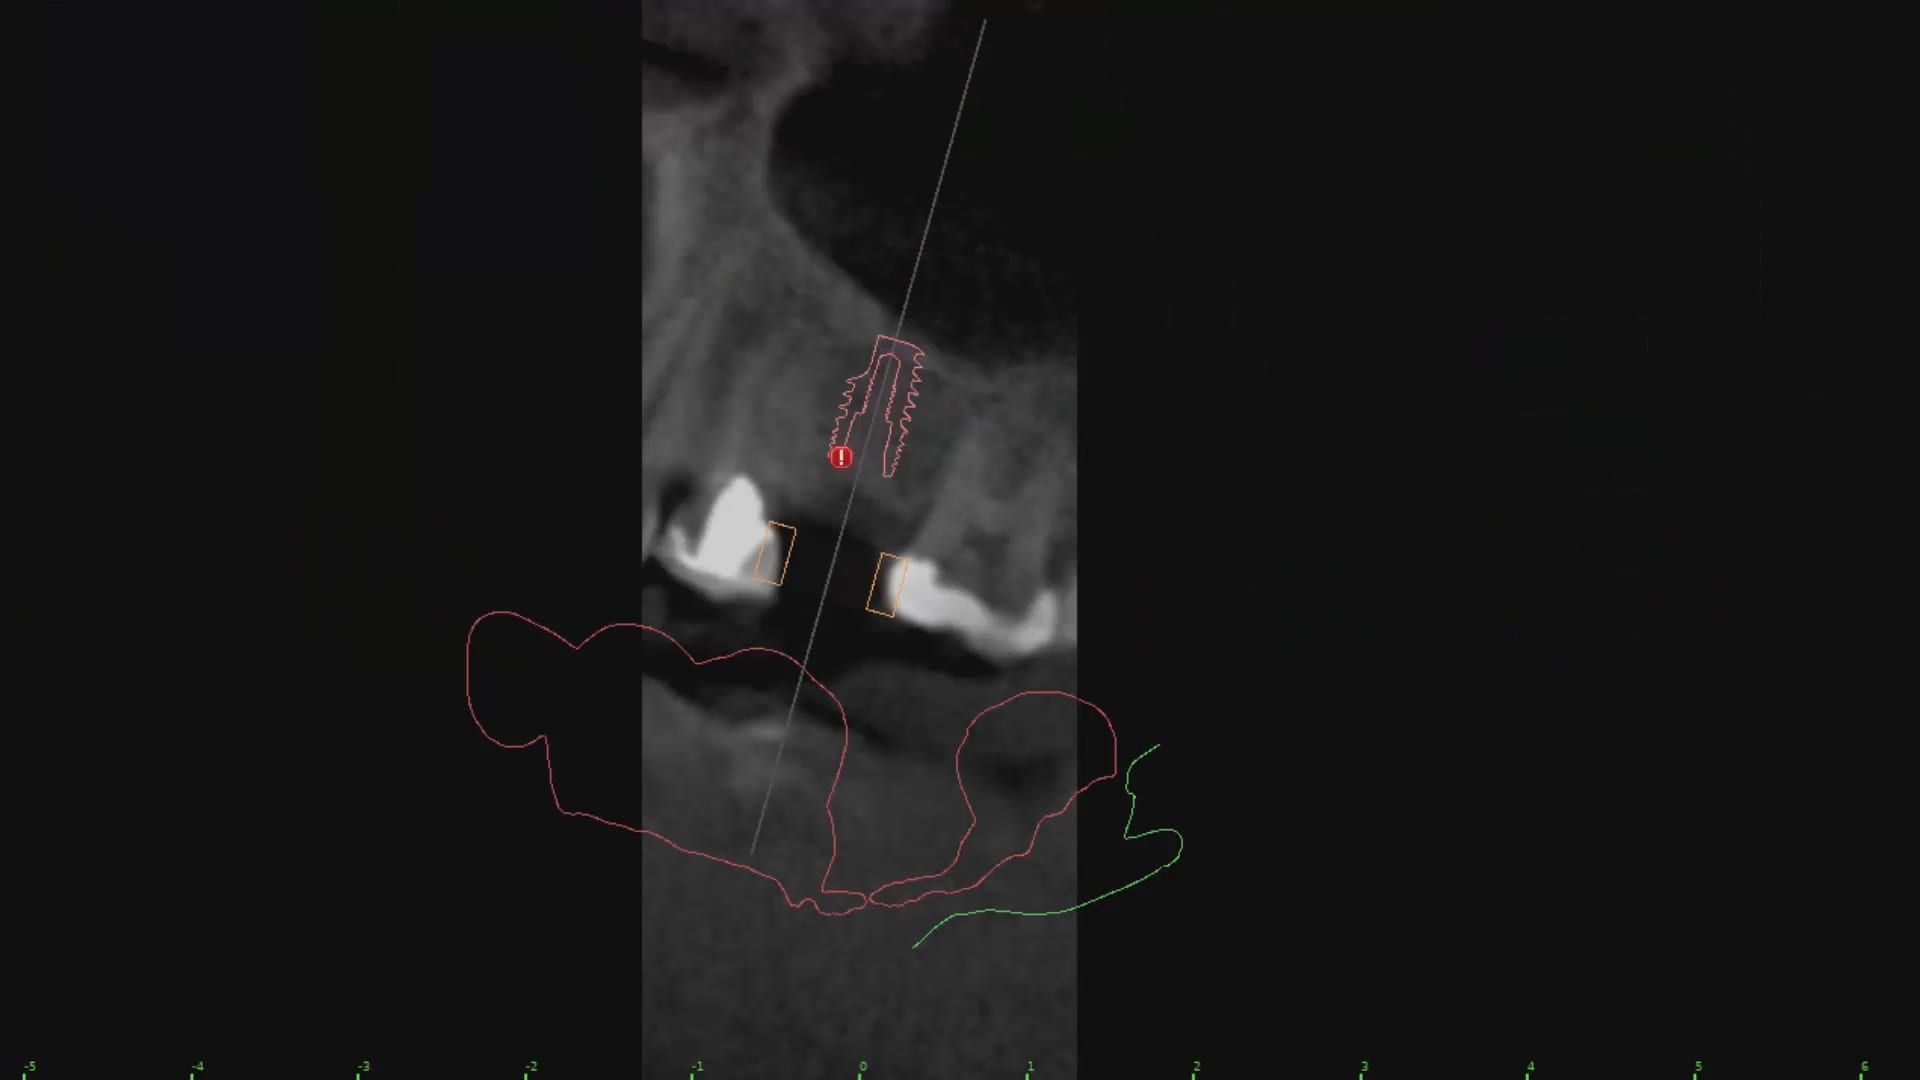
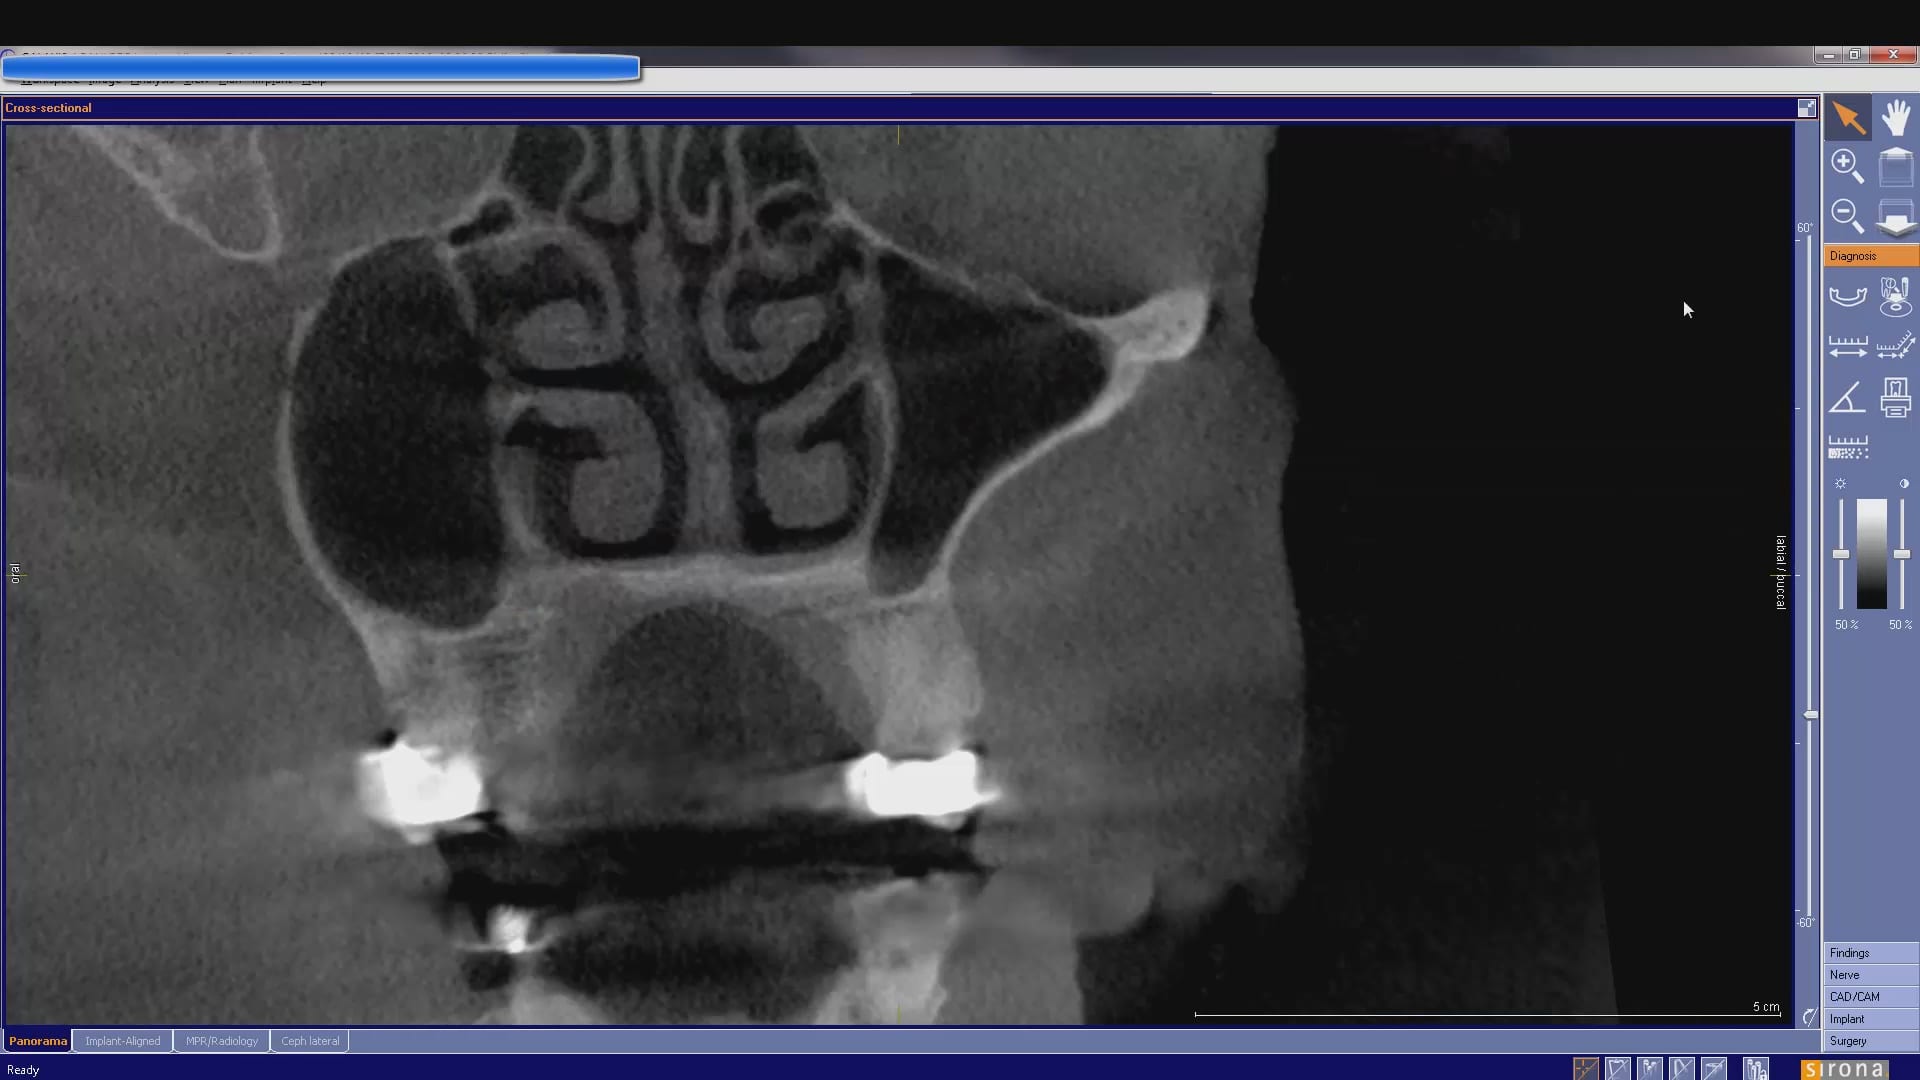
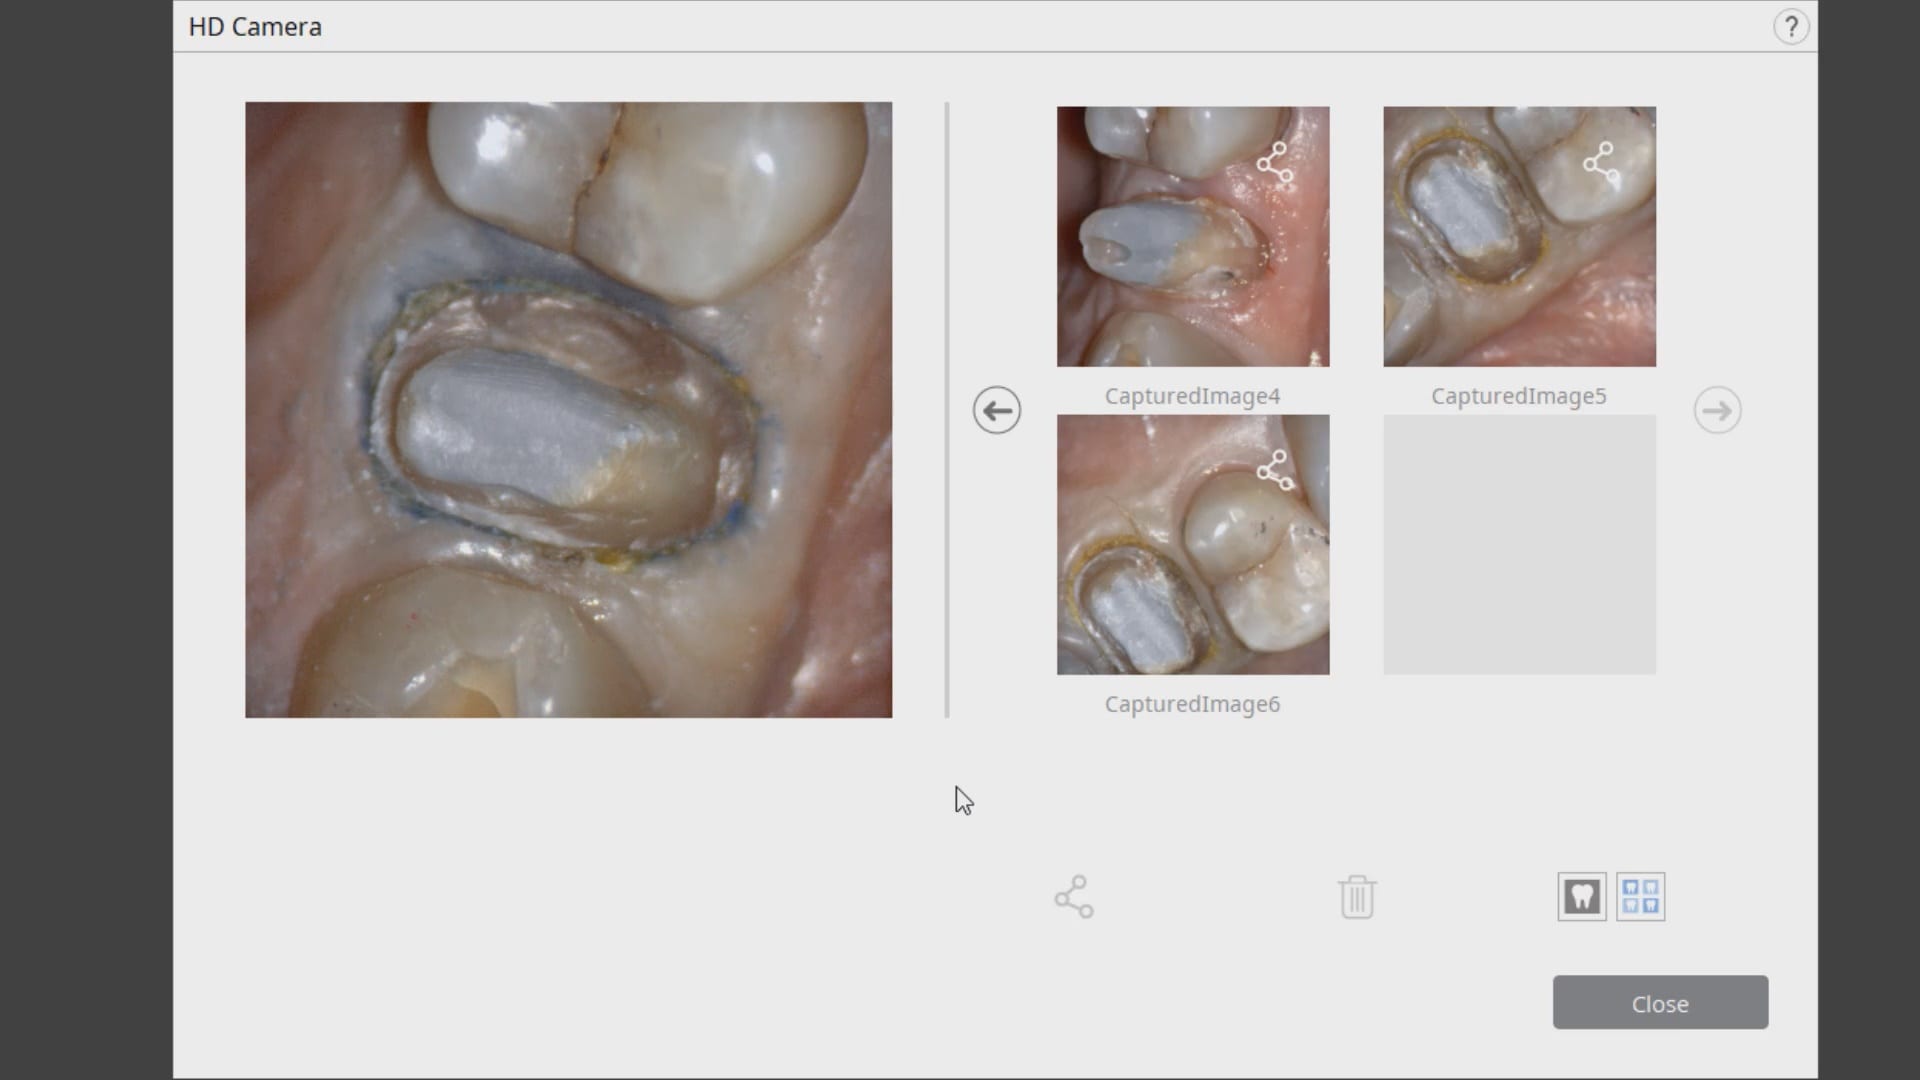
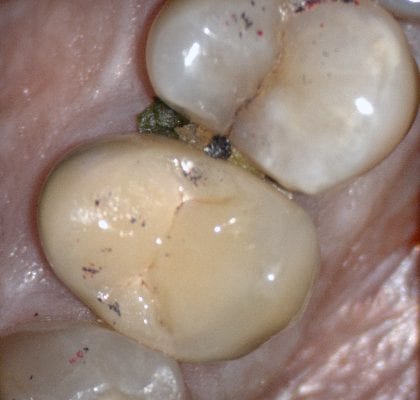
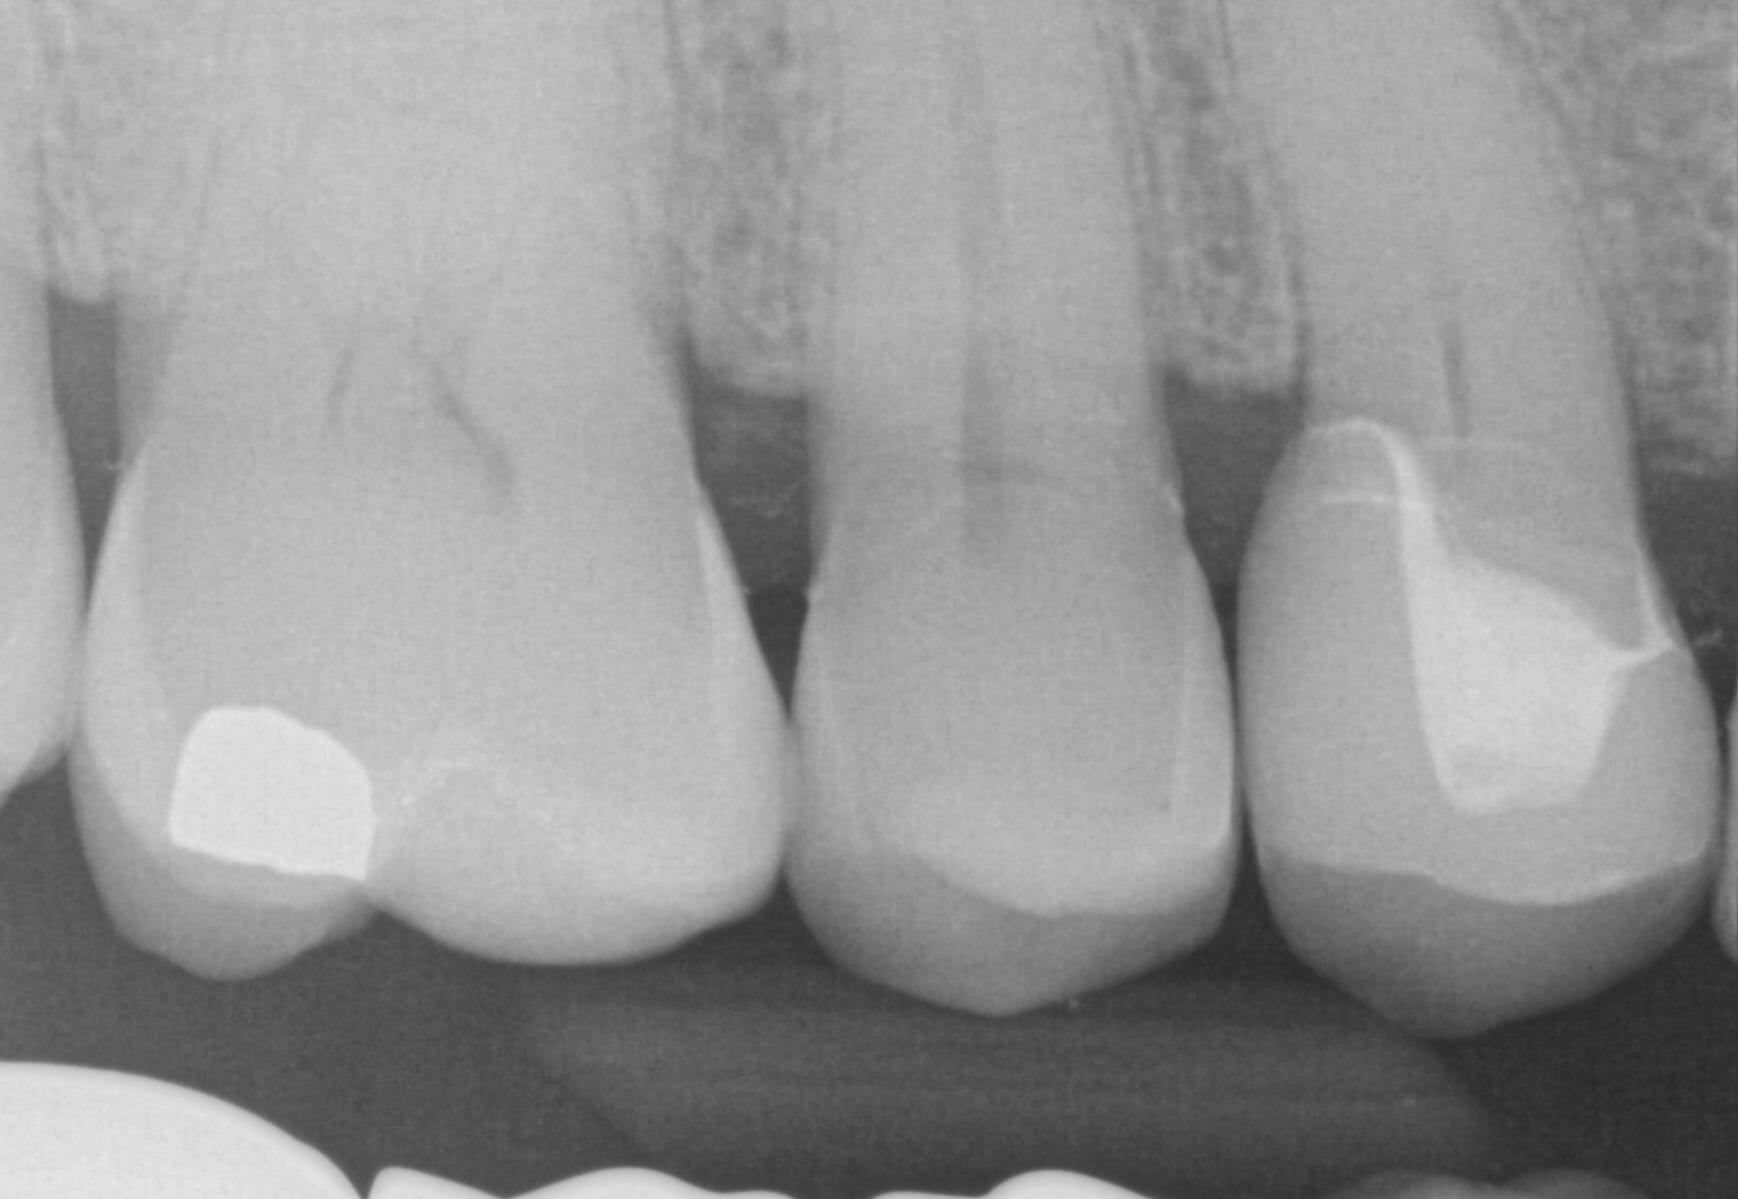
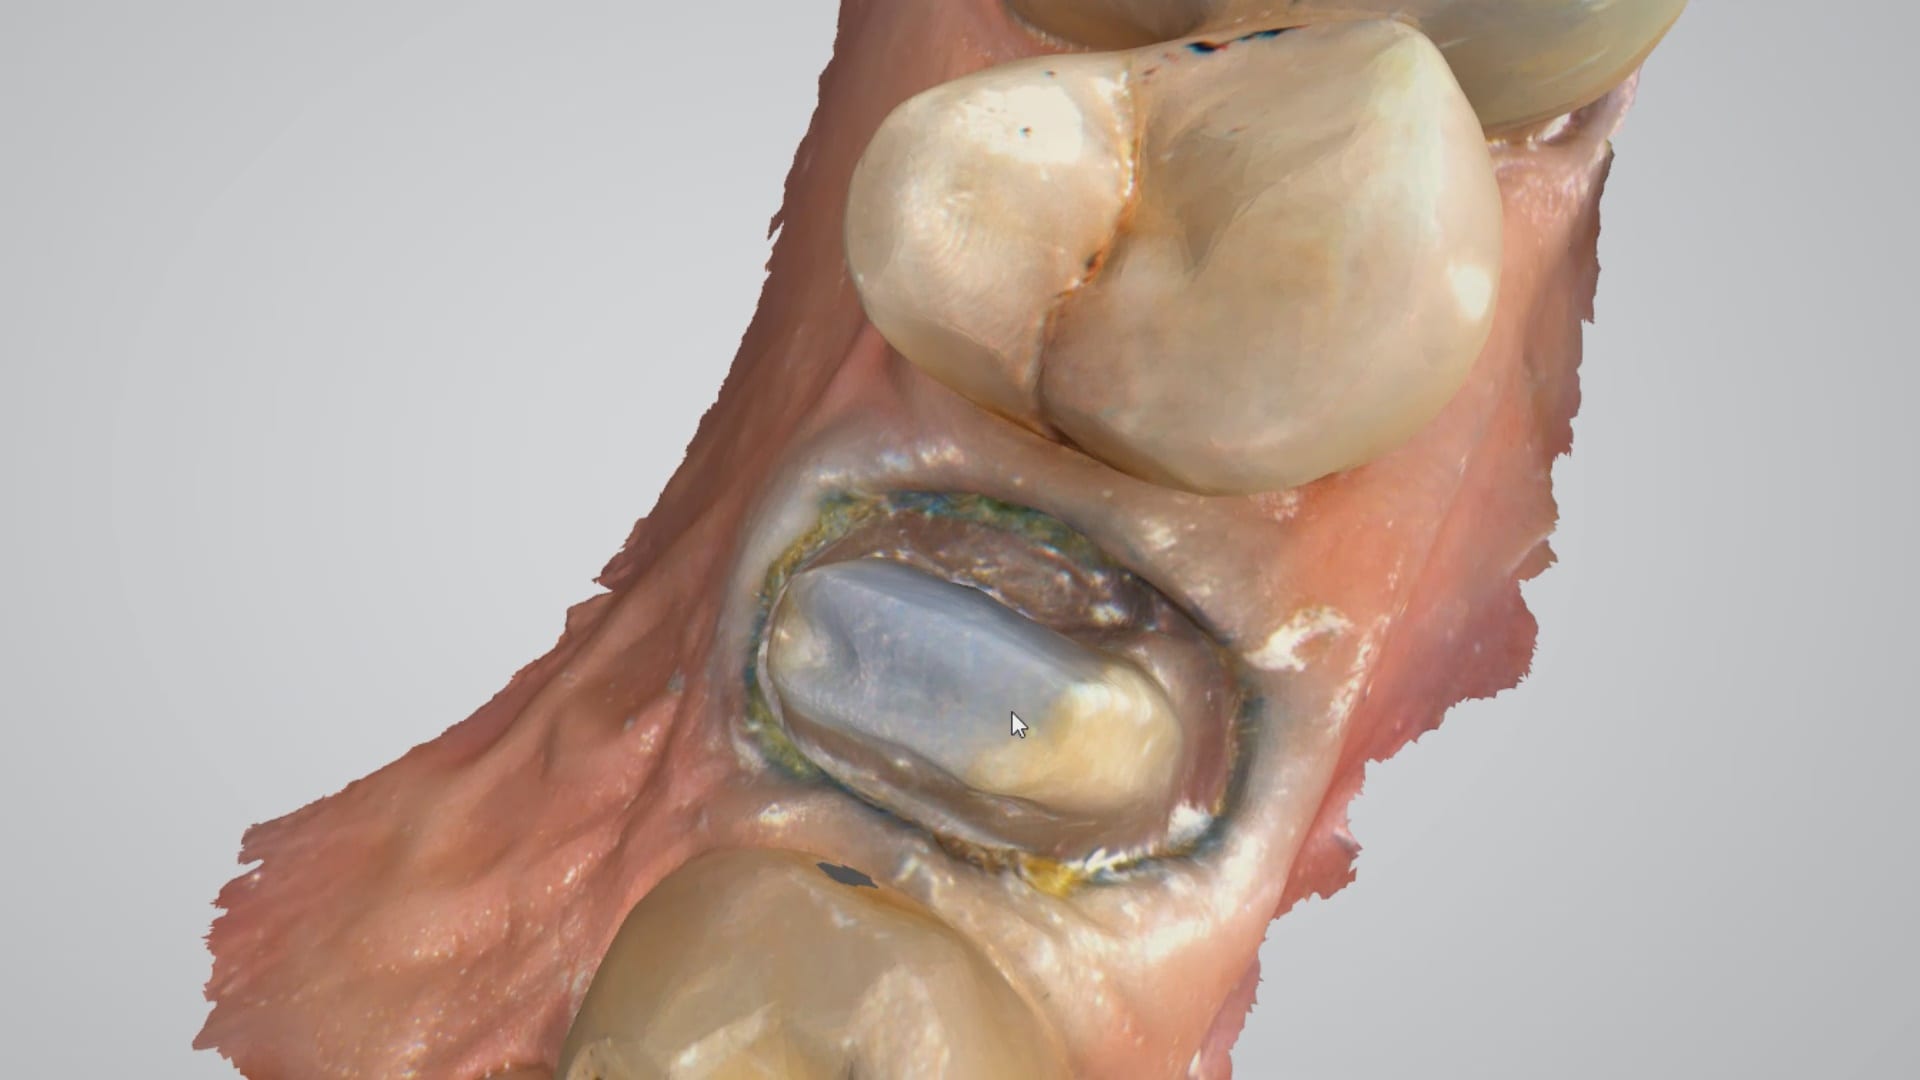
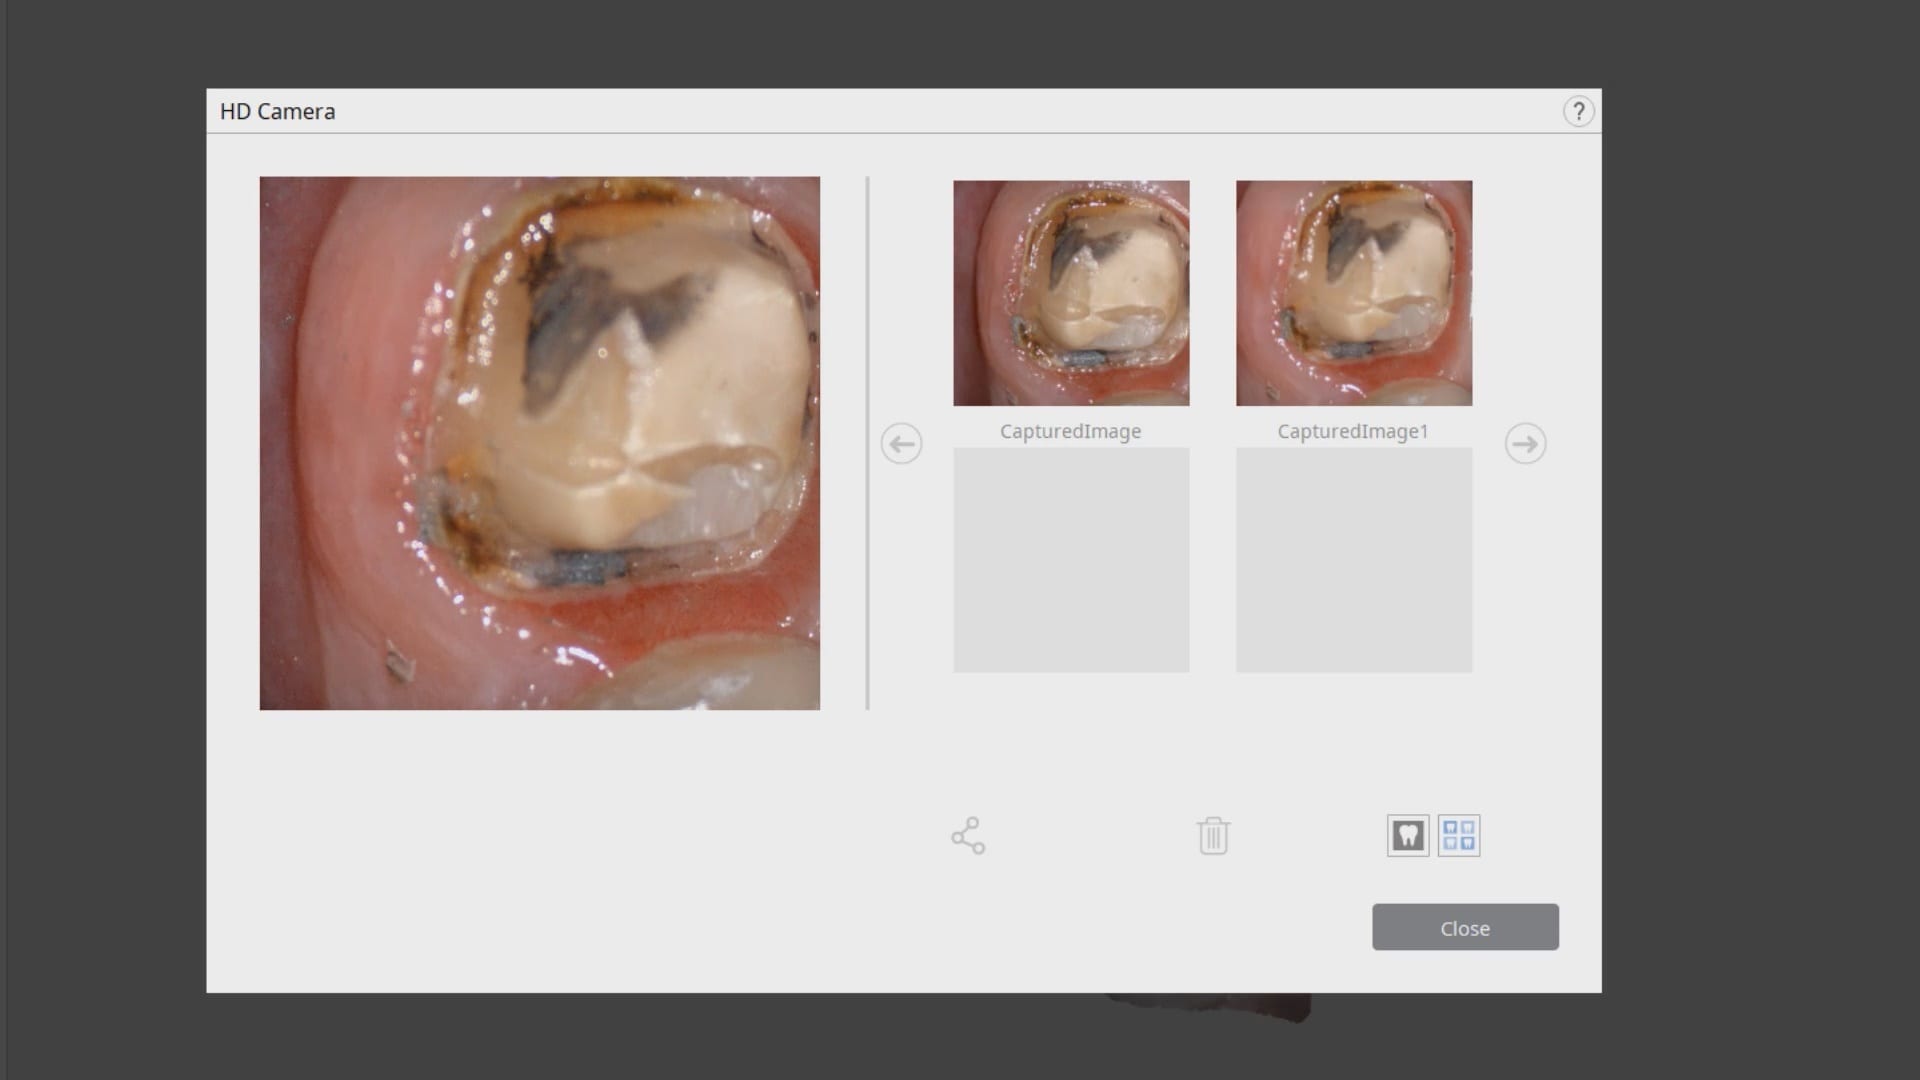
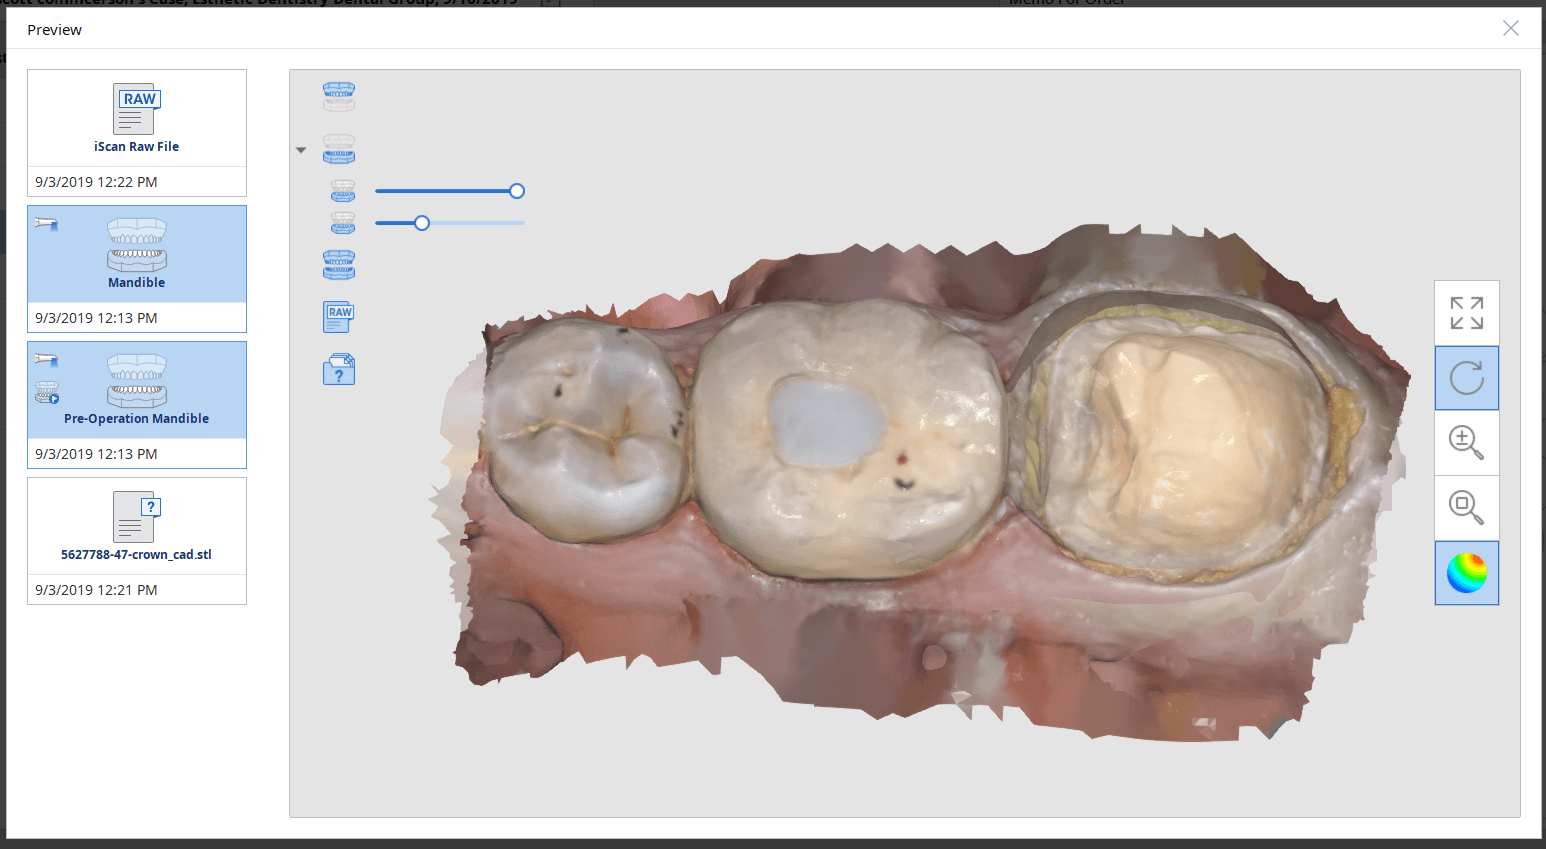
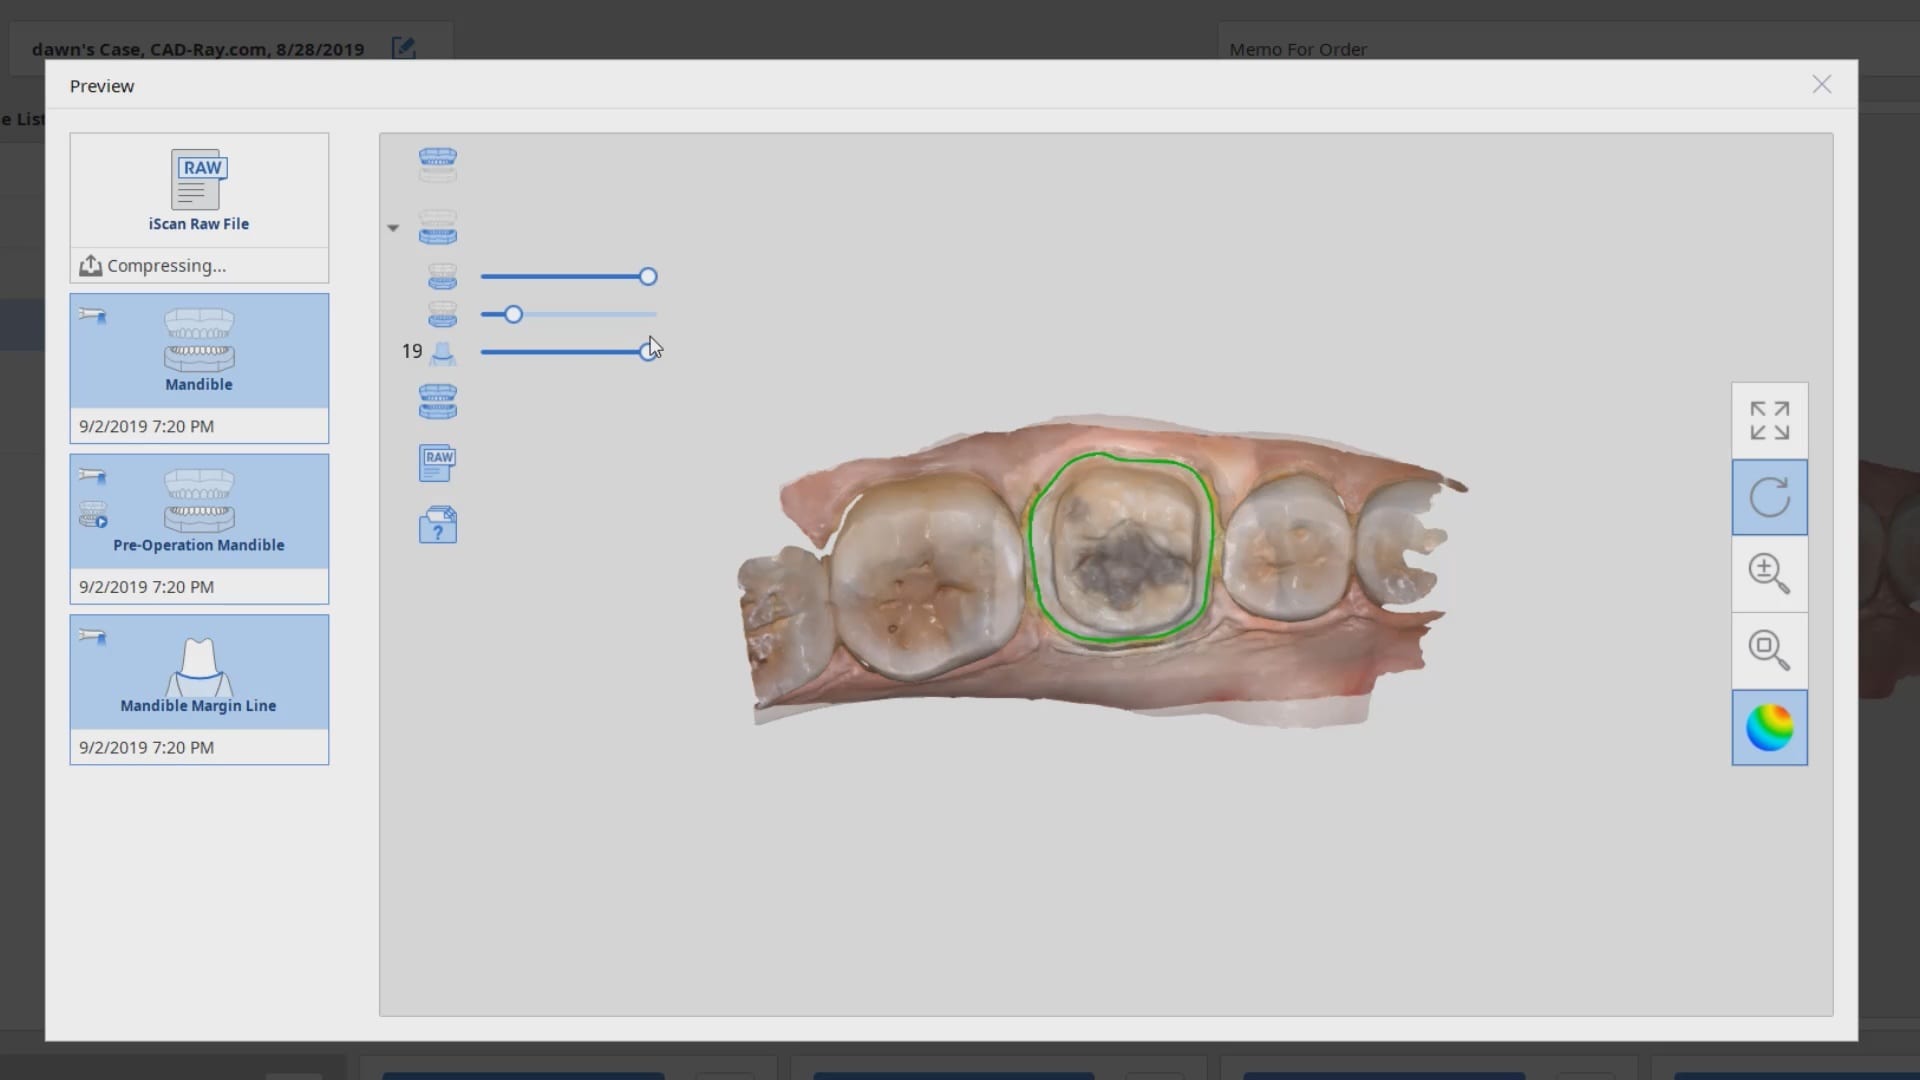
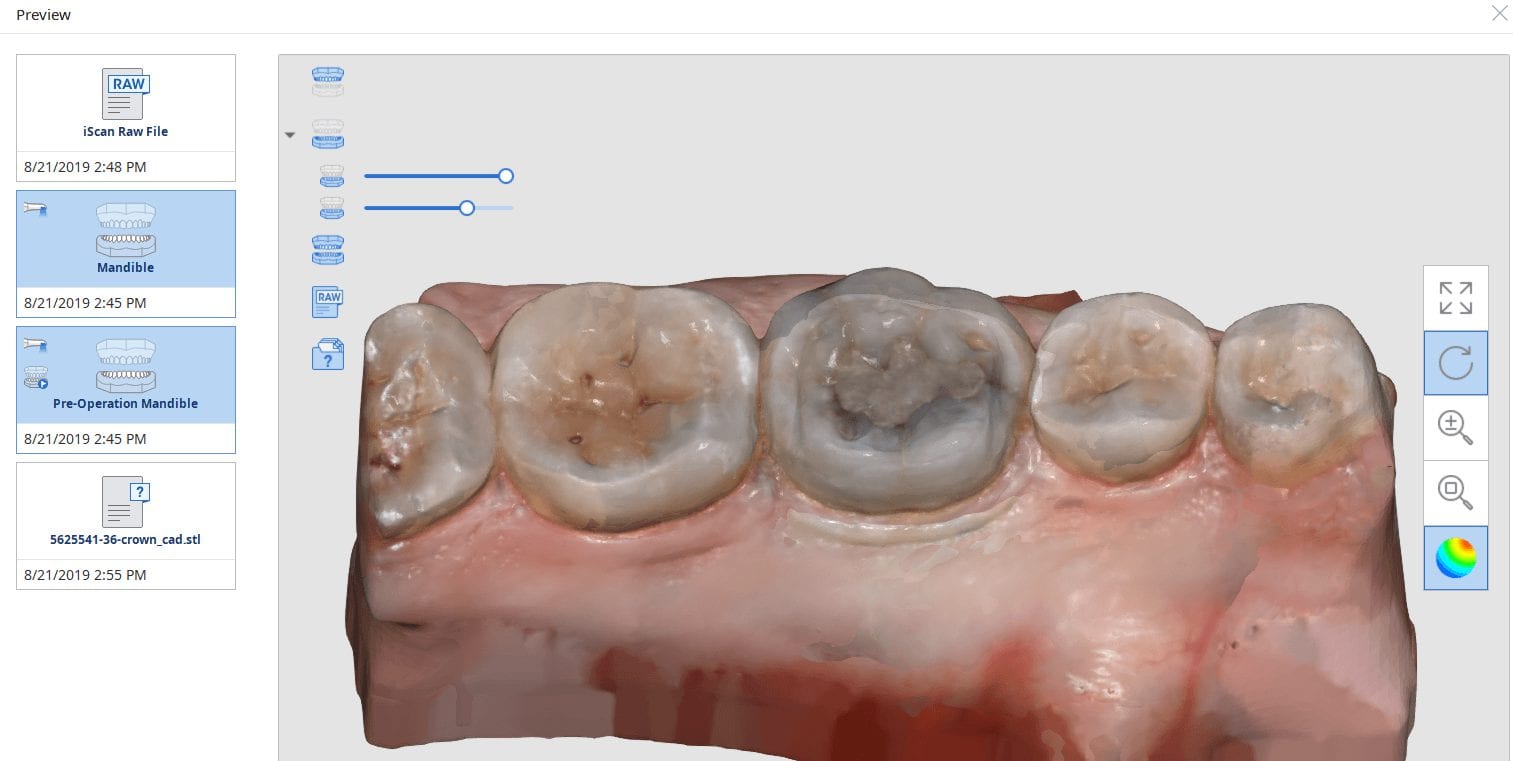
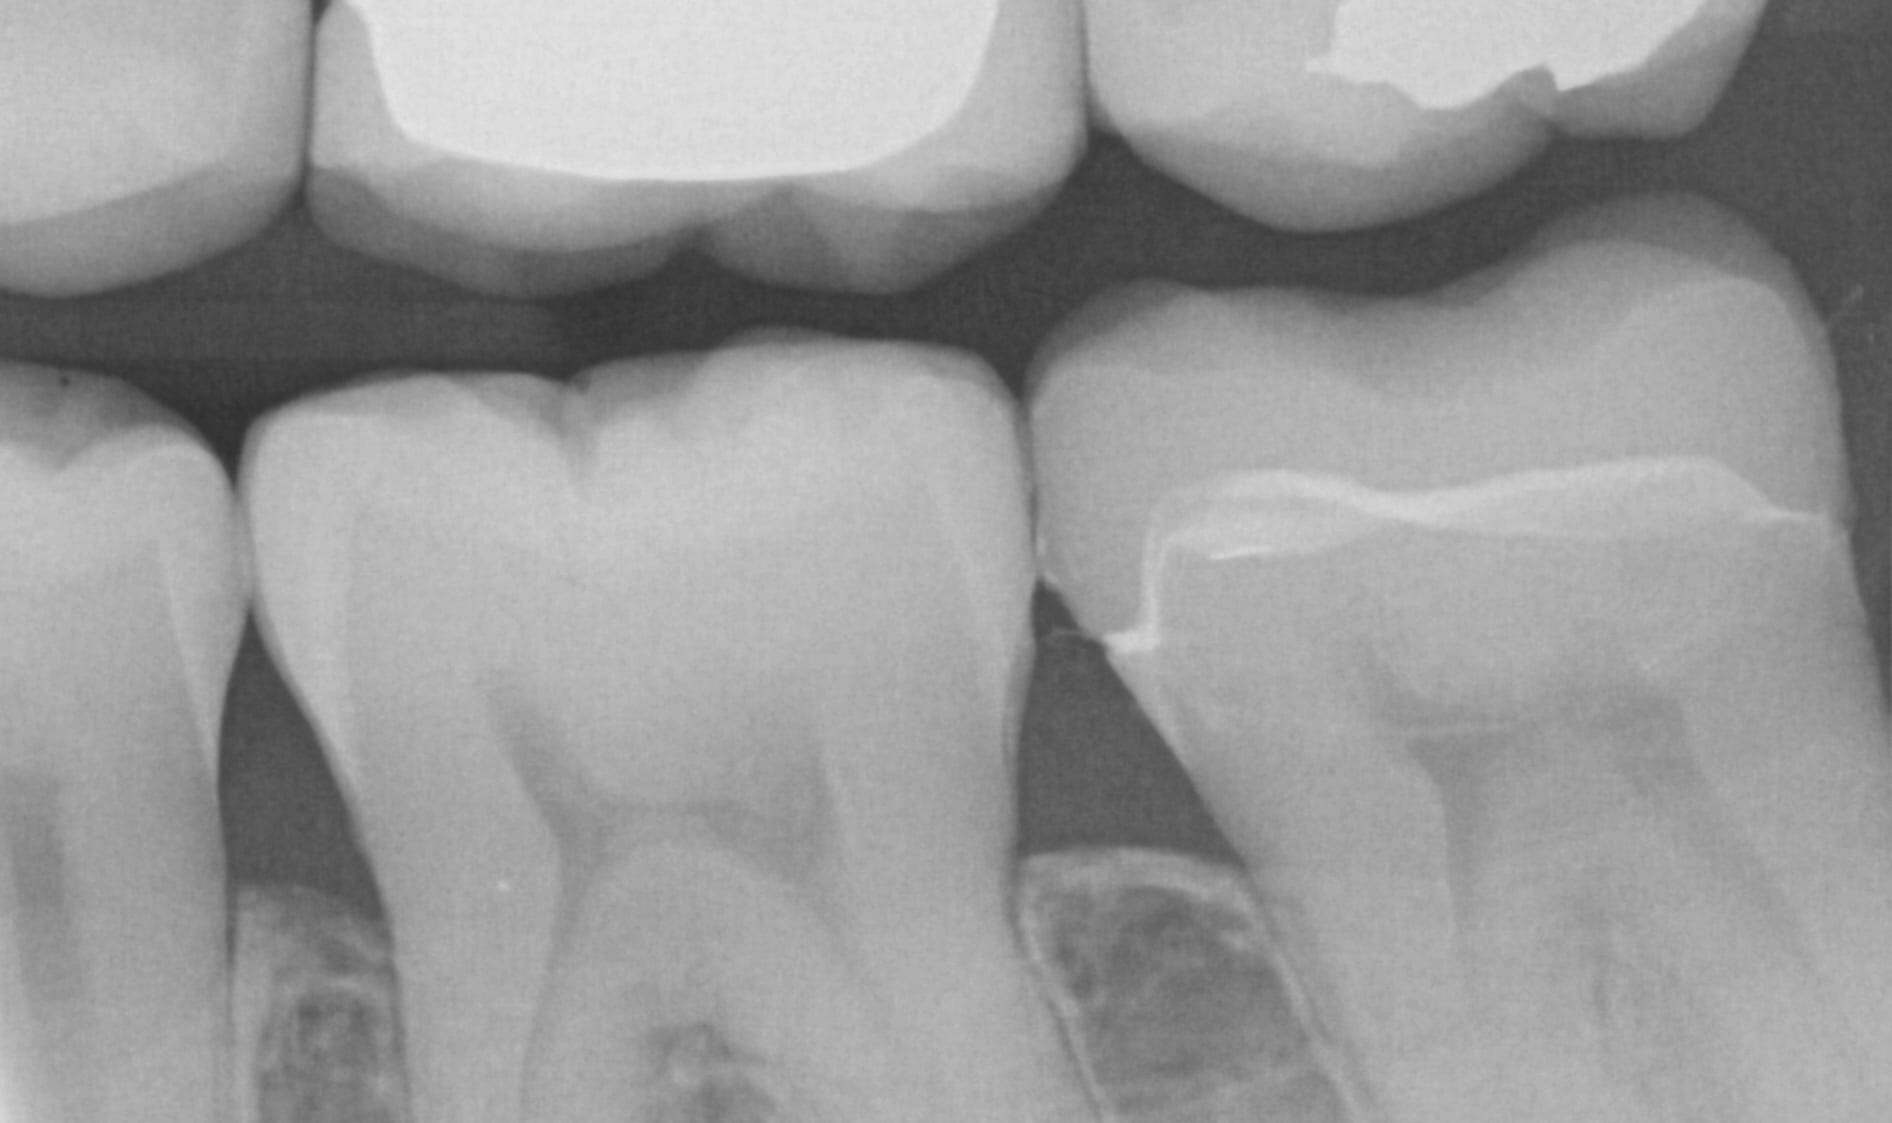
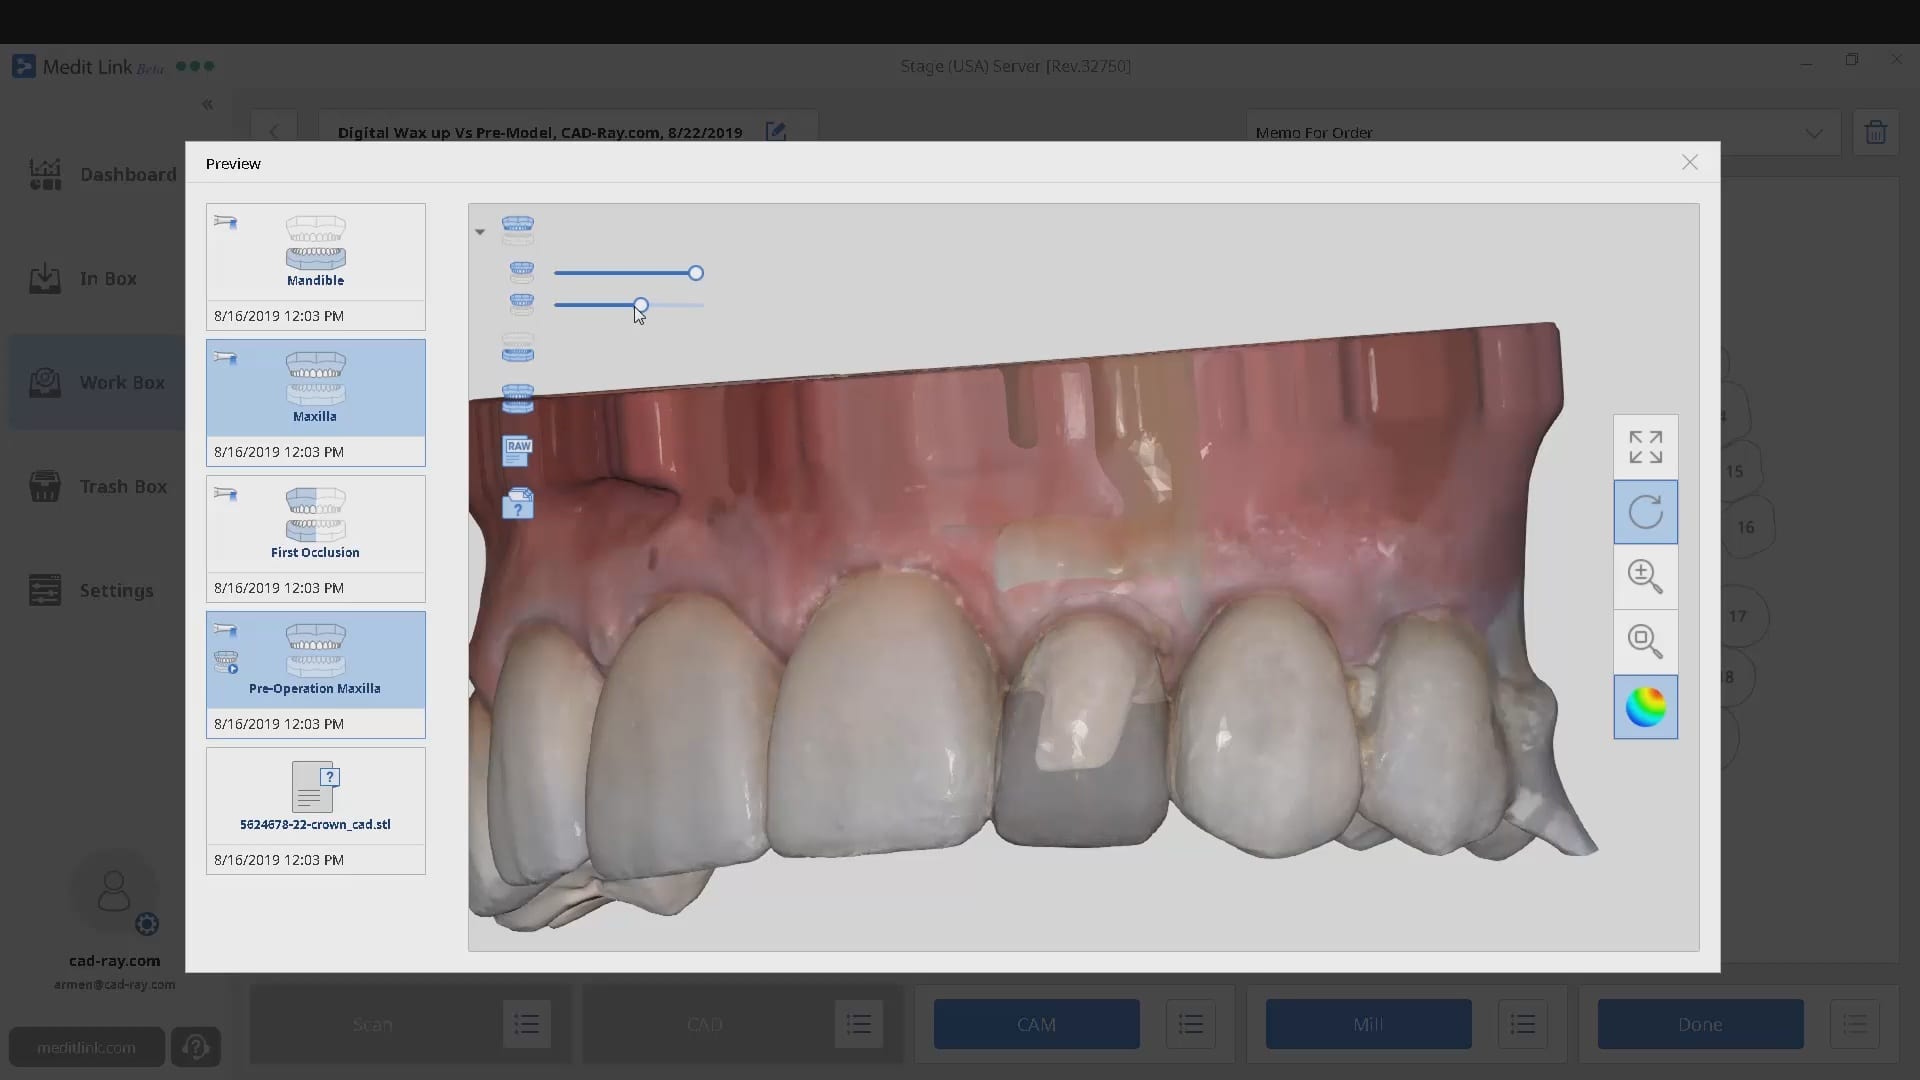
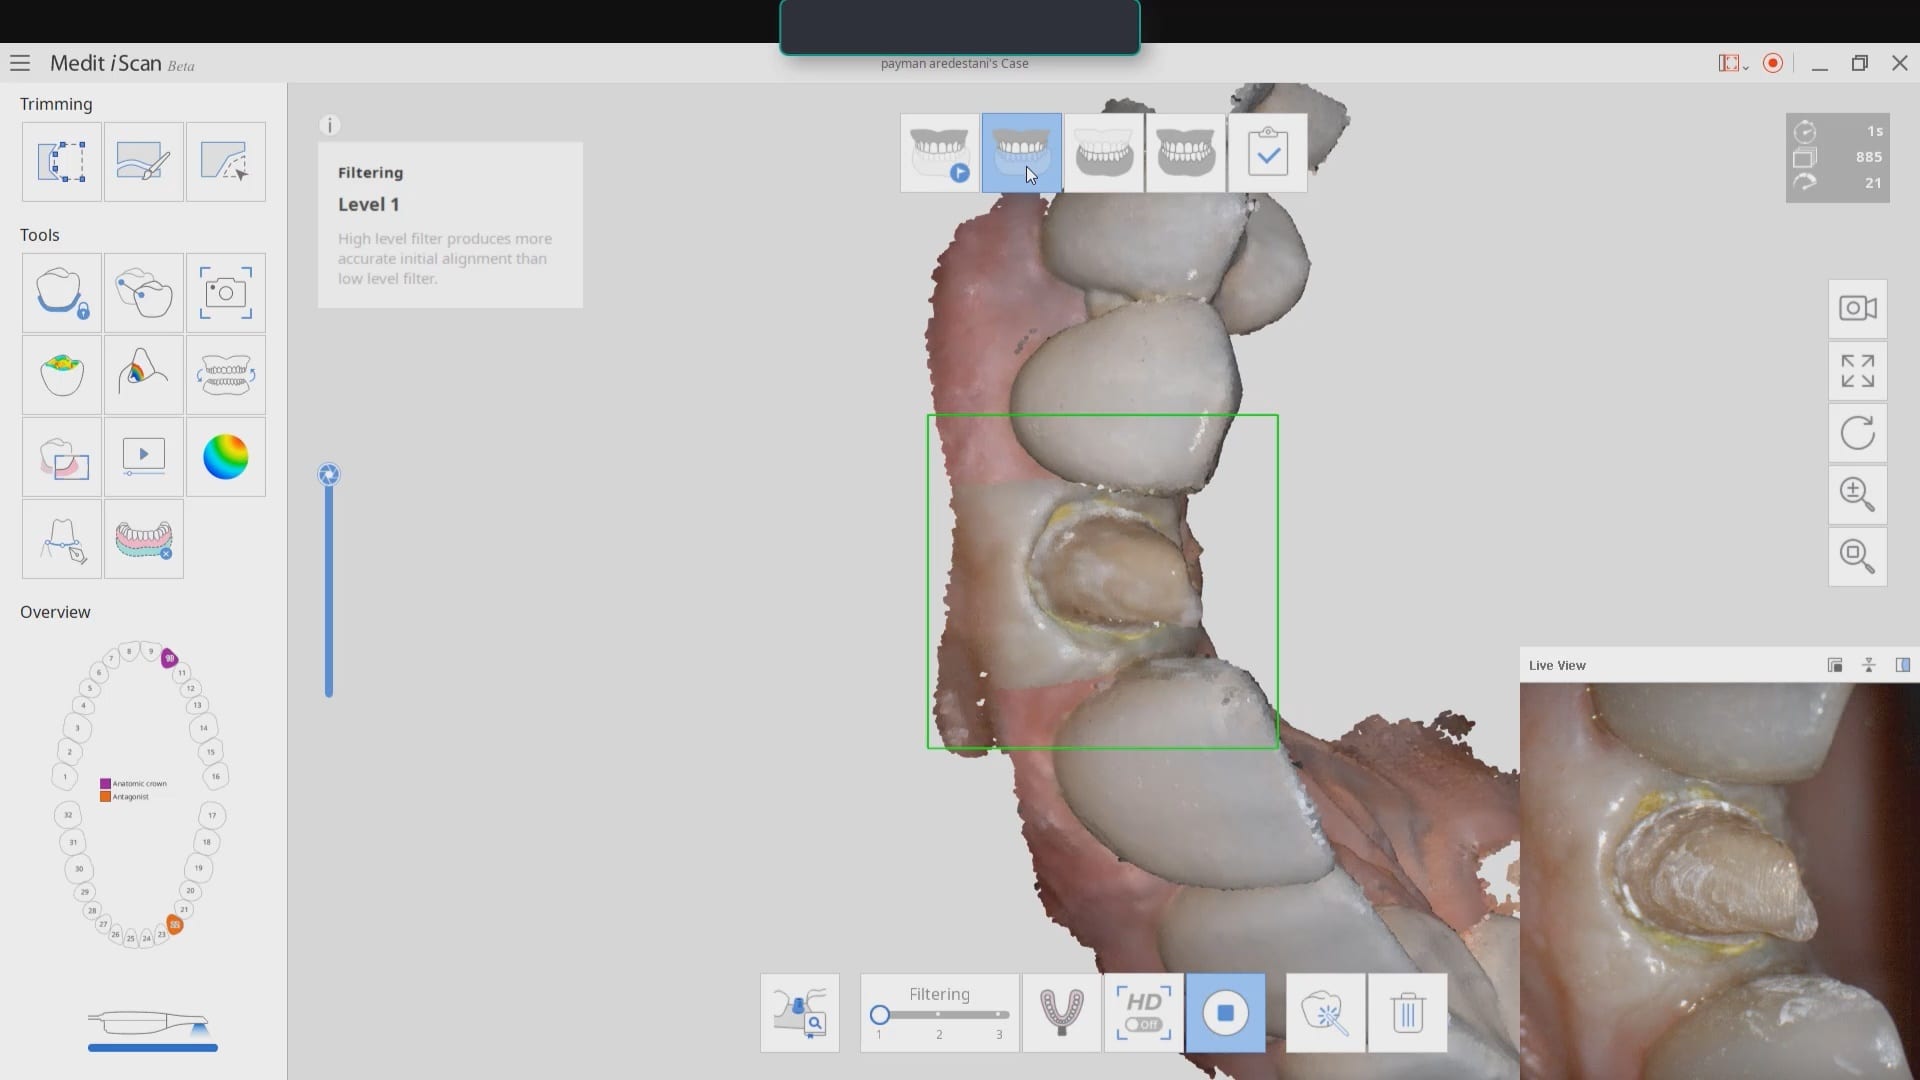
In this case presentation, we utilize the medit i500 to image the pre-existing crown and to fabricate a restoration that is a replica of the pre-existing condition. The patient was advised that the recurrent decay was in close proximity to the canal space and that endodontic treatment may be a possibility. The CBCT showed no evidence of any peri-apical radiolucency and the premolar tested vital prior to treatment
CT used to evaluate apex of premolar for crown replacement
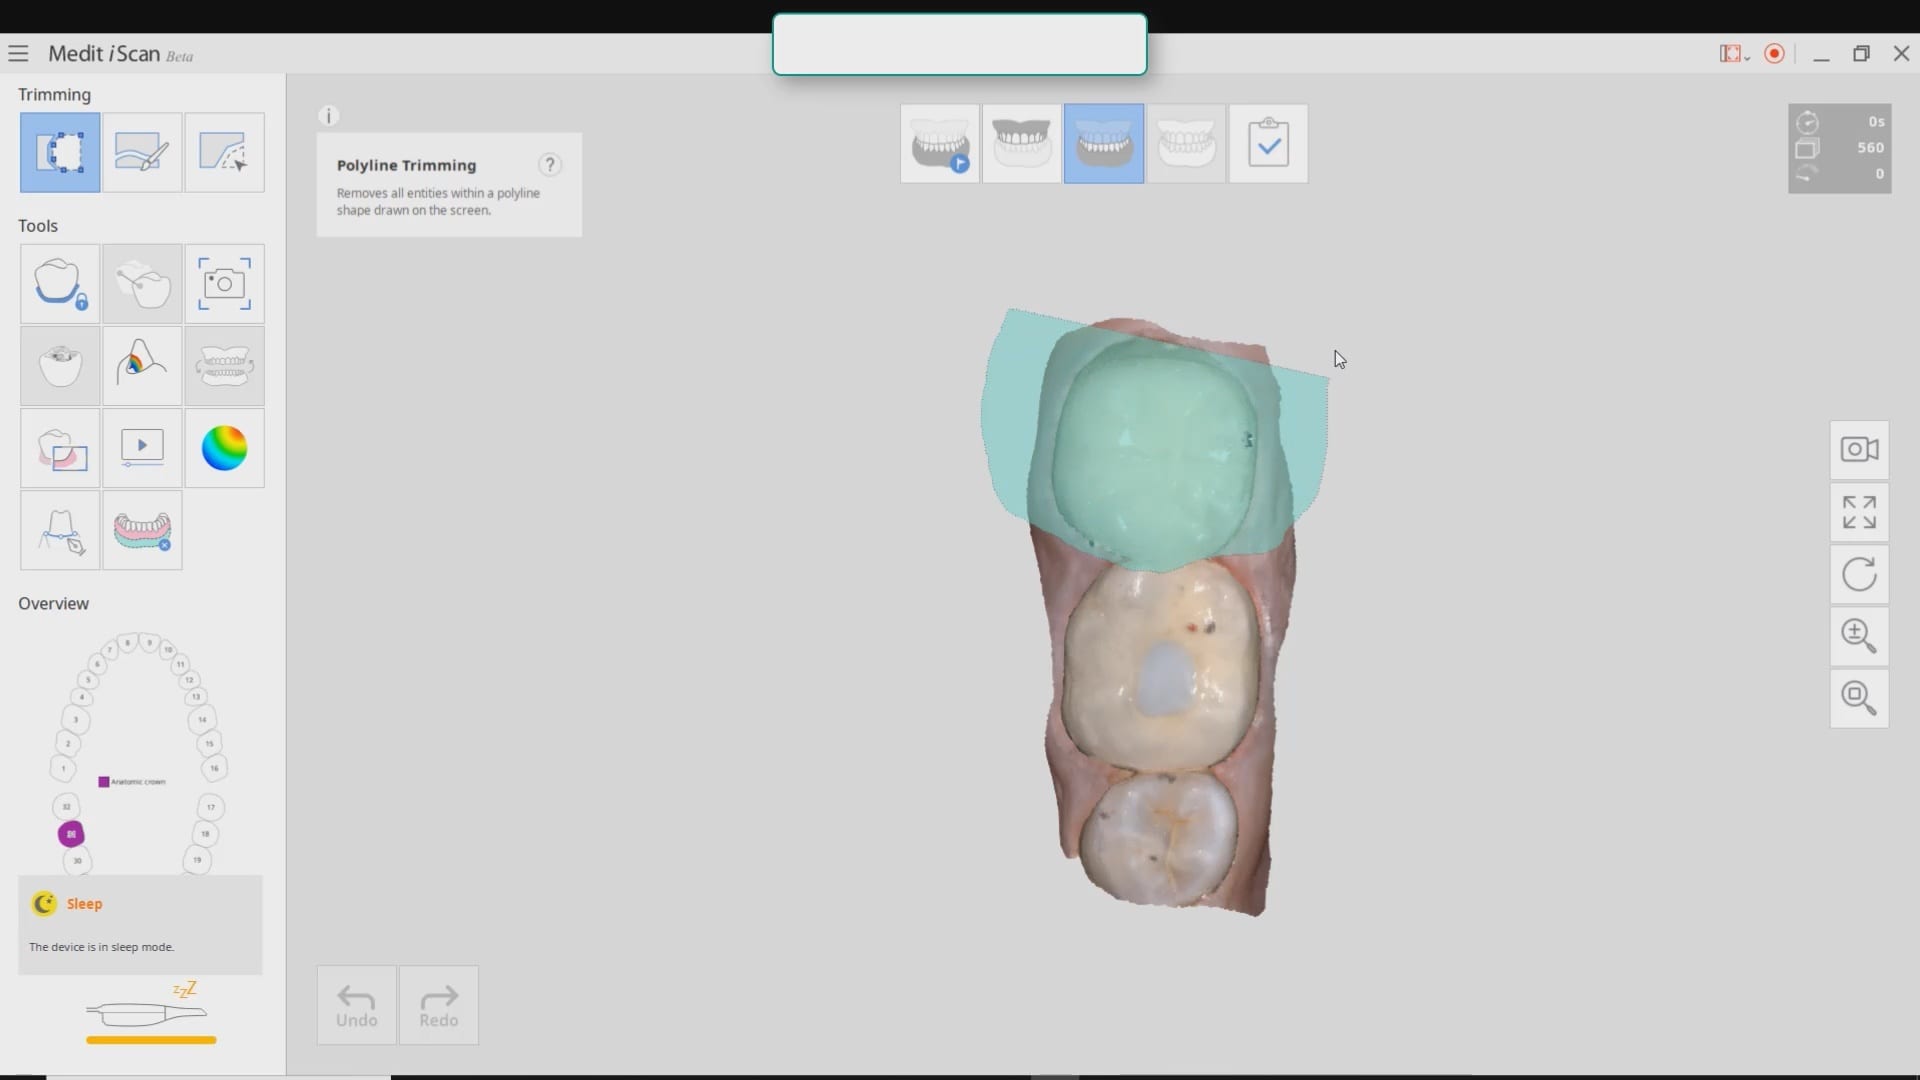
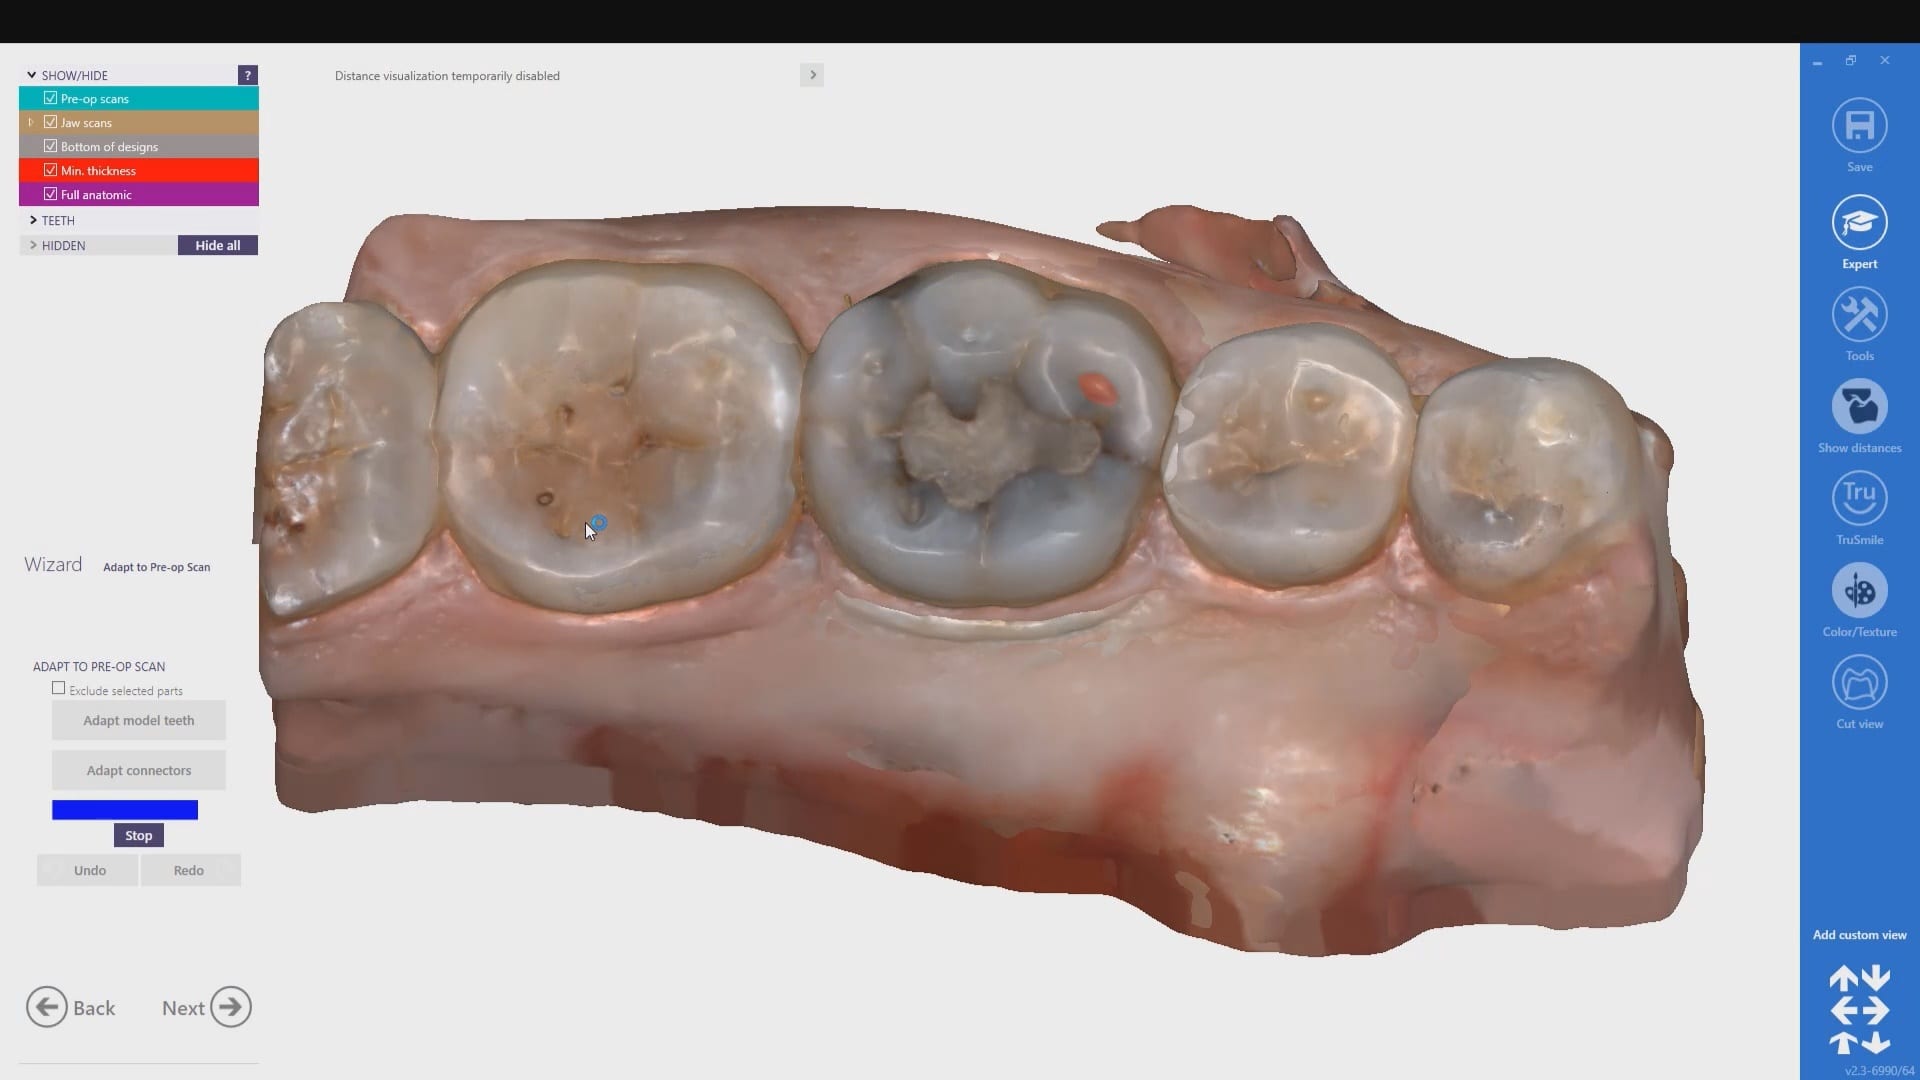
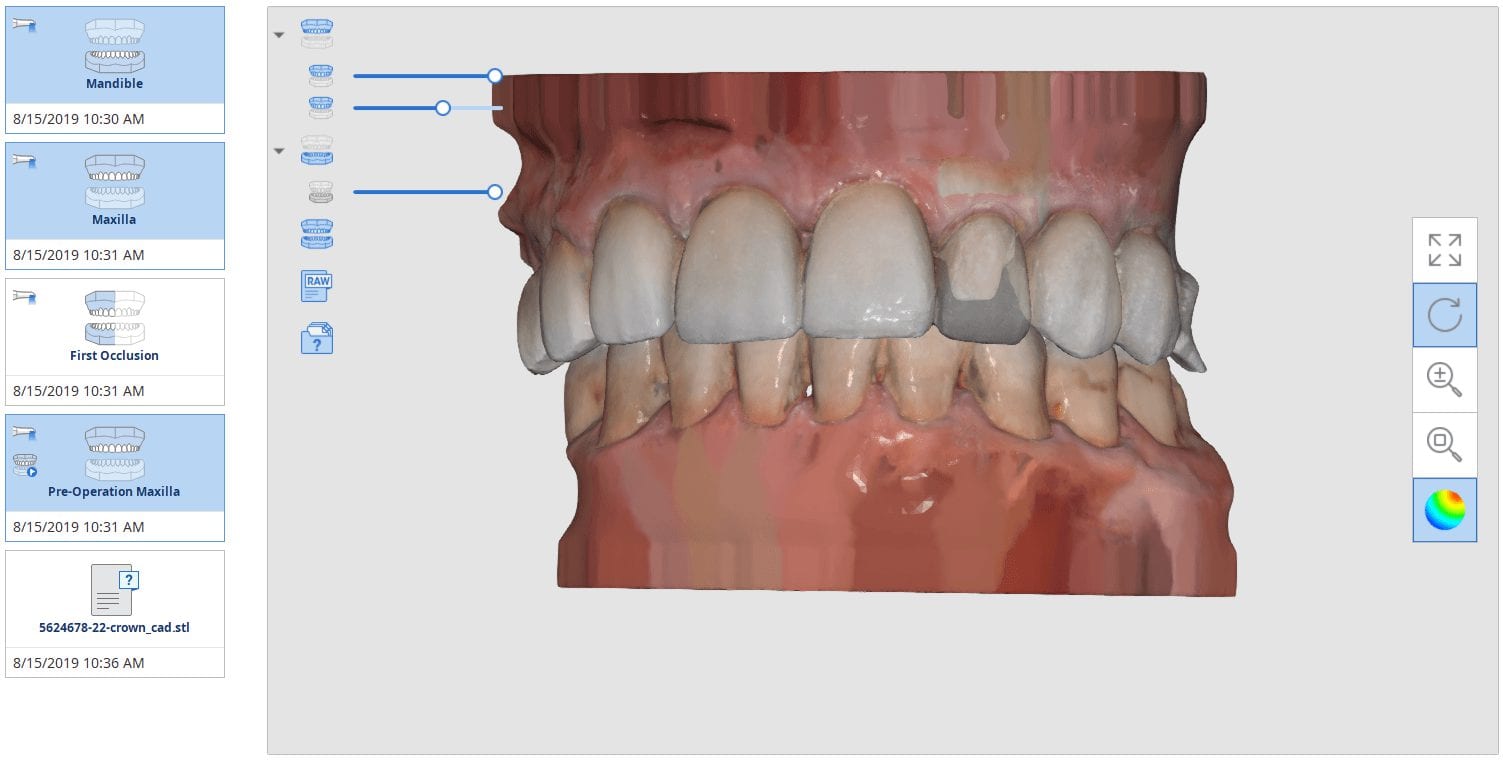
Case set up involved imaging the pre-existing condition in the pre-op catalog box. Excess information was cropped to reduce file size. The data was then copied to the maxillary arch catalog box and the area to prepared was edited out in preparation for final optical impressions.
Immediate Post Op
The remaining decay and previous build up material was removed just prior to bonding the restoration with NX3 dual cure resin cement so the dentin was exposed for the least amount of time possible.
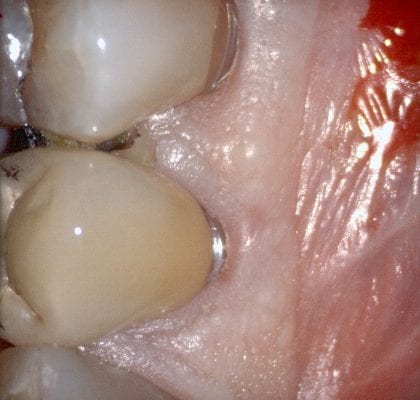
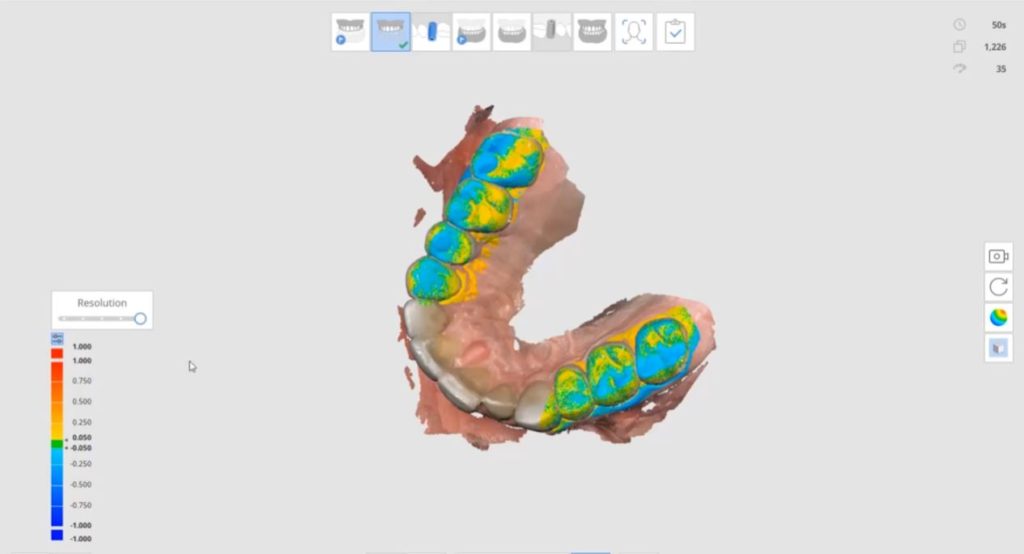
At CAD-Ray, we are big proponents of open architecture and the doctors control the flow of their patients’ digital data, whether it is a CT scan or an digital impression system. We have put the Aoralscan through a battery of tests. For single unit, it delivers on quality that equals any other scanner on the market. We were particularly impressed with this deep margin and how well the graphics could differentiate tissue from tooth structure on the distal of the prep
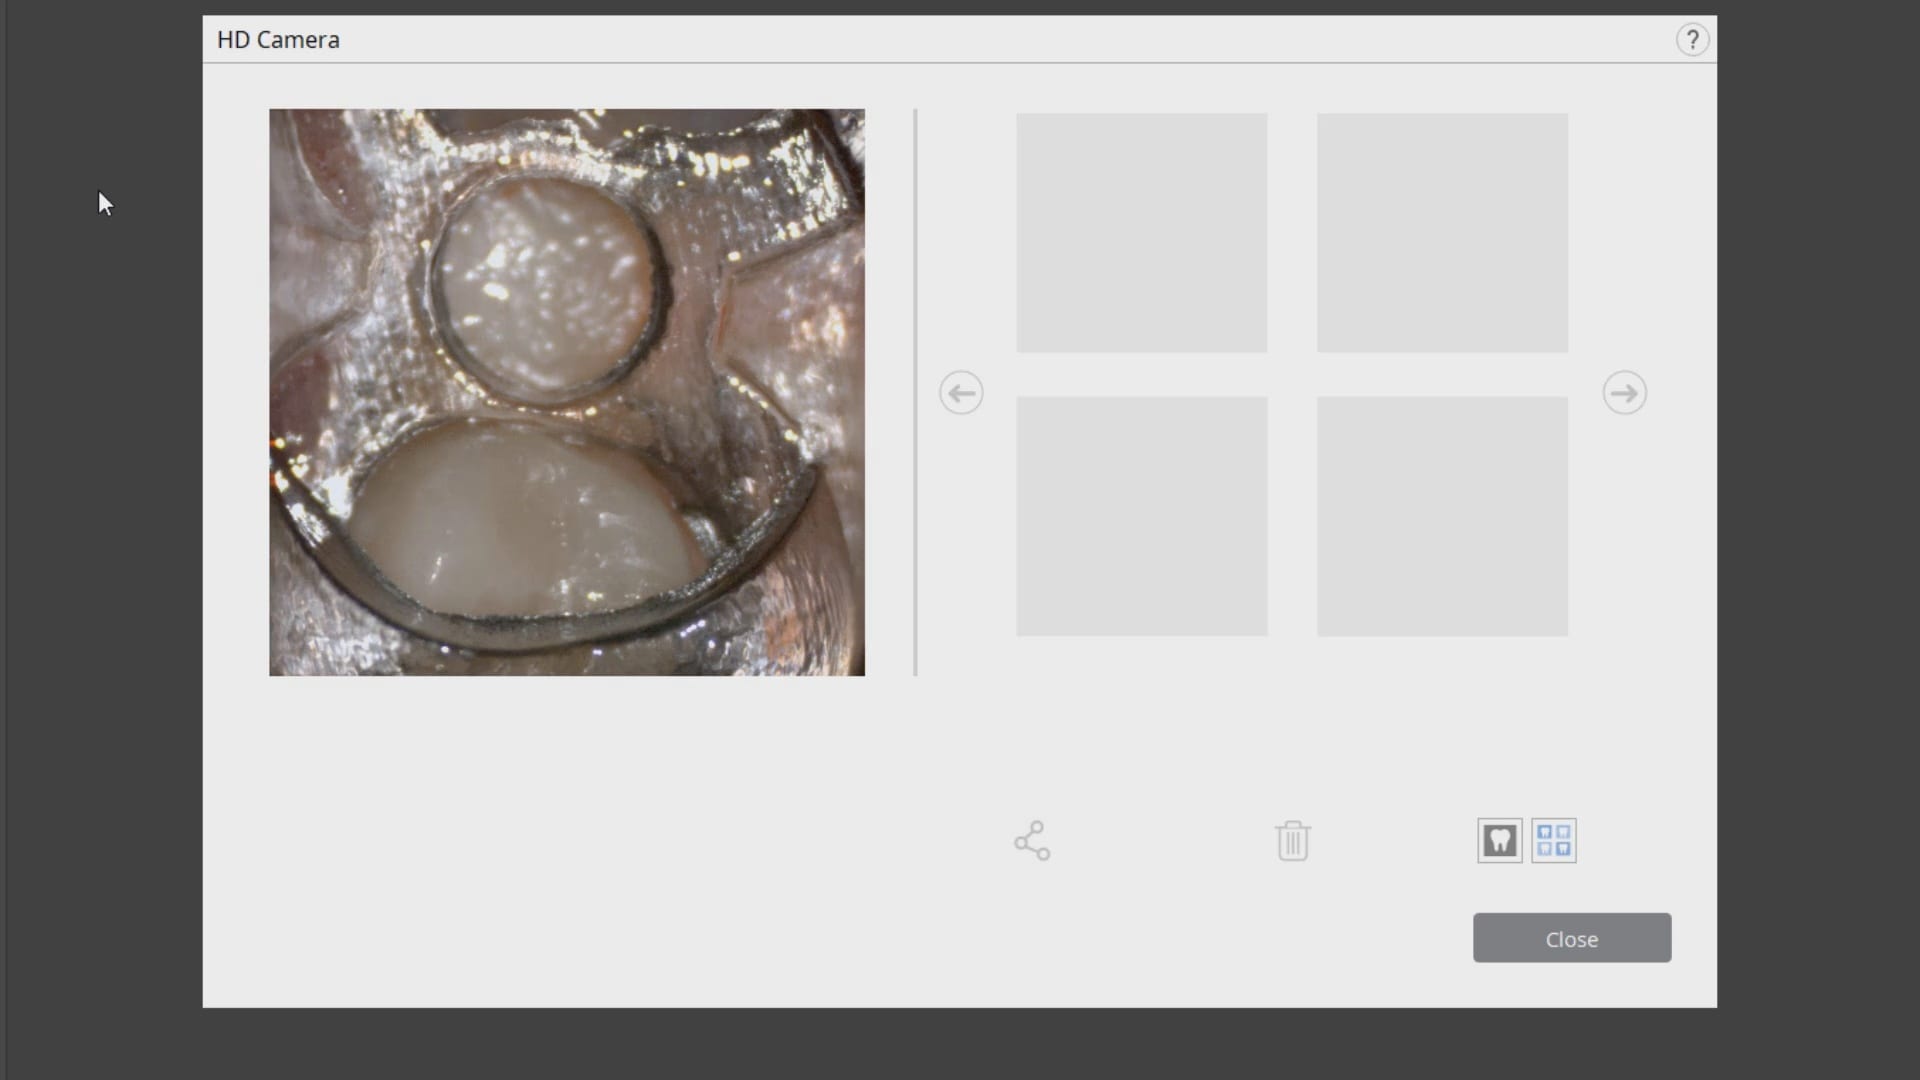
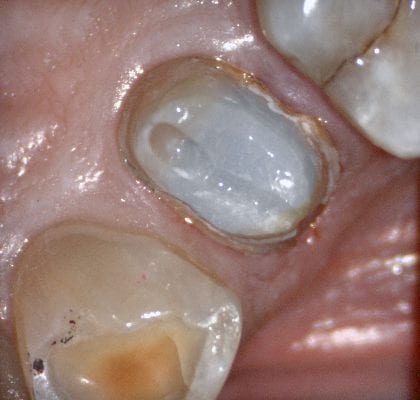
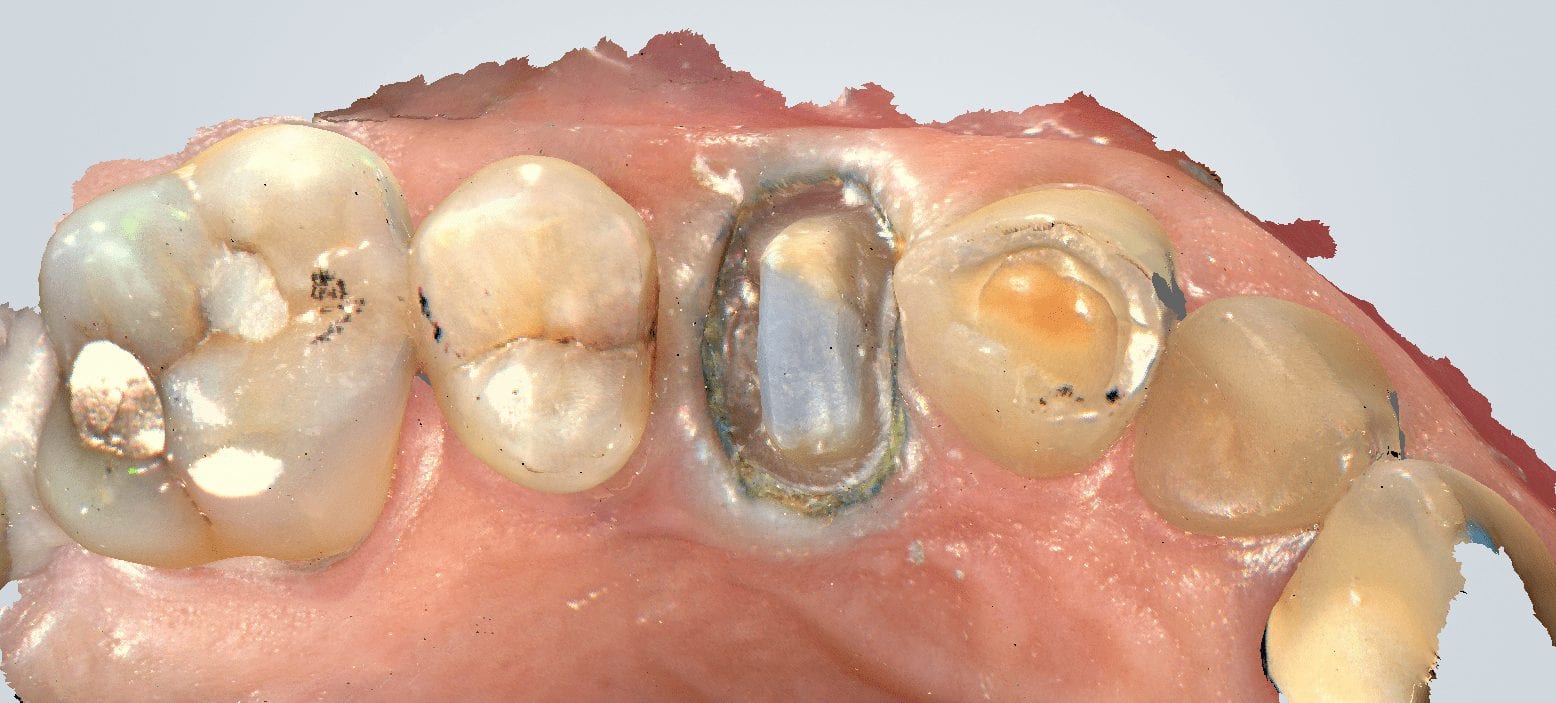
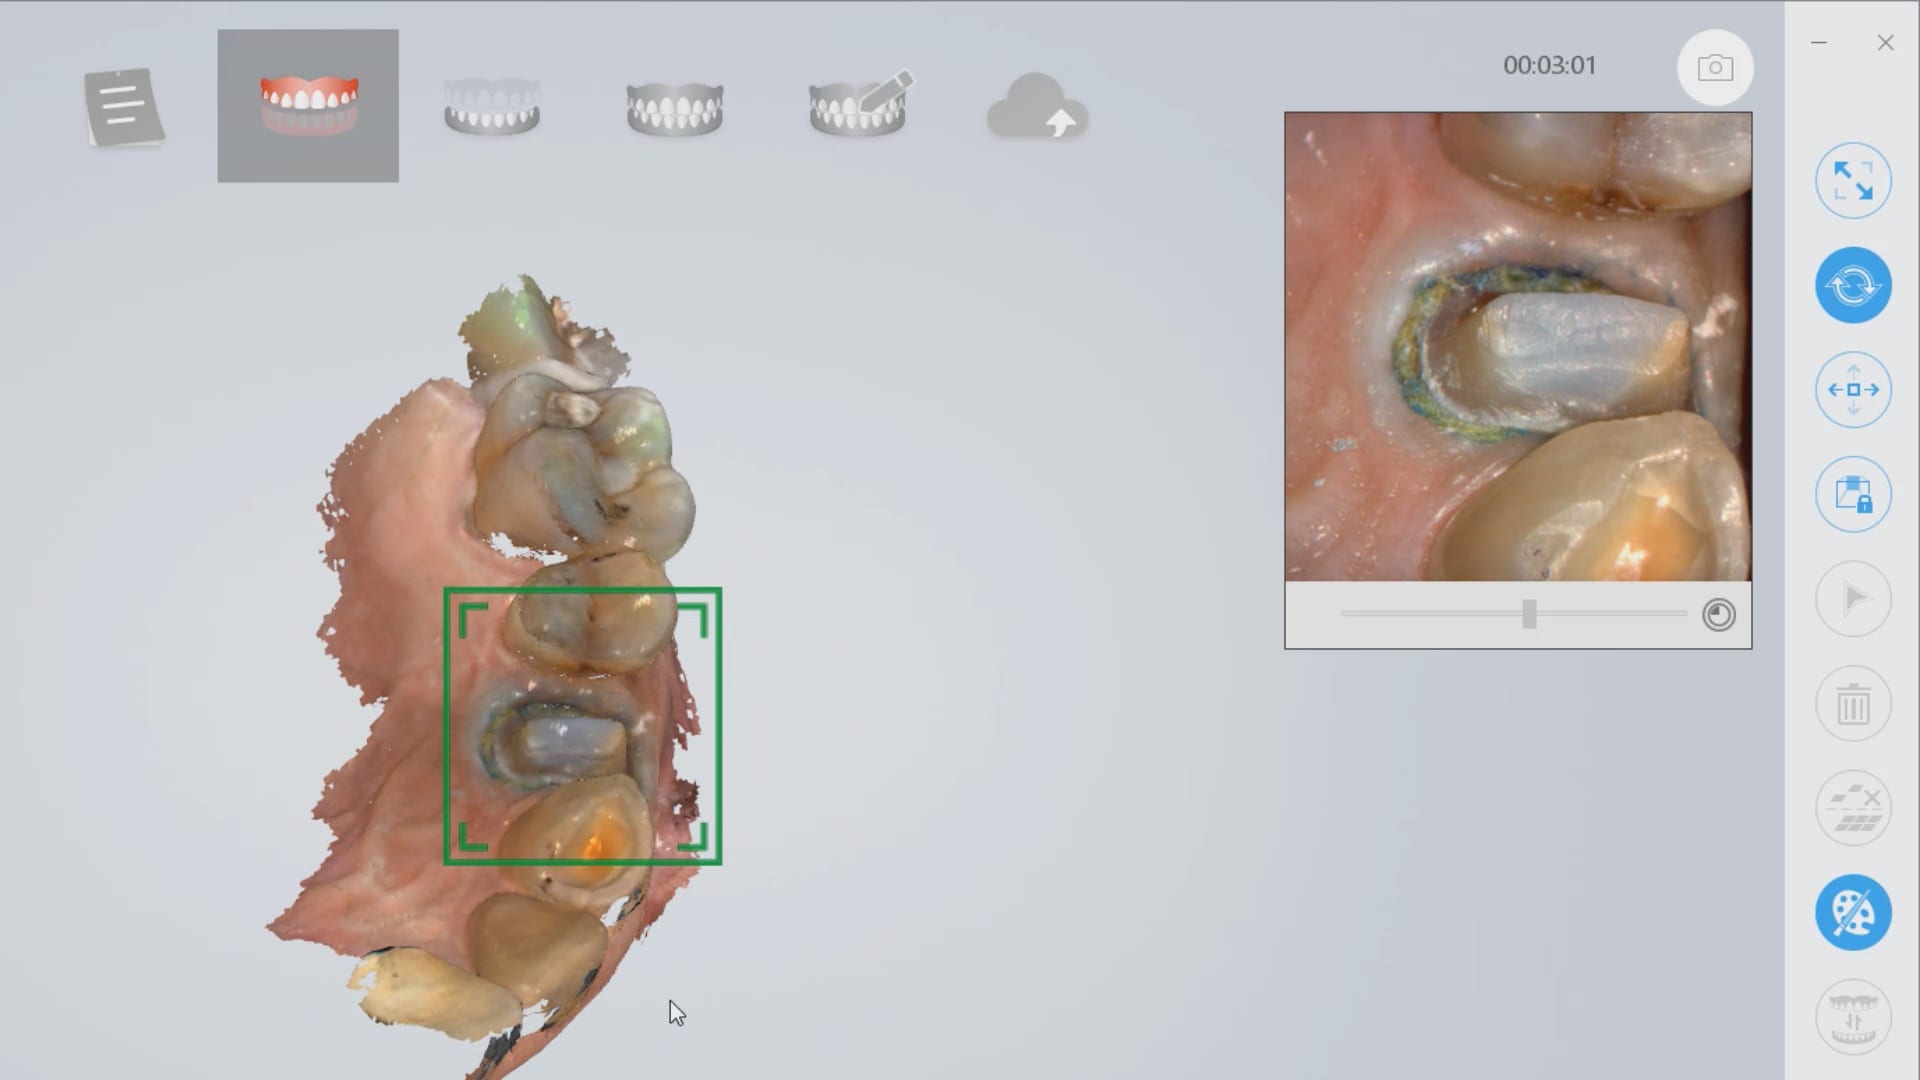
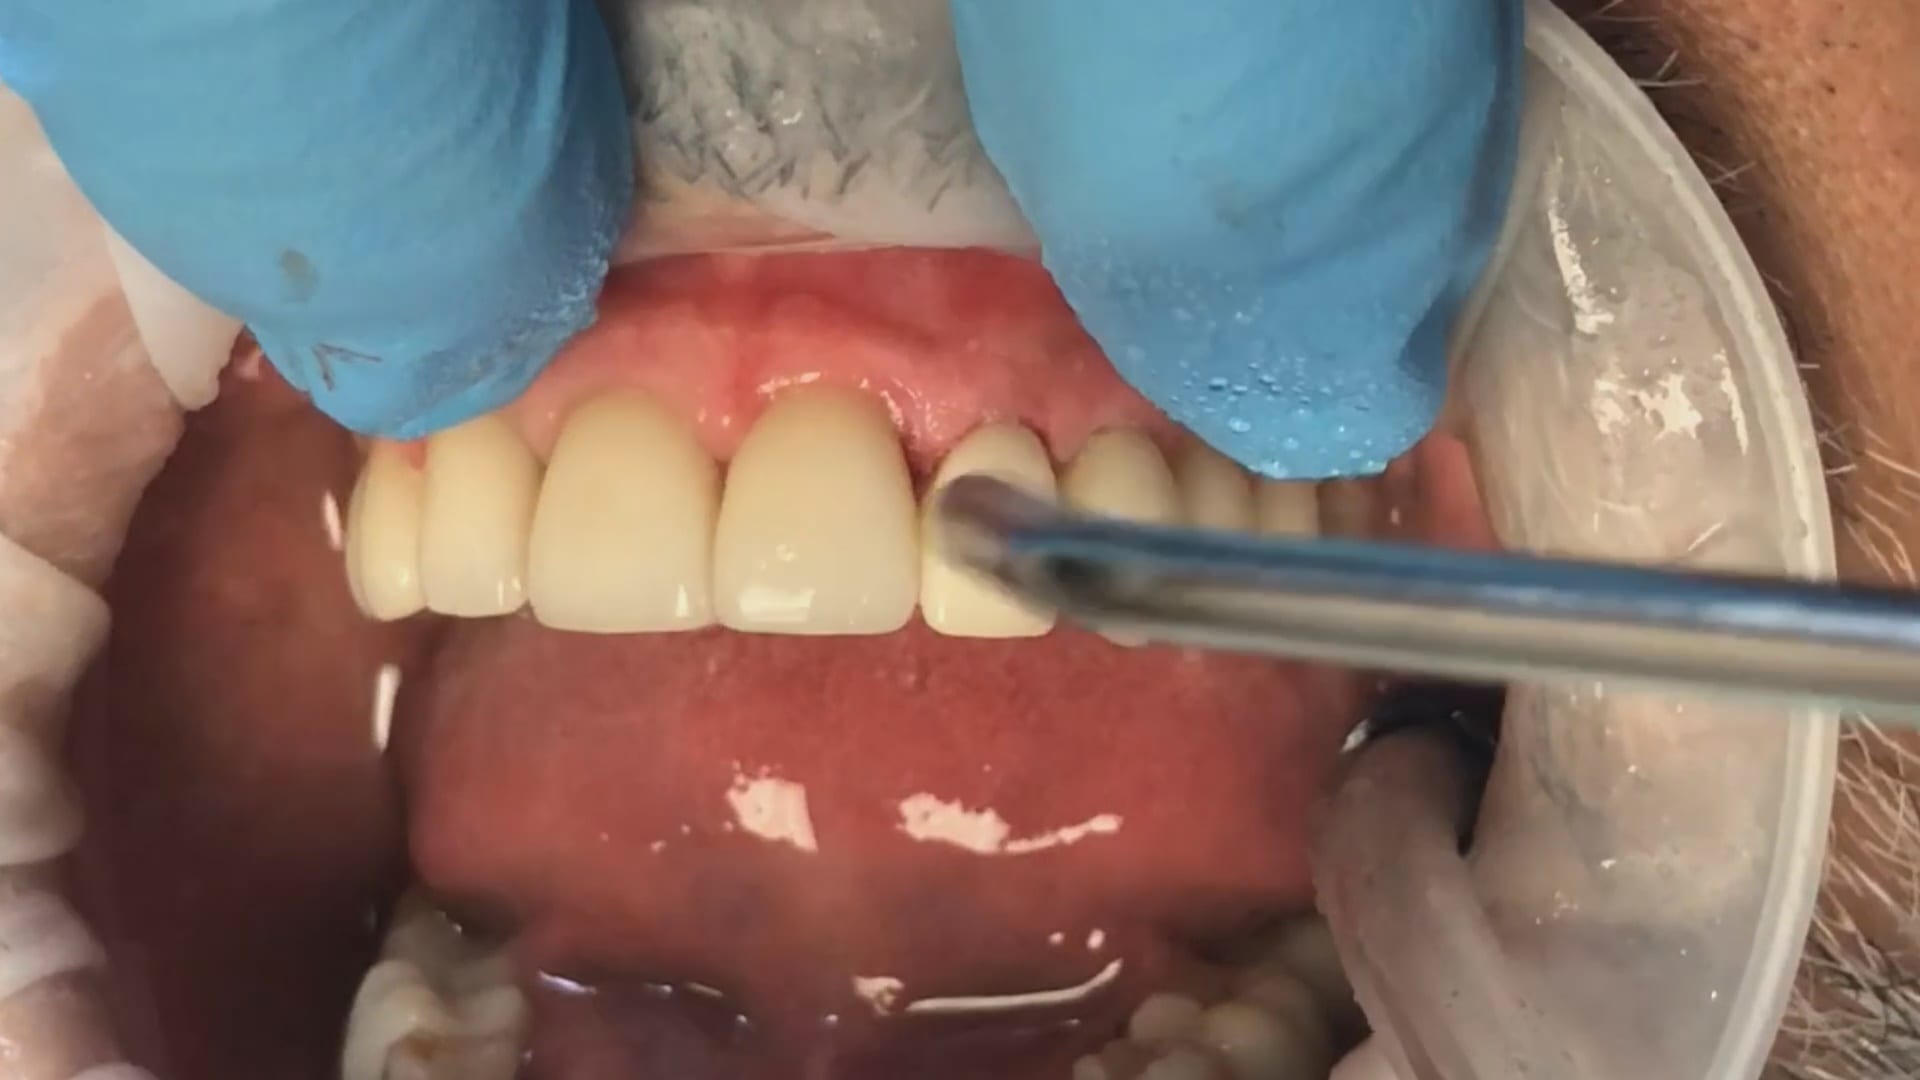
In this case presentation, we feature a crown that needs to be replaced due to open margins and recurrent decay.
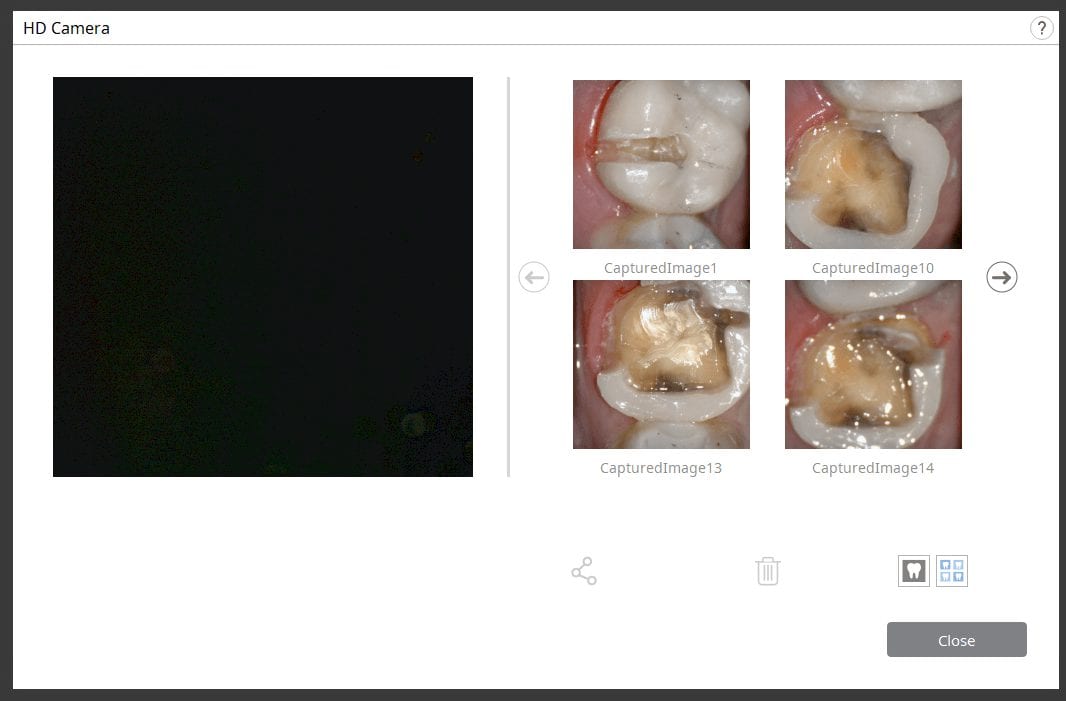
With the Medit i500, after the patient is anesthetized and the area is isolated, the pre-existing crown is imaged in the pre-op catalog box. The area to be prepared is cropped out in anticipation of the imaging the modified preparation.
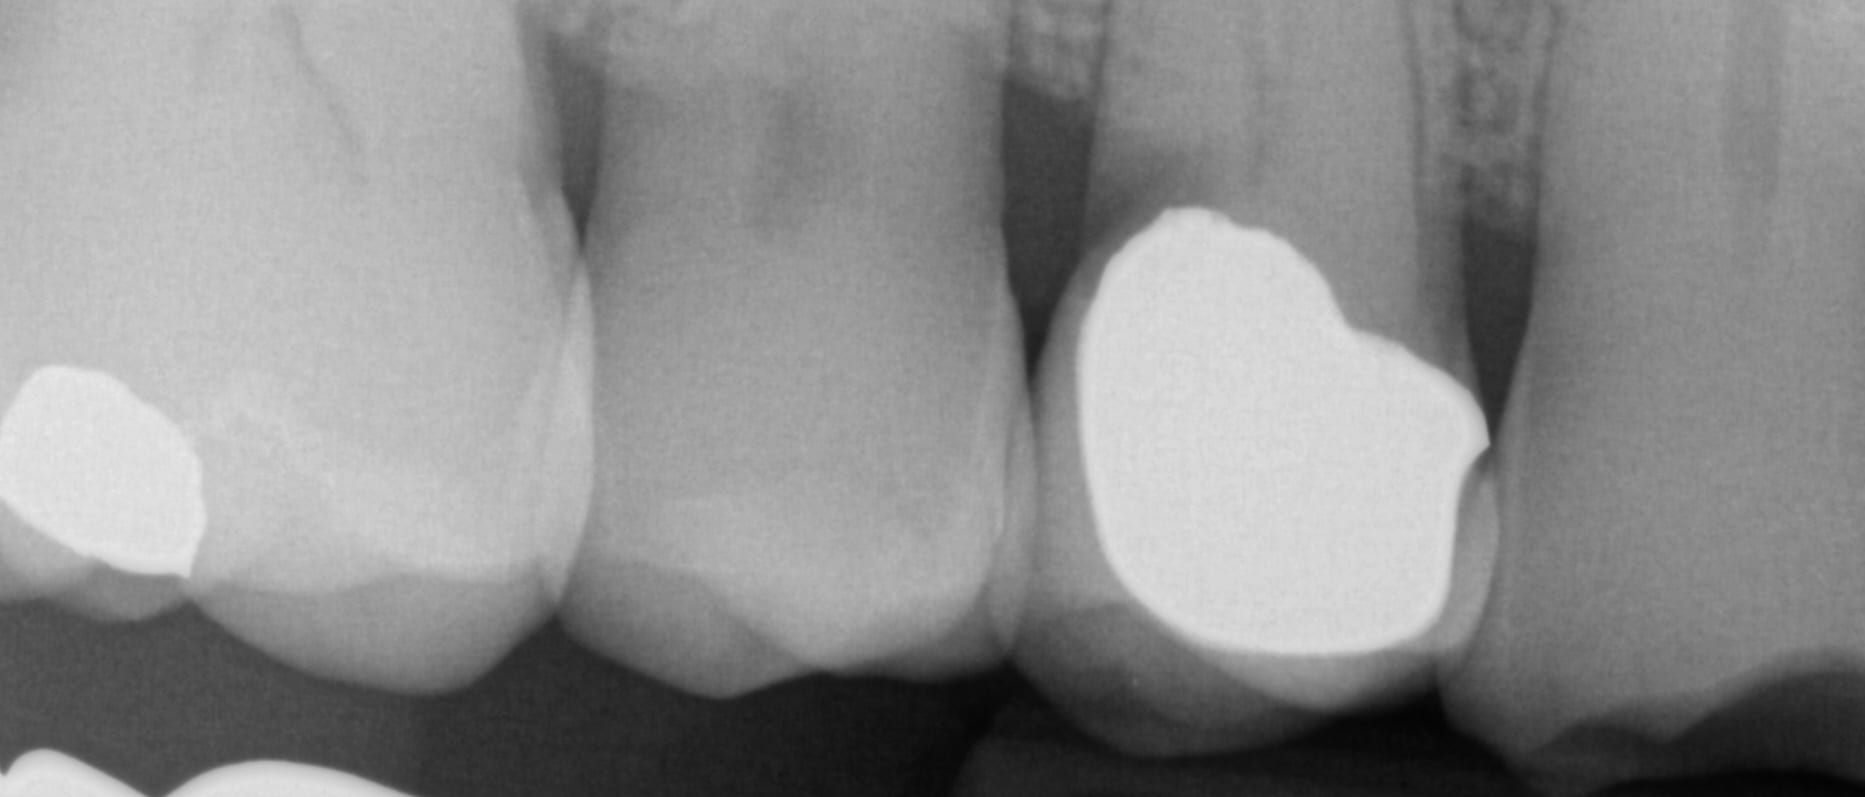
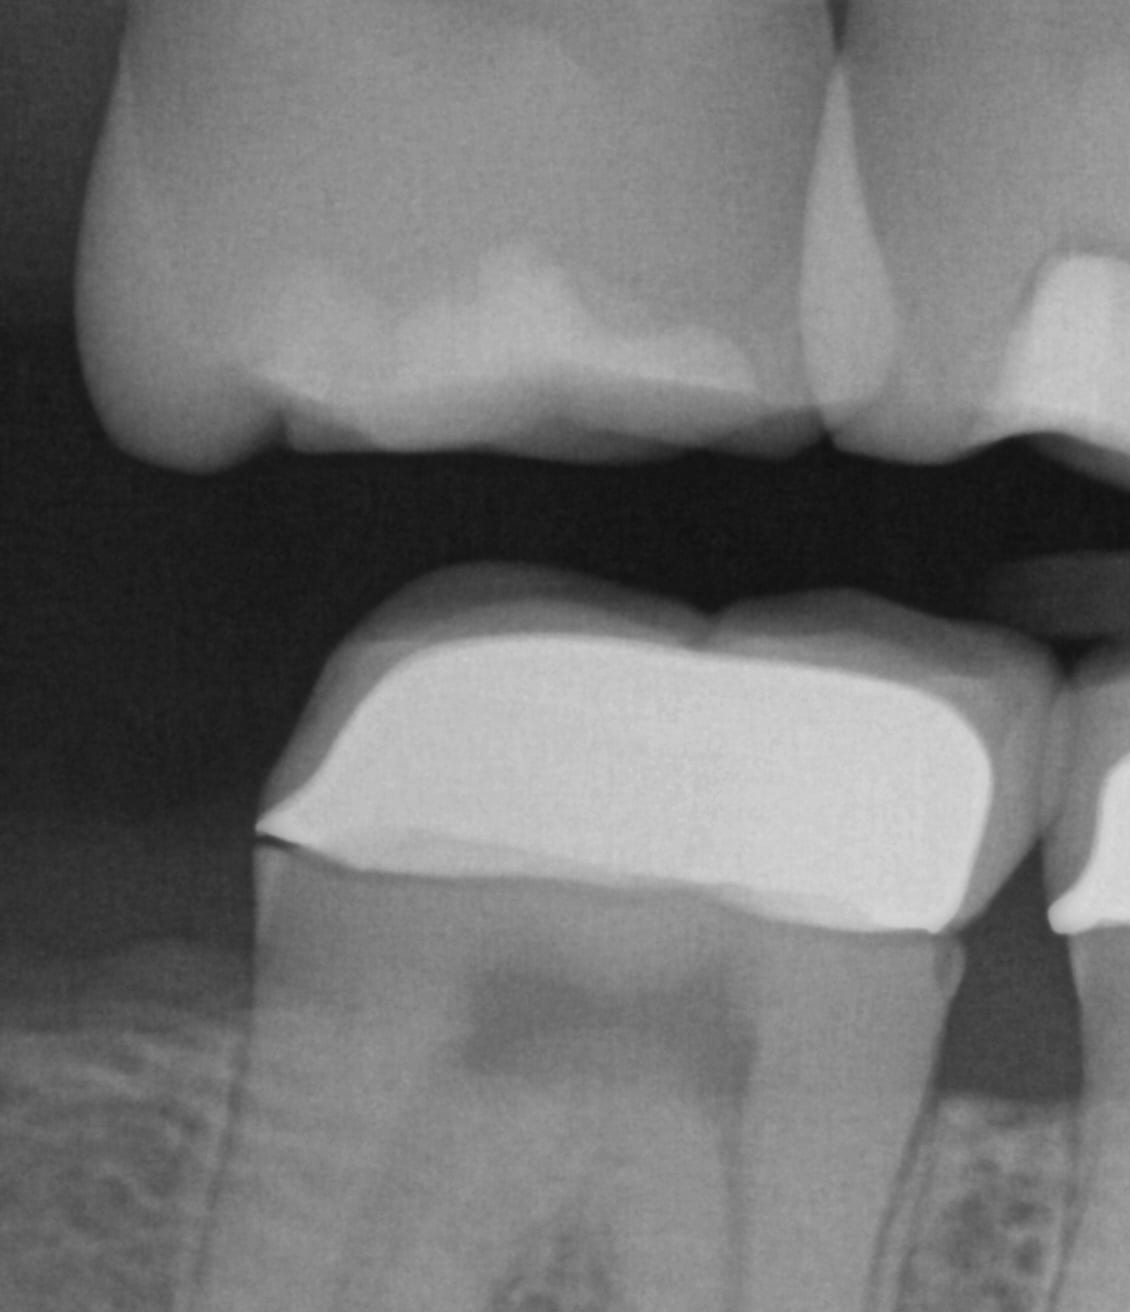
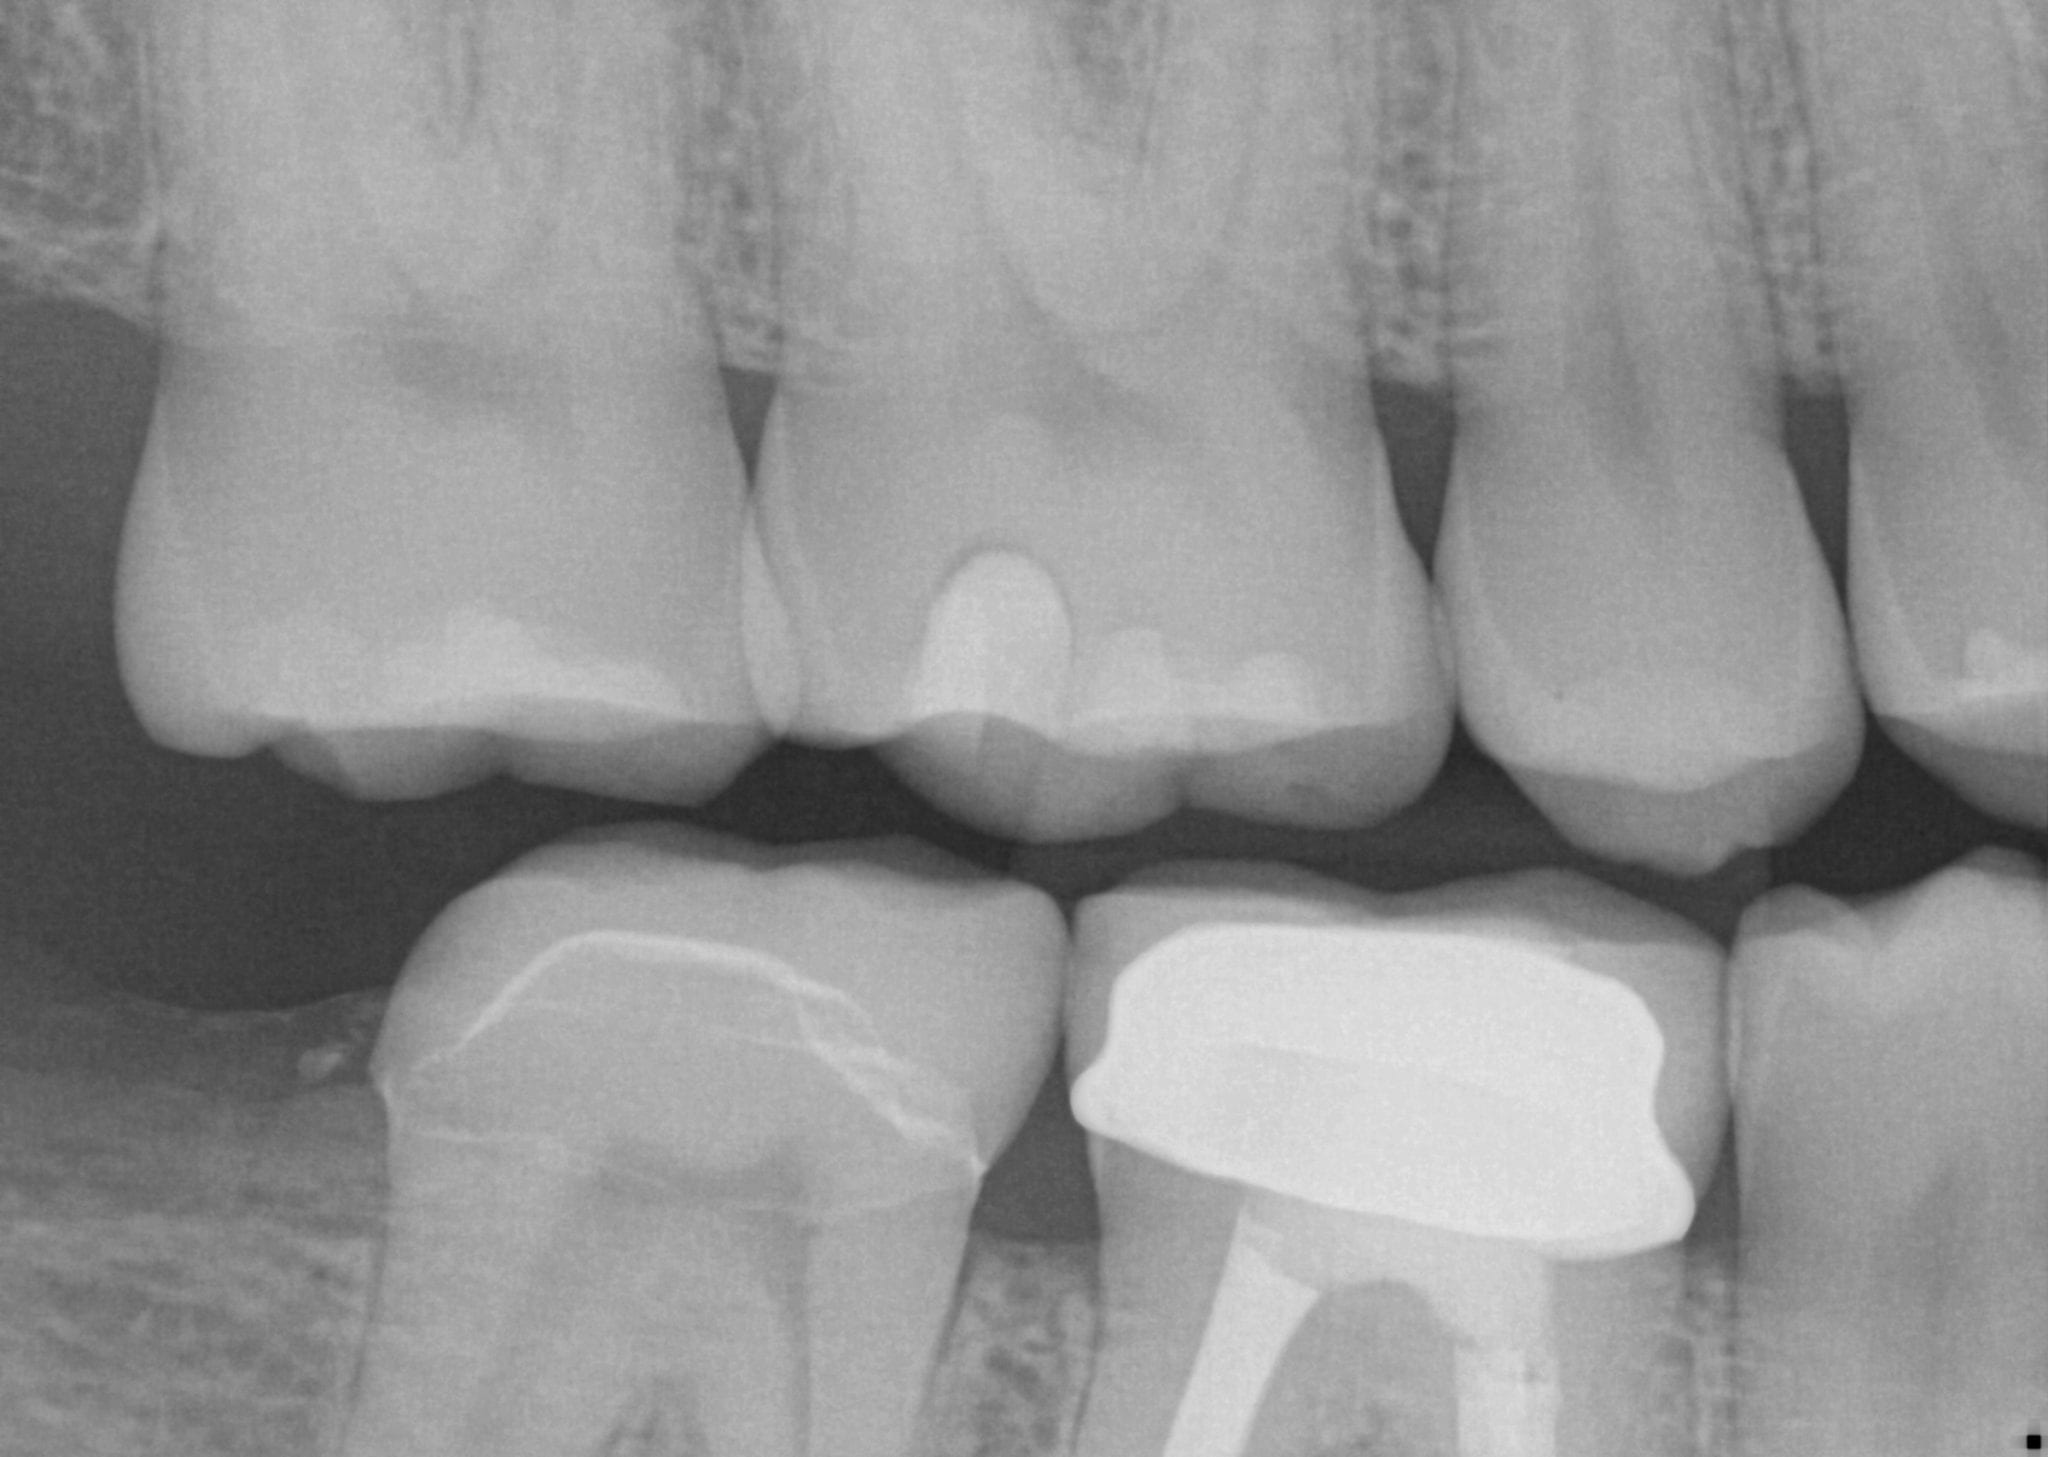
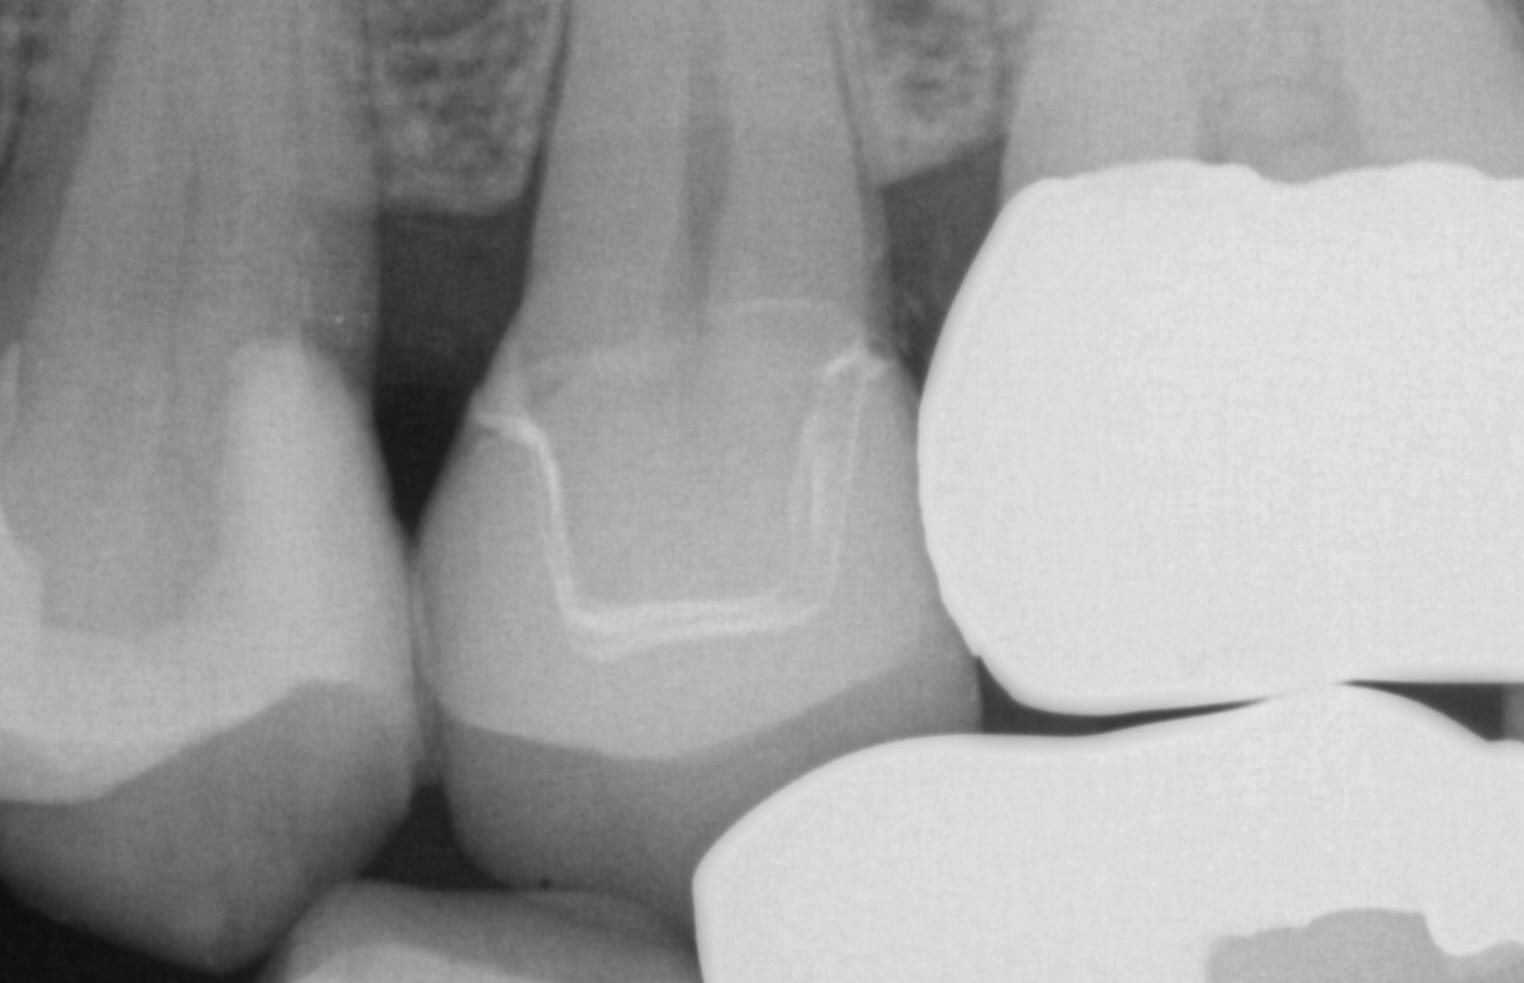
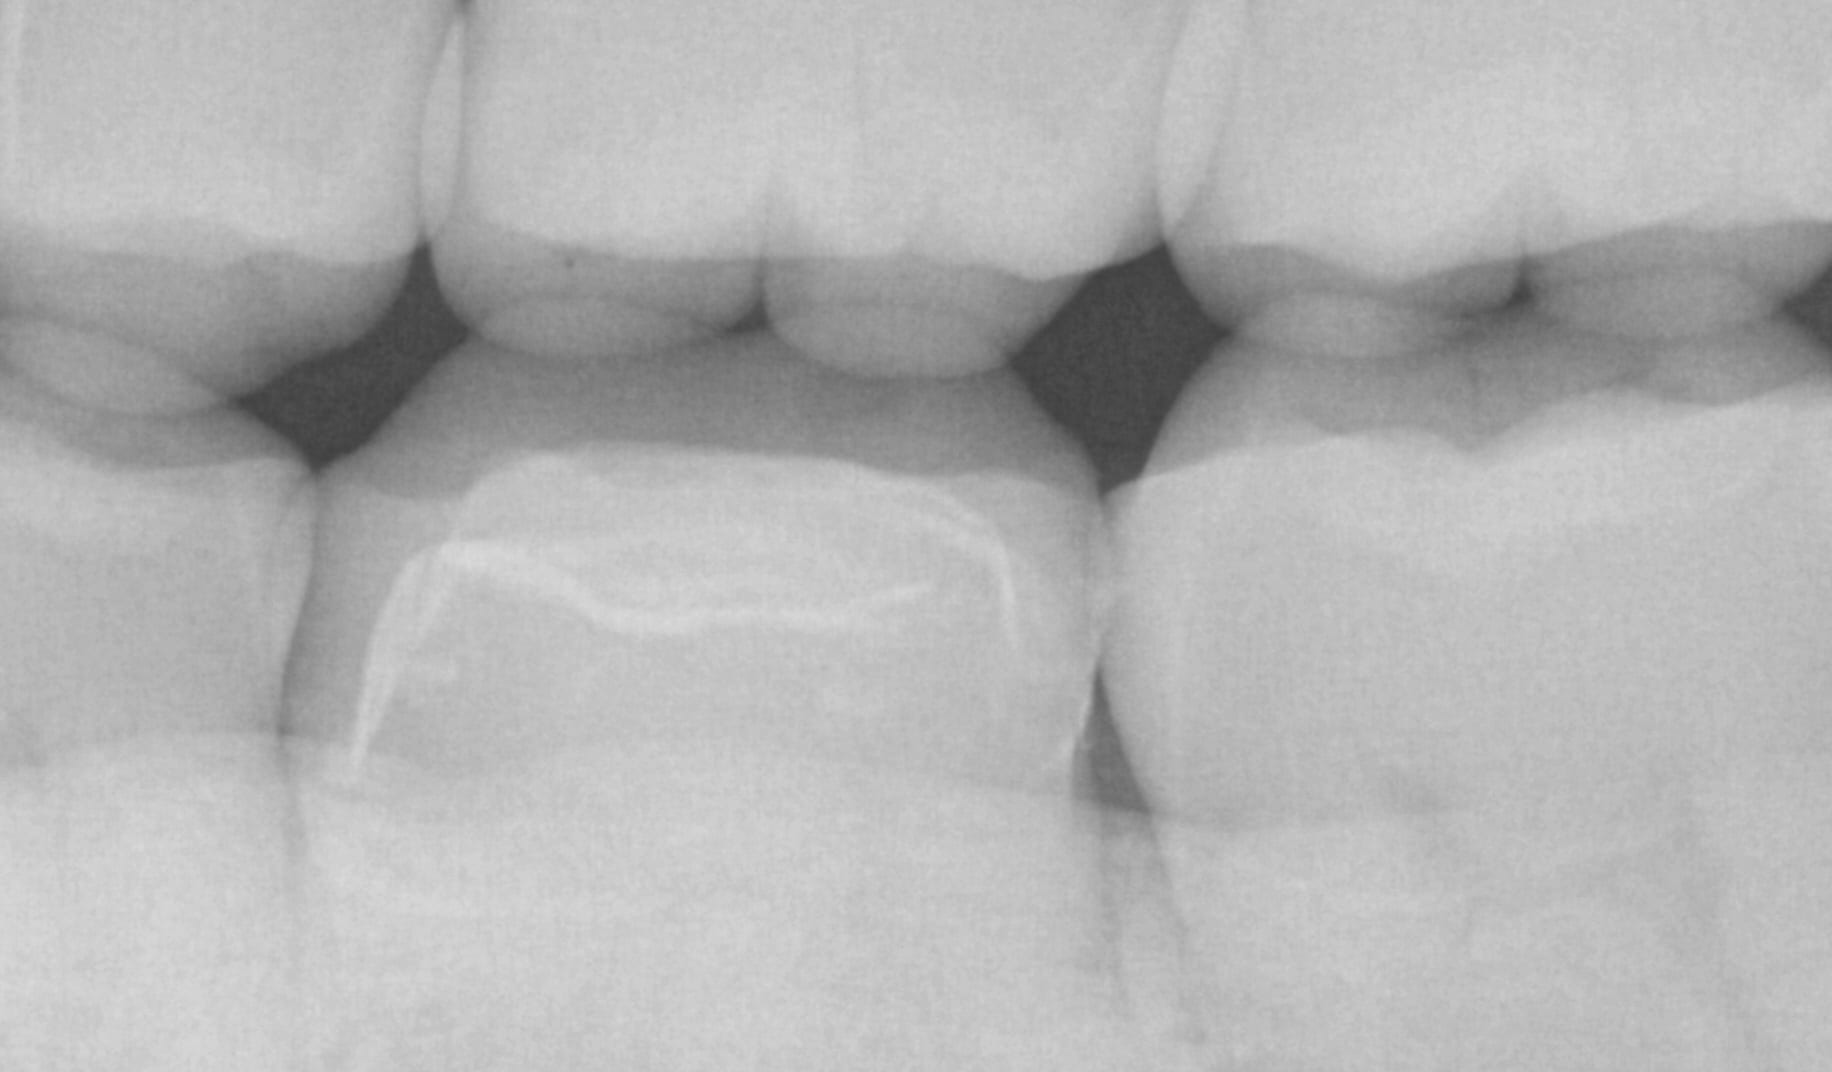
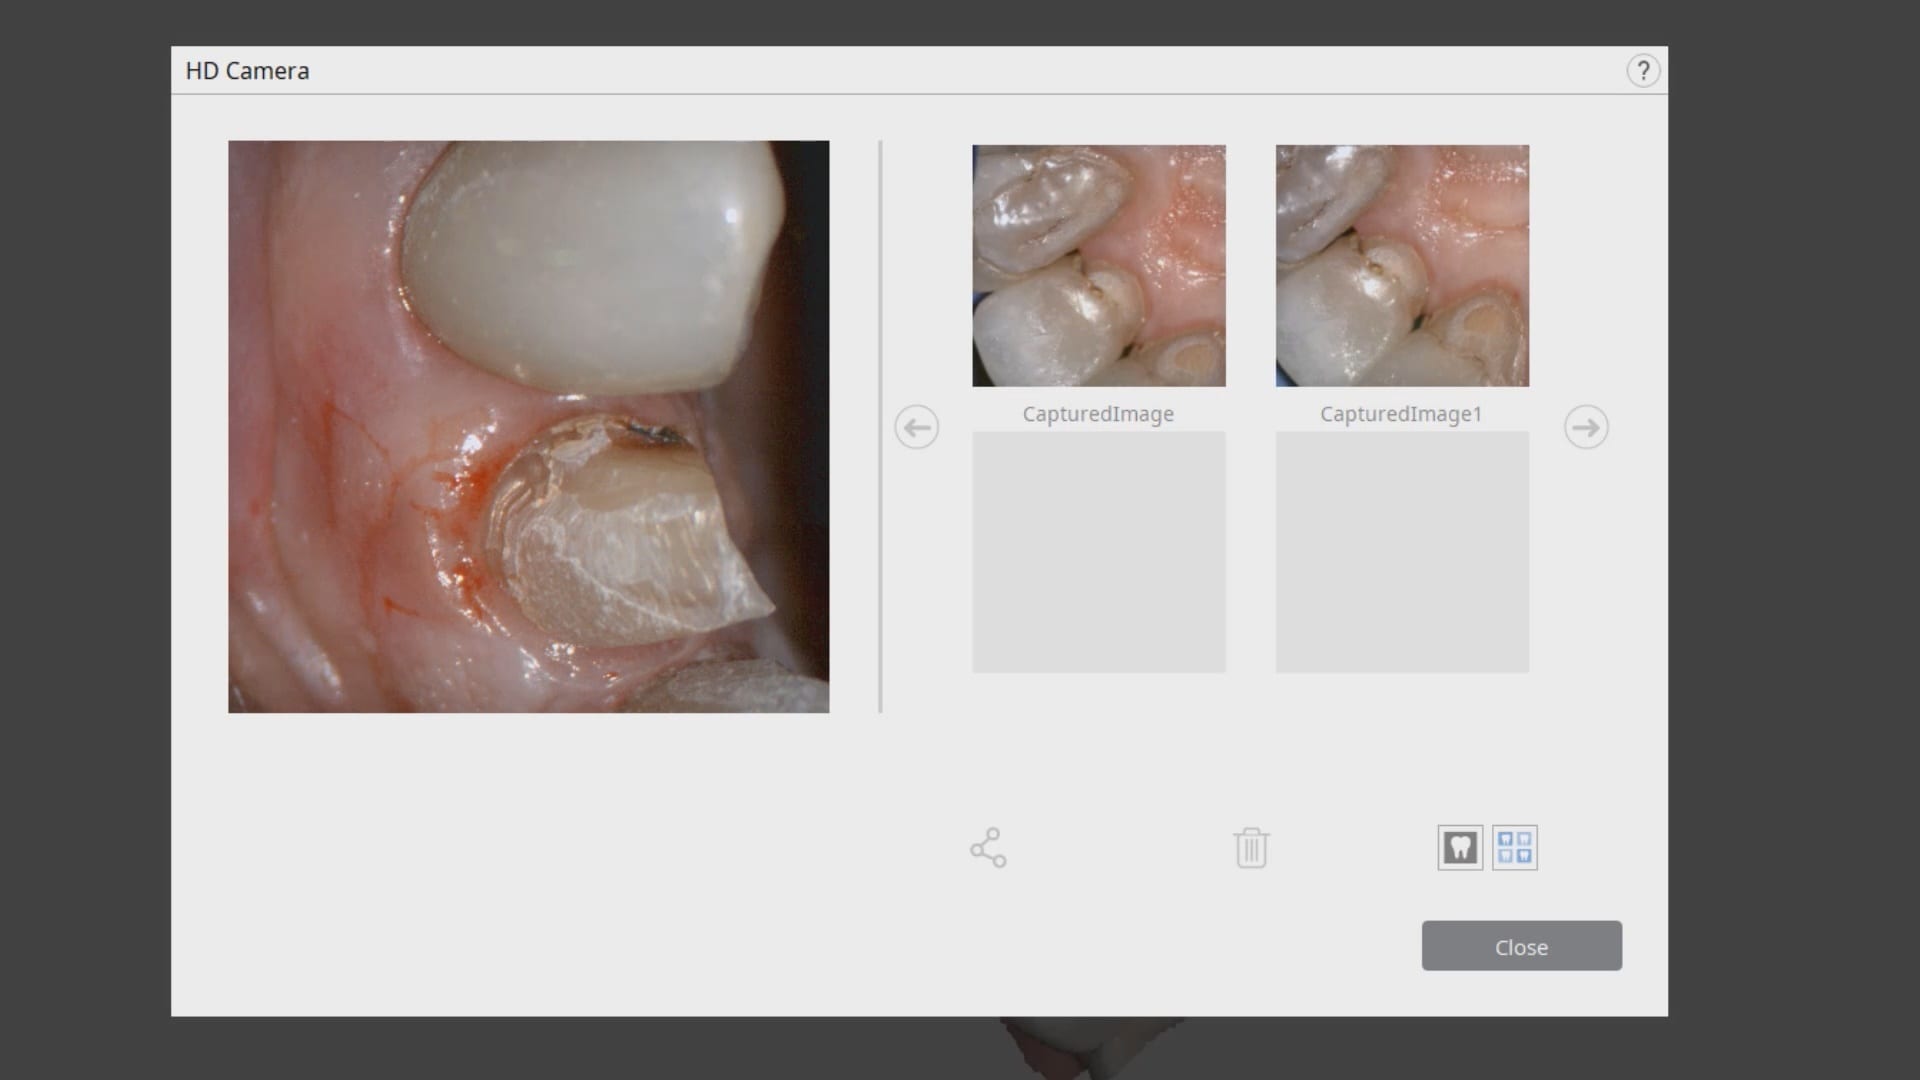
Once the crown is removed, expasyl is packed into the sulcus with a Number 2 cord. With the pre-op bitewings X-ray it was readily apparent that the tissue should be positively displaced in order to capture the margins. It took two layers of cord to achieve hemostasis for imaging with the Medit i500.
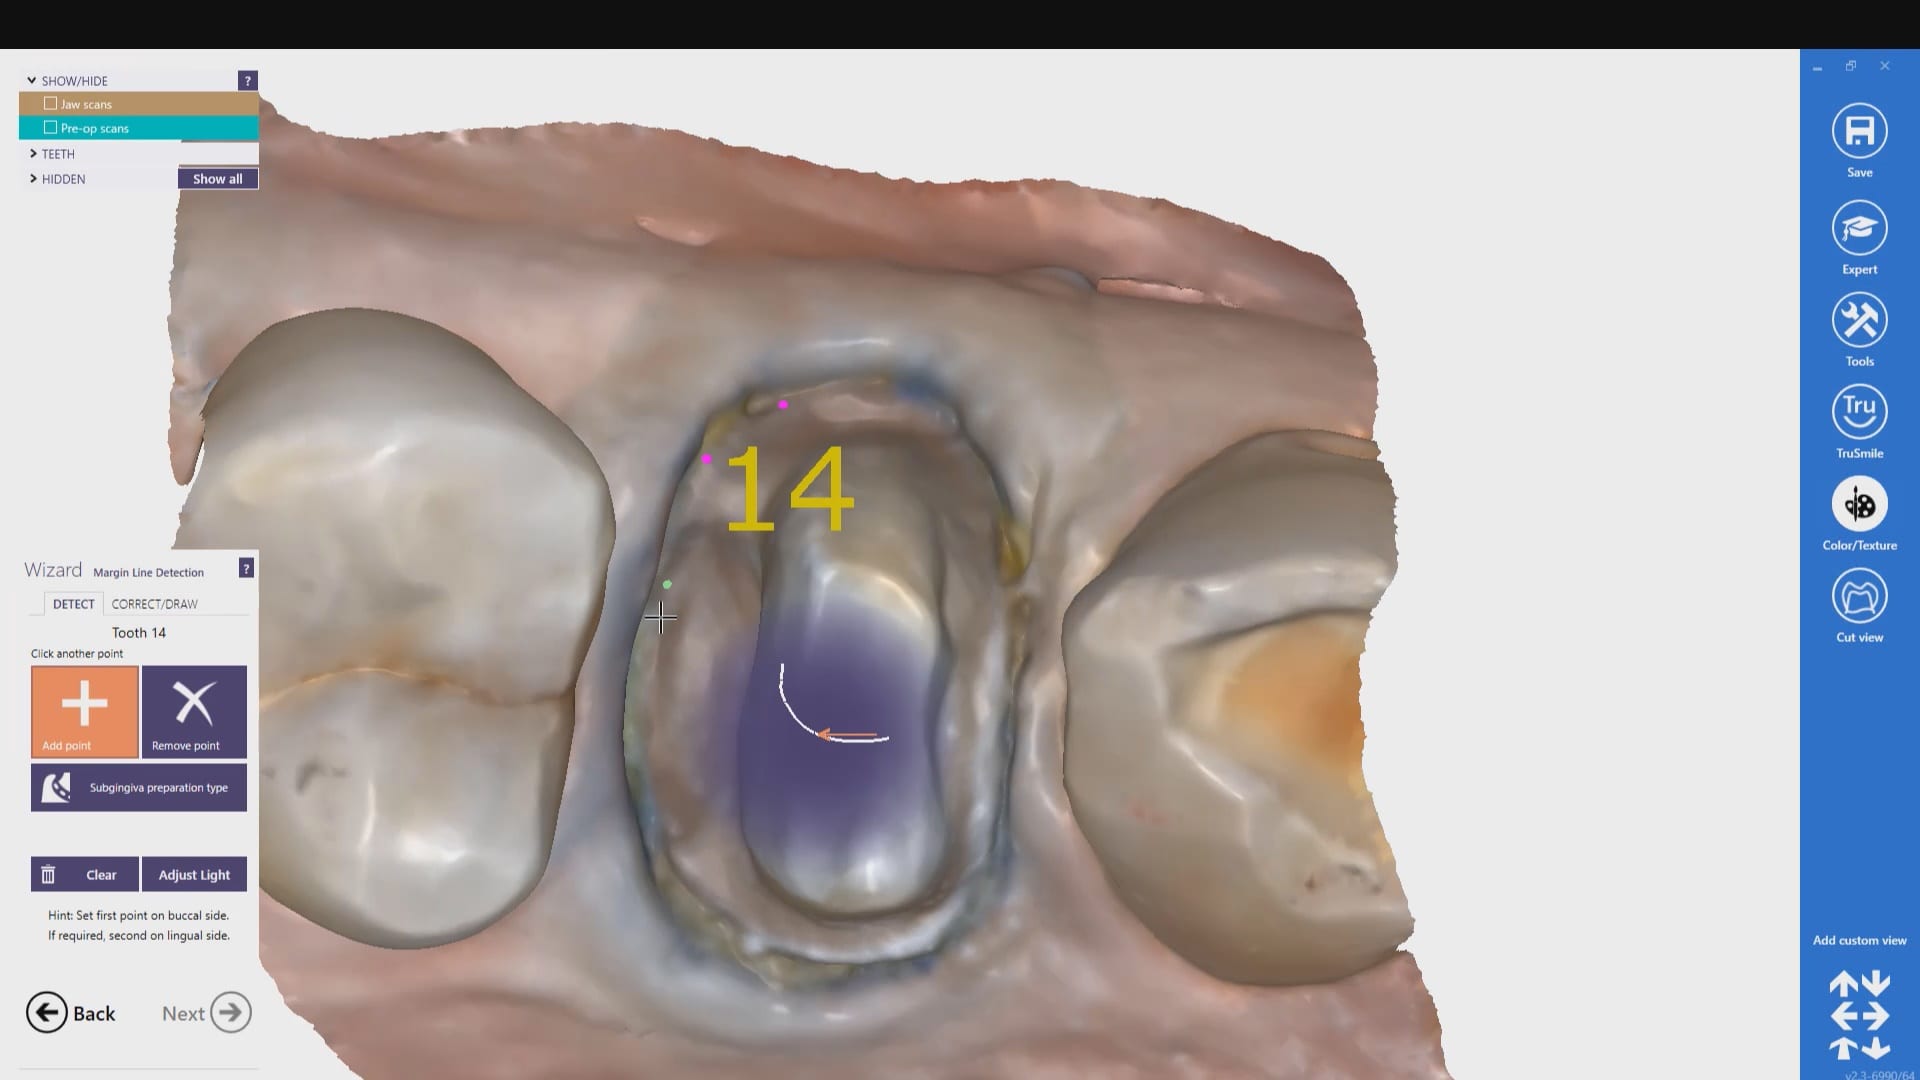
While placing the margin in the native imaging software, it was noted that some tissue was obscuring the margin on the lingual side. The area was isolated both clinically and in the software. It was cropped out and filled in with ‘good data’ after proper protection of the adjacent teeth and margins so that we did not obscure their geometry.
Once the margins are identified and the case is processed it is automatically imported into exocad for design and then sent to the Imes Icore CORiTEC Once for manufacturing. The emax restoration was tried in and then delivered after crystalization.
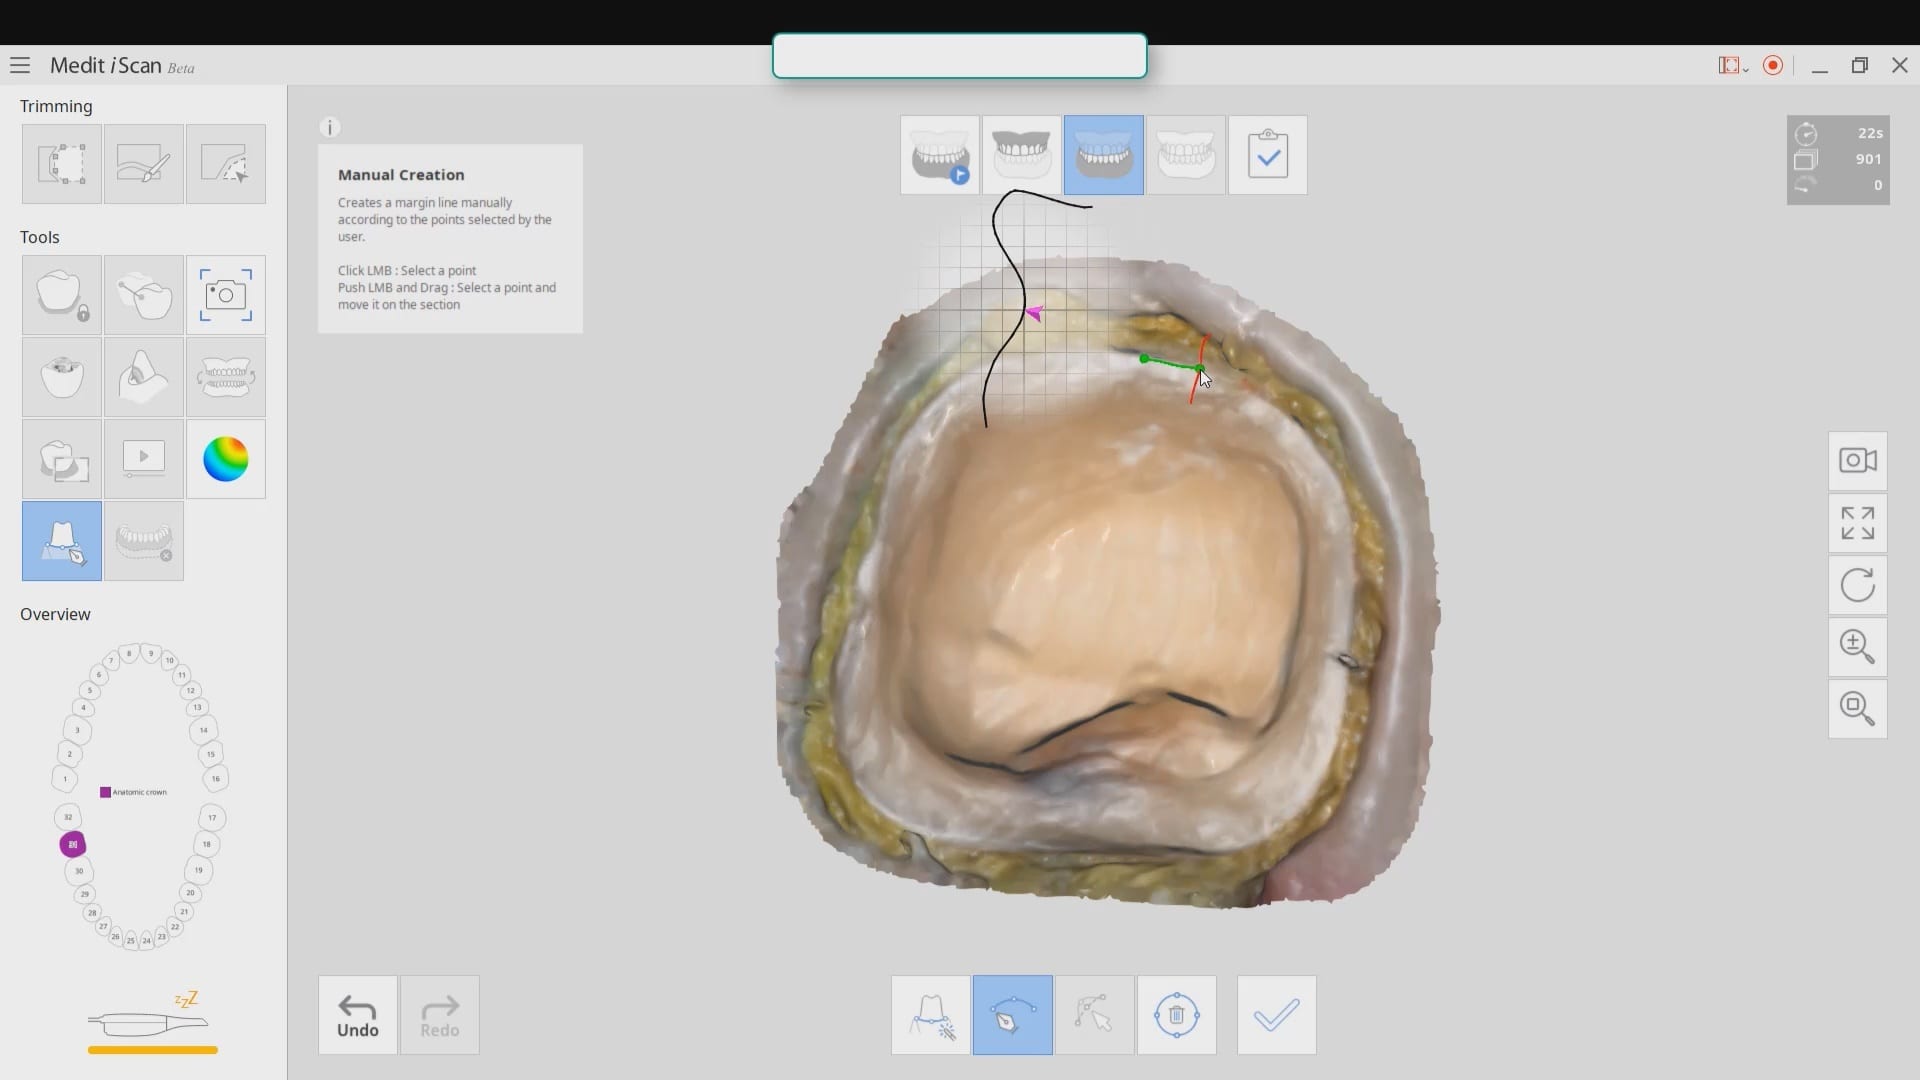
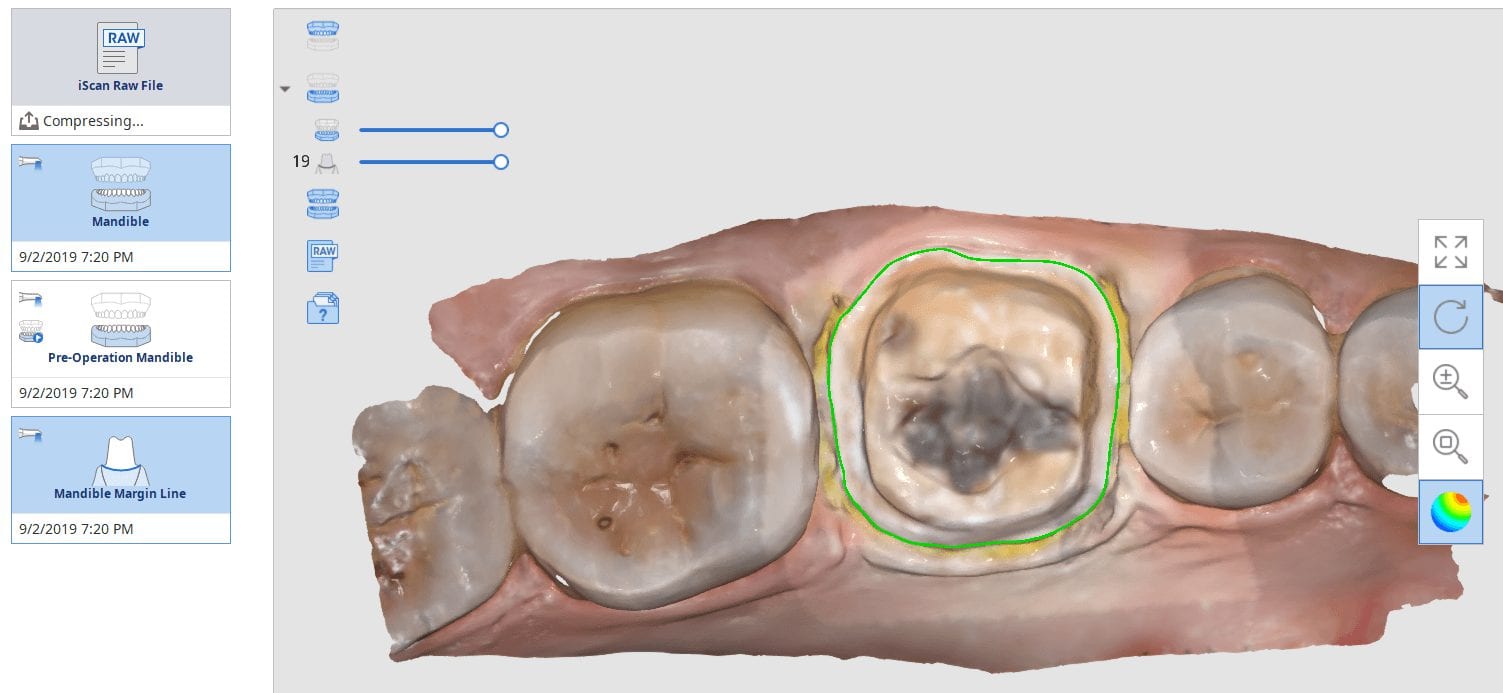
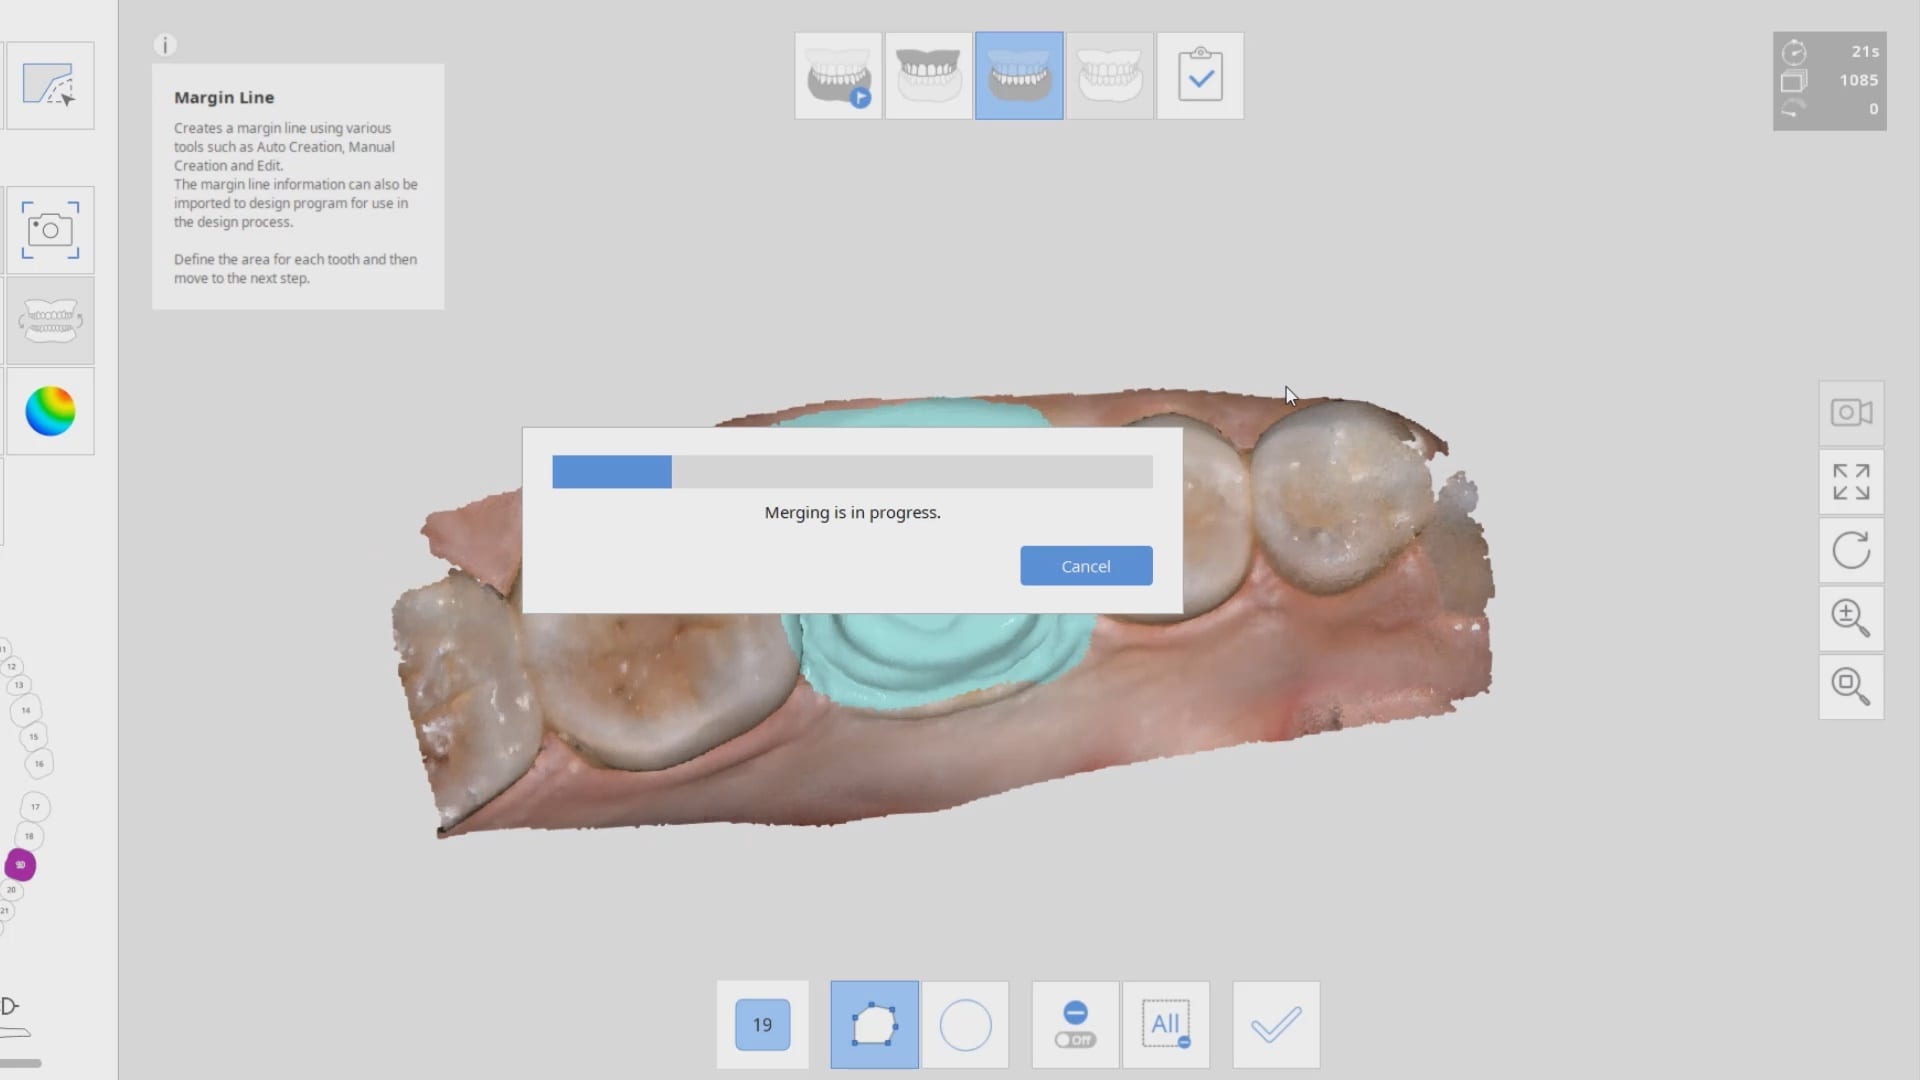
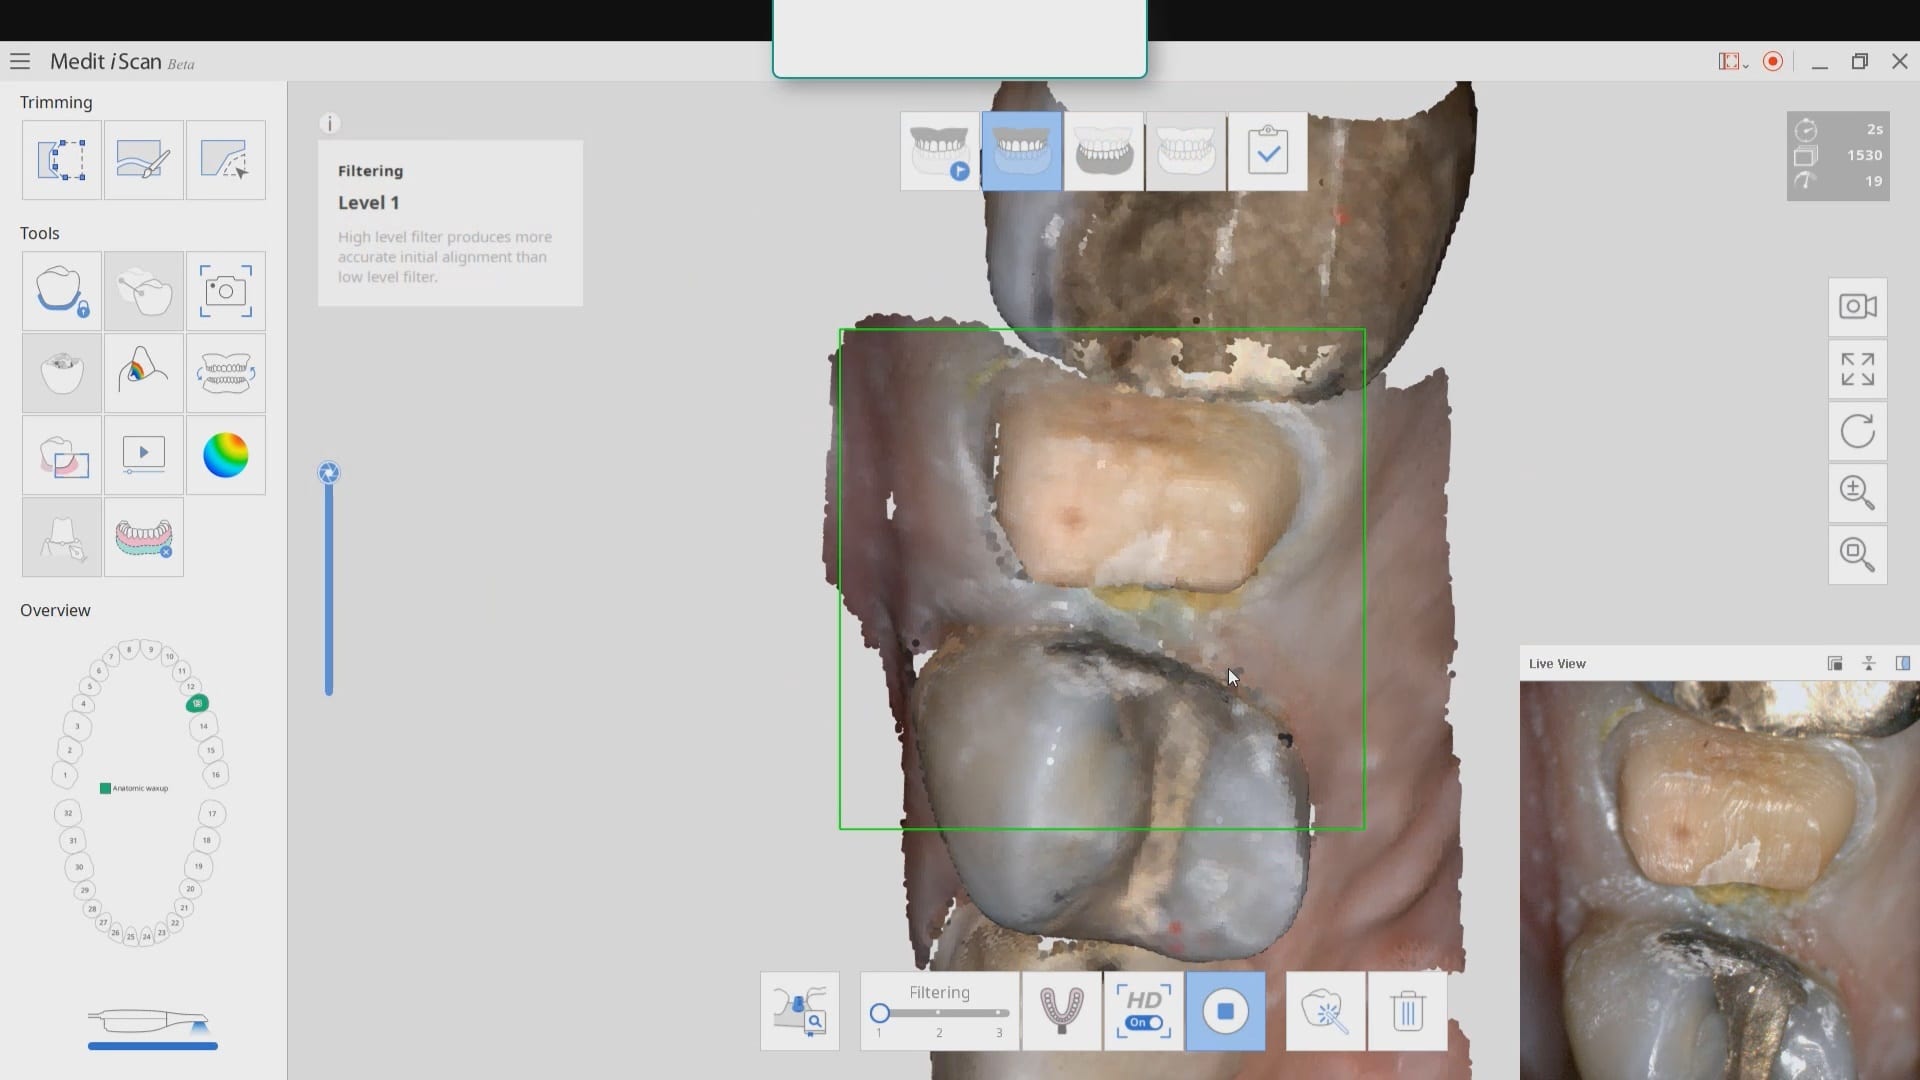
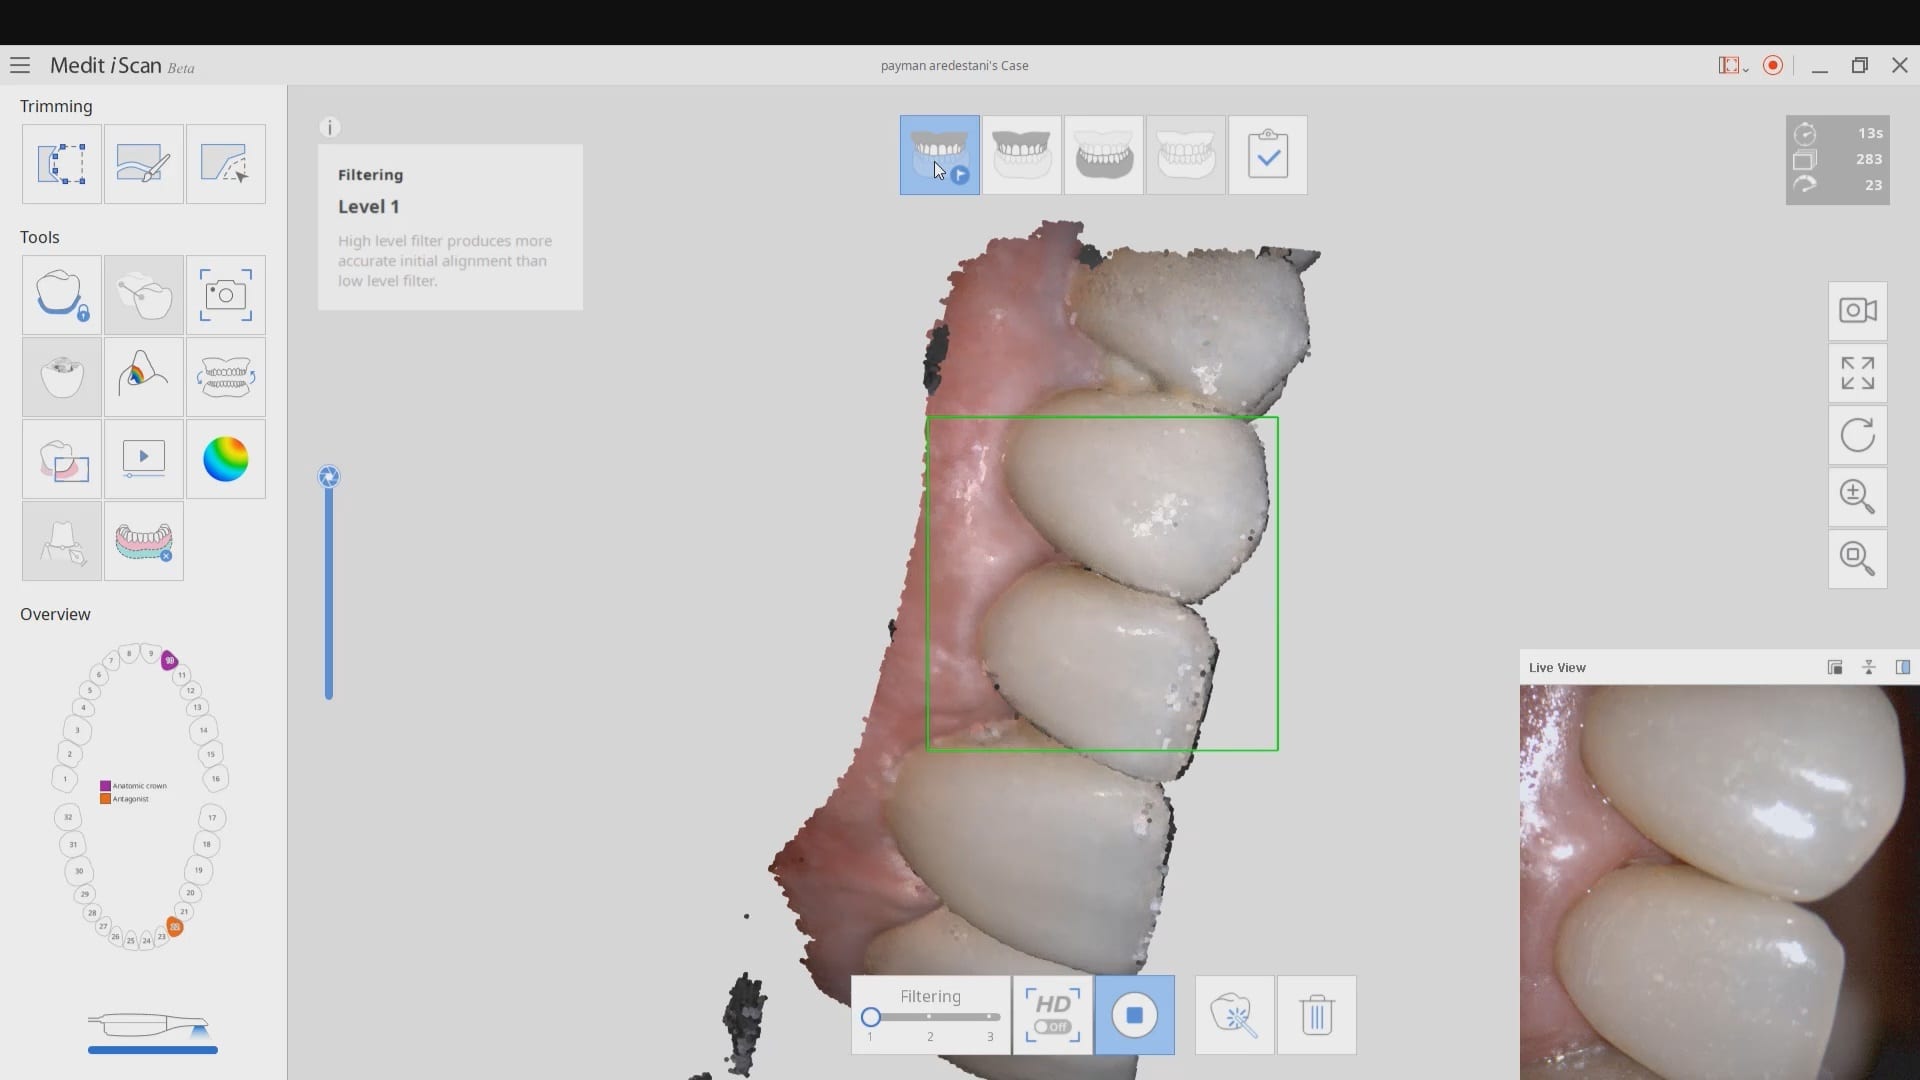
On September 5, 2019 Medit will officially launch the 2.1 software that will allow dentists to mark their own margins before sending to the lab. Since most images captured from models are inherently large in file size, you can selectively focus on the area where the raw images are taken. You highlight the area and you process the data sets as shown in the first video.
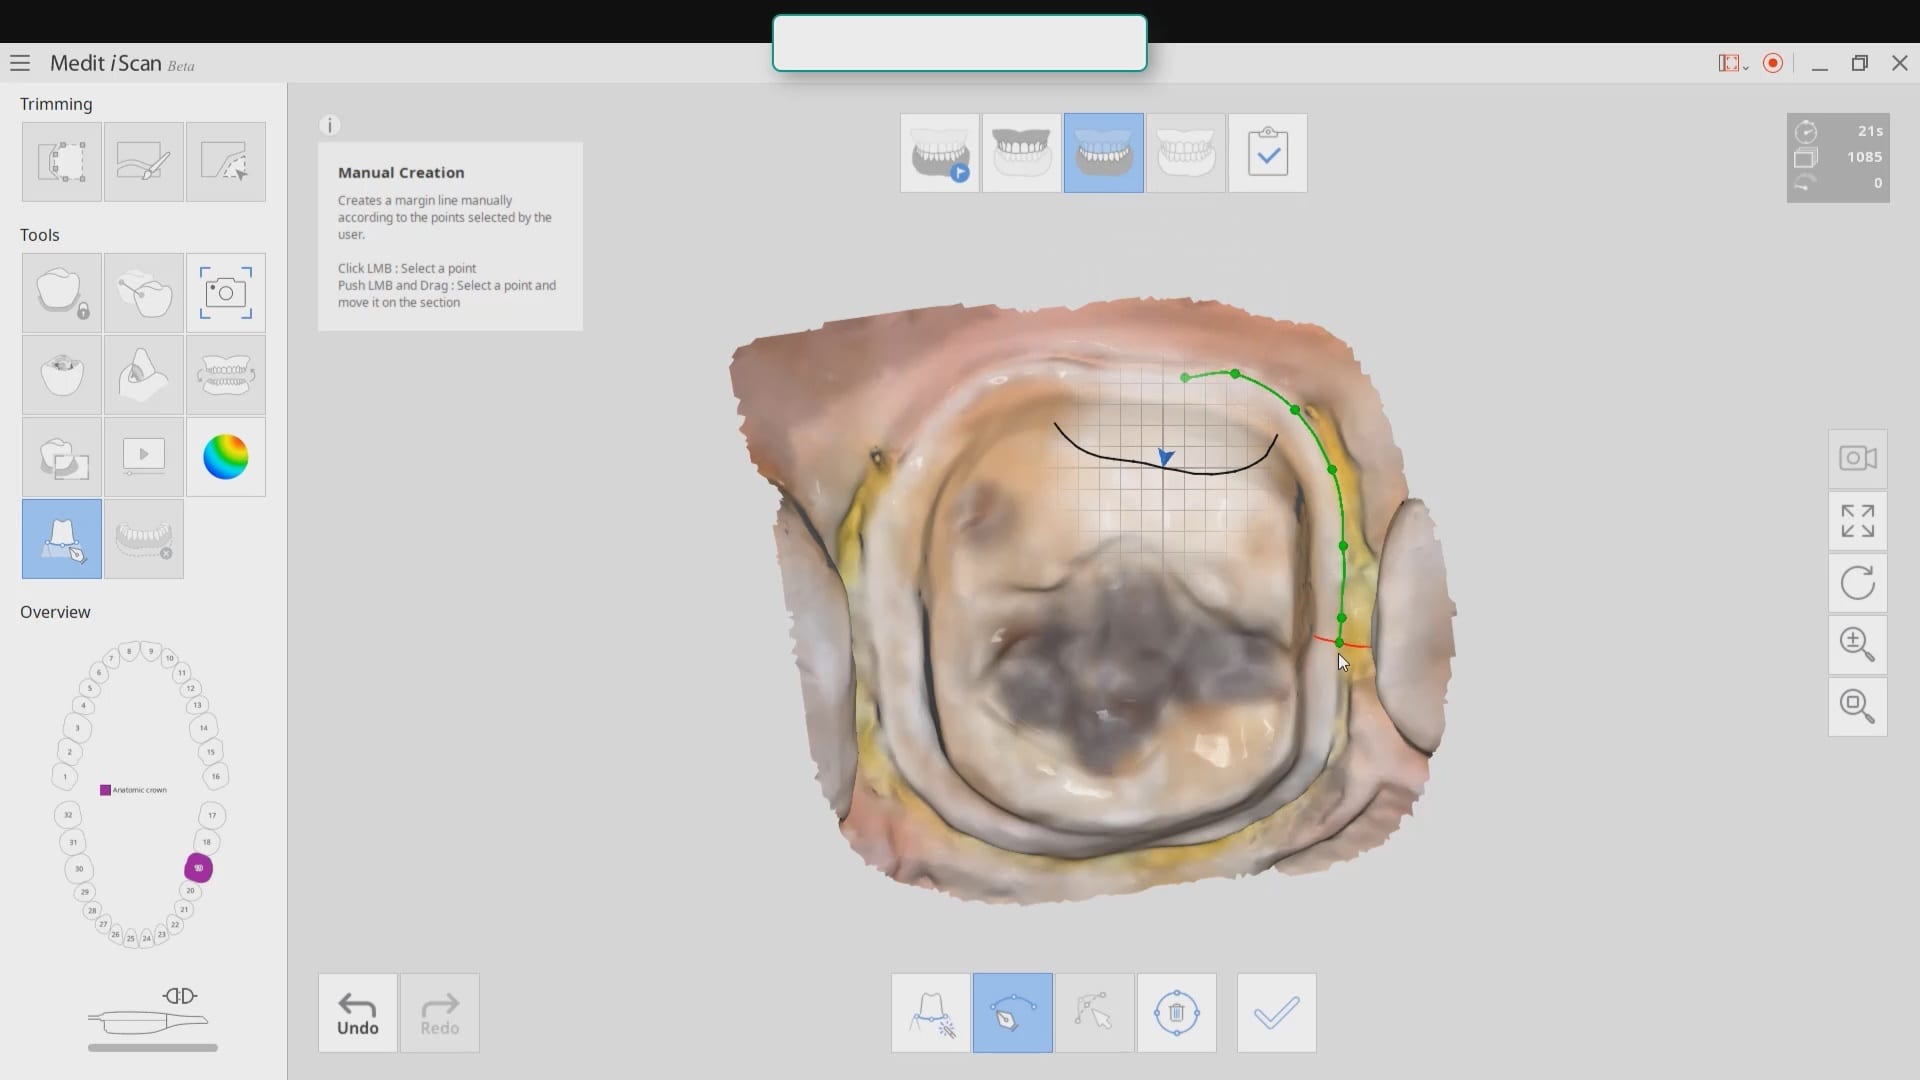
Once the area is identified, you can utilize the margin marking tool. You have many aids to help with margins, including the ability to visualize the transition from one plane to another, along with colors in the models.
margin line drawn in Medit i500 native scanning software
Once you have captured this detail you can click on the cad software and continue with design or submit it to your lab so they can proceed with the design and fabrication.
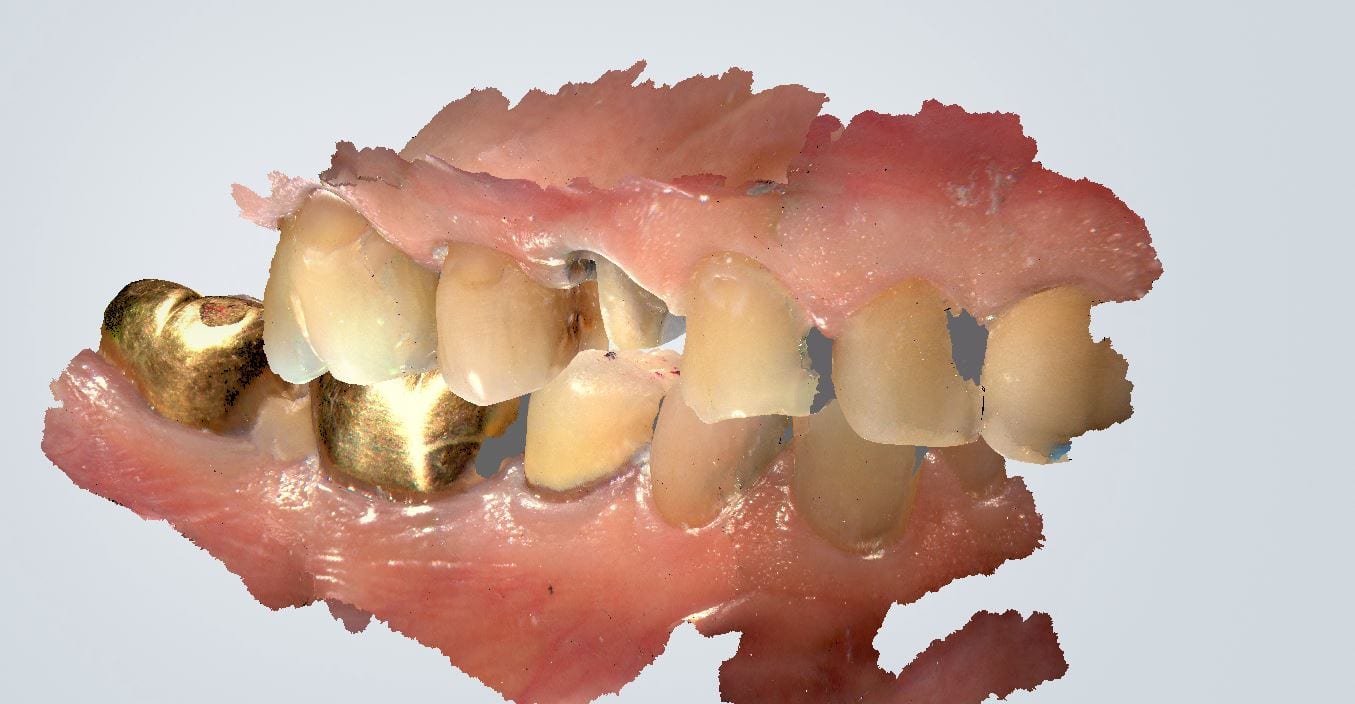
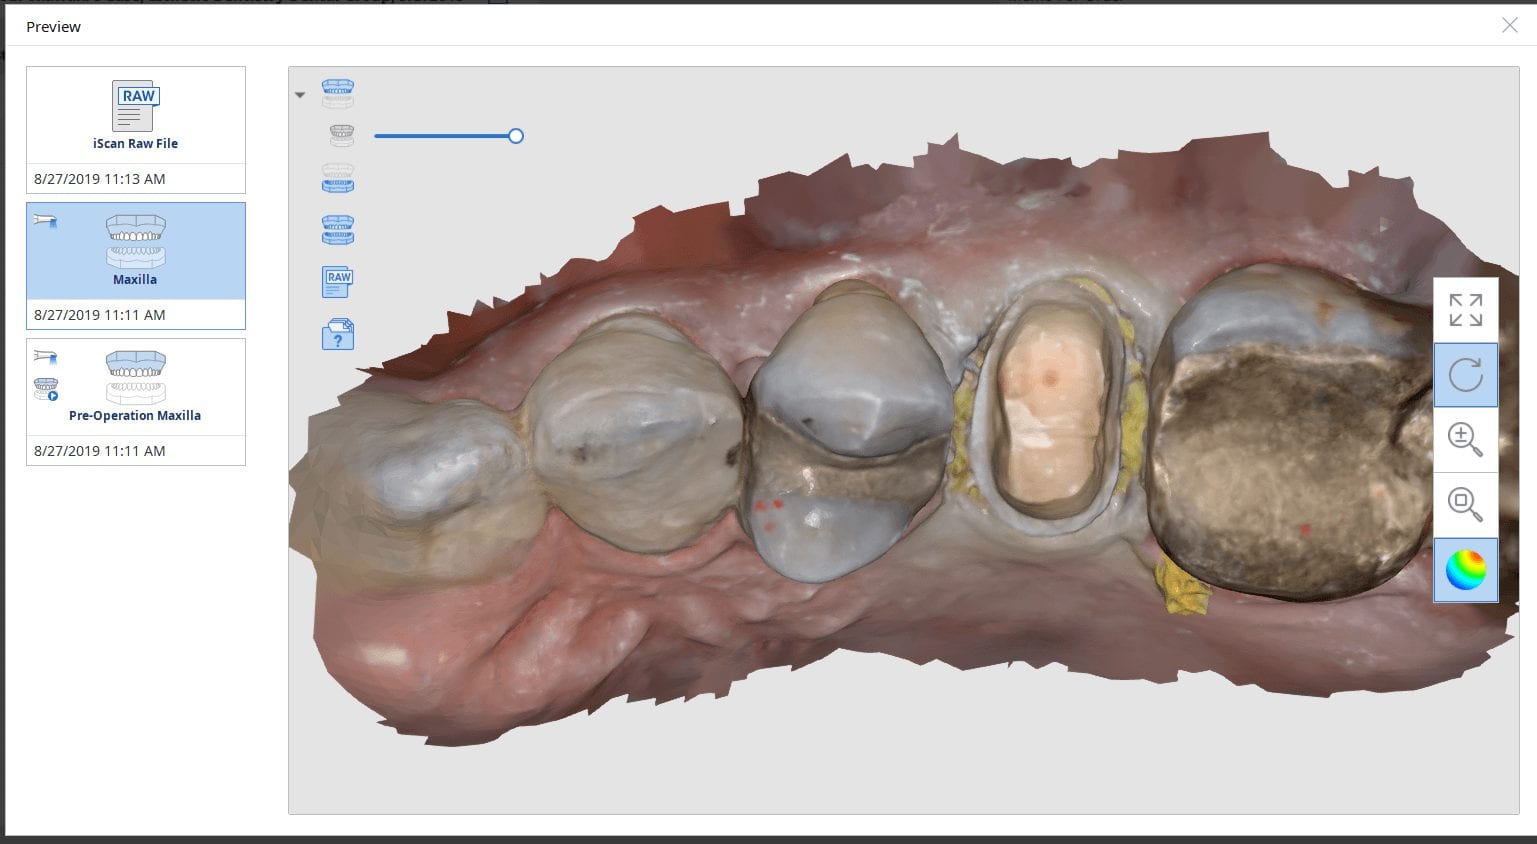
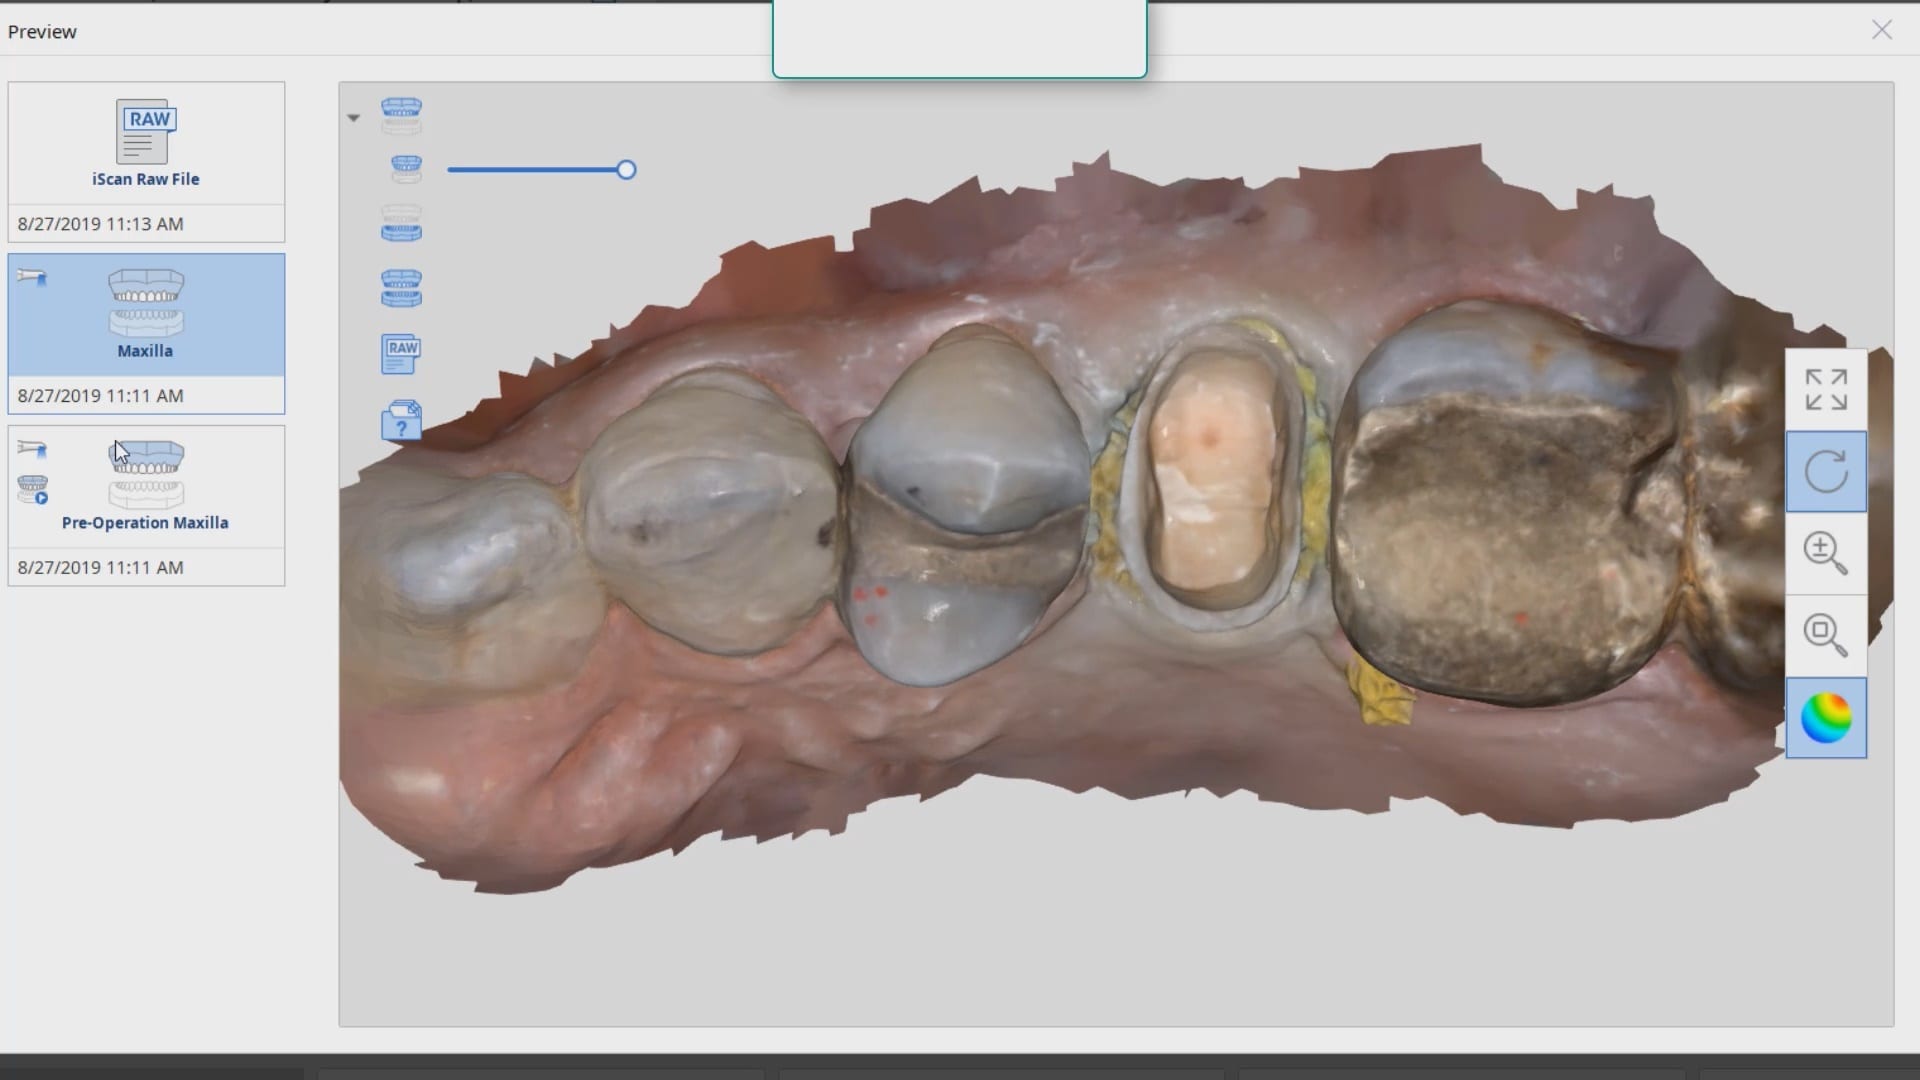
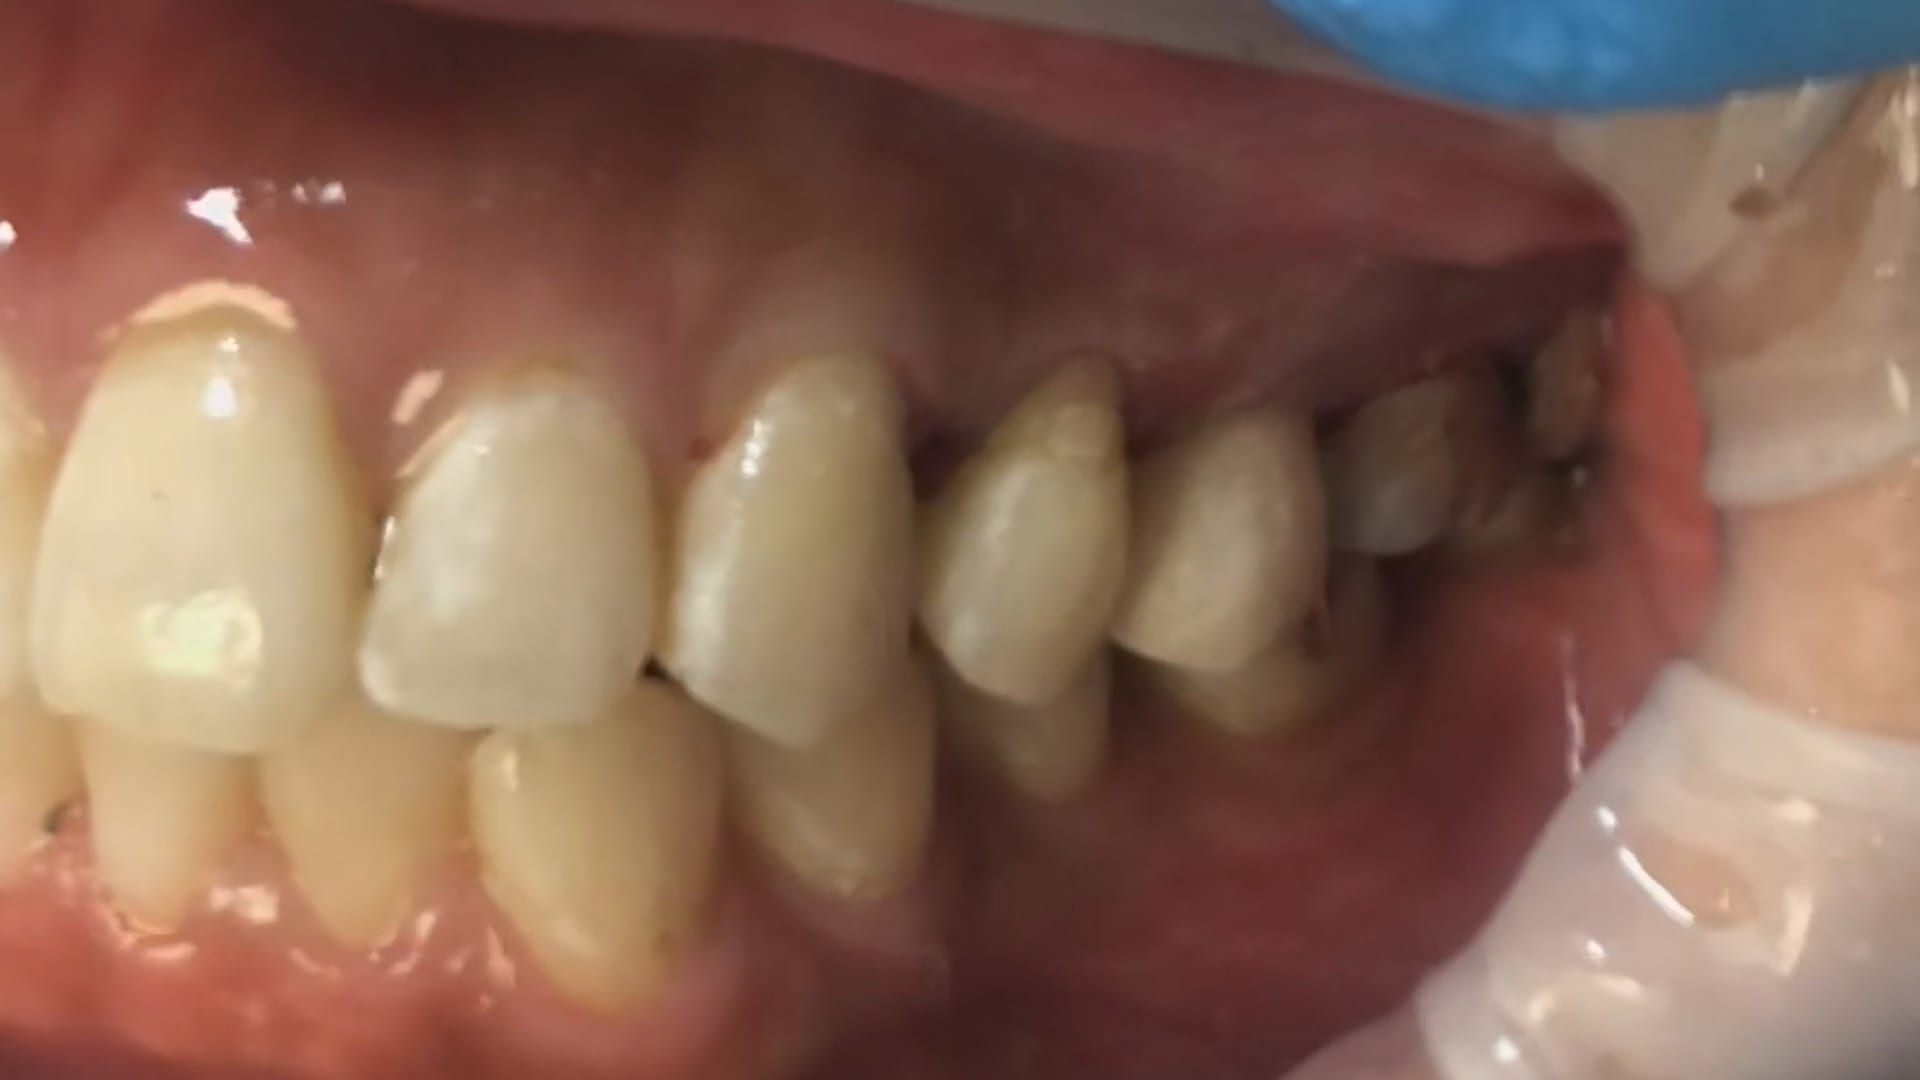
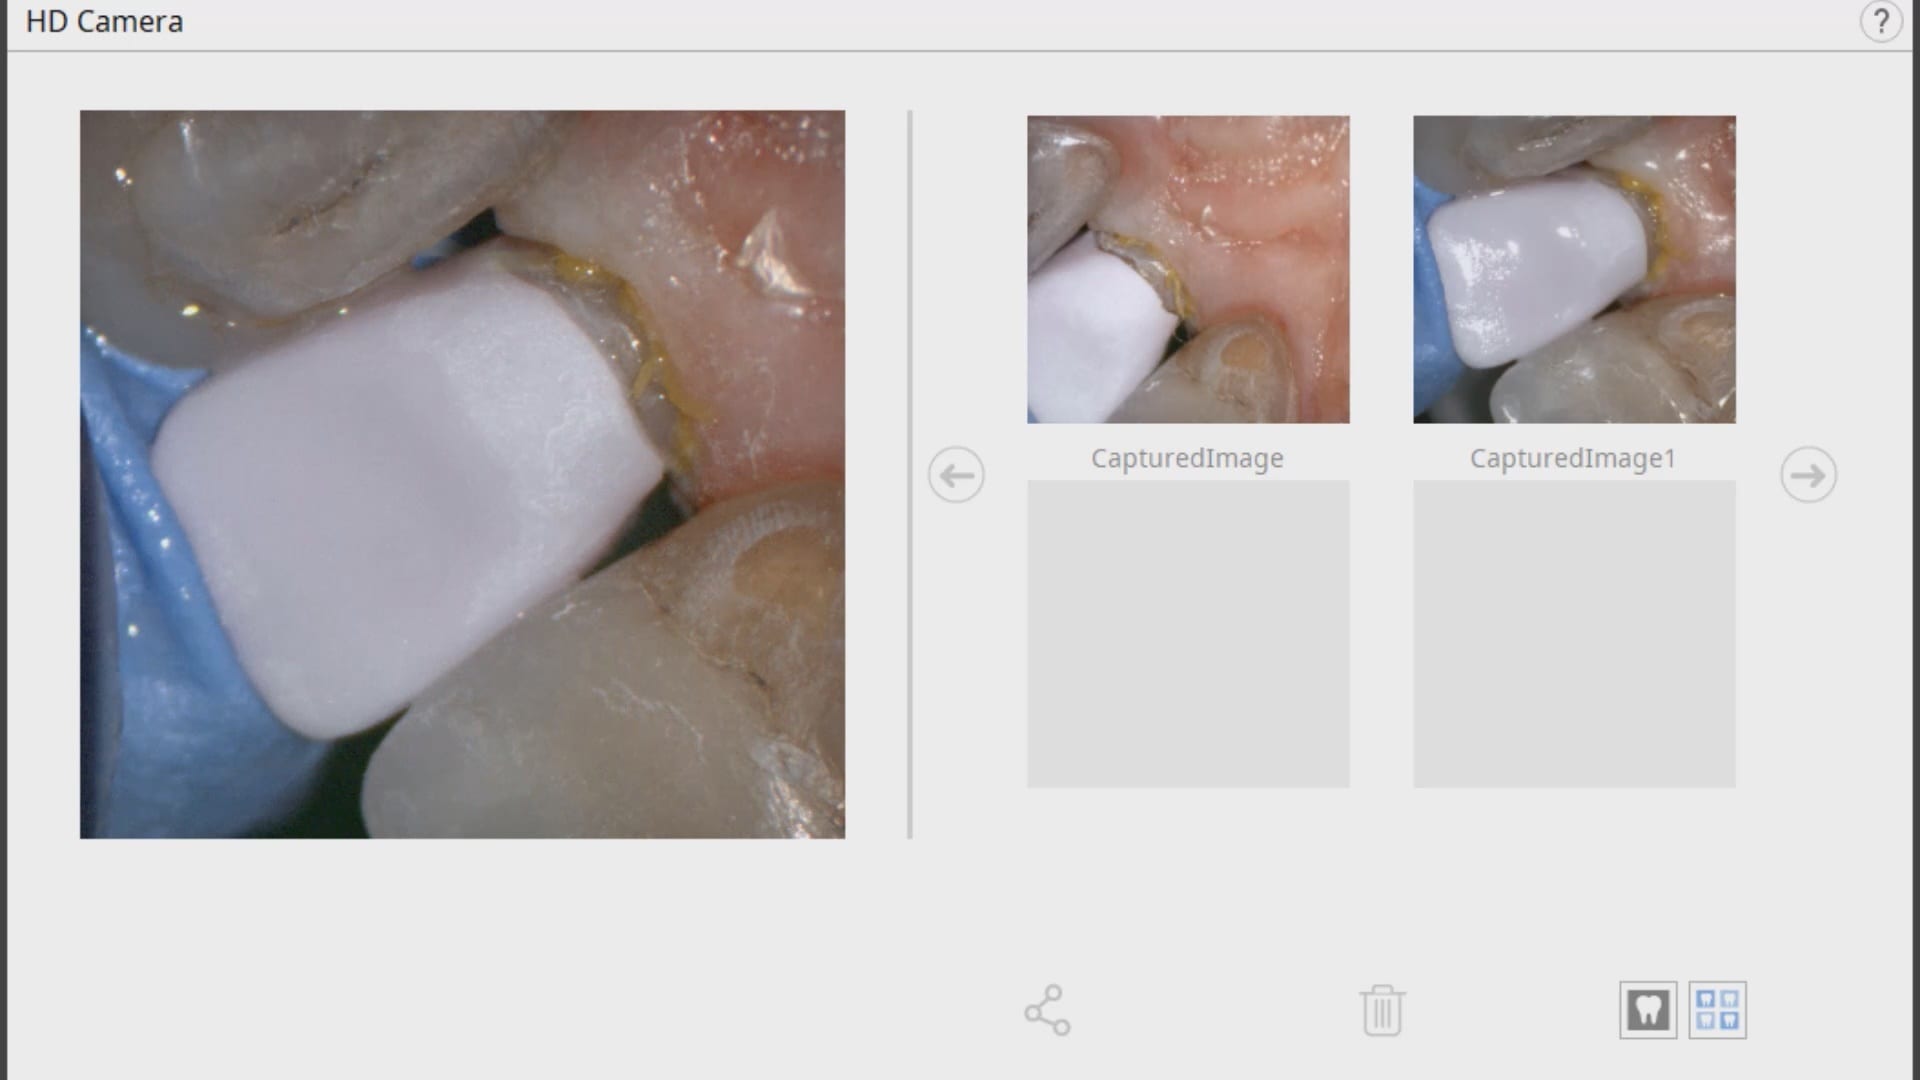
In this article, we demonstrate how to manage a crown replacement on a second upper premolar with the Medit i500, exocad, and the imes icore CORiTEC ONE milling machine. The pre-existing crown was over 2 decades old and the recession revealed a supra-gingival margin. Furthermore, there was no room to improve the anatomy or its outline form as it was in occlusion with the opposing dentition.
A powerful design technique is the copy of the pre-existing crown. Images of the pre-op are taken while the patient is numb and its contours are copied onto the final design of the restoration. This process usually takes a minute or so, after which we milled a size 12 emax block restoration.
One of the most dreaded procedures in dentistry is to cut off a bonded lithium disilicate material. With zirconia, since the bond strength is weak, just “rattling” the crown helps it pop off. You could also debond the restoration with a laser pretty quickly. With emax, you must use copious amounts of water so you don’t fry the pulp. You must also refrain from splitting the crown with a crown remover because you can damage the remaining tooth structure catastrophically.
In this sequence of photos, you will see how we recommend the removal of the bonded restoration. You must first create a trough across the occlusal surface of the crown. Ideally, use a 1.6 mm disposable bur to reach the interface between tooth structure and restorative material. As soon as you reach this junction, take a flat ended diamond bur and start working that same location and remove all the ceramic on the occlusal surface. Staying right at the junction of the material and tooth is the critical part of the process.
After you have removed the occlusal surface, you can take any bur and work the junction one the axial wall. By this time enough work has been done where the walls of the restoration start to break and peel off on their own.
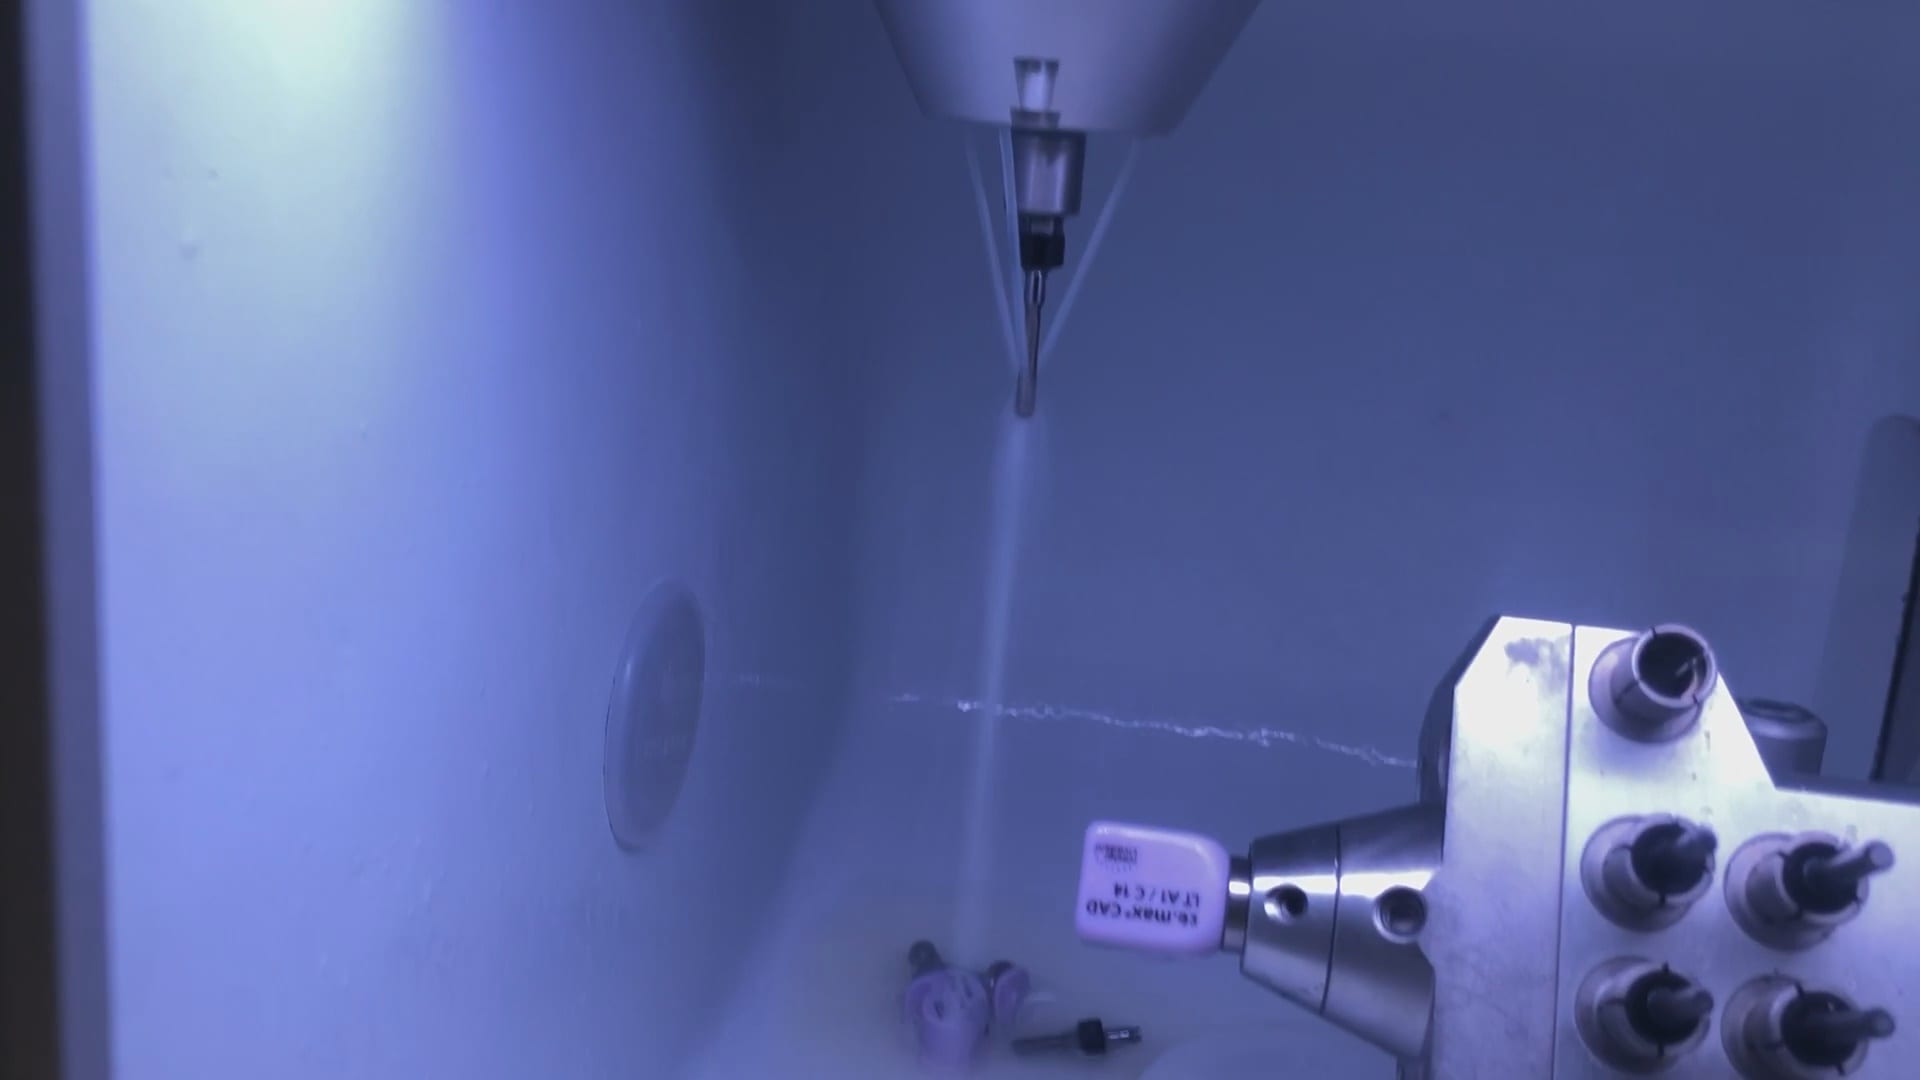
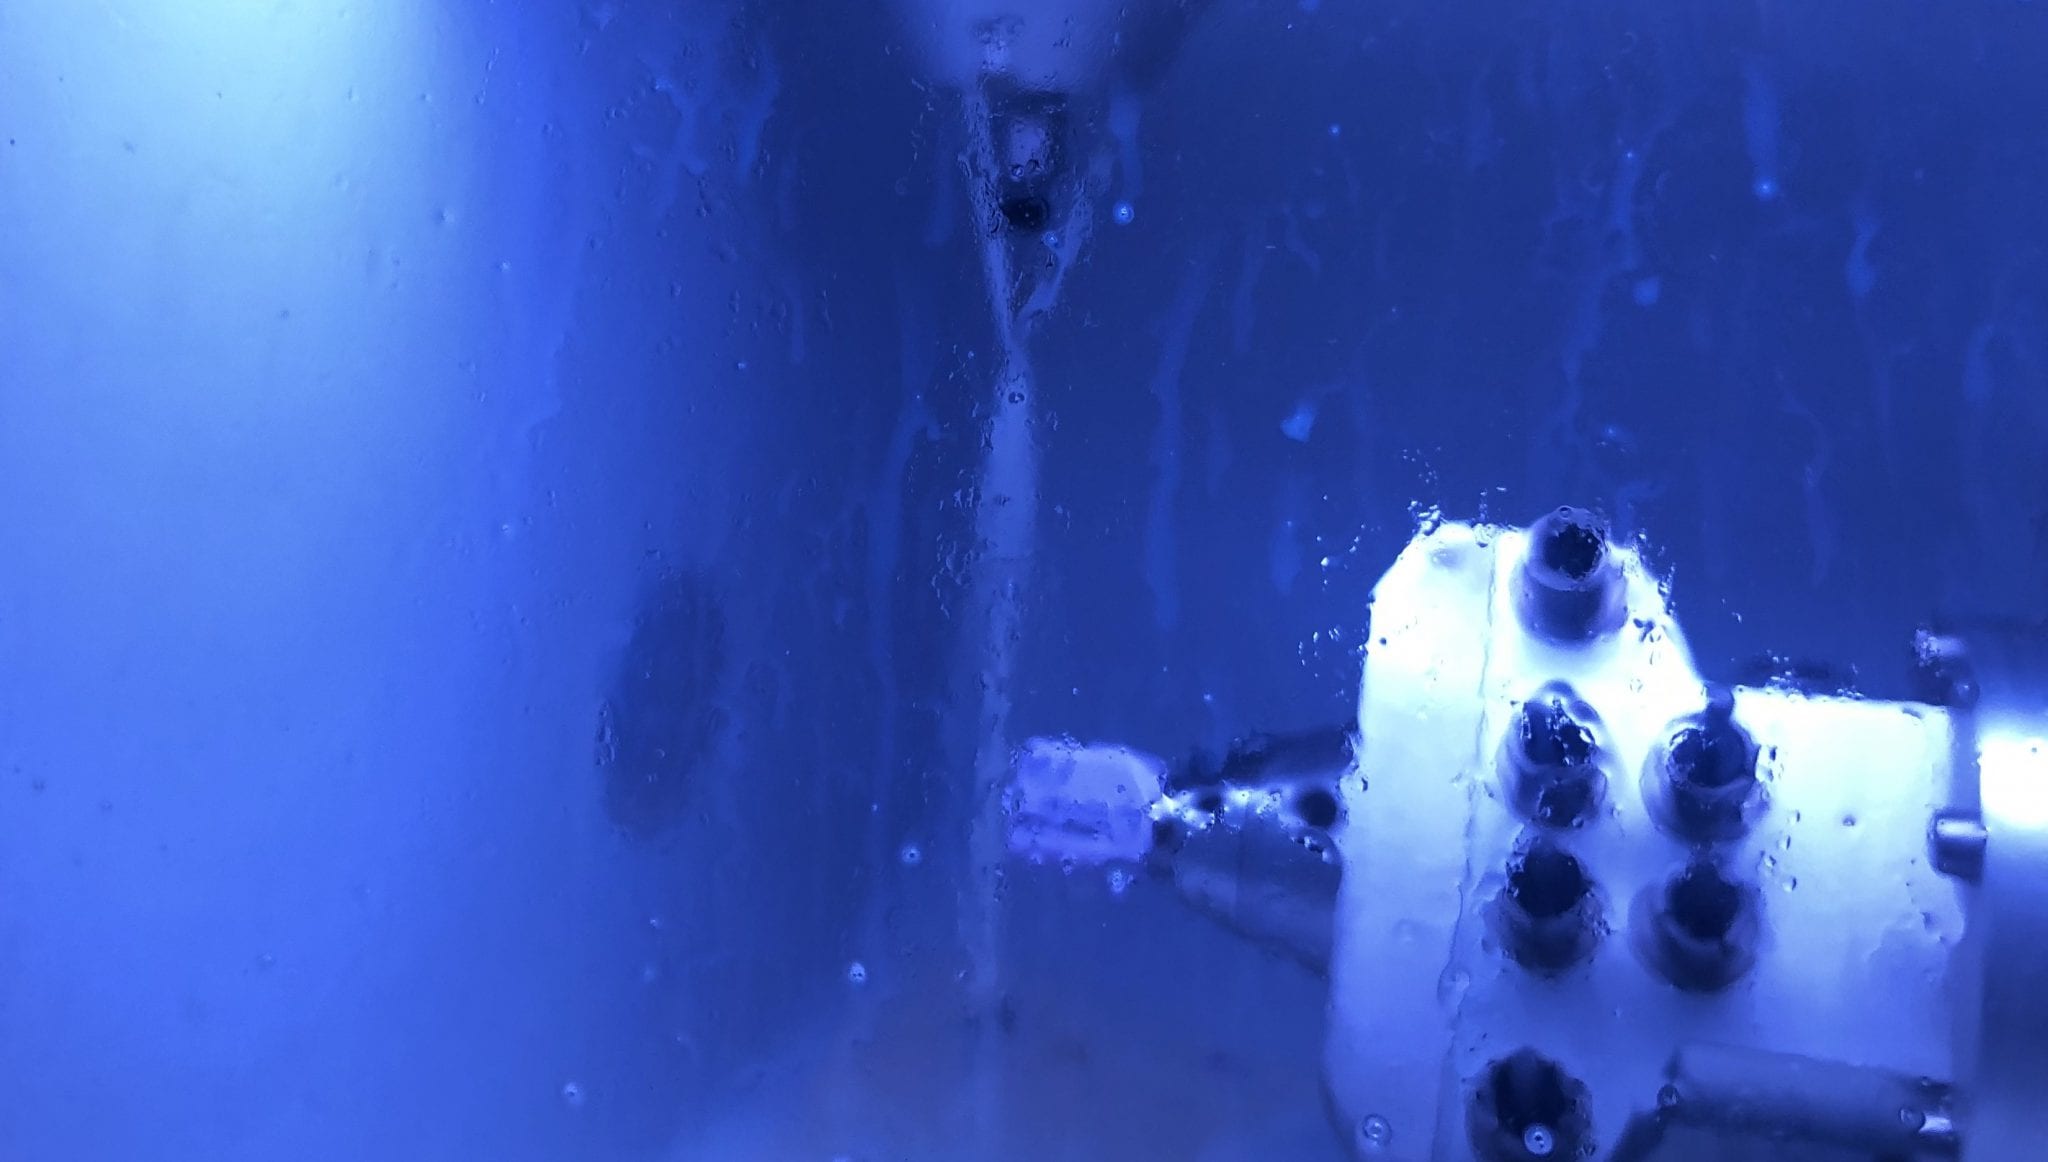
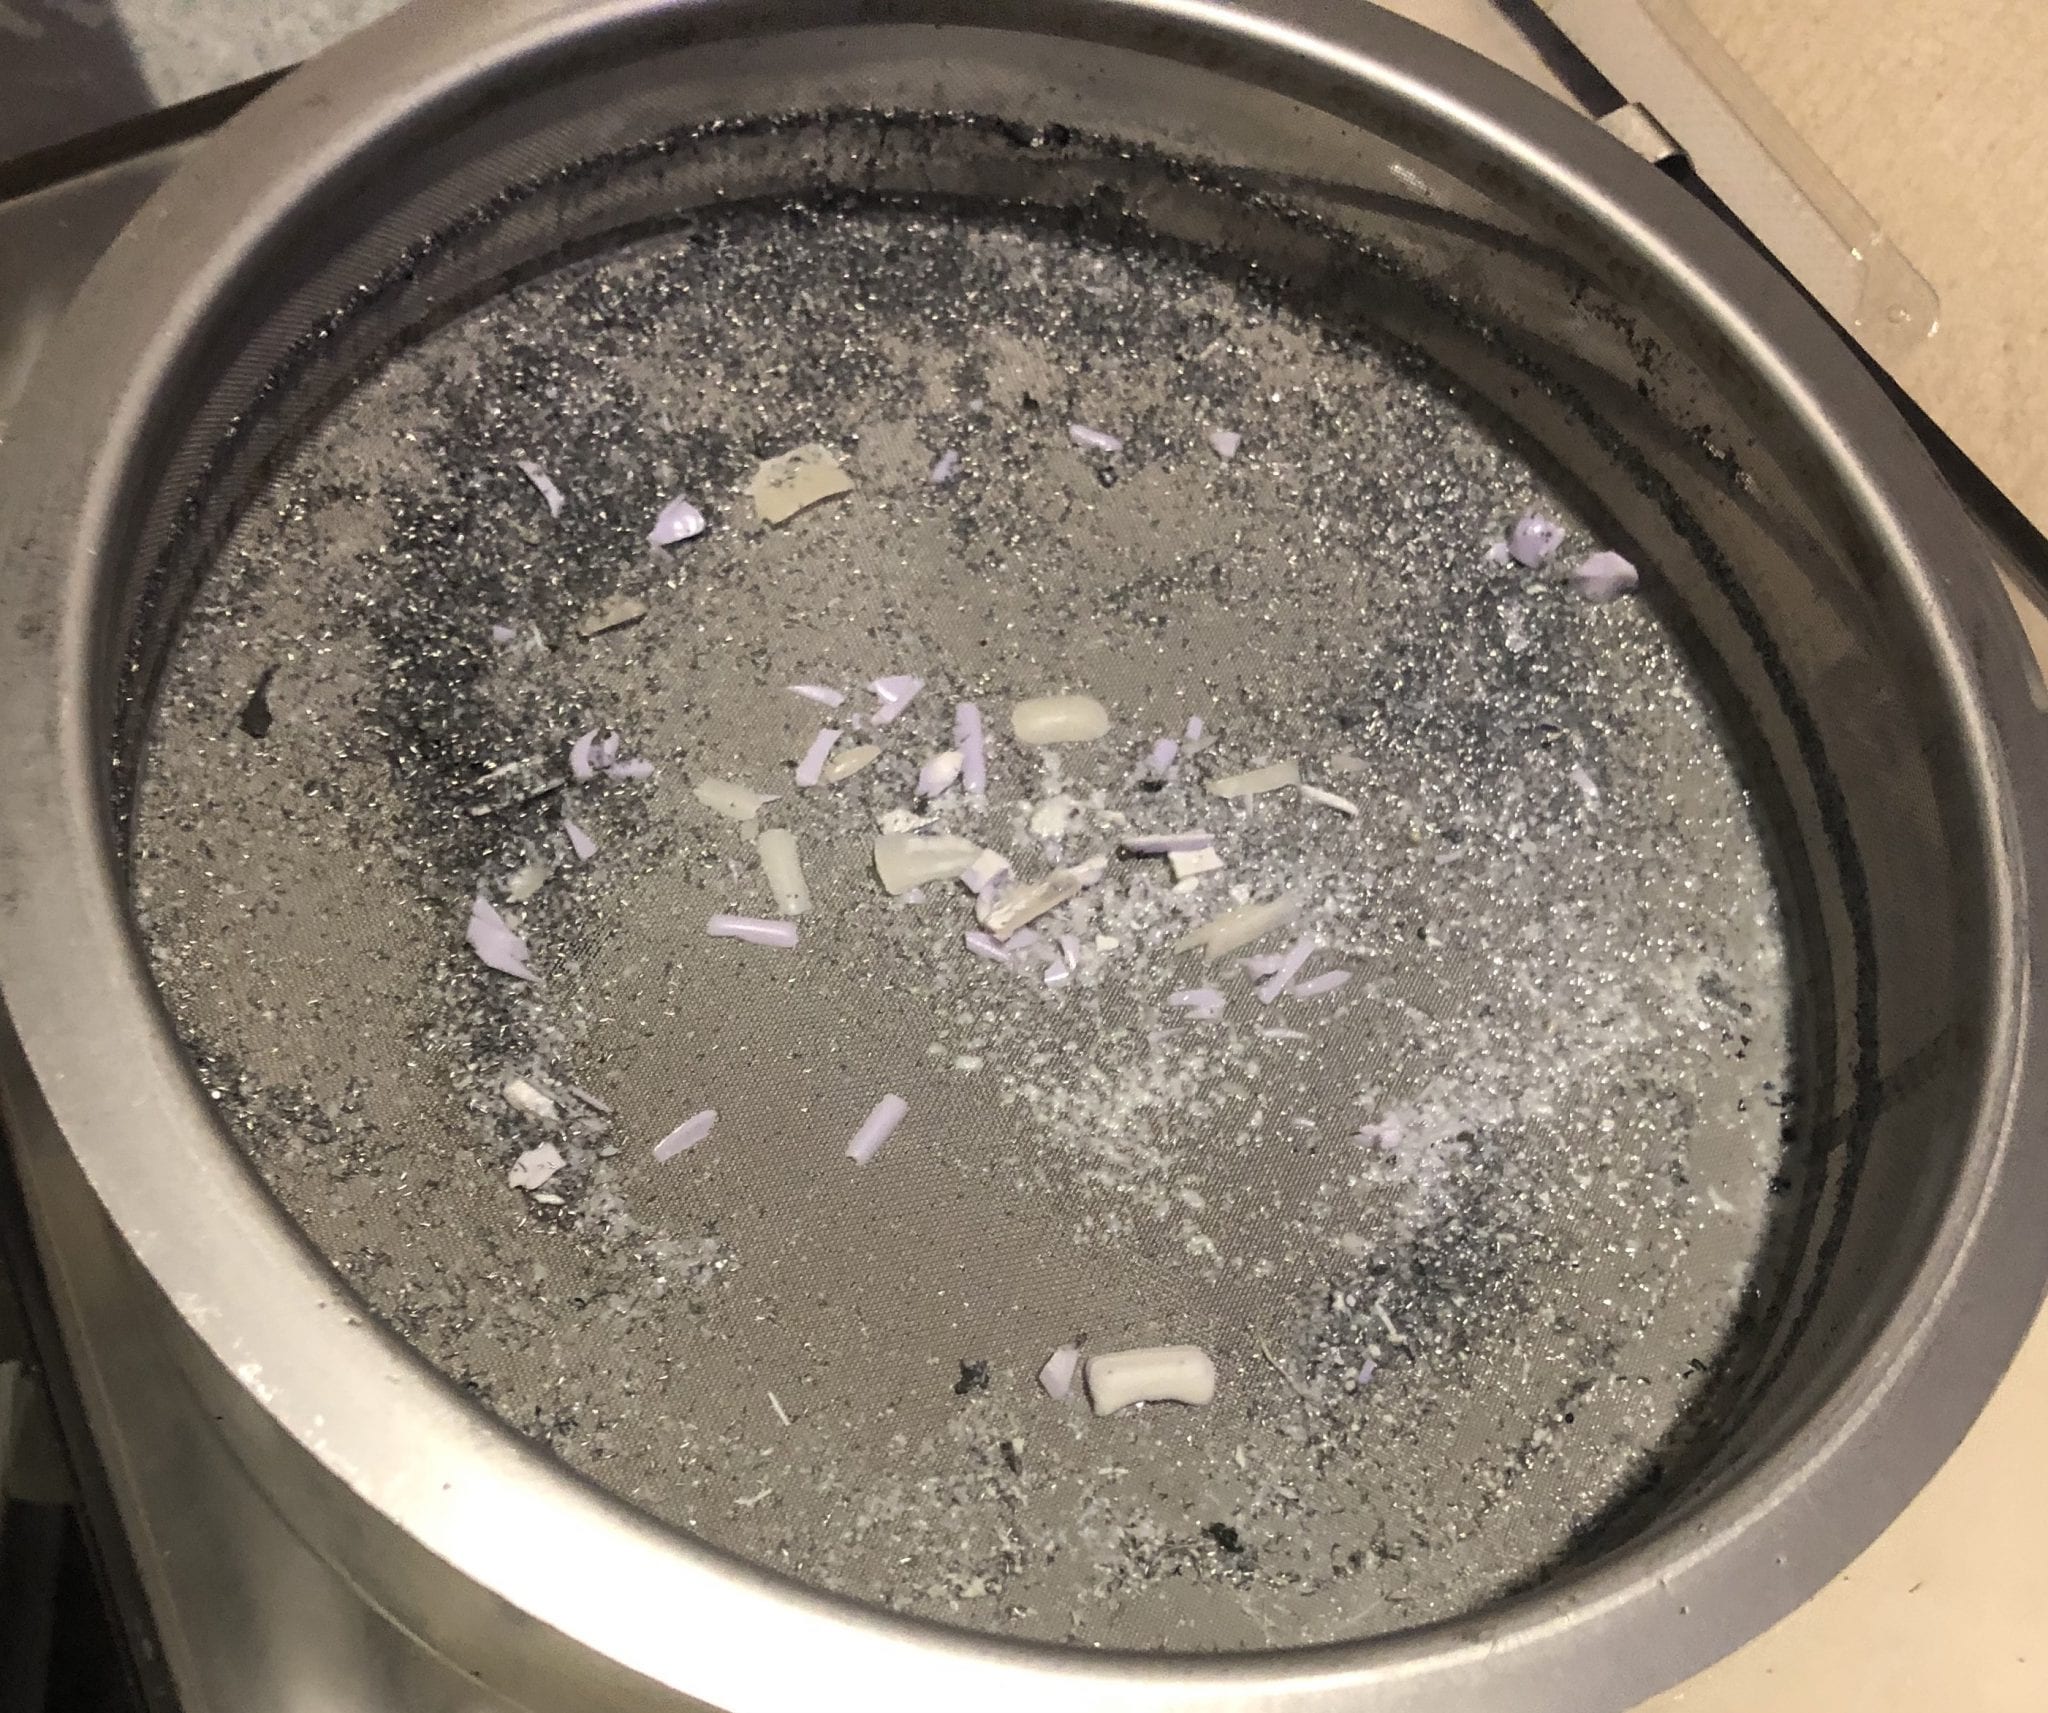
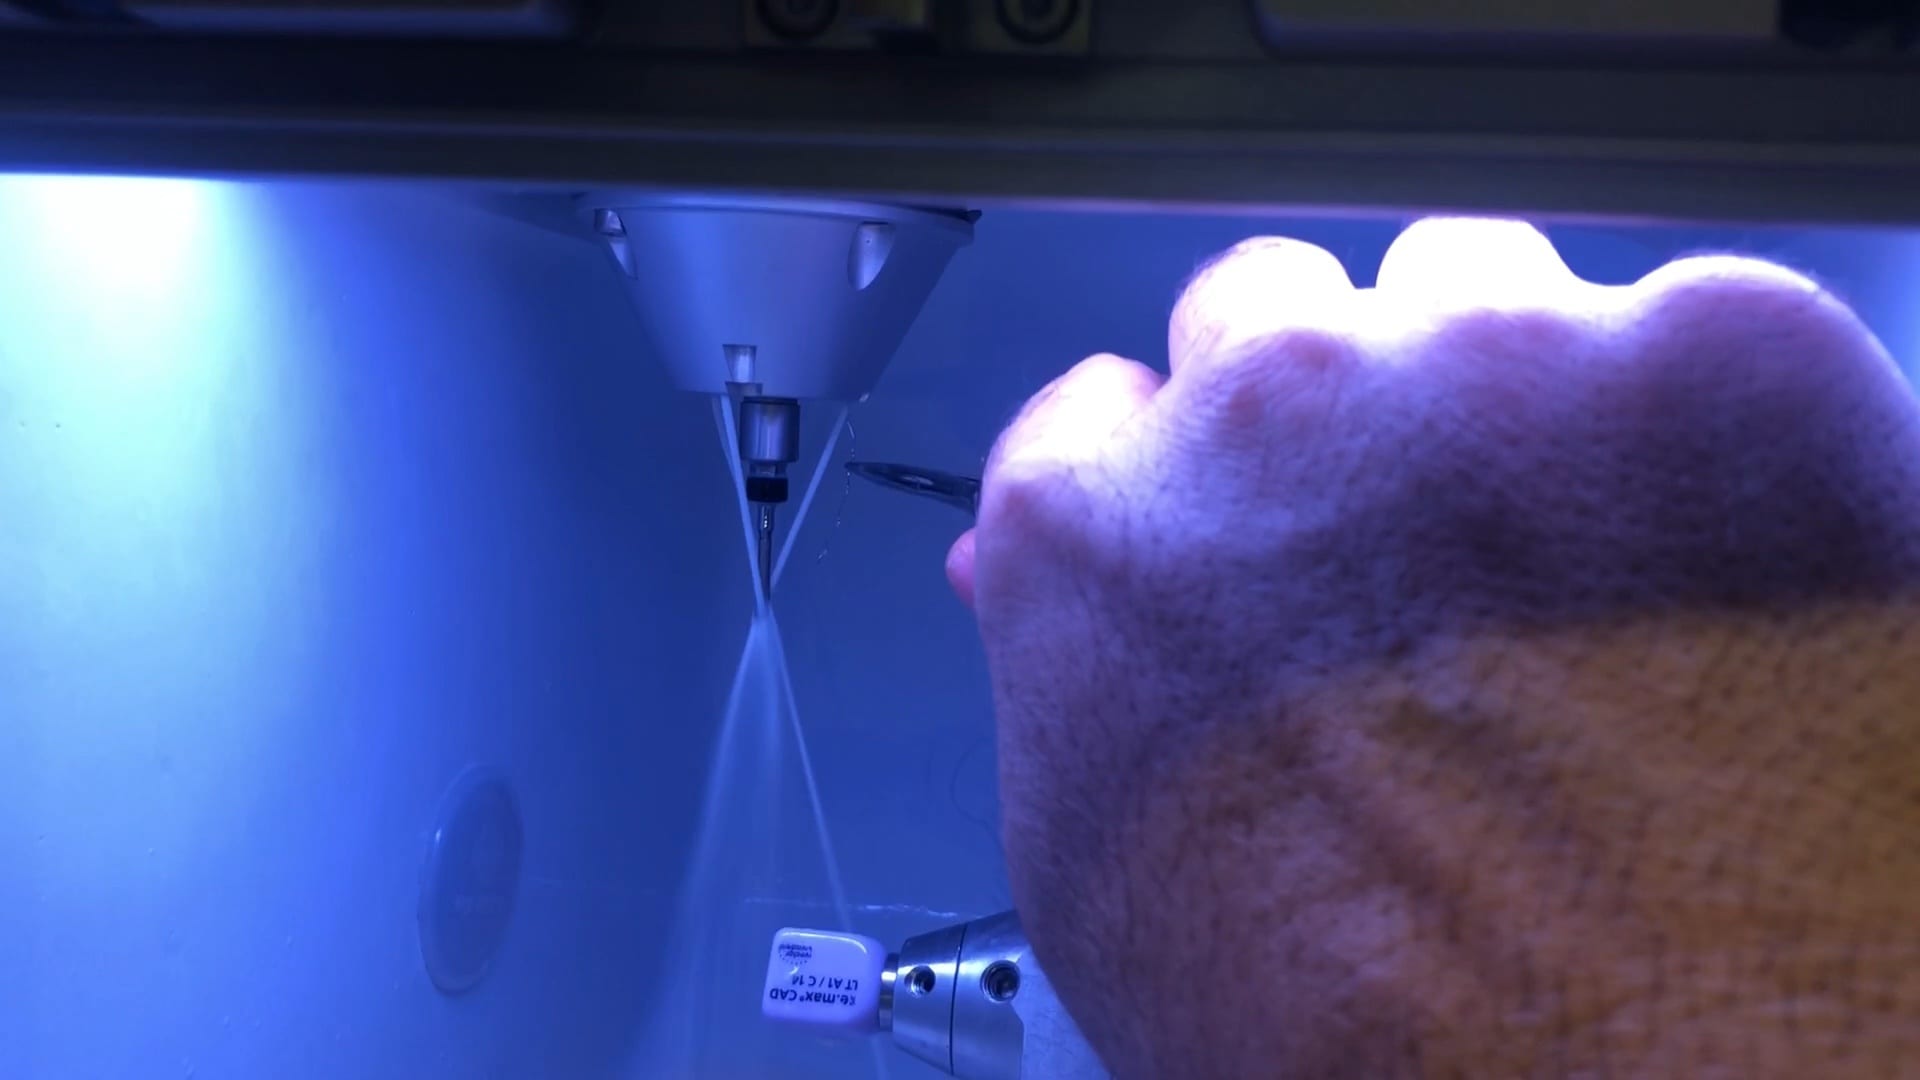
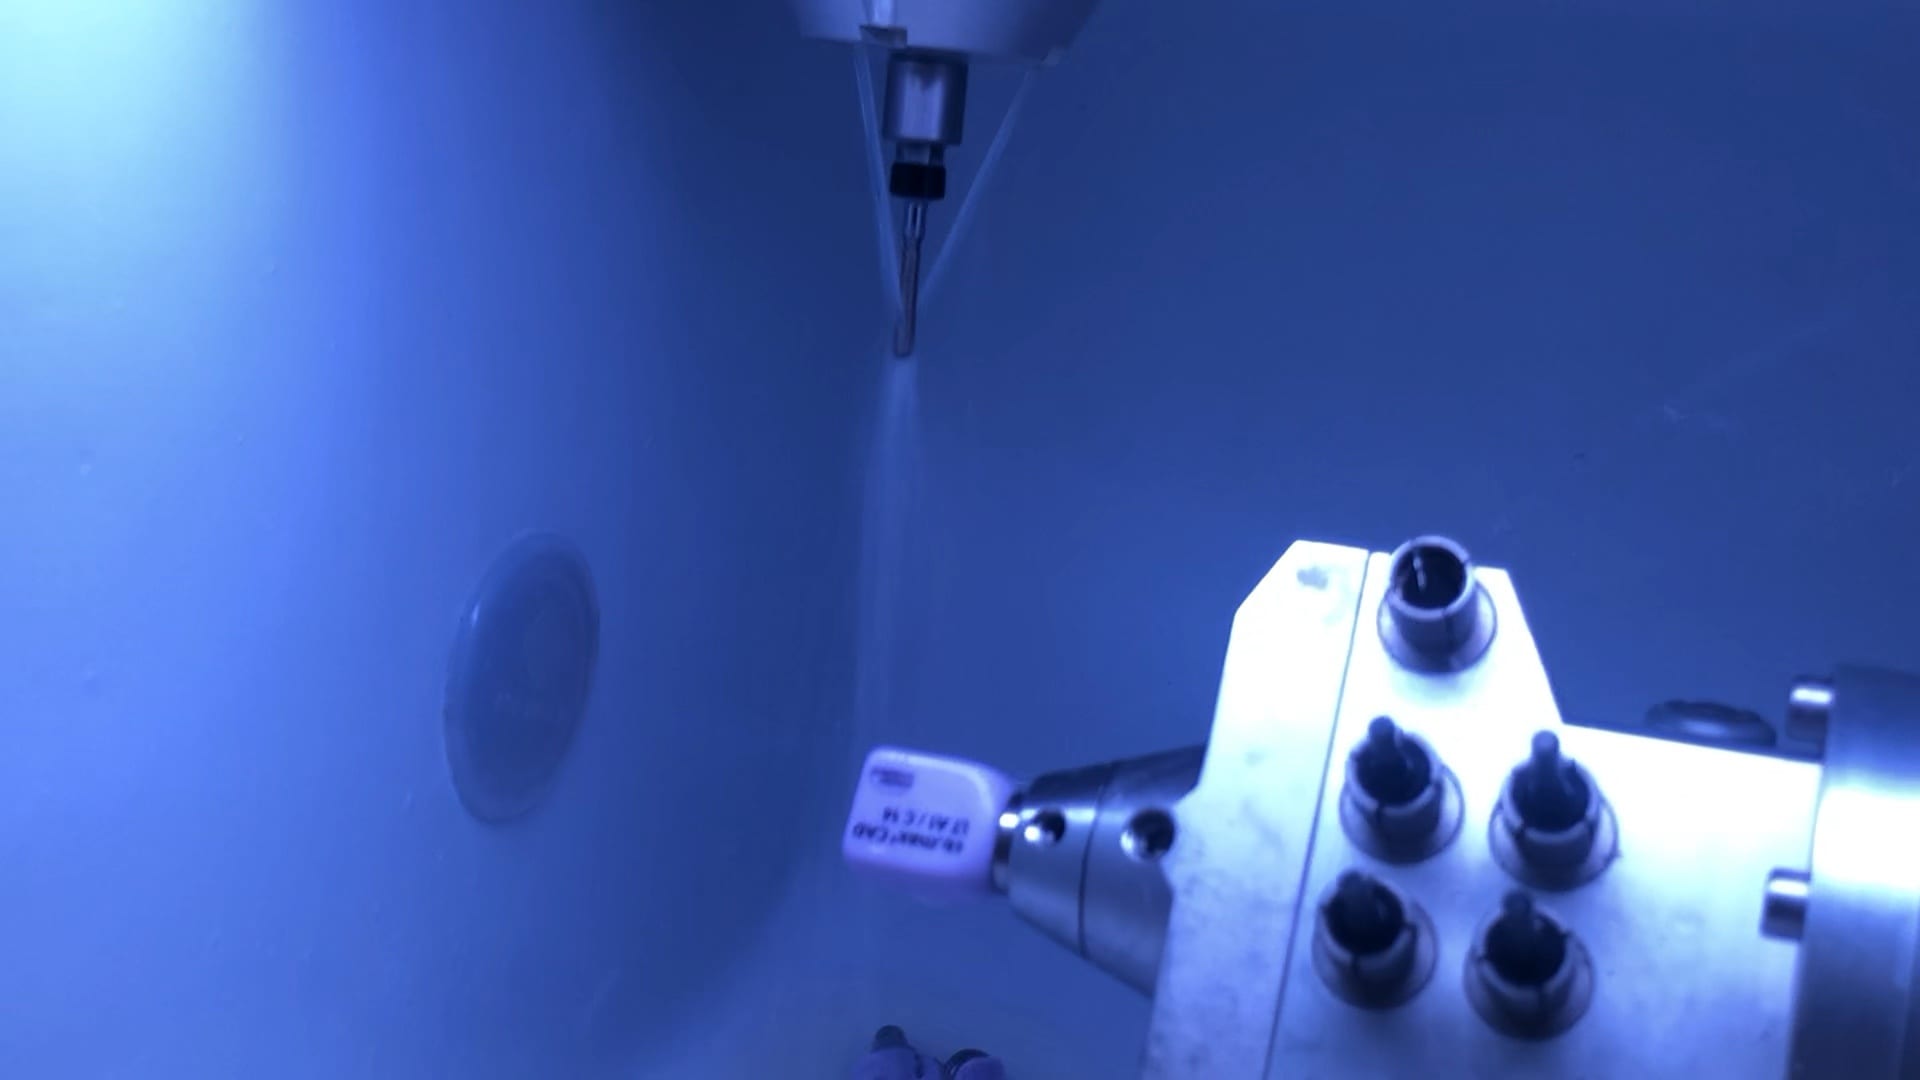
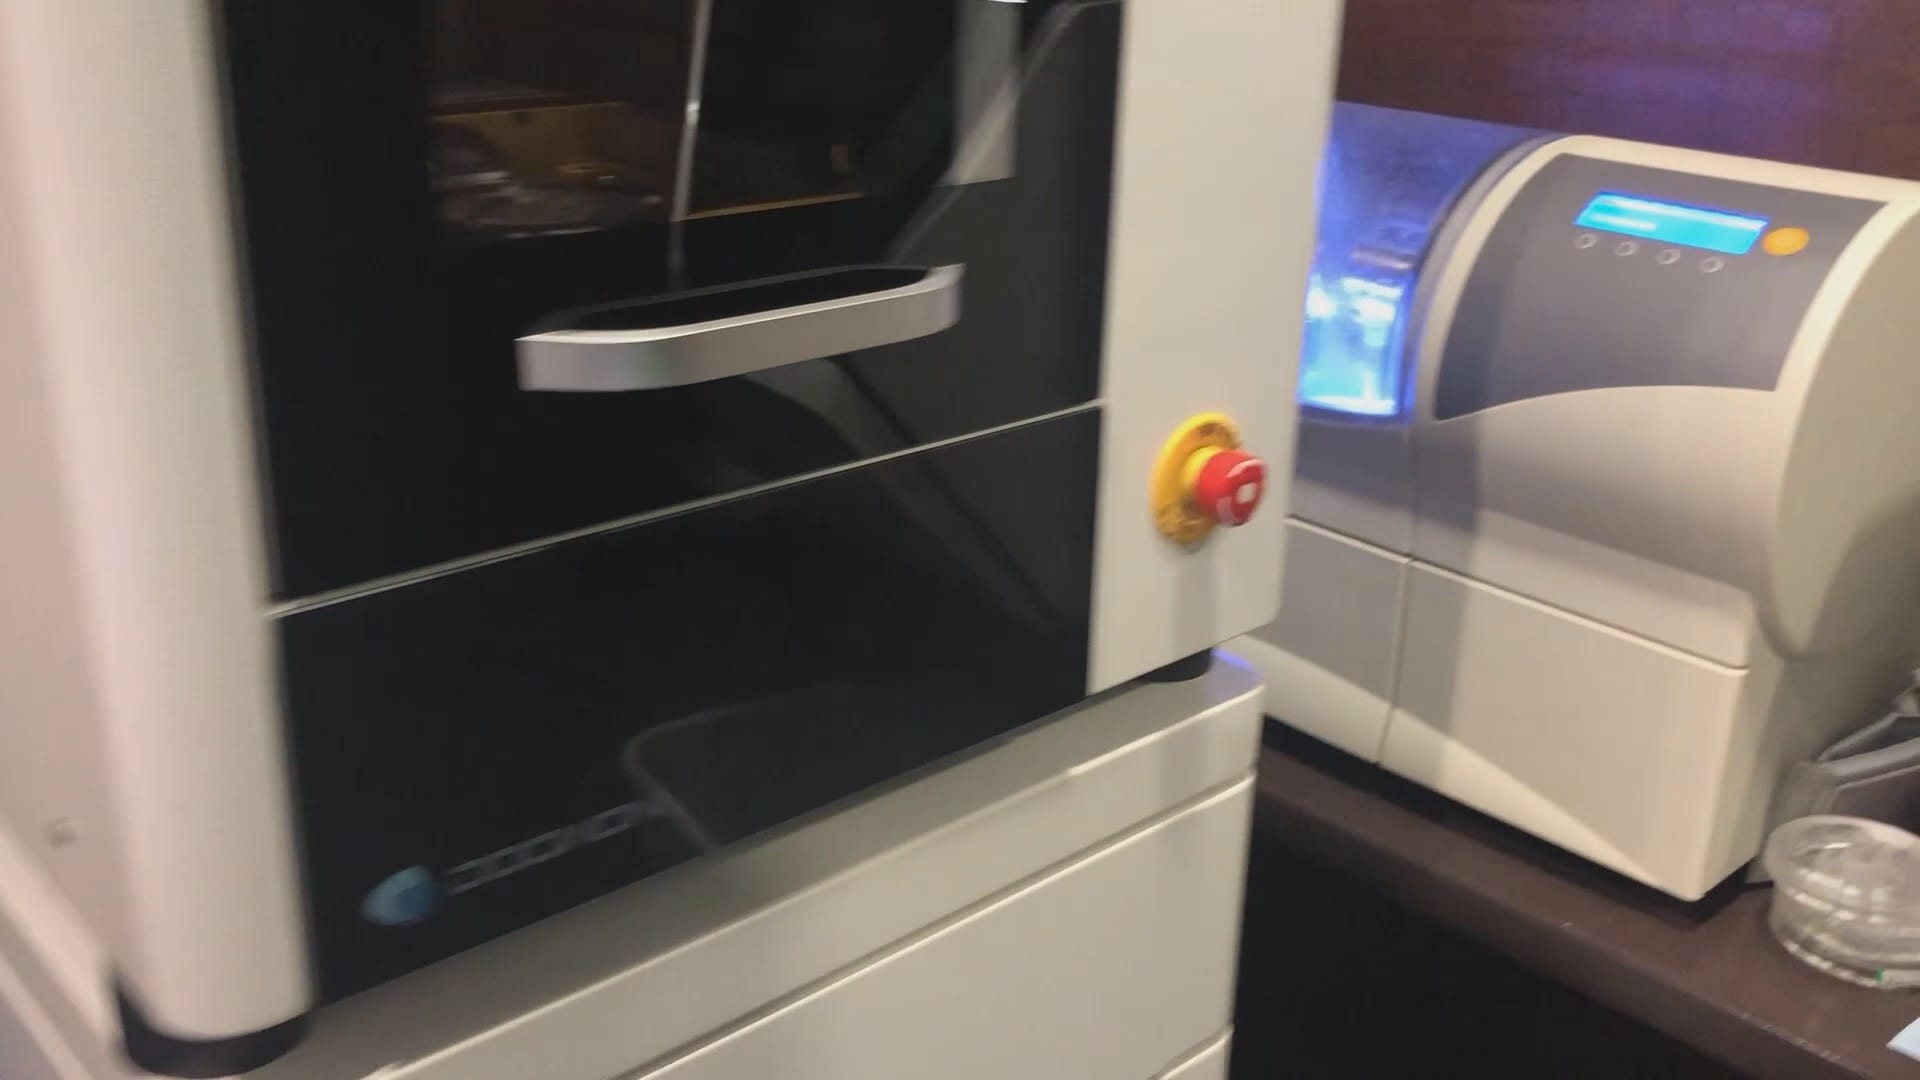
All milling machines have guidelines for proper cleaning and maintanance. The imes icore CORITEC ONE’s spray channels must be kept clean, otherwise they will spray off the target block materials. Essentially you will dry mill ceramic which will damage the material and break the drills very quickly.
You can see how little particles of ceramic and titanium dust can clog the lines.
Here we just used an ortho plier and orthowires to unclog the lines. It’s easiest to have the water spraying so you can identify the channels and see the immediate results.
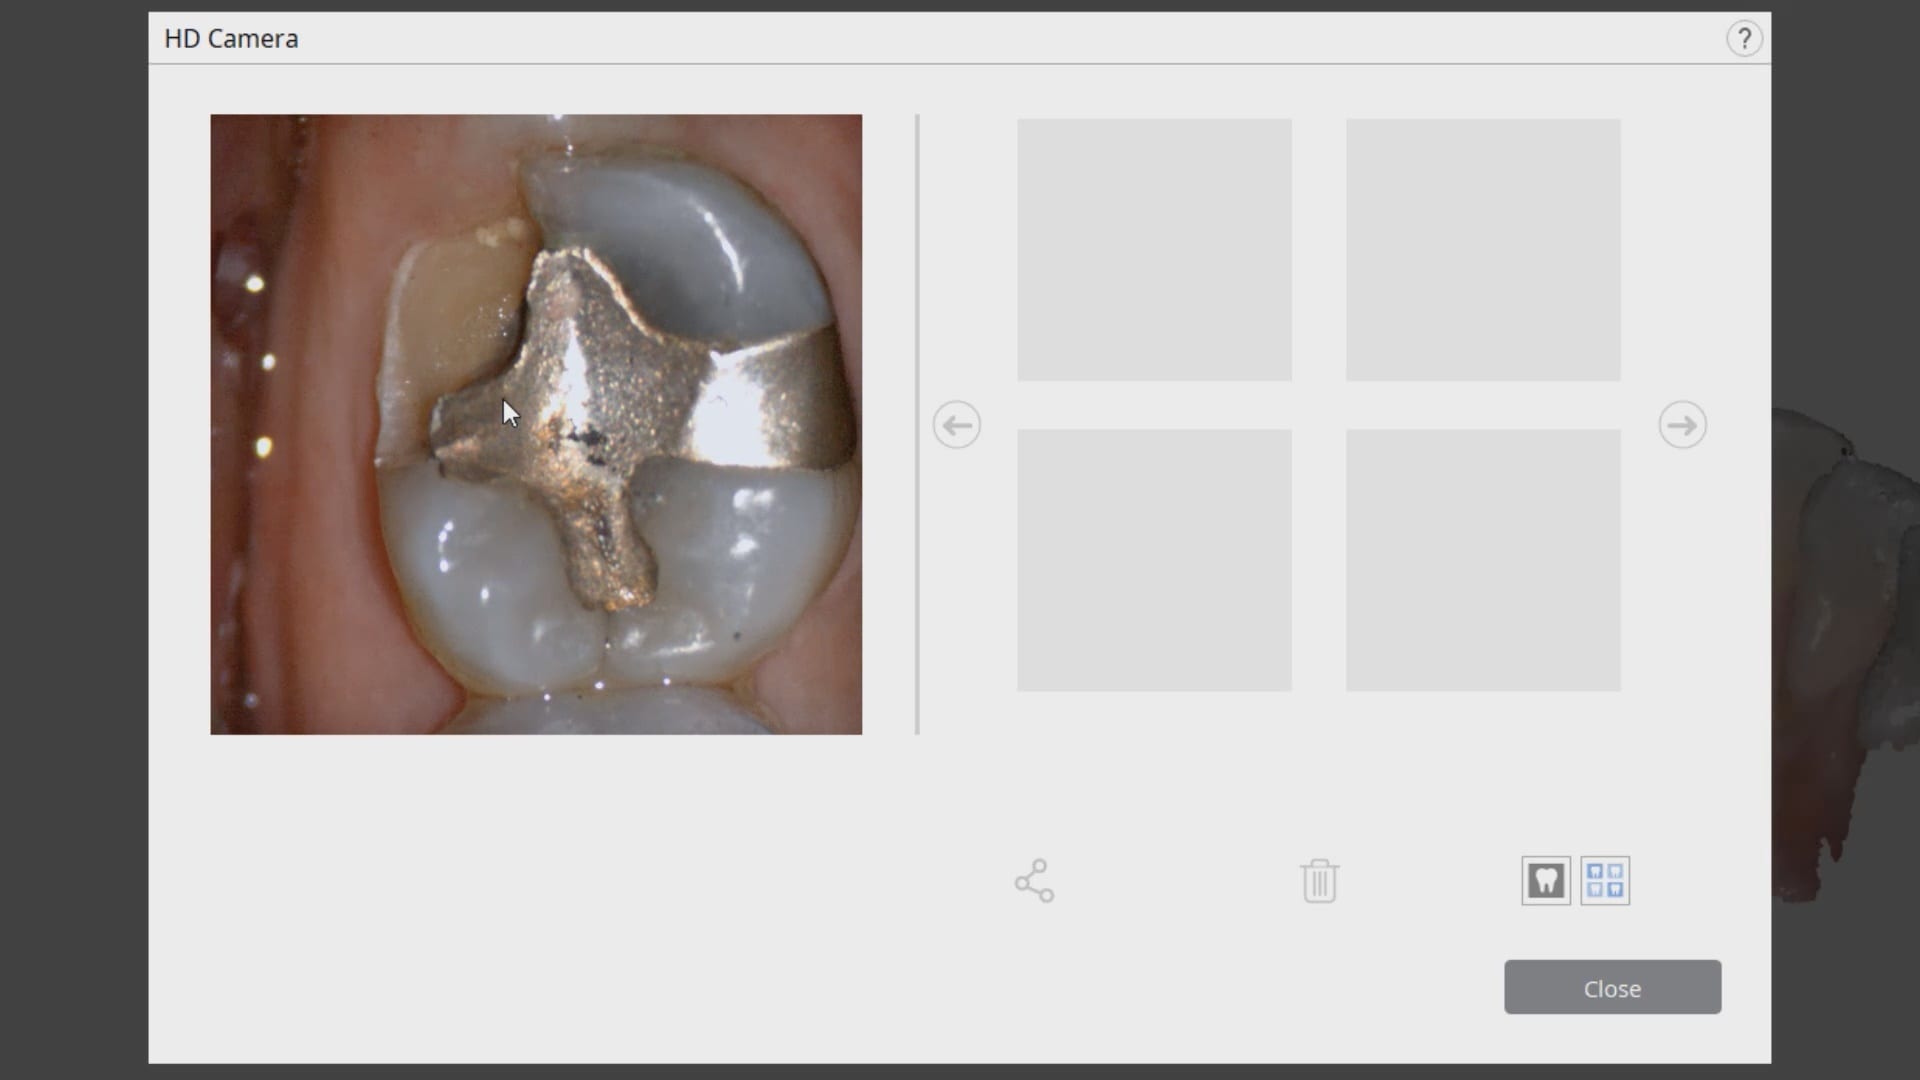
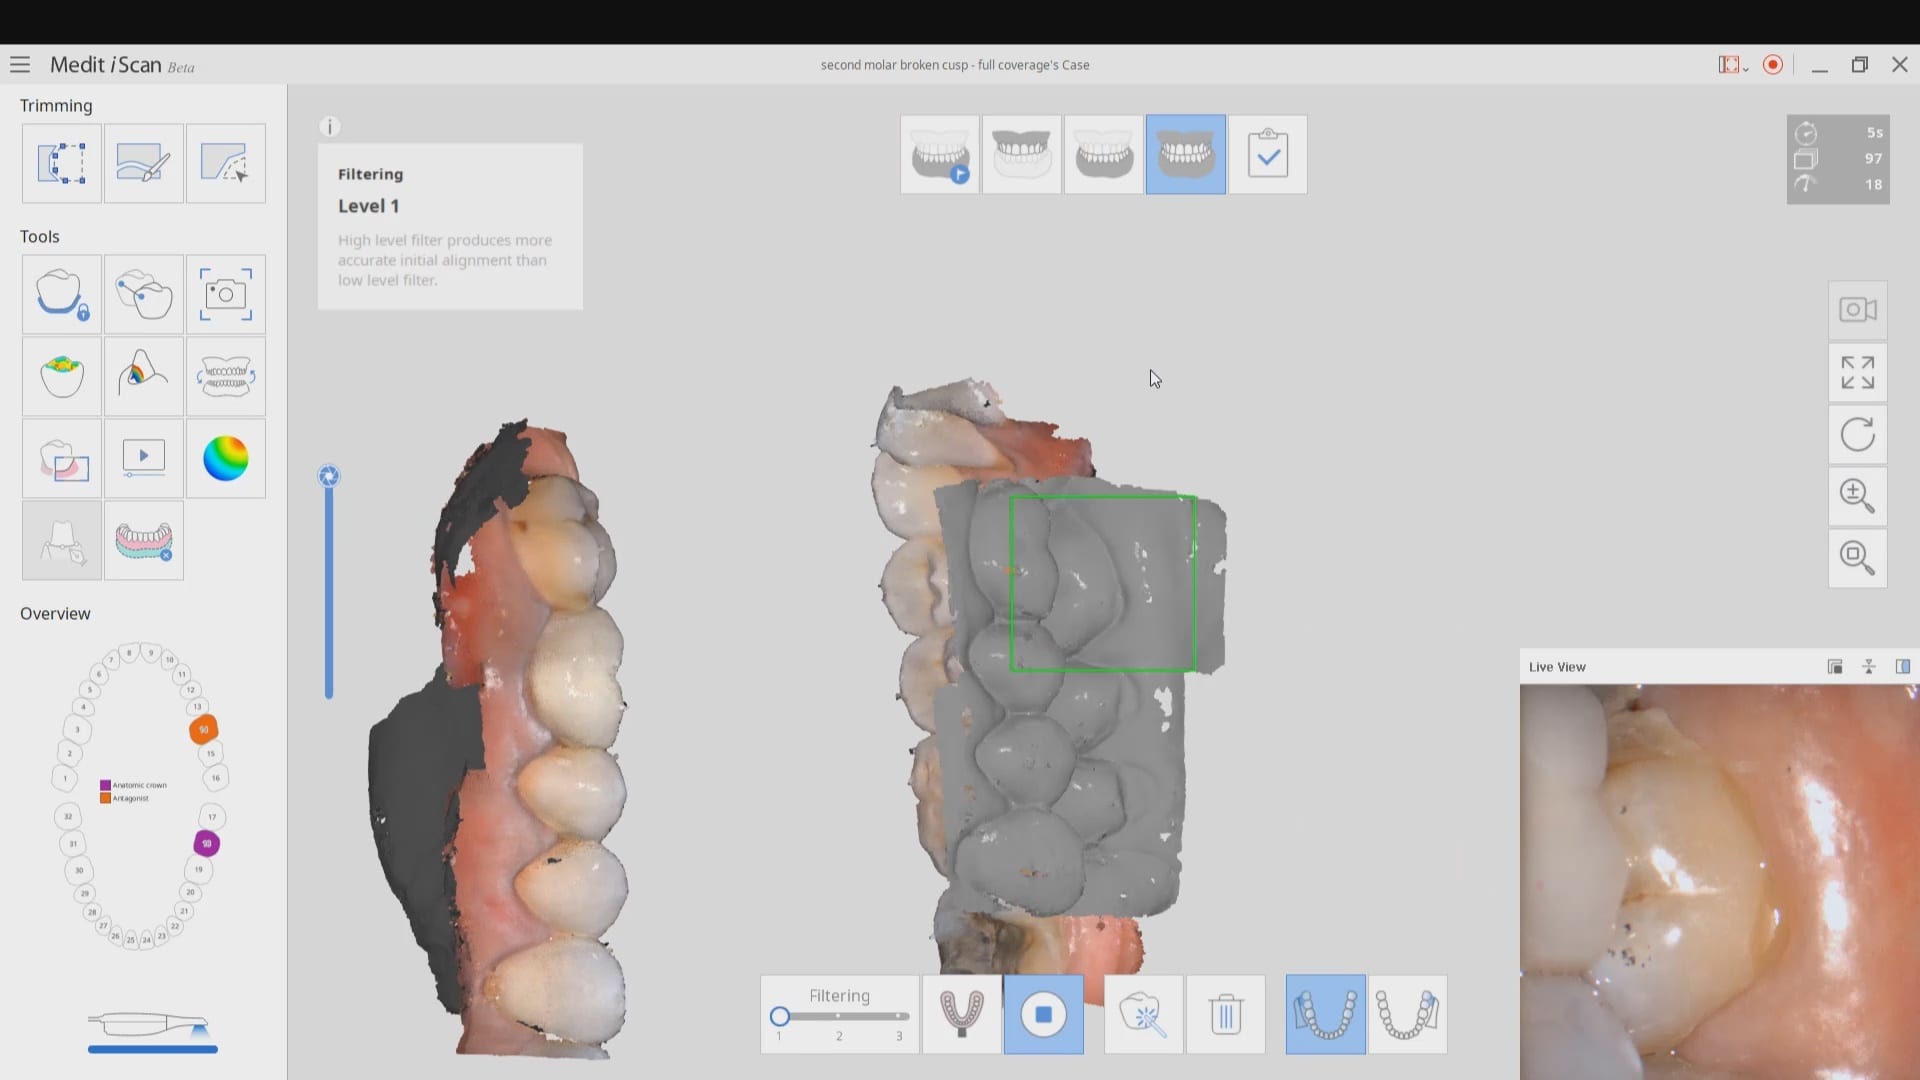
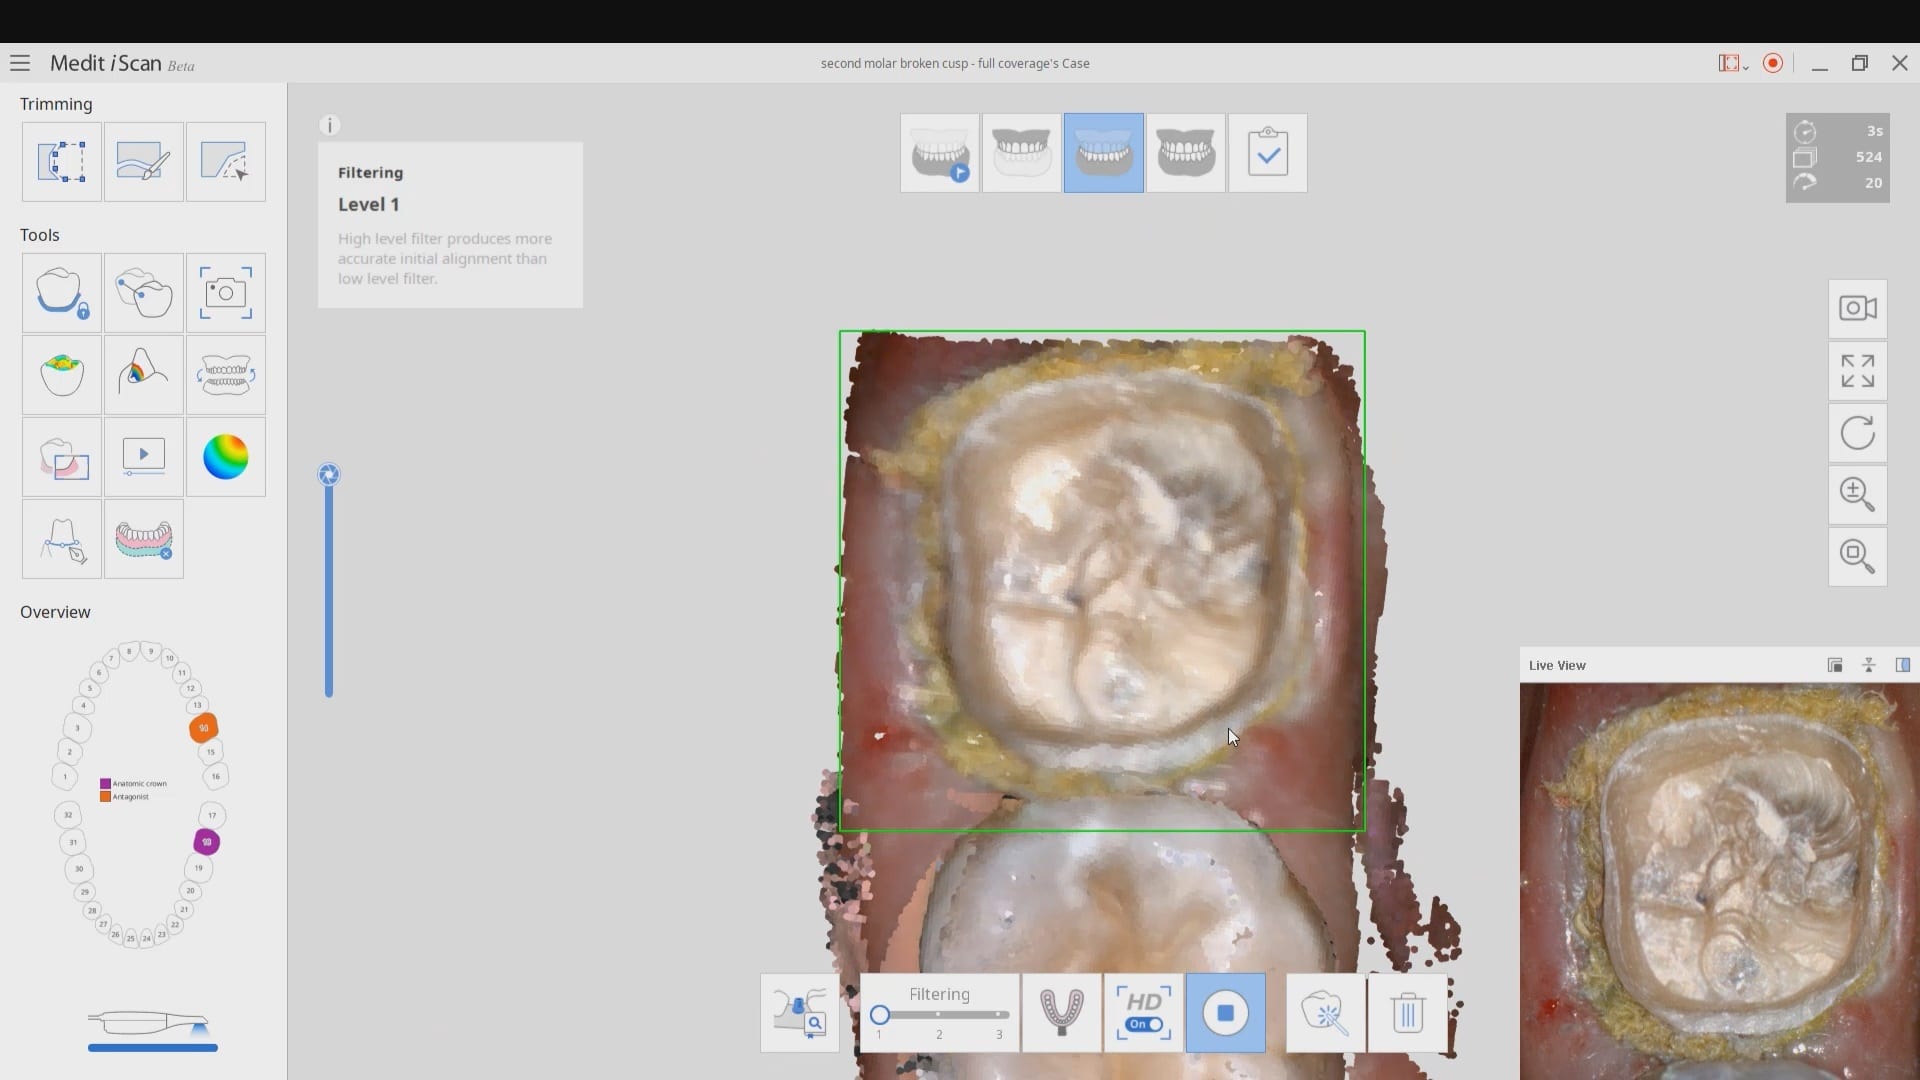
In this particular case, we are restoring a lower left molar with a full coverage crown. The pre-existing condition has multiple fracture lines and the patient currently wears a retainer. The pre-op optical impression is taken while the patient is reaching anesthesia. Once enough reduction has been achieved, the preparation is captured and an immediate proposal is rendered that replicates the pre-op condition perfectly.
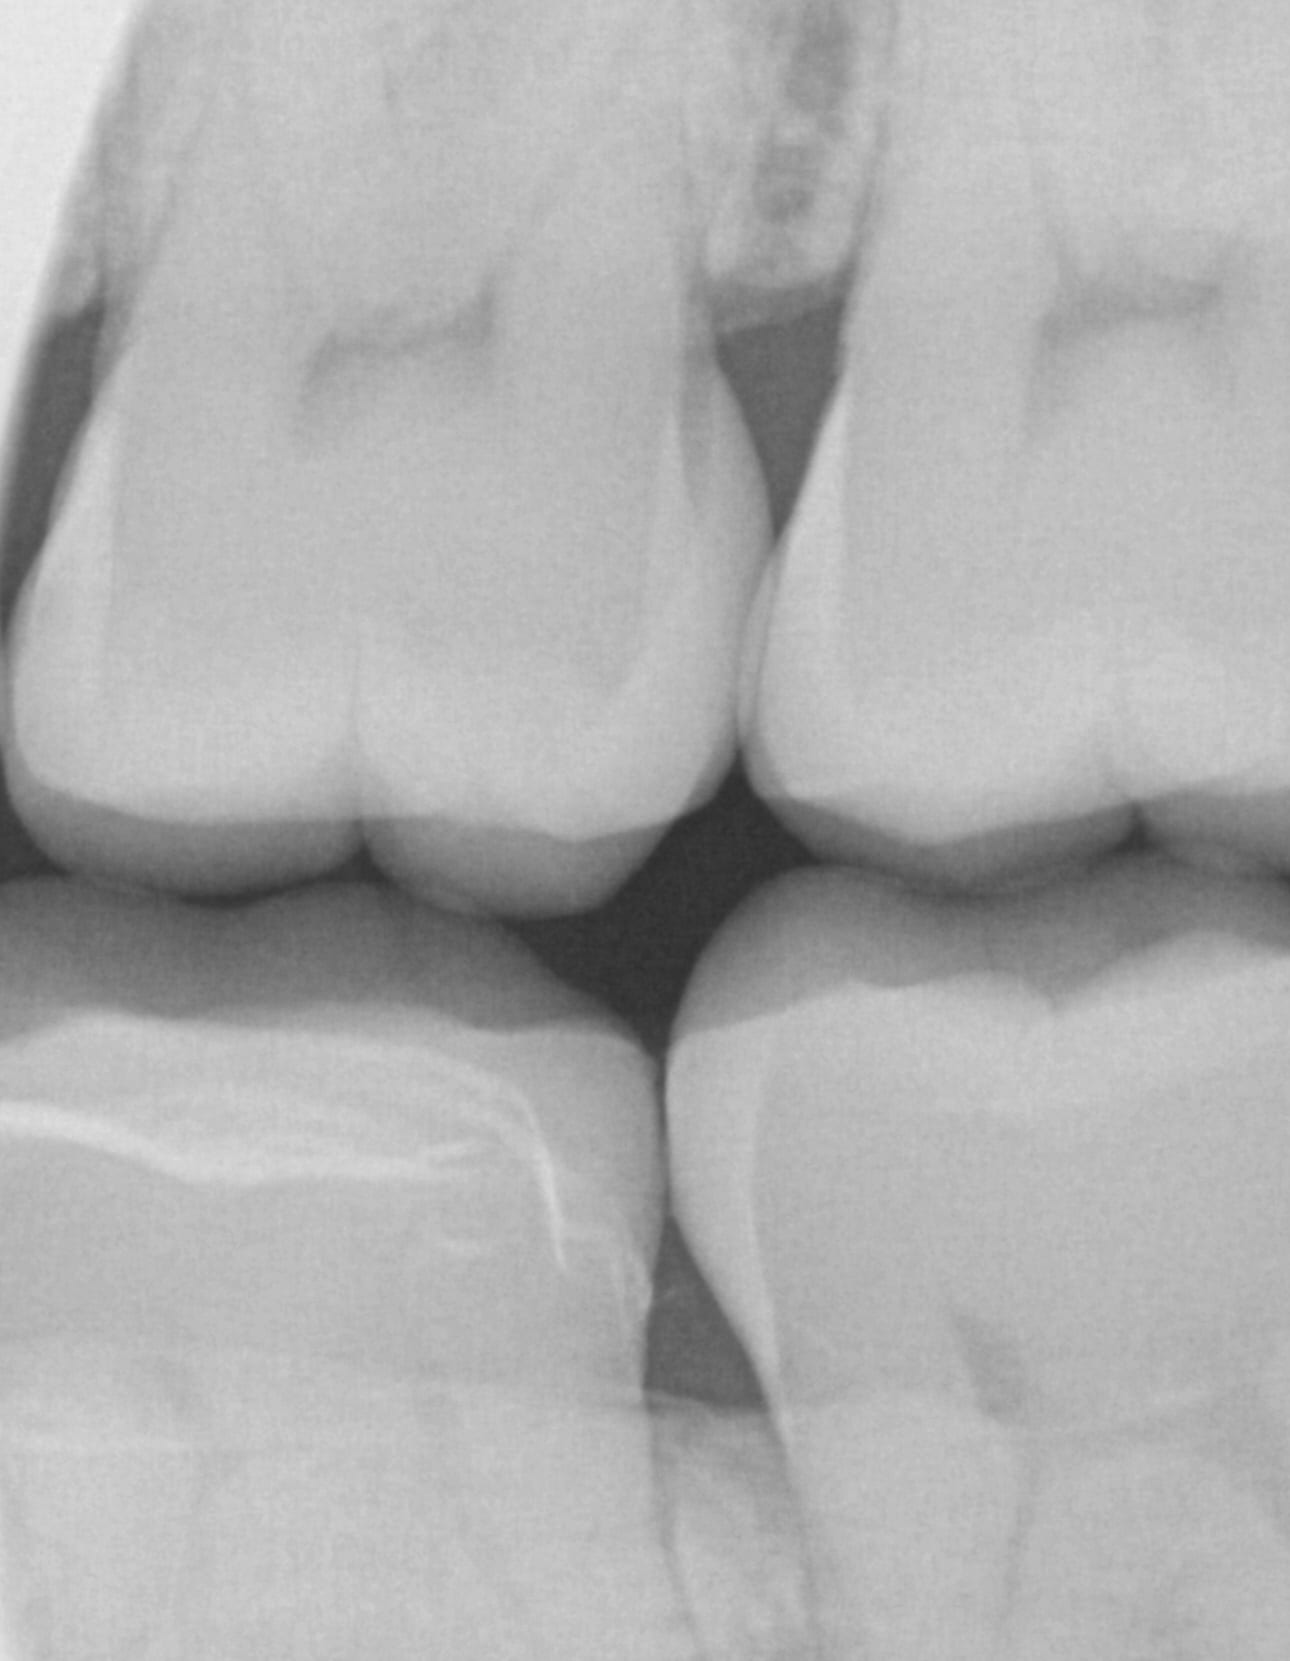
Note how the settings for the start of the adhesive gap influence the cement line that you see on the post-op bitewing after immediate delivery, even though it was milled with the CEREC MCXL.
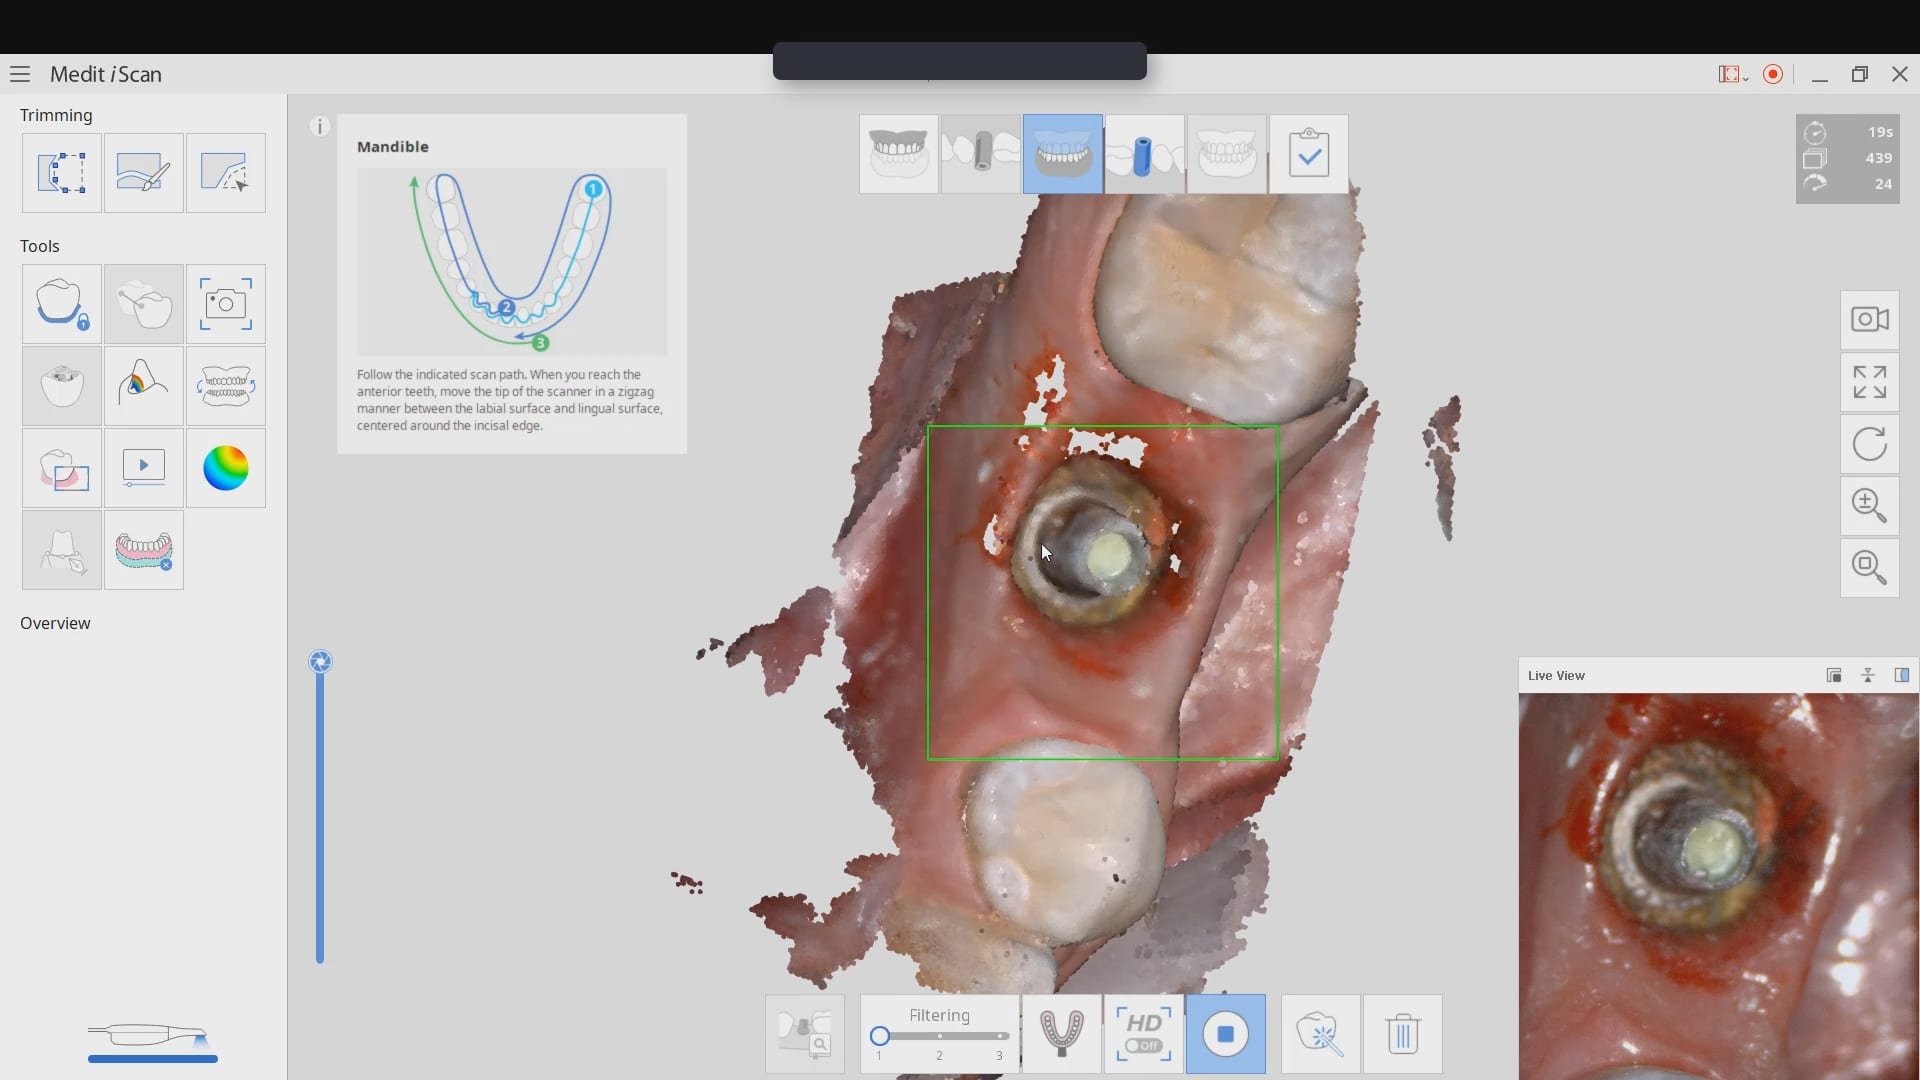
A new feature coming to Medit i500 is the automatic detection of scanbodies while you are imaging. In this clinical case, two implants are placed in the lower left quadrant in a fully guided fashion. Spacing limitations and proximity to vital anatomy did not allow for proper parallelism. This can create all kinds of headaches with analog dentistry where the trays can inadvertently lock in the mouth of distort upon poor up.
With the digital approach, you can scan the gingiva, the arch with easy access to adjacent contacts, and then the scanbodies themselves. What is great is that you do not disturb the primary stability you just achieved by placing physical forces on freshly placed implants.
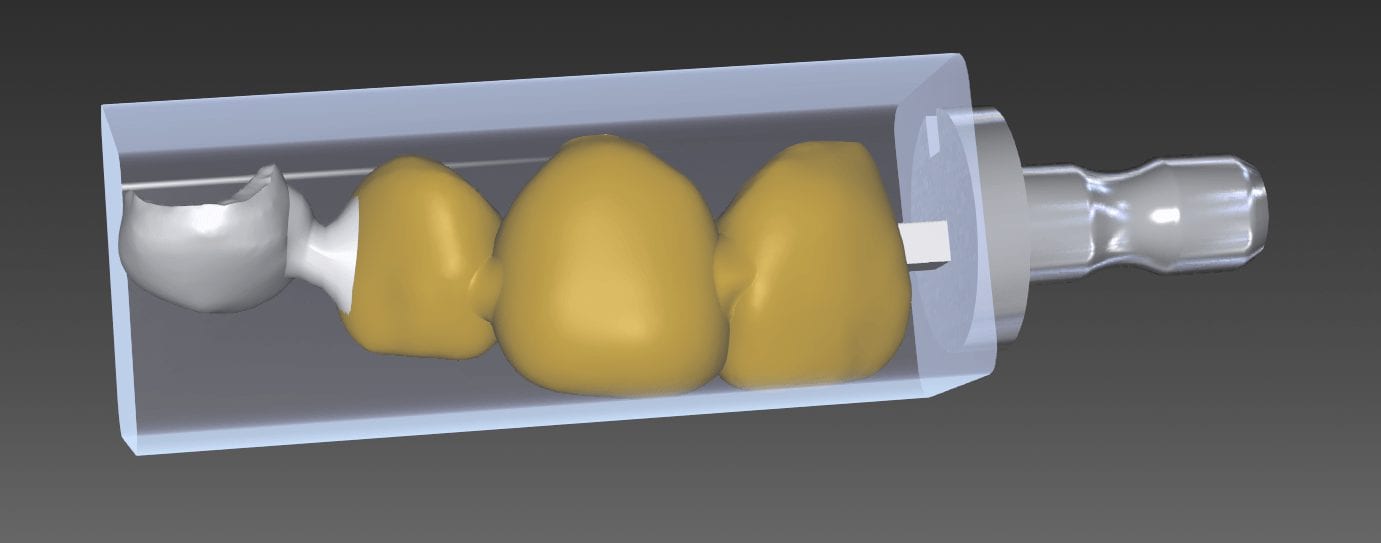
Once the images are captured and the scanbodies are identified, we launch exocad and the data is not only automatically imported into the Computer Aided Design Software, it also plots the fixtures in the correct position and identifies their location and timing so you can proceed with the design of the custom abutment and / or tibase restoration.
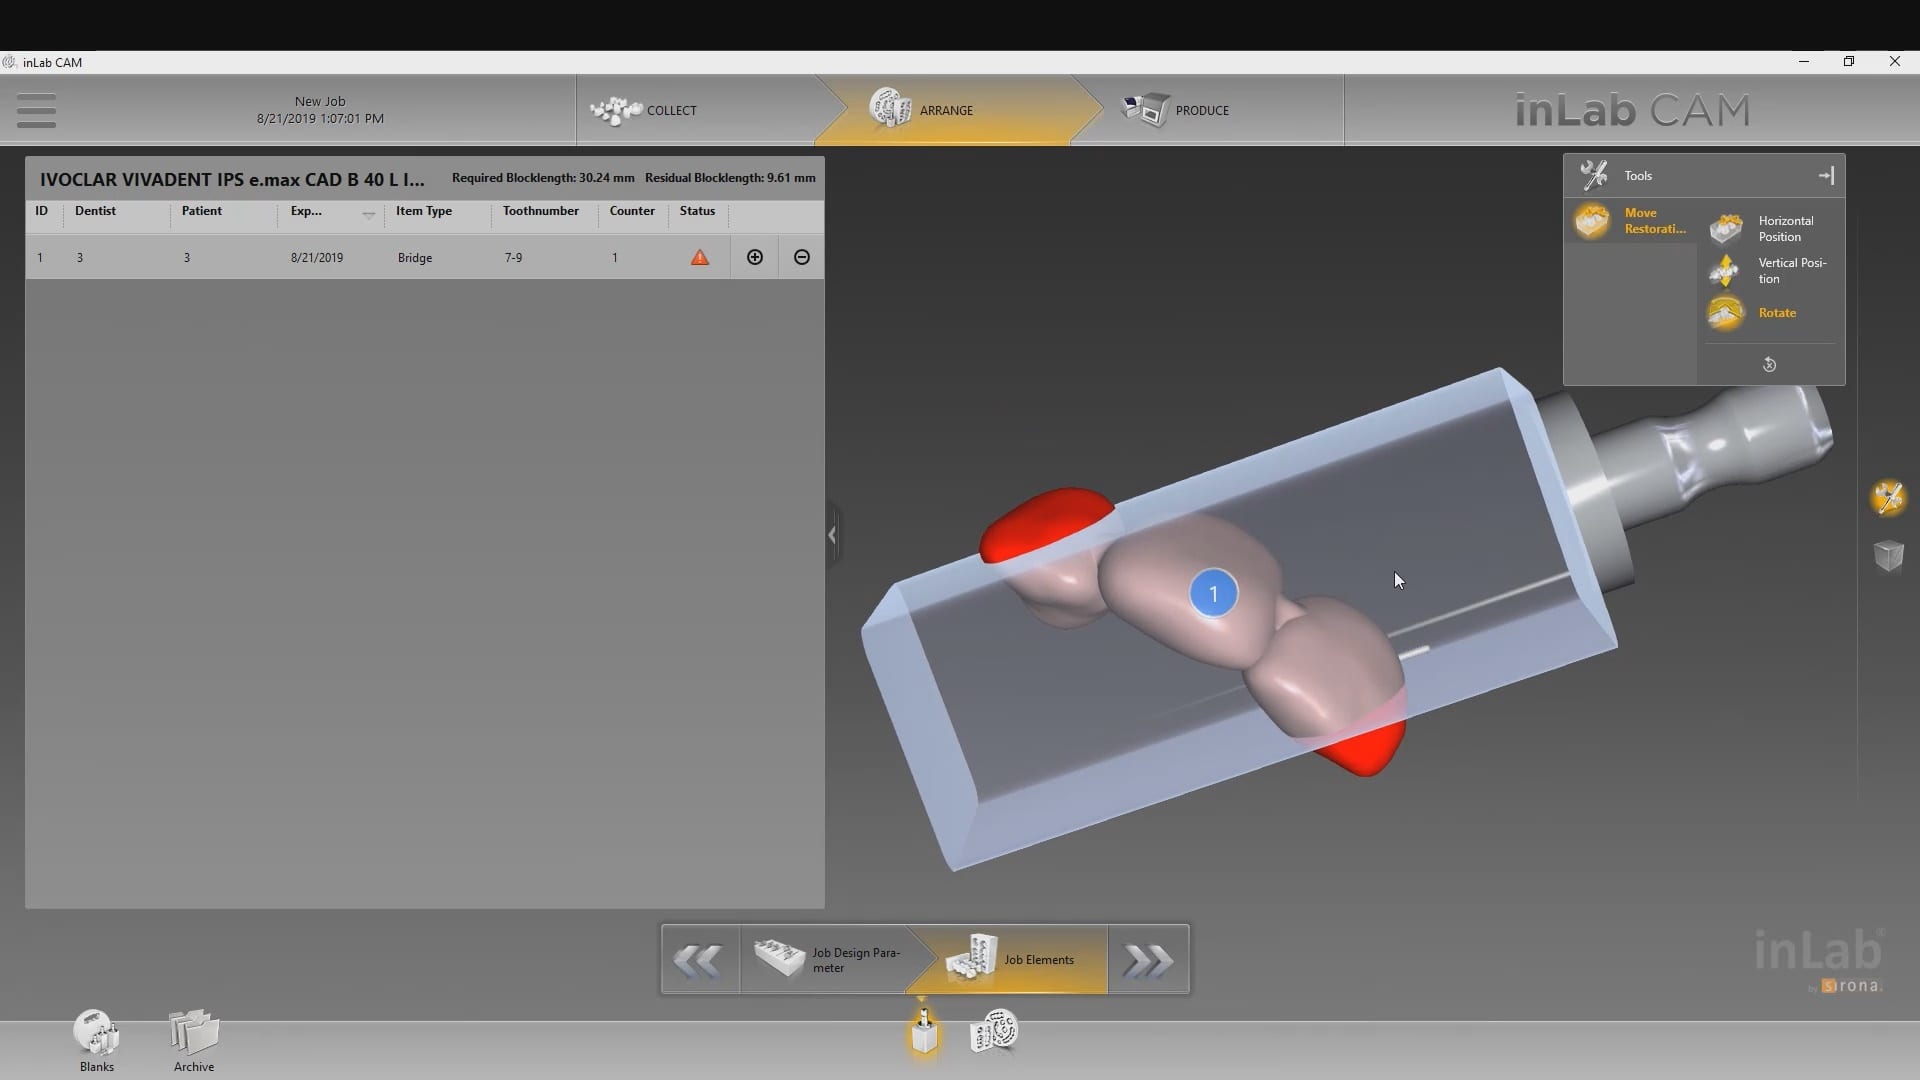
This 4 unit case was imaged in Medit i500 and designed in exocad. The final restoration was taken to CEREC inlab cam. When the construction file is imported into cam, it contains data such as the margin line which is important for the milling machine to know for its tool path calculations.
In this particular situation, the construction file dictated the position of the restoration in the block which would have not allowed for proper milling. Instead of loading the construction file, we imported the stl design, redrew the margins really quickly and were able to mill the two separate (4 unit) case out of a single emax block.
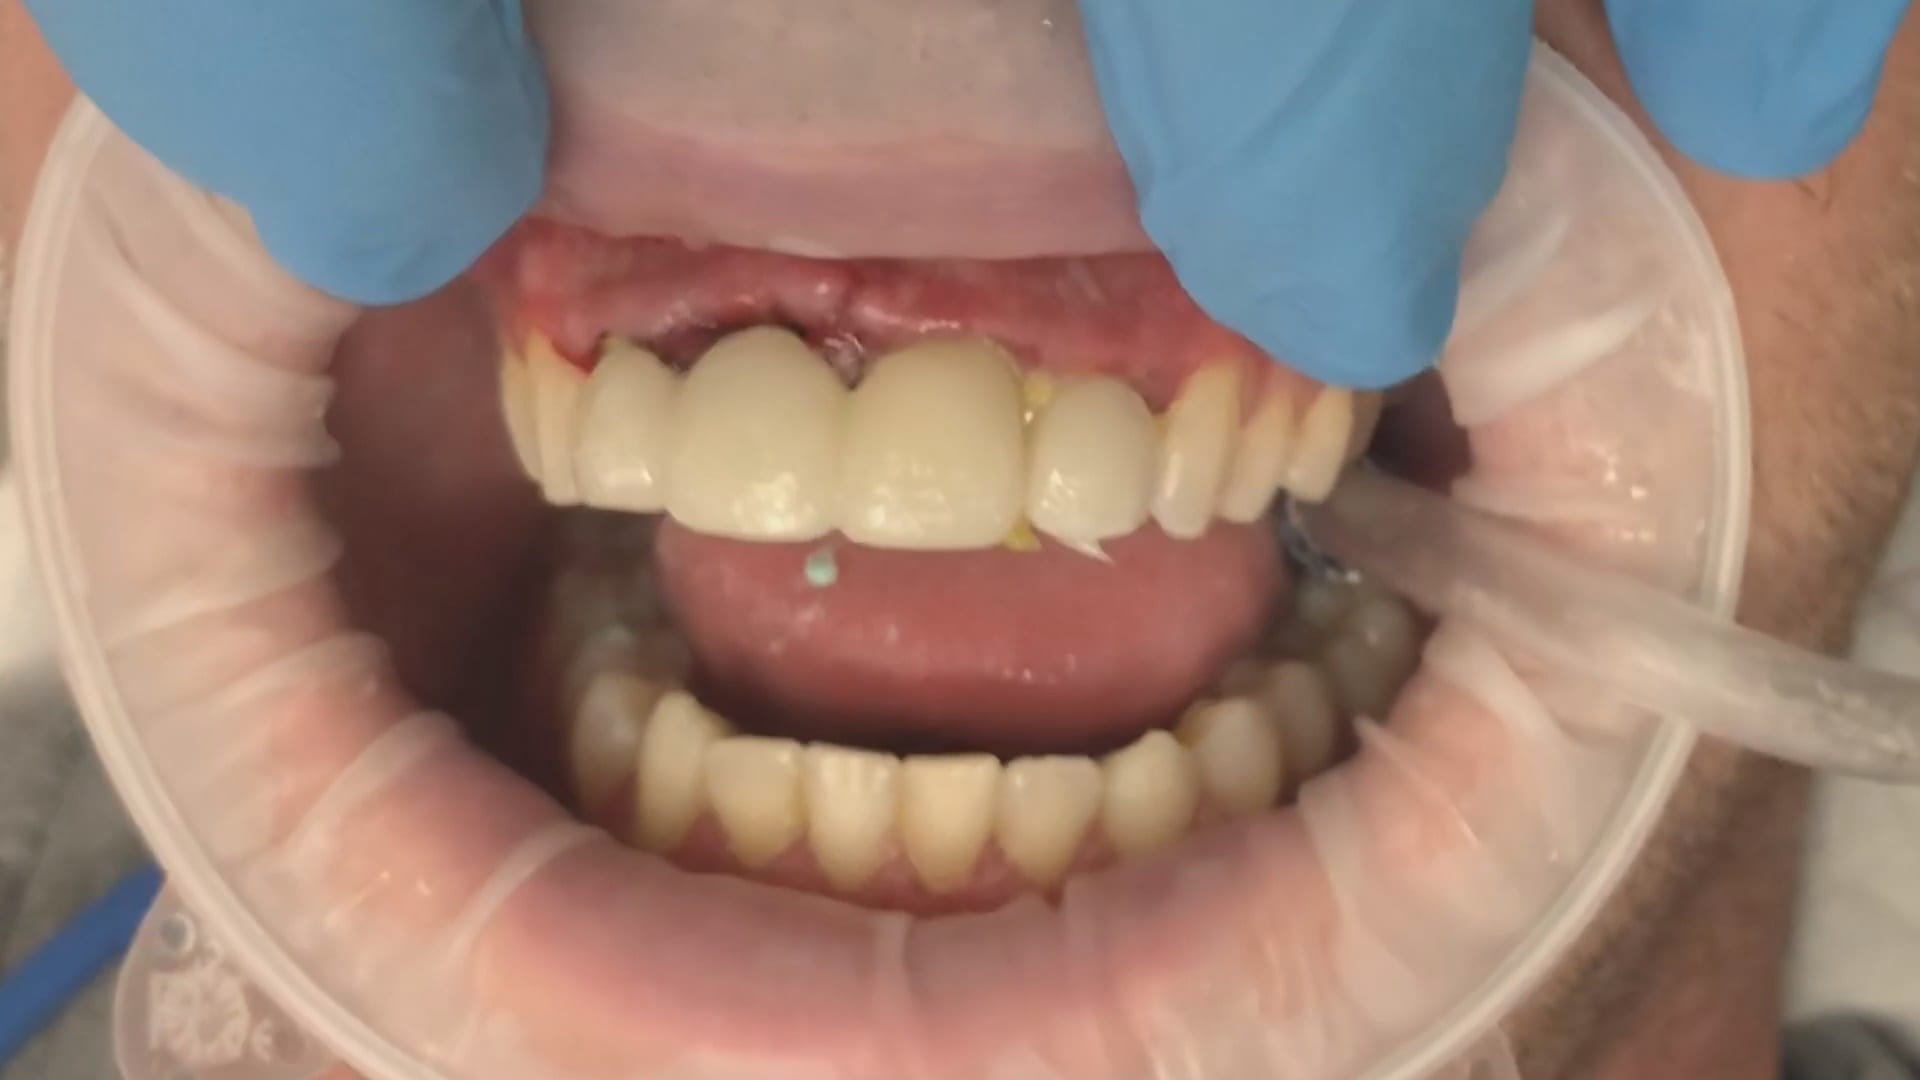
Same visit crowns can be a practice builder. We had a patient referred for in house fabrication of a restoration because she did not want to go through the procedure twice. A family member made the referral for a broken tooth.
After the tooth tested vital and the patient consented to treatment, she was anesthetized. While waiting for the onsite of anesthesia, the upper arch was imaged along with the lower arch and the bite in the occlusal one window box. The case was set up for just imaging the preparation. Most of this can be delegated to team members.
We highly recommend that you capture the final bite after you have finished preparing the most distal tooth. You can use your camera to visualize your clearance. You can keep reducing the occlusal surface until you have enough clearance.
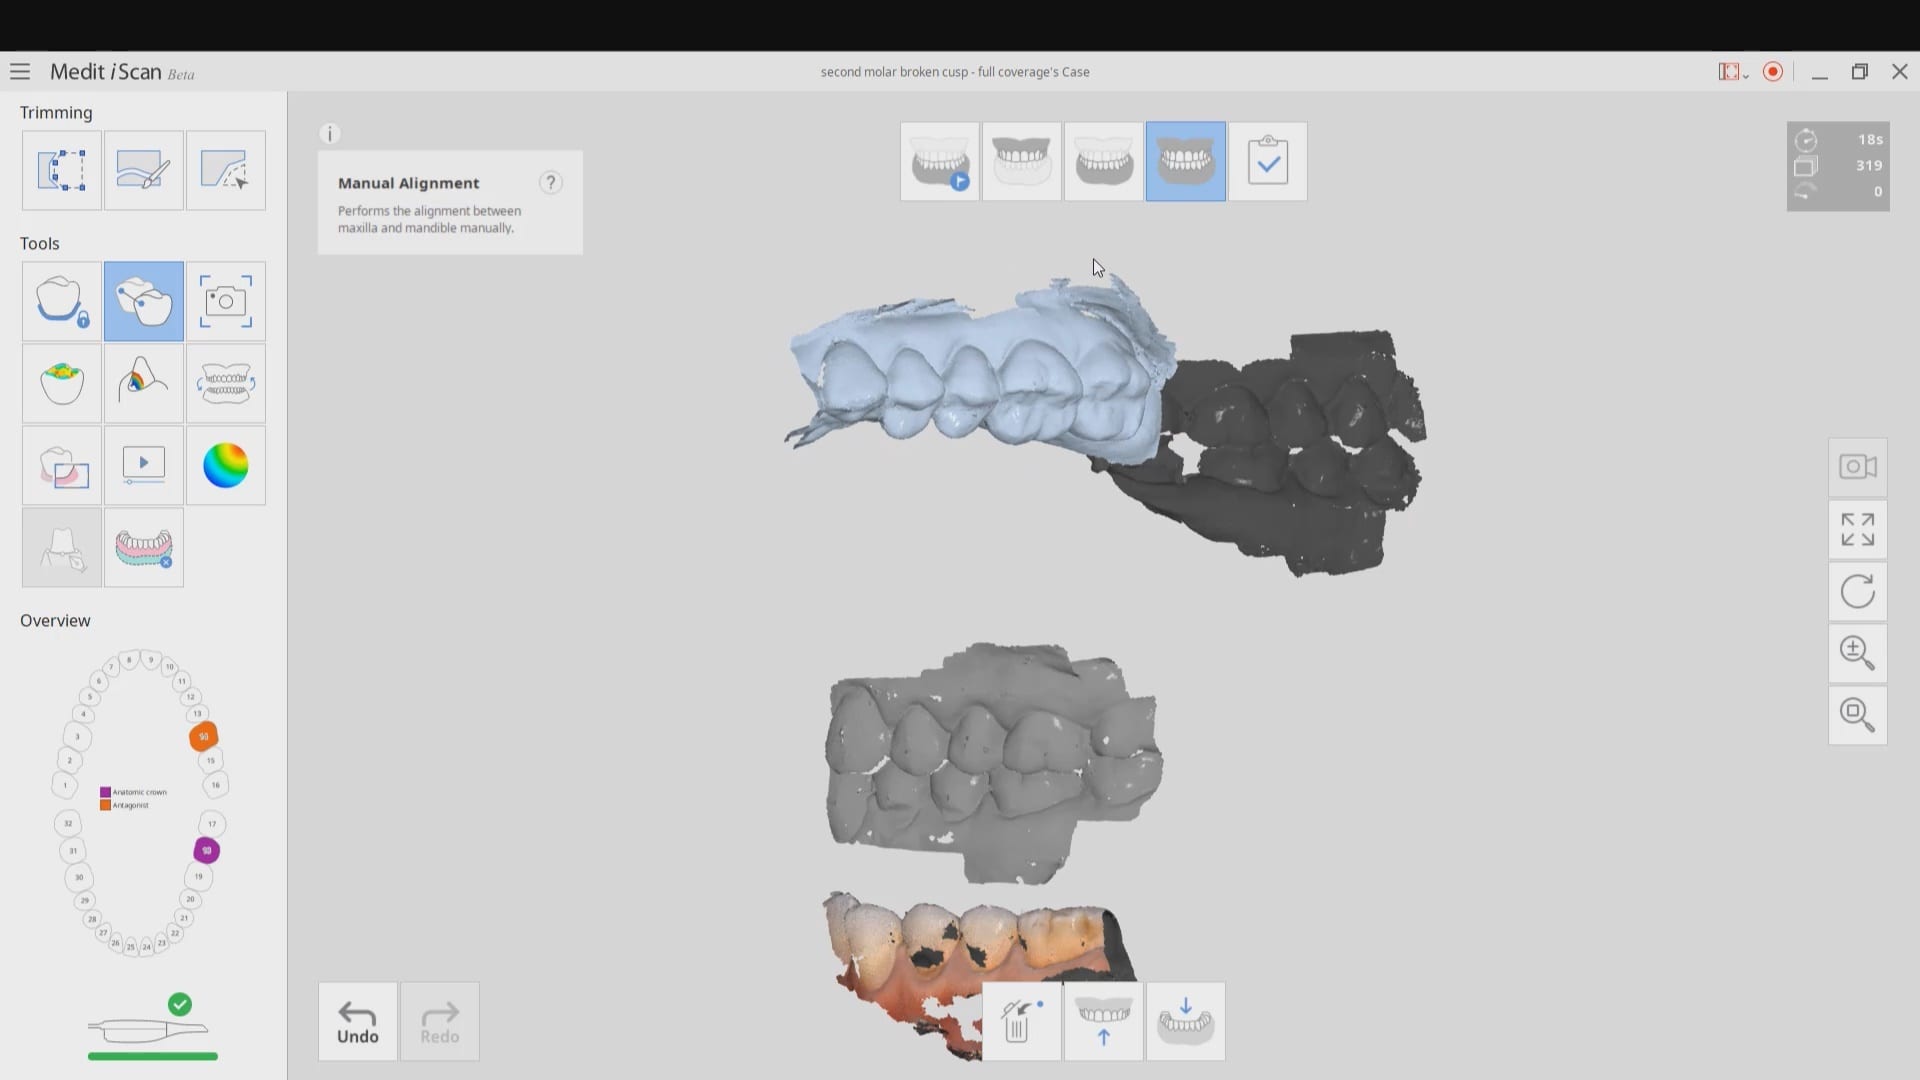
In this particular case, when we took the second occlusion images, the models would not turn green. When this happens, you should immediately ascertain if you have captured the first or second bite correctly. Double check to see if the jaw settled or if the patient moved their jaw during this acquisition step.
You can watch how we troubleshoot the bite and manually choose the second bite to relate the arches together.
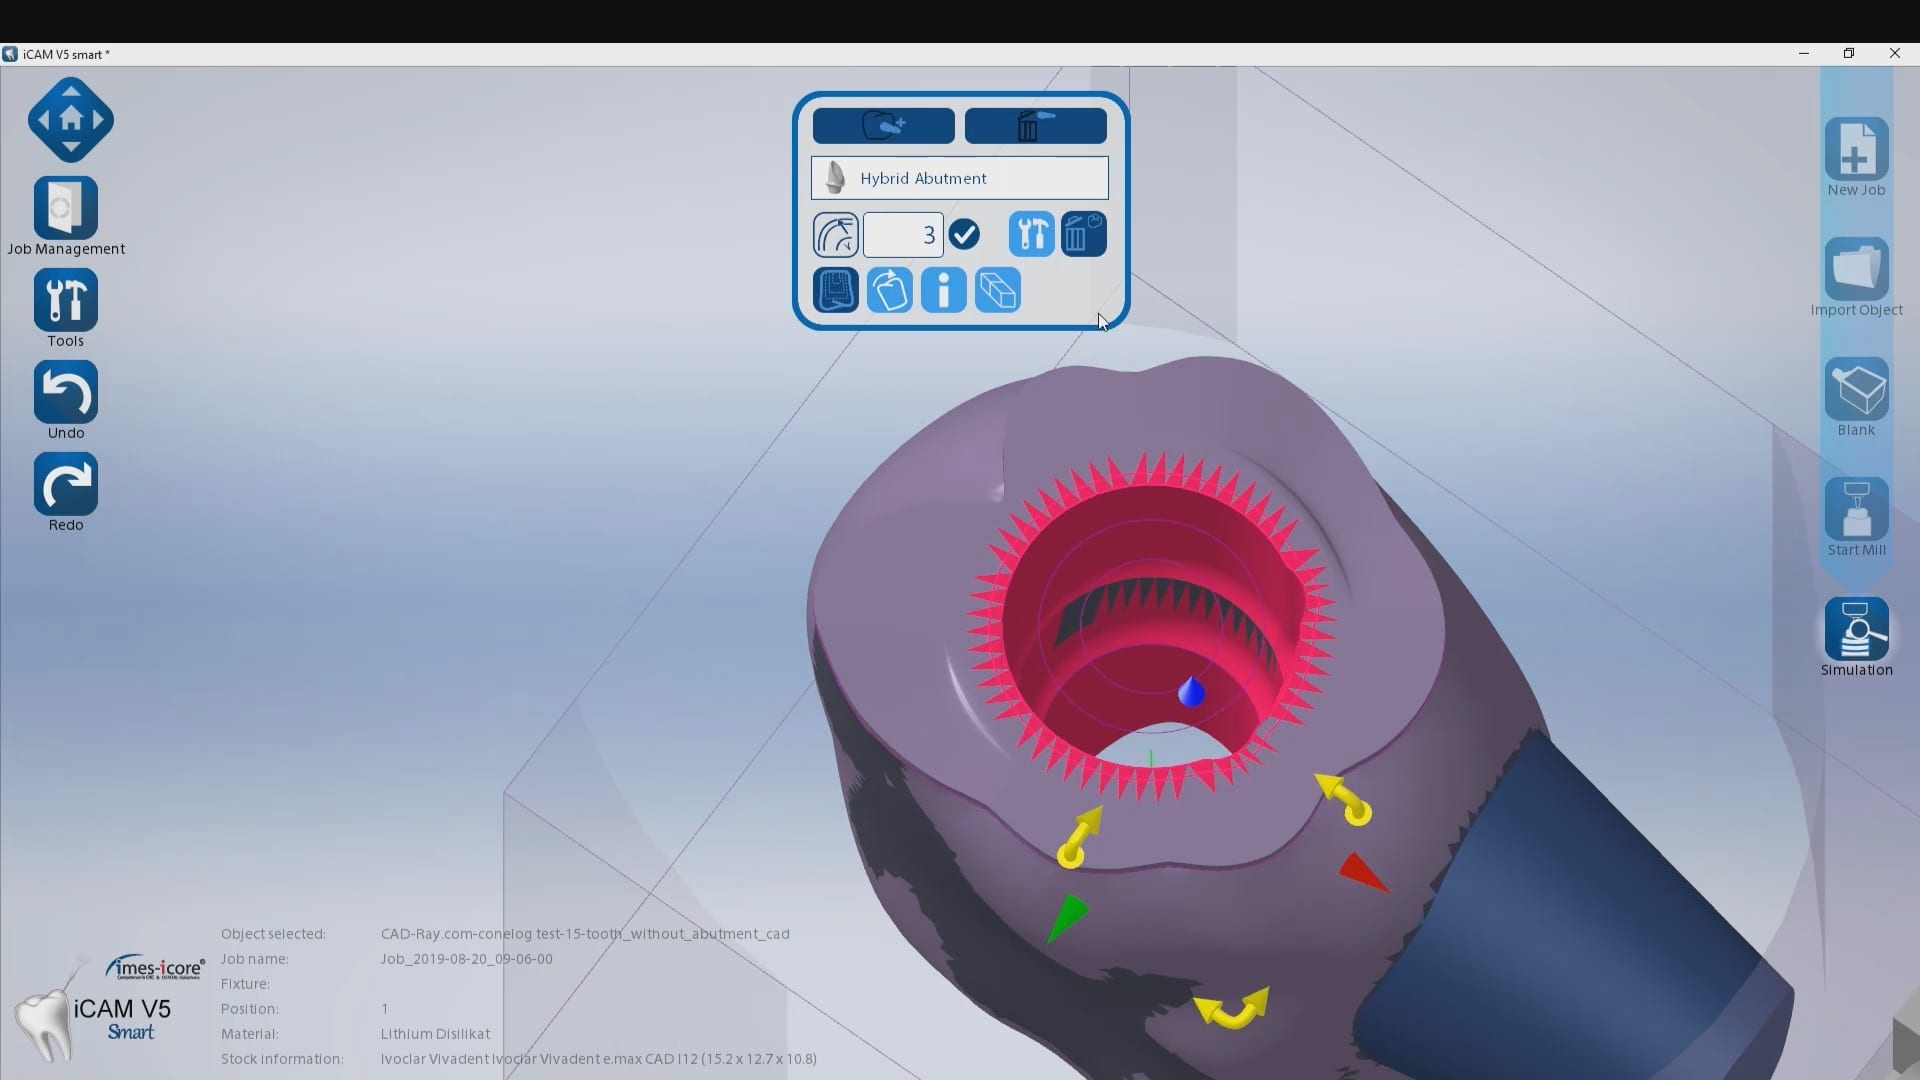
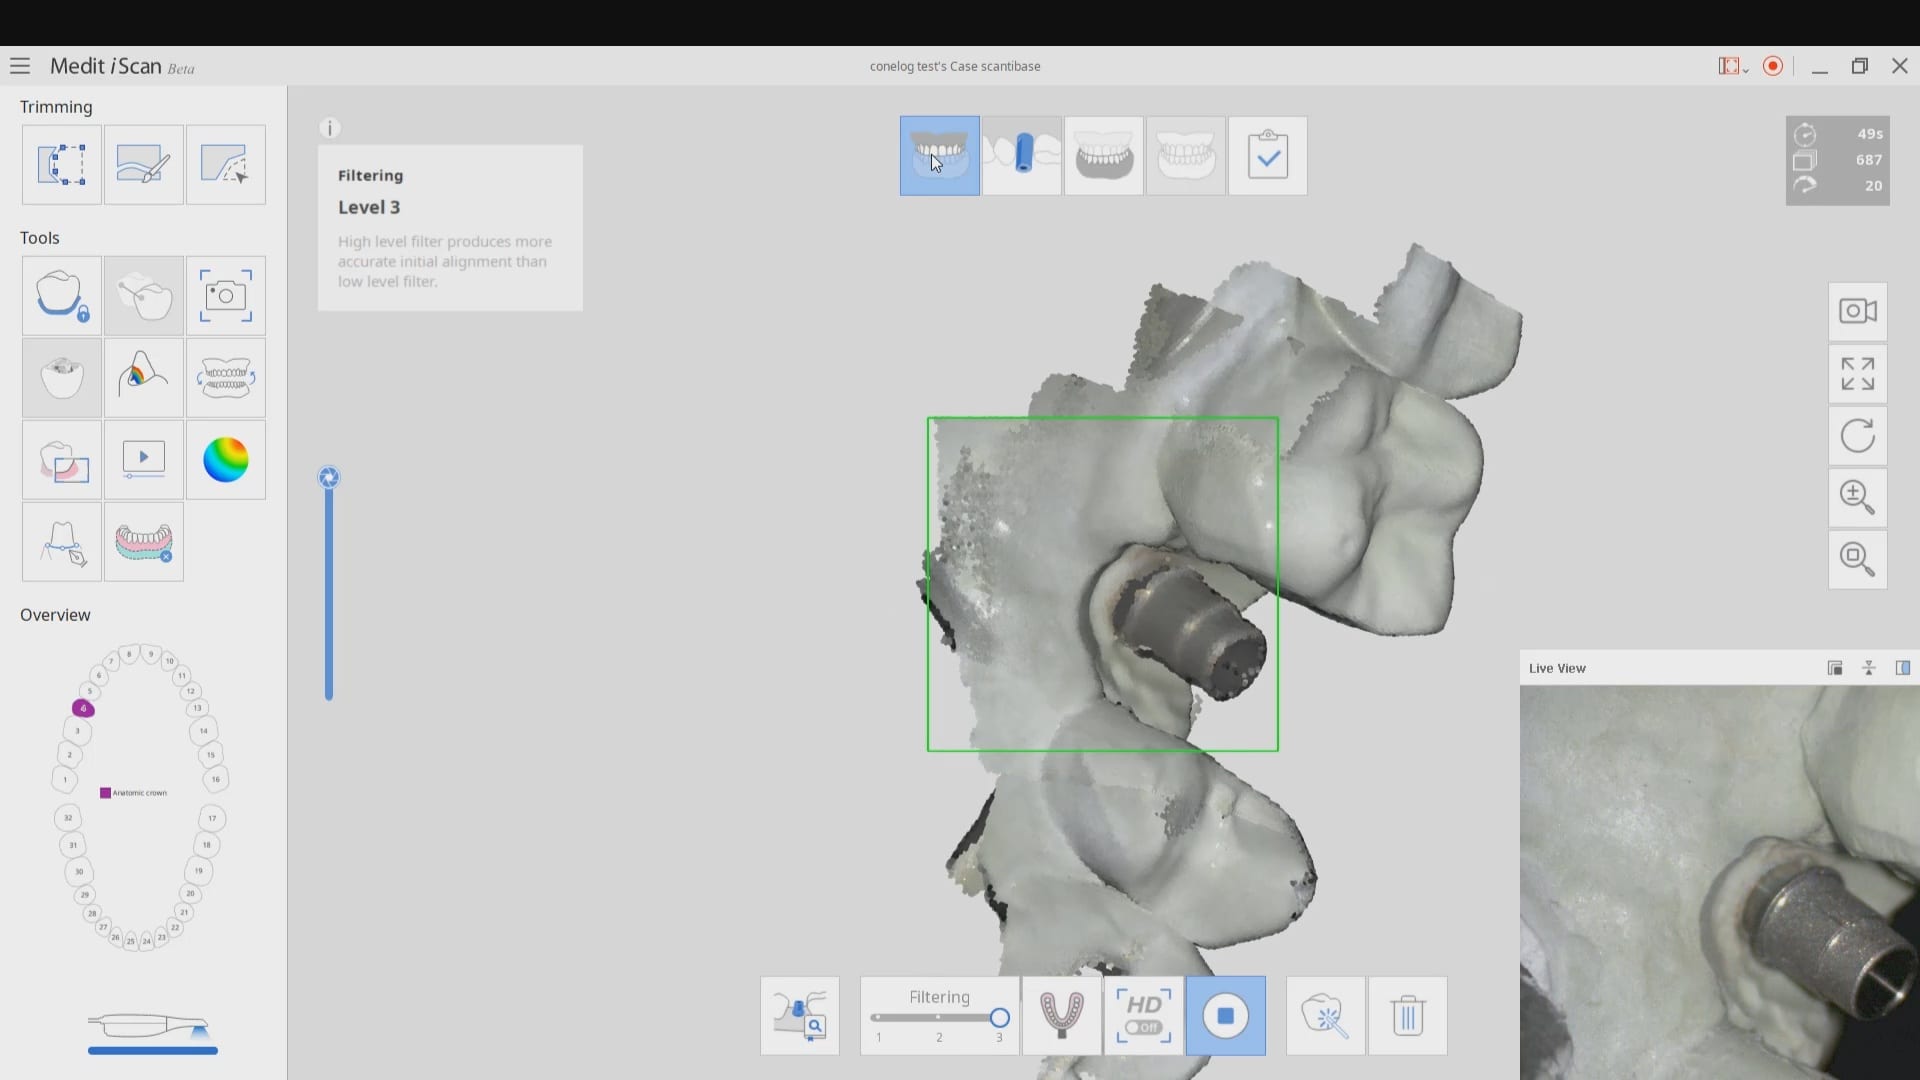
At CAD-Ray we are constantly testing milling machines that can render ceramic or metal abutment restorations. In this particular case, we are testing the conelog line of tibases and utilizing the automated identification of the scanbody with the new Medit i500 V2.1 Artificial Intelligence program. Not only does the software identify the scanbody and locate the fixture but it also imports the whole complex into the cad software where the fixture and digital tibase are already identified and aligned.
We scanned the tibase as well on the model and merged it to the digital proposal to see how closely the digital proposals matched the physical model.
It is very important to properly identify the scanbodies and to label them accordingly. A single mis-step can result in ill fitting restorations and cause disappointment. If the nomenclature or the math doesn’t add up, it is always a good idea to contact the manufacturer of the scanbody to verify your findings.
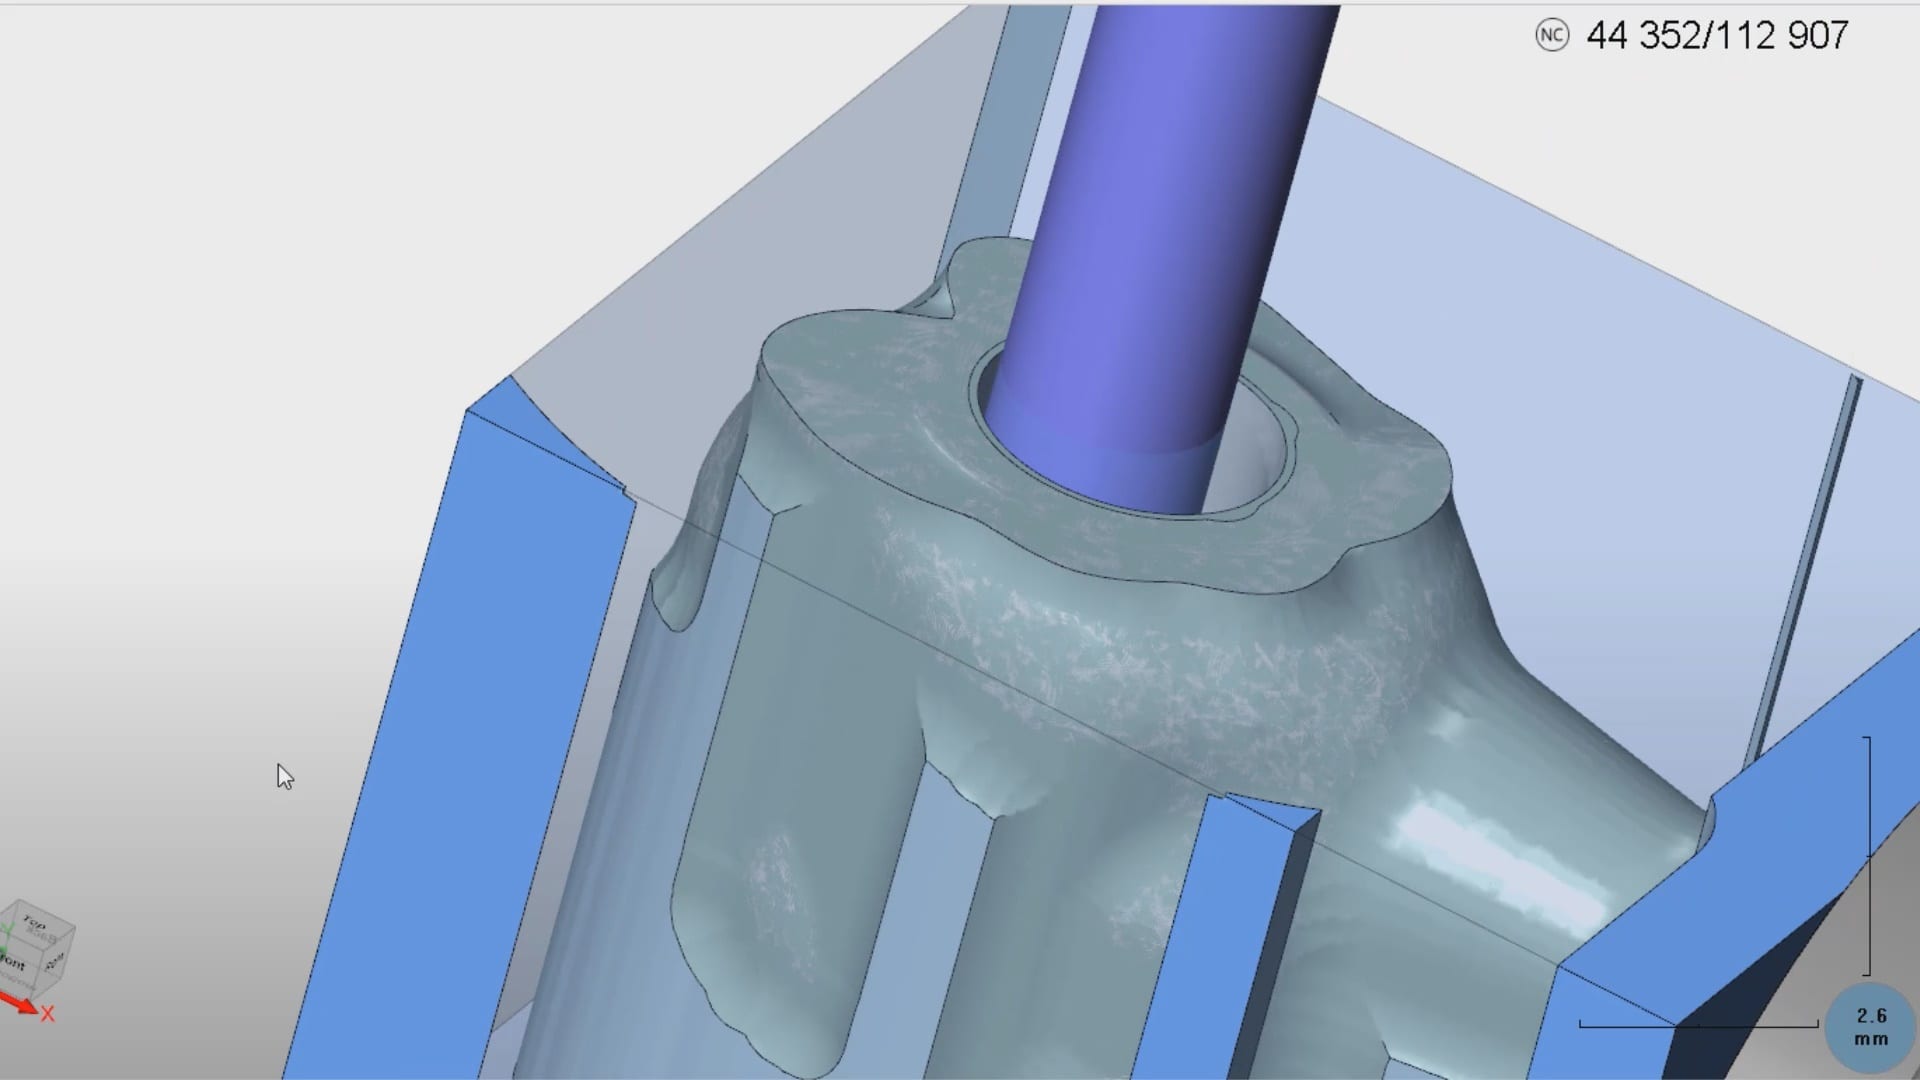
In the first set of videos, we demonstrate how the scanbody is imaged with the Medit i500. For this particular demonstration, we placed a tibase on a conelog 4.3 mm diameter fixture and then a peek scanbody on top of it. Indexing and making sure it is seated is of paramount importance. Once the software identifies the complex it can automatically import it into exocad software so you can proceed with the design.
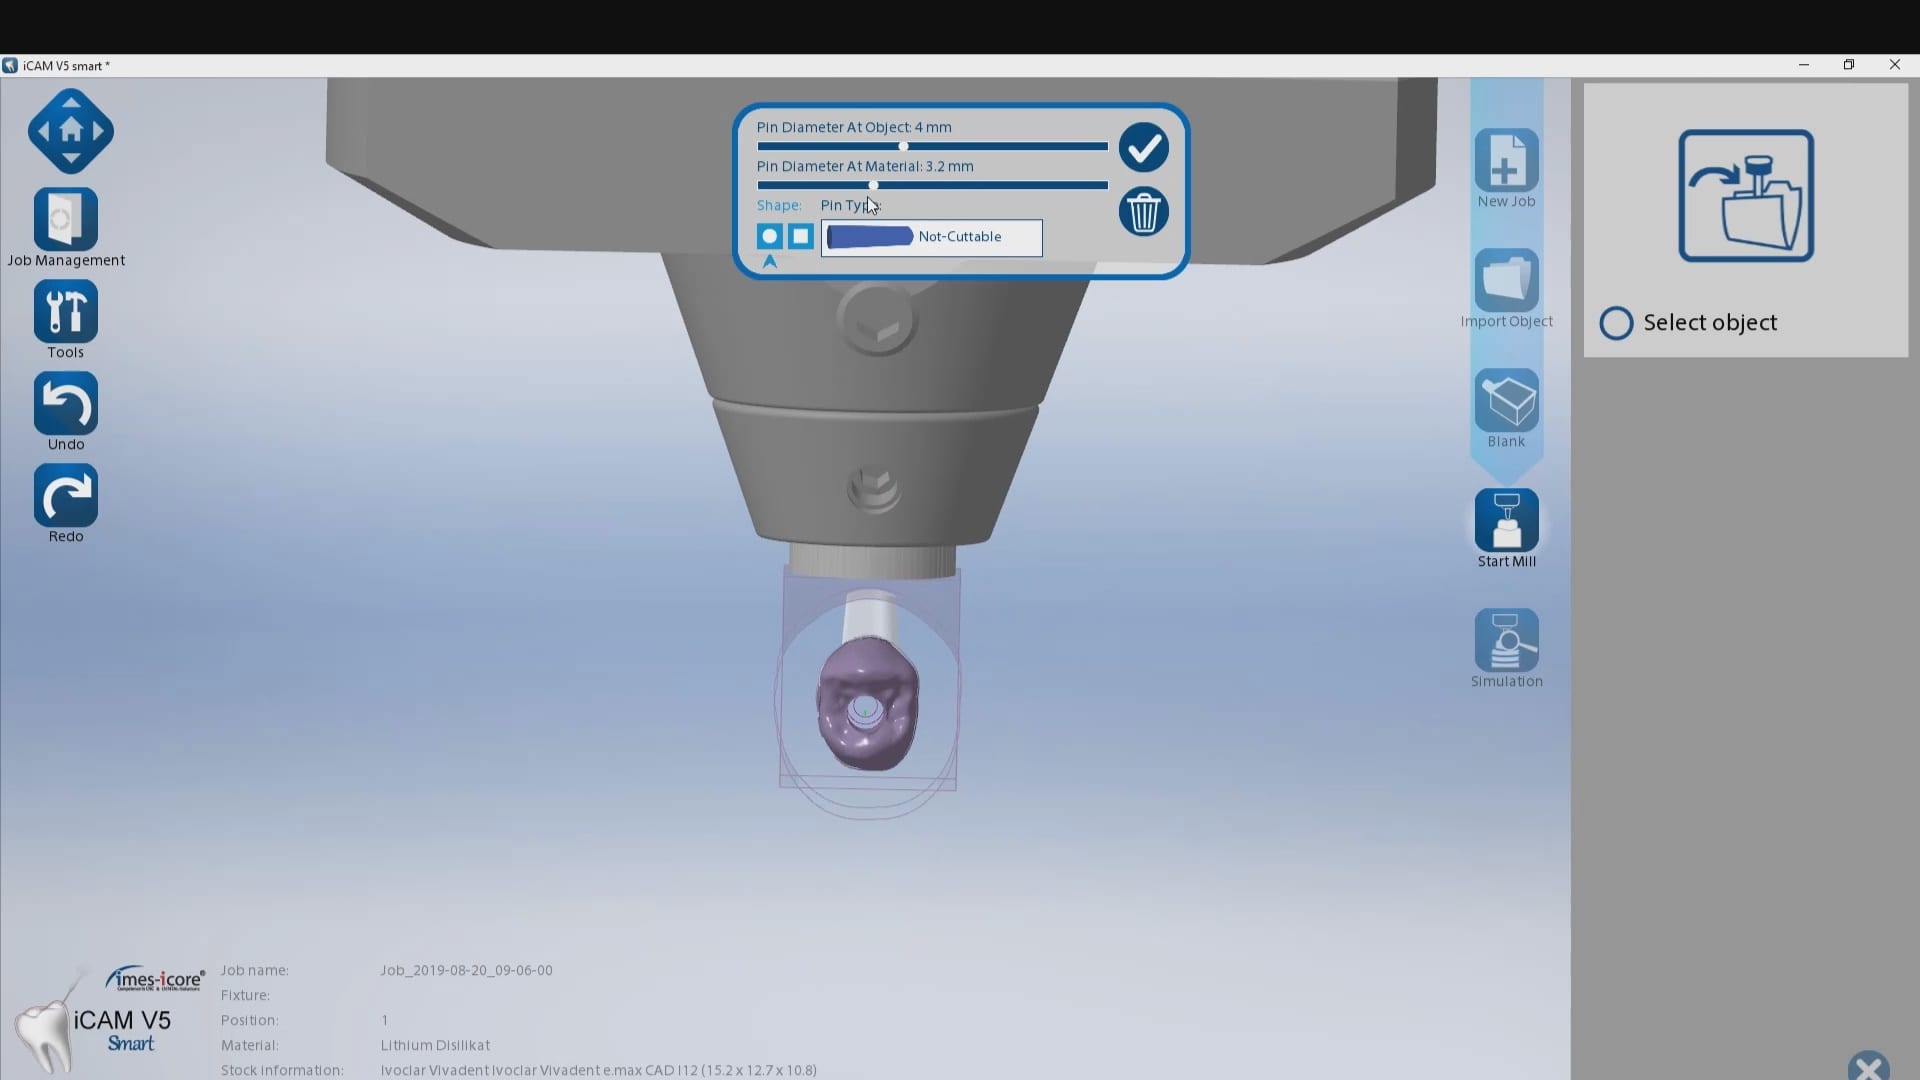
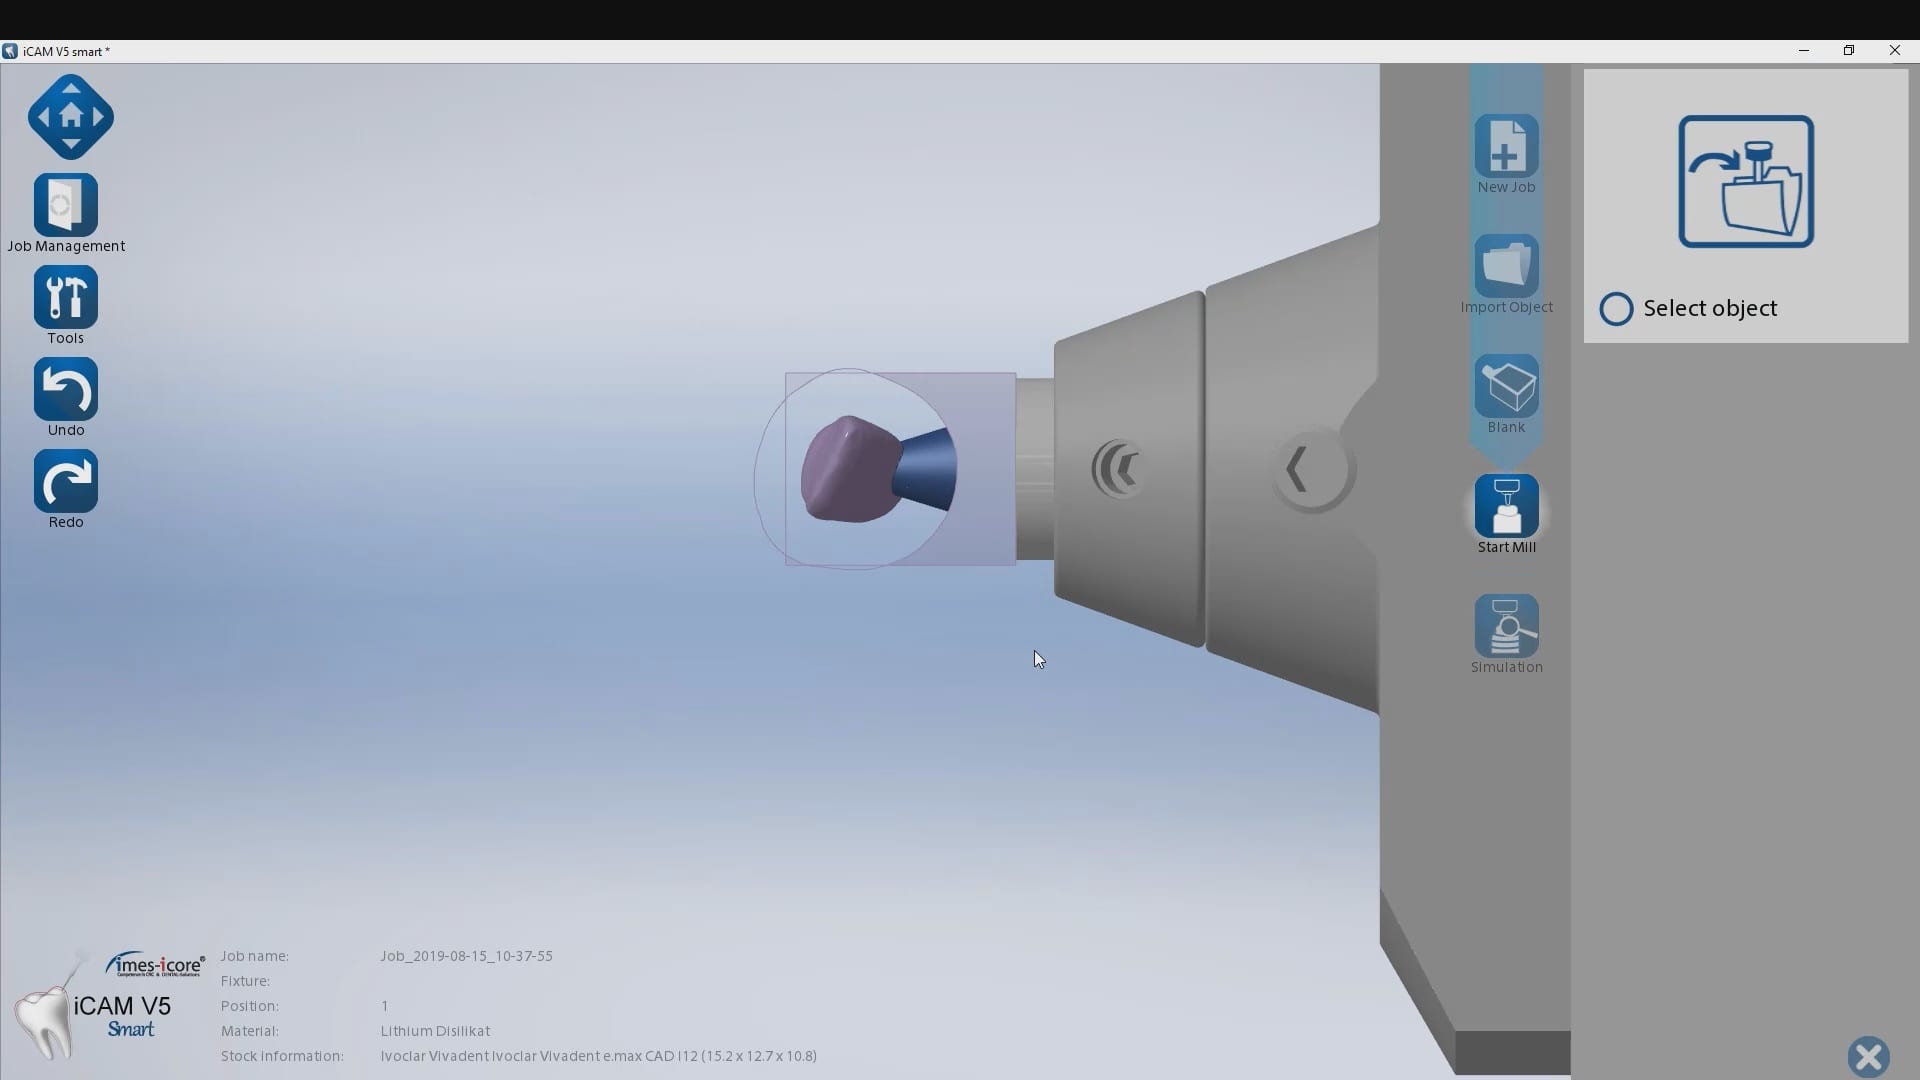
This test case is milled for record keeping and FDA compliance as we are distributors of multiple scanners and milling machines. We are only concerned about the fit of the restoration. After the design was completed it was then imported into milbox CAM software, nested, and the sprue was configured for the mill.
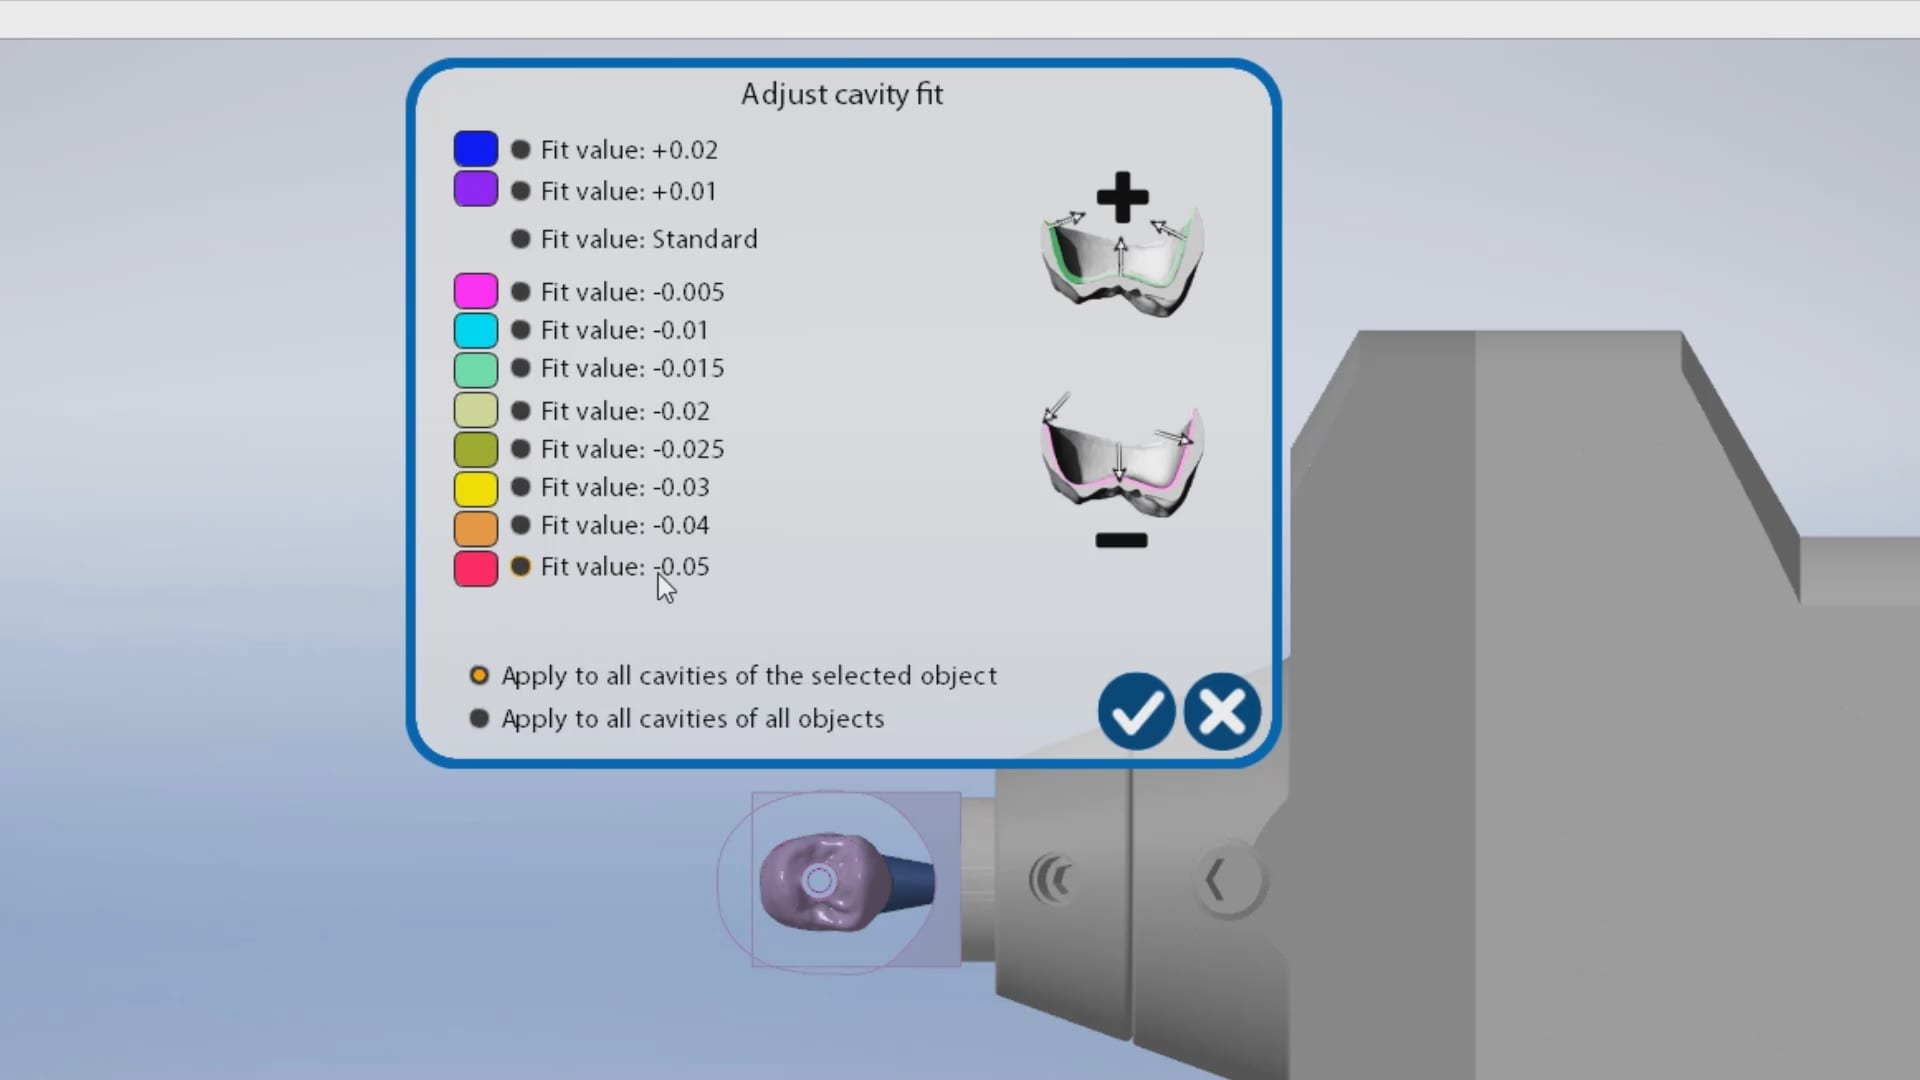
The first produced restoration did not seat completely and the internal was relieved in an analog manner. It did finally seat but by then, it lost its anti-rotation mechanism. The case was then reloaded in millbox and the internal relief was increased by – 0.05 mm. That simple adjustment allowed for proper seating without any analog adjustments. You can also appreciate some residual material that may keep you from seating. Both the software and the carbon marks left on the intaglio of the restoration can be clear indications of what needs to be adjusted.
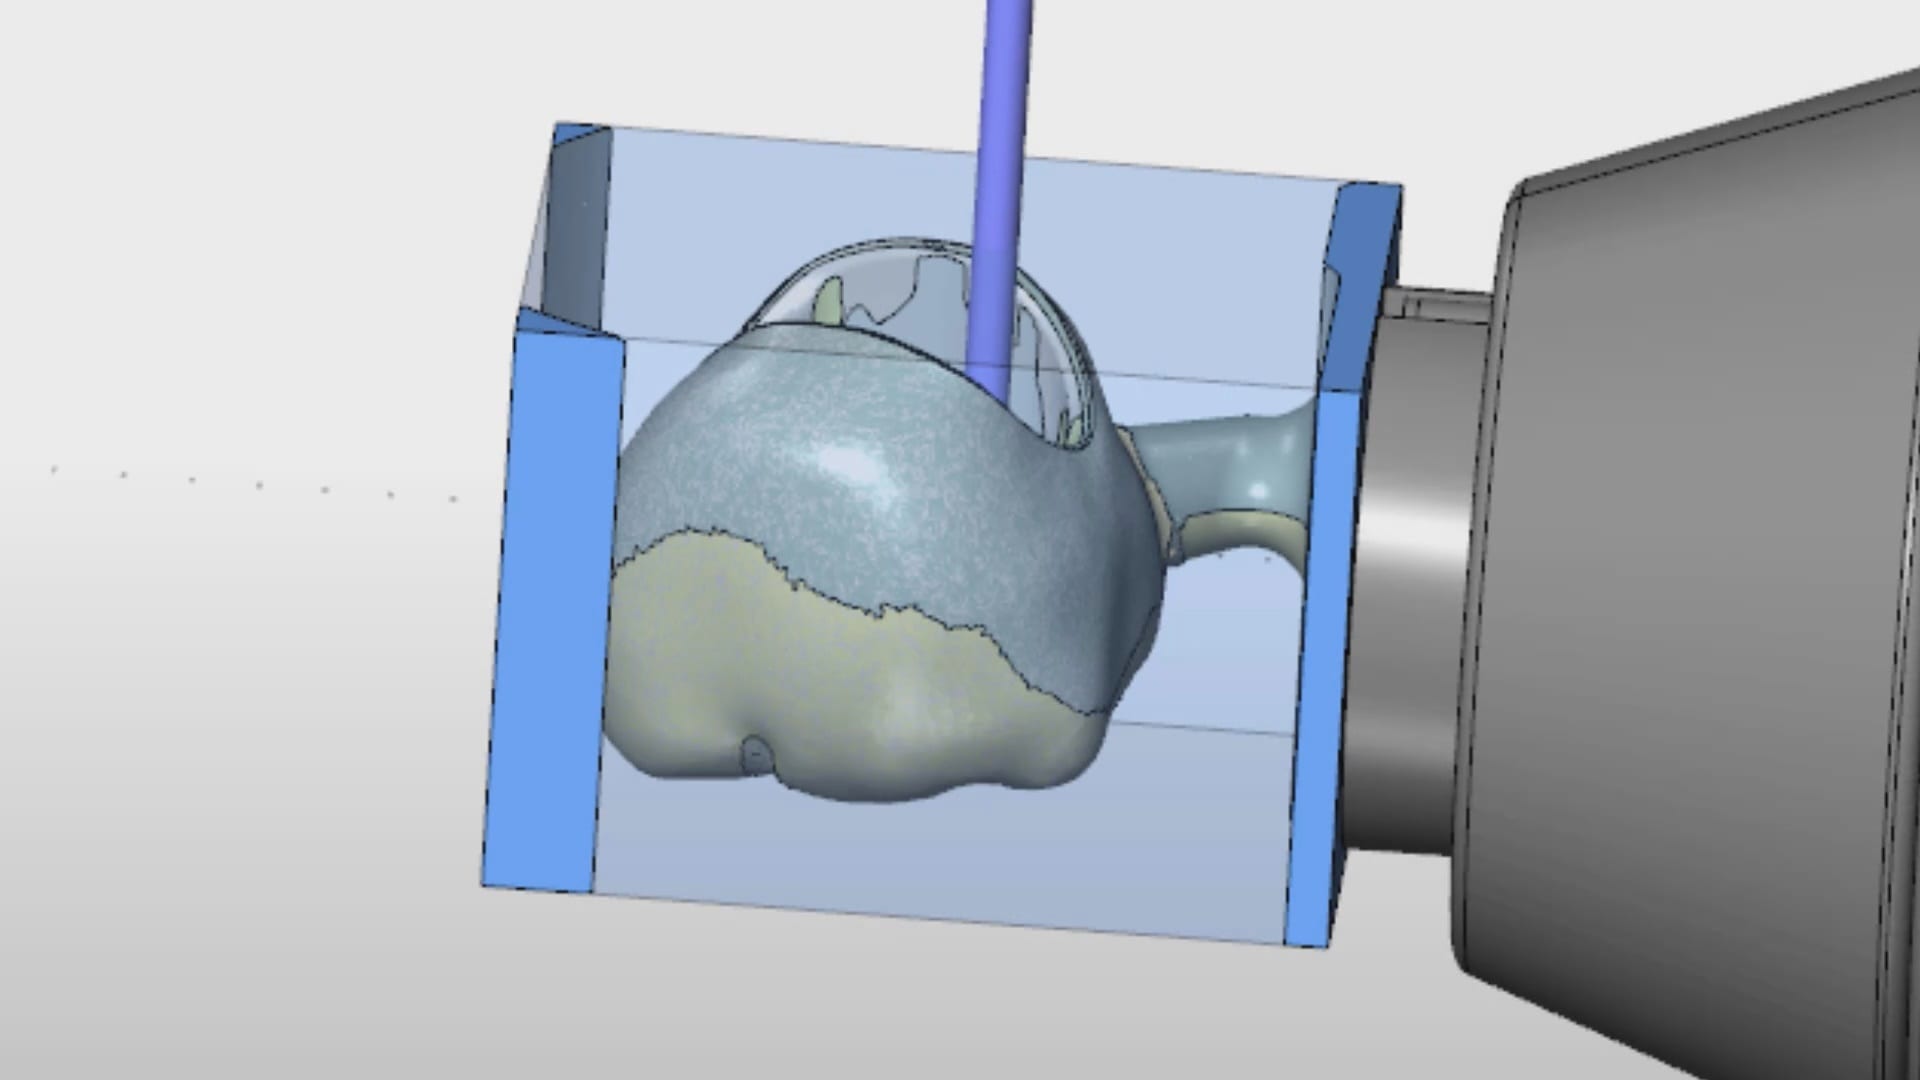
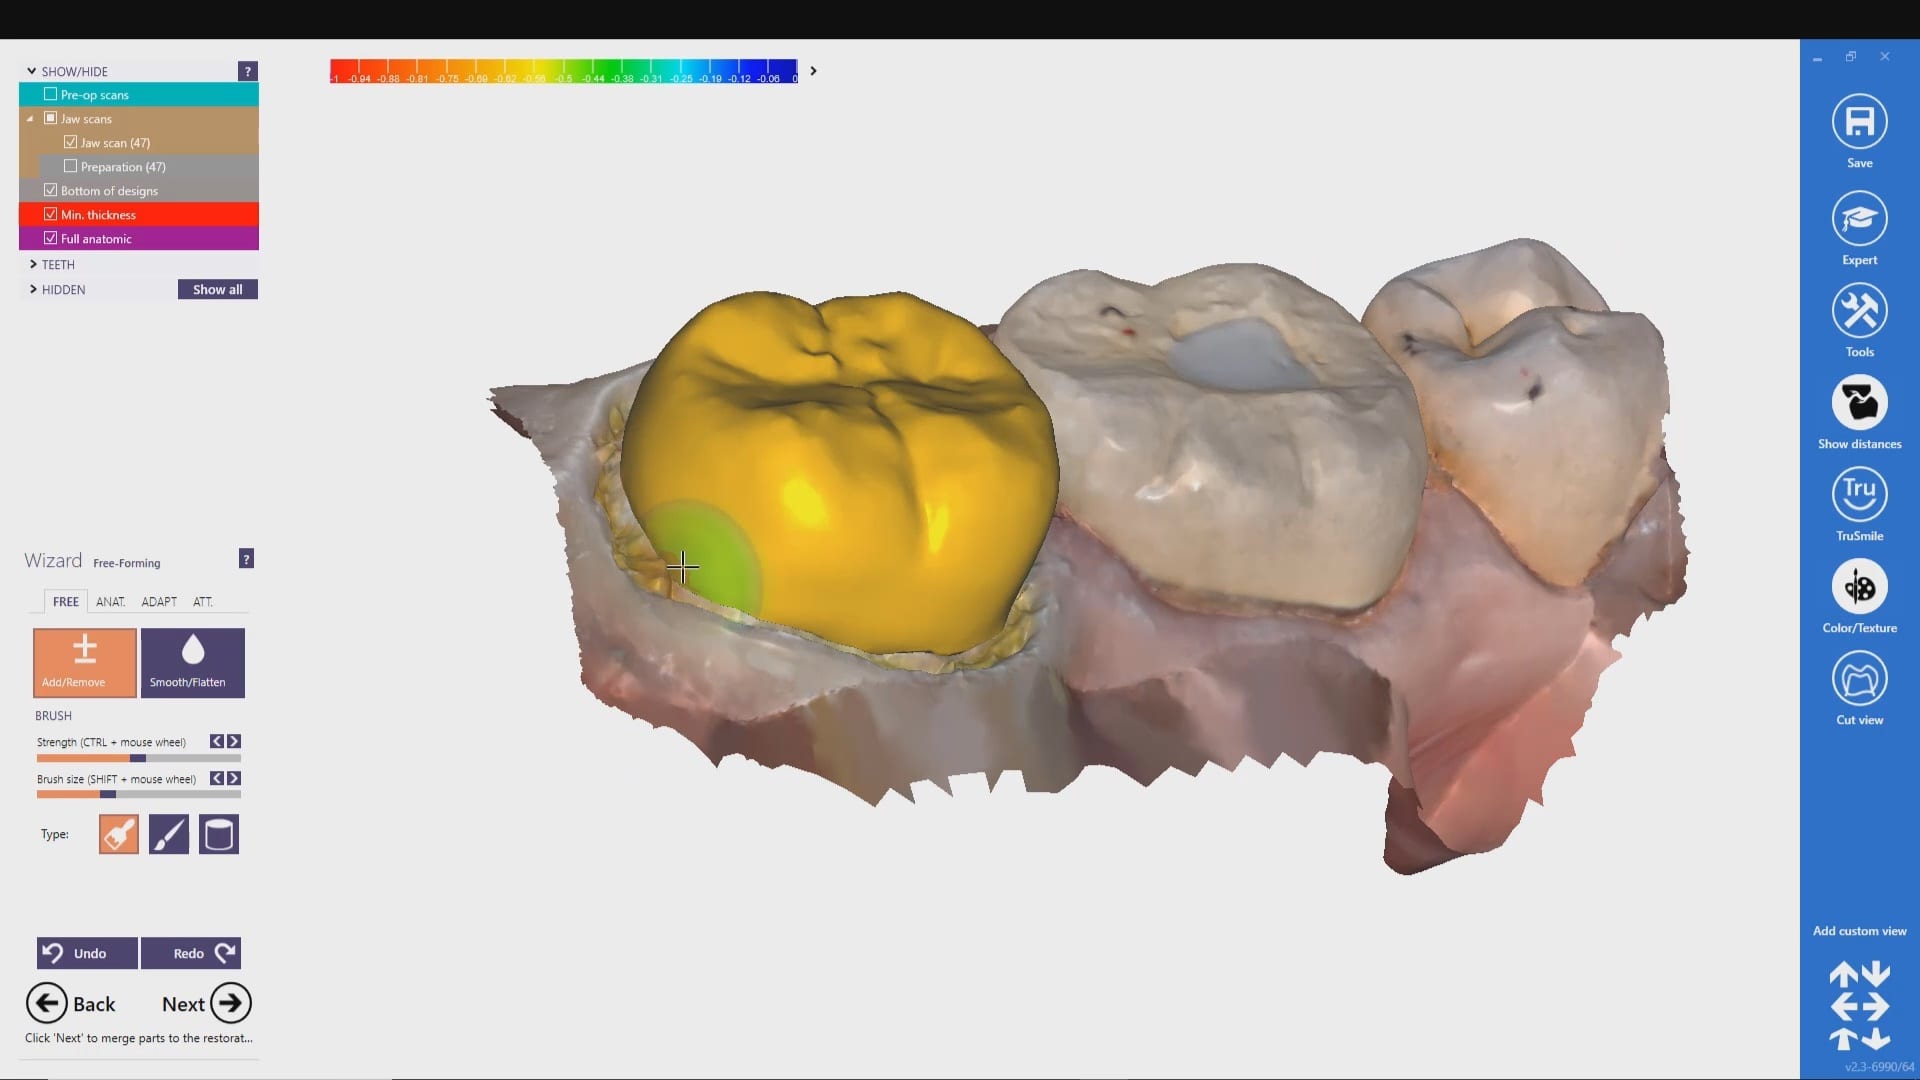
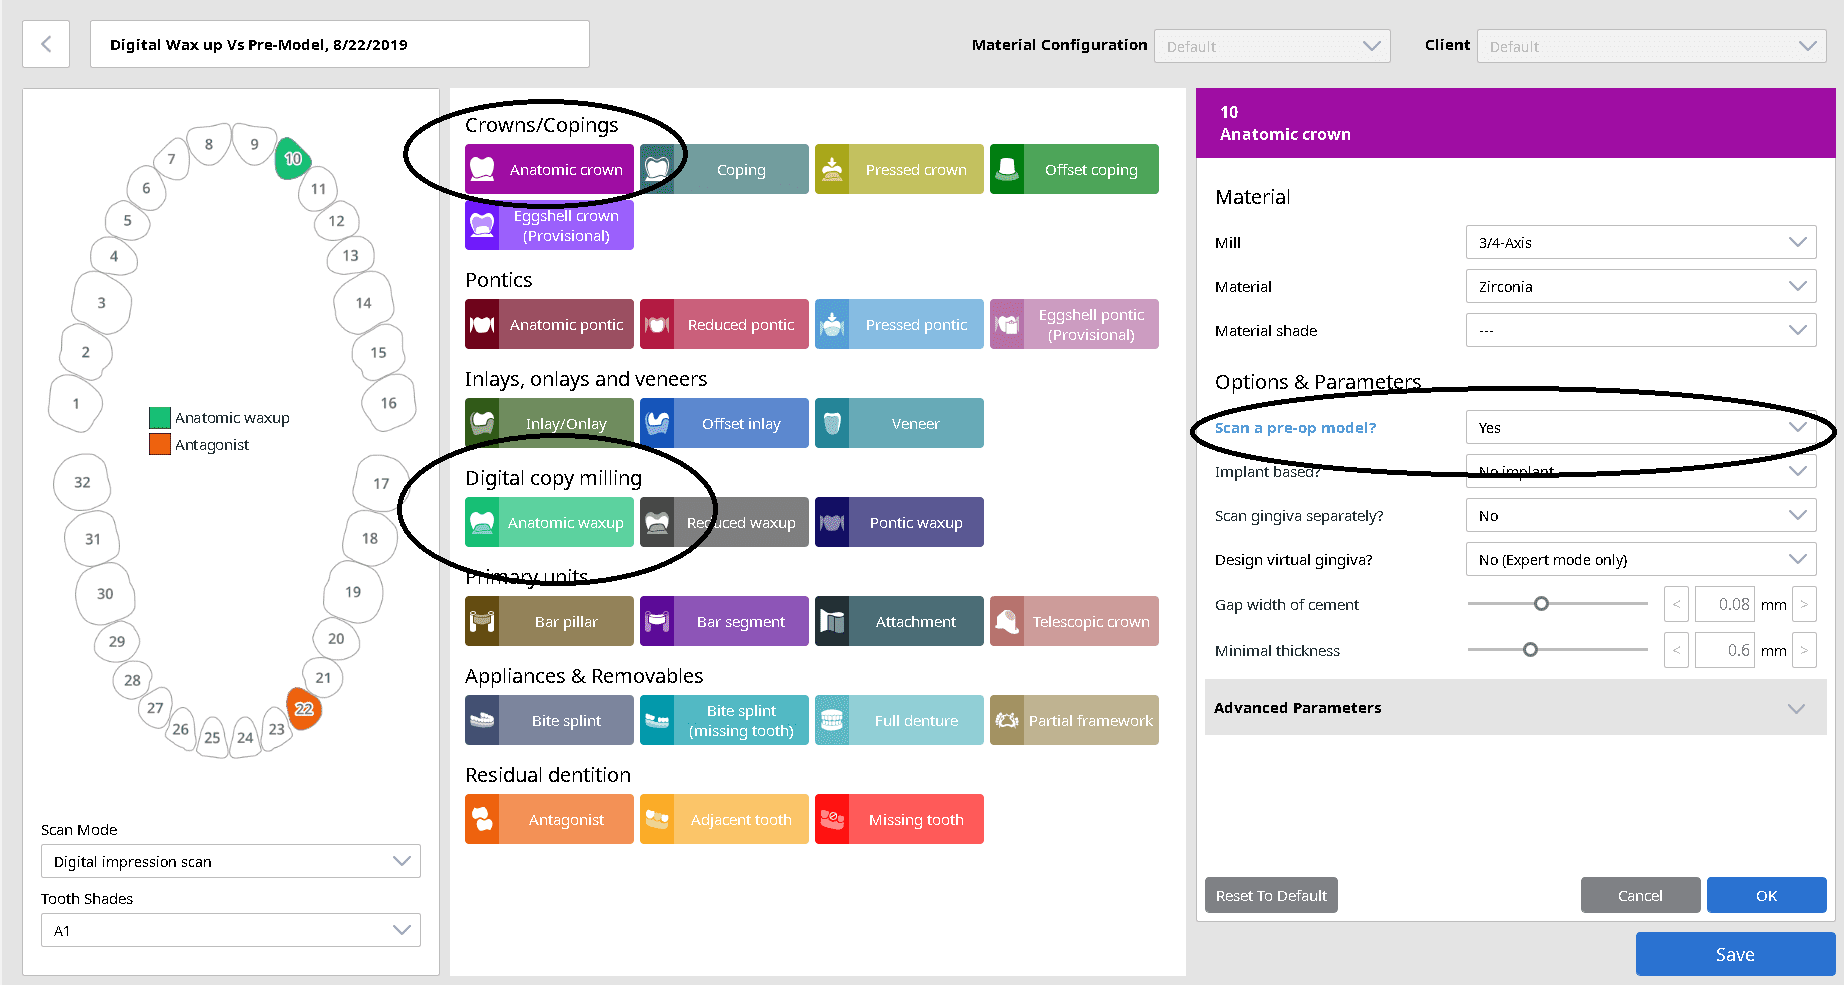
In CAD-Ray’s version of exocad, we have dramatically reduced the steps necessary to get a final proposal with copying a pre-op, mock up, or wax-up. We’ve configured the wizzard to walk you through the steps of defining your path of draw after margin placement, trimming away material you don’t want your proposal “to touch” and giving instant proposals.
There is one difference you need to be aware of in design modes; Anatomic Crown vs. Anatomic Wax up. When designing a crown, you can choose to include the pre-existing model in the equation. When you select “YES” to “Scan Pre-Op Model?” you tell the design software to incorporate that into the equation, but you will get a free form proposal and then you adapt it to the pre-op model. Alternatively you can choose Anantomic Wax Up and you will design an restoration in under a minute that is to your liking.
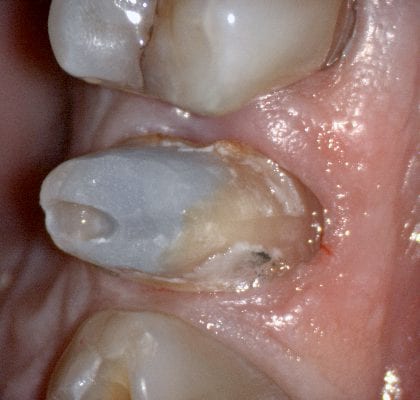
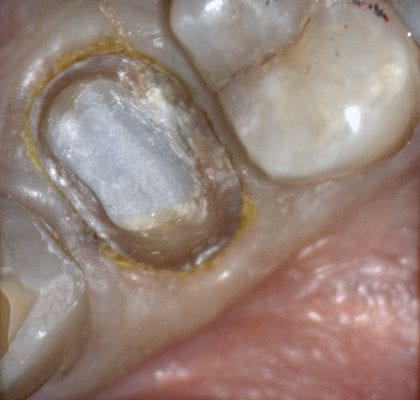
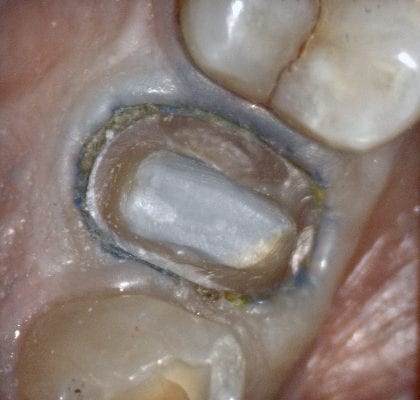
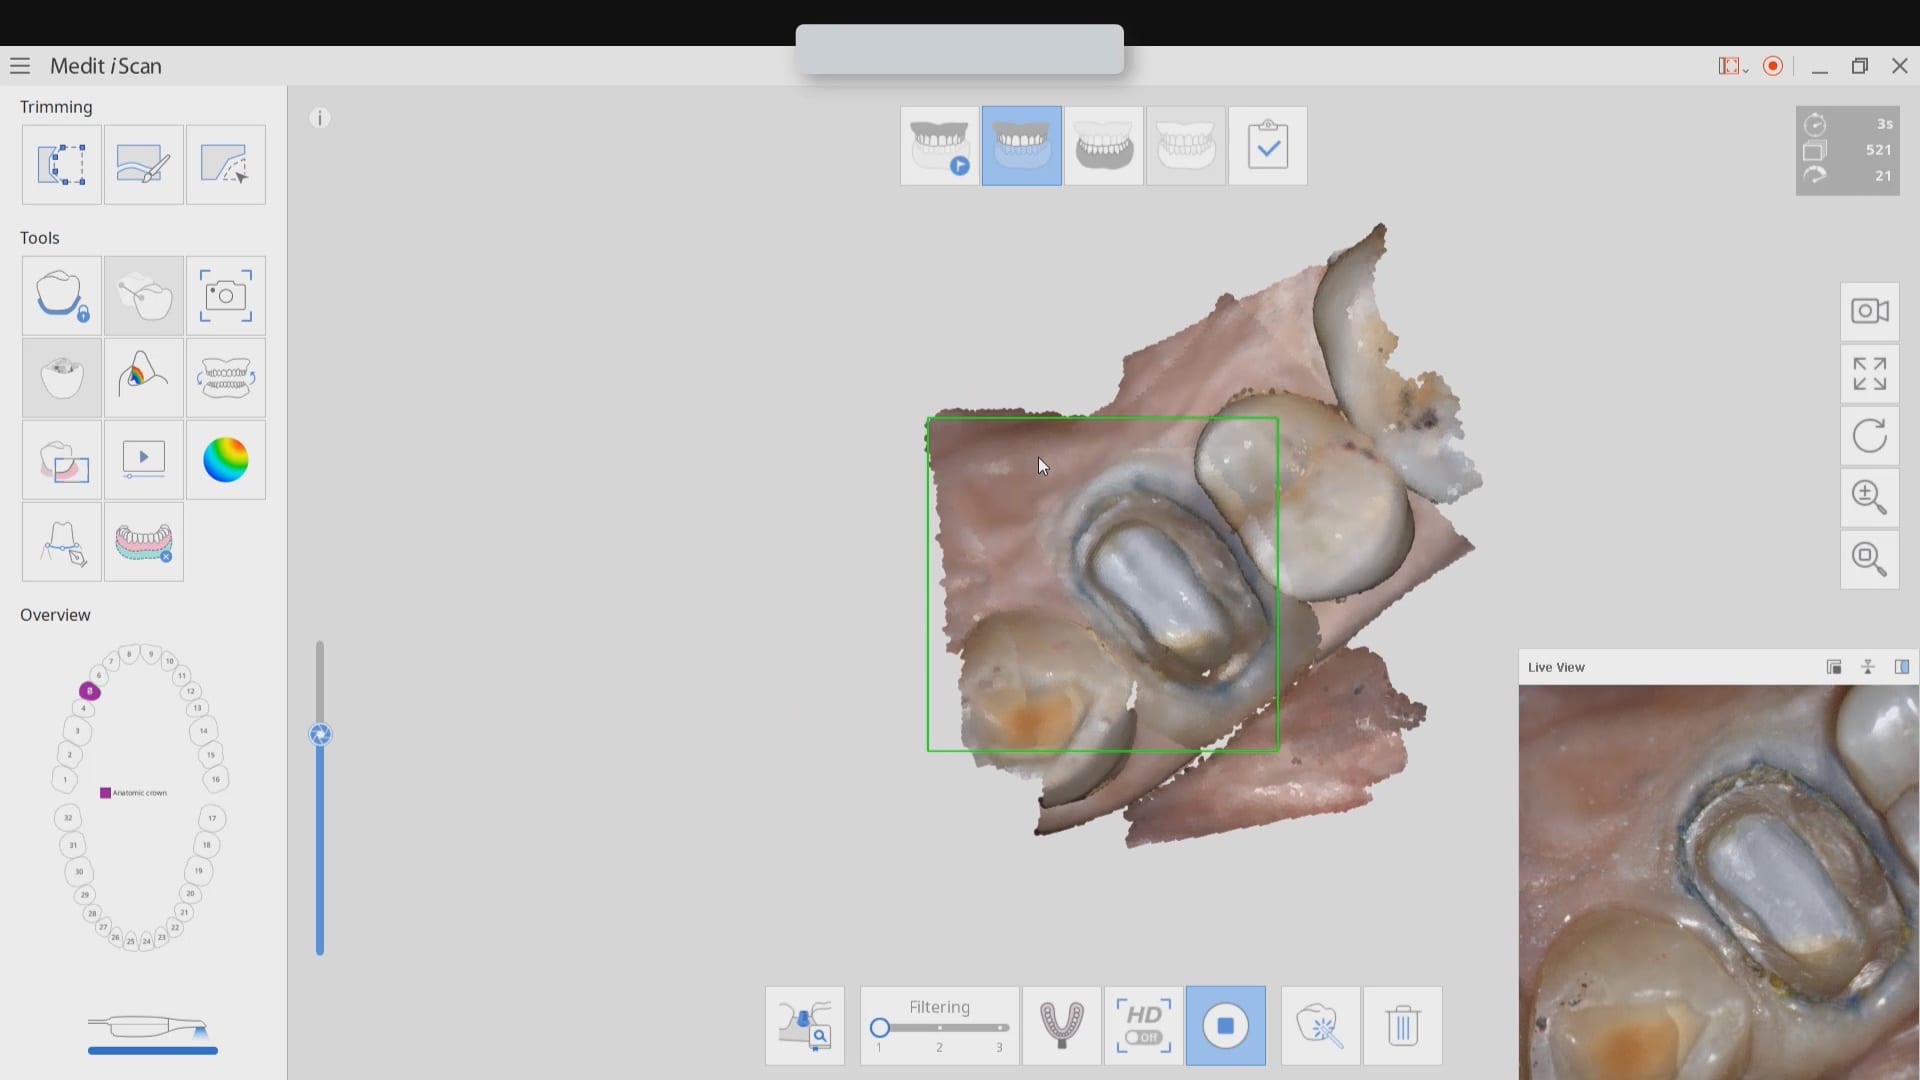
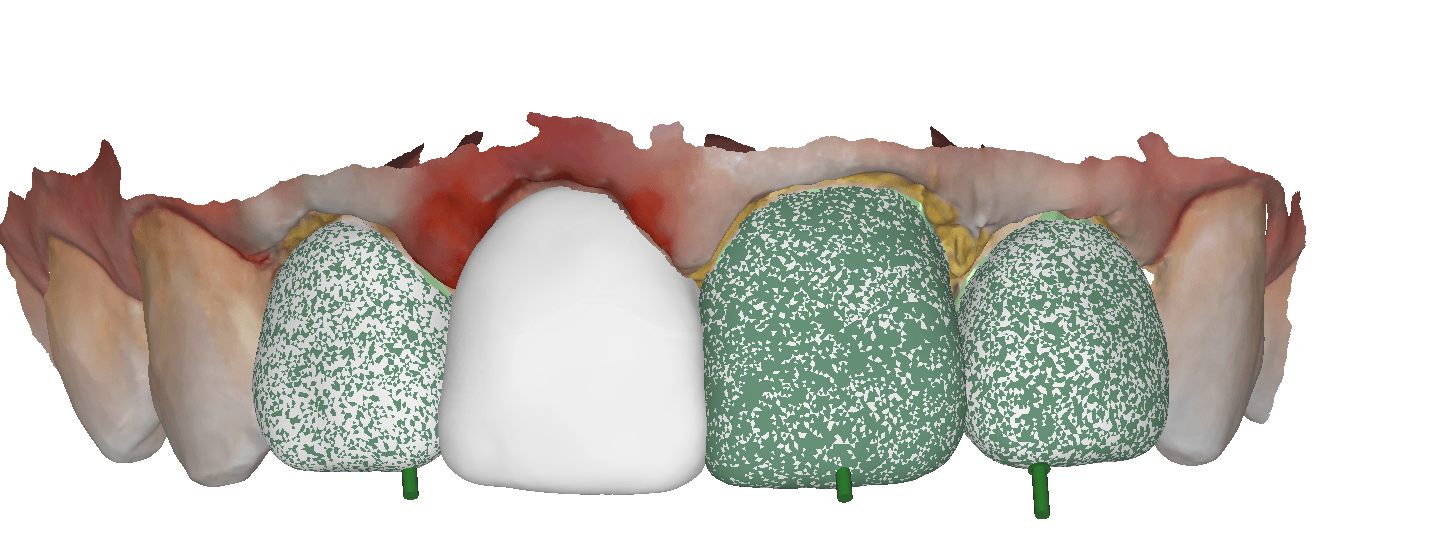
In this article, we feature an upper left lateral crown that needed to be replaced due to recurrent decay. While the patient was getting numb, we defined the job description in the Medit i500 software and imaged the pre-existing crown, the opposing and the bite. We digitally cropped out the tooth to be prepared and proceeded with crown removal. Once the margins were refined and the tissue was displaced, we imaged the preparation in HD mode and processed the case.
Once the digital models were rendered, we launched the integrated CAD software that automatically imported the pre-op, the opposing, the prep model, and the bite. Their relationship is preserved in the CAD software and no modifications were necessary. You have two ways to copy the pre-op; one way is to program the CAD software so it replicates the pre-op perfectly while the other gives you a raw proposal that you can then choose to adapt to pre-existing situation.
Direct Import of Models into CAD Software for Design and Mill
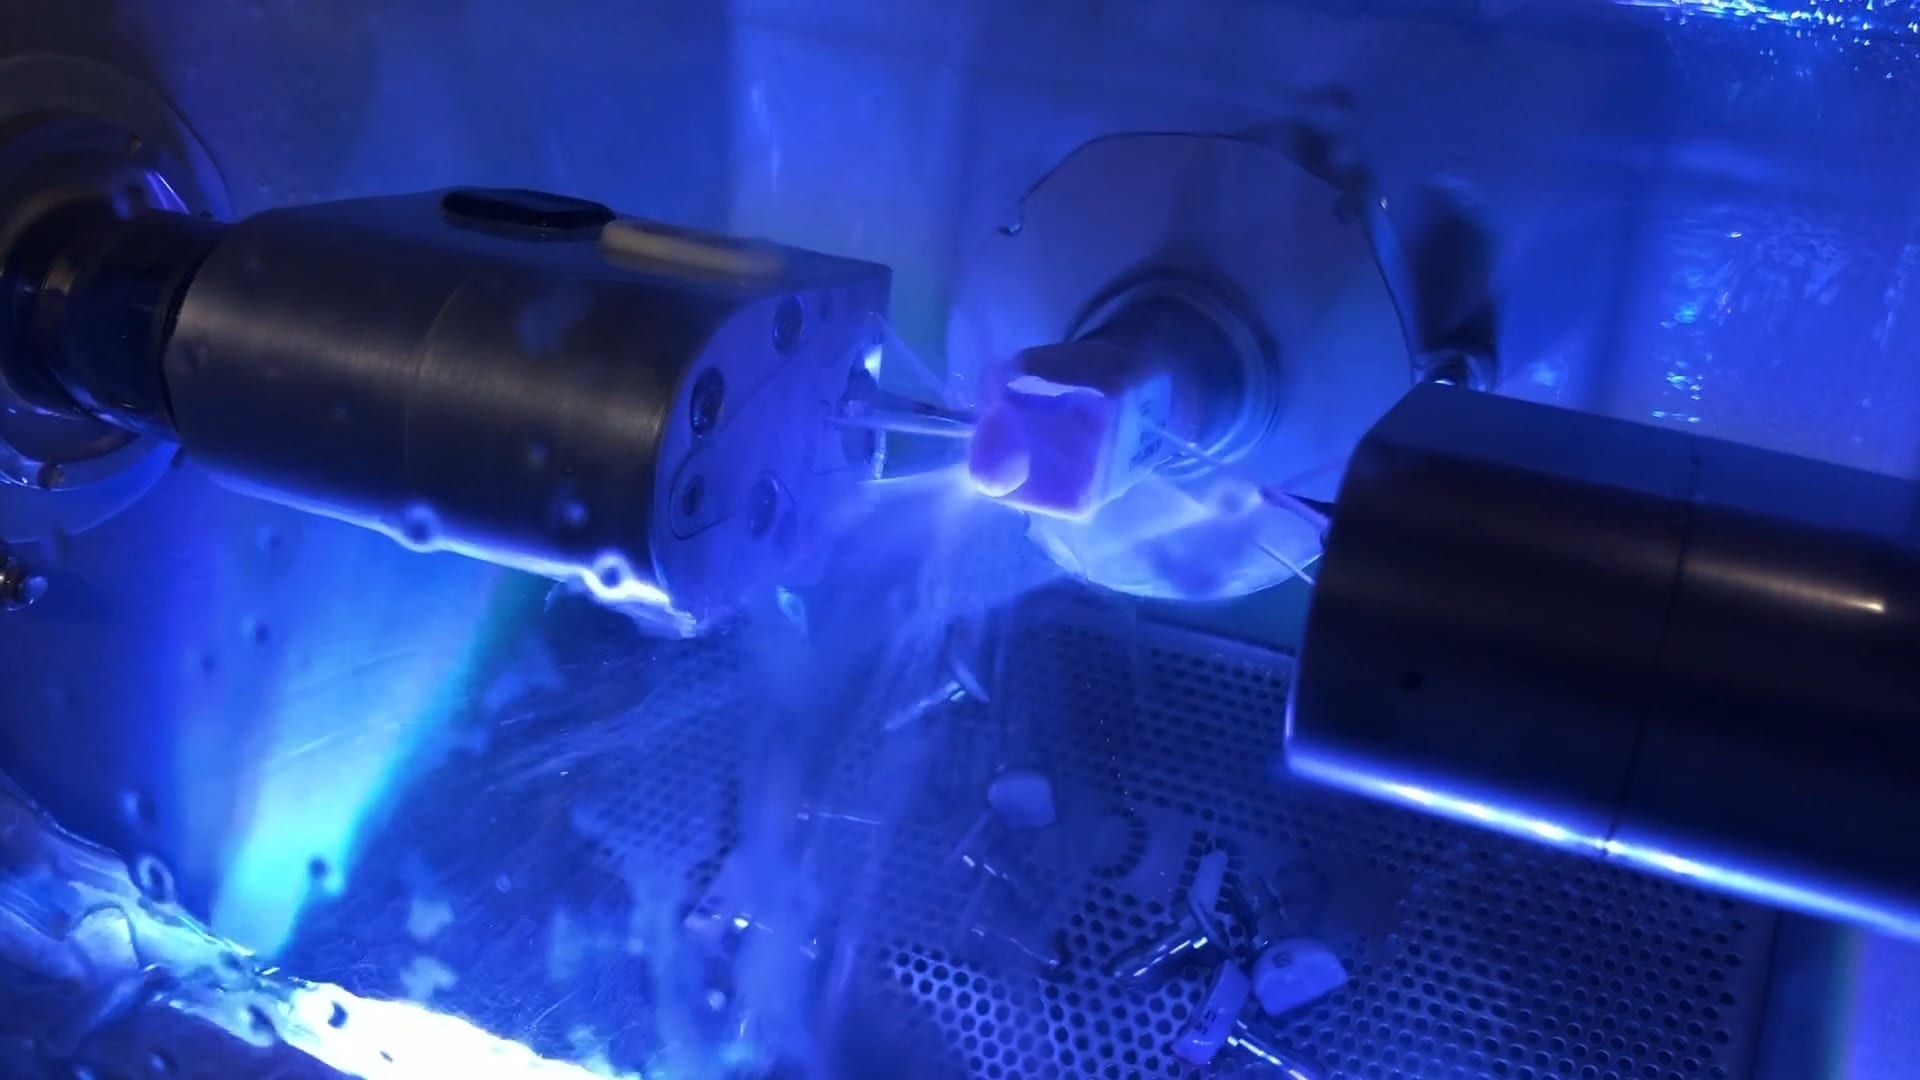
Once the case is designed in the CAD software, you can then take it to any CAM and Milling Machine to produce a restoration. Here we milled an emax restoration with the CEREC MCXL and the imes icore CORiTEC ONE at the same time so we can compare the final results. The CEREC milling machine produced a restoration faster by about 90 seconds but the final results of the margins by the CORiTEC Machine was far superior. Also, the CAM software, Millbox in this situation, allows us to choose a third drill that is 0.6 mm in diameter. This increases milling time but results in less overmilling than the 1.2 mm burrs that milll the intaglio of the CEREC Machine.
Please, take a seat, you should not be standing while you watch this.
Artificial intelligence by Medit i500 now identifies the location of your scanbody but it also automatically launches all that proper information into CAD software for instant abutment designs. Make sure to watch both videos. Enjoy.
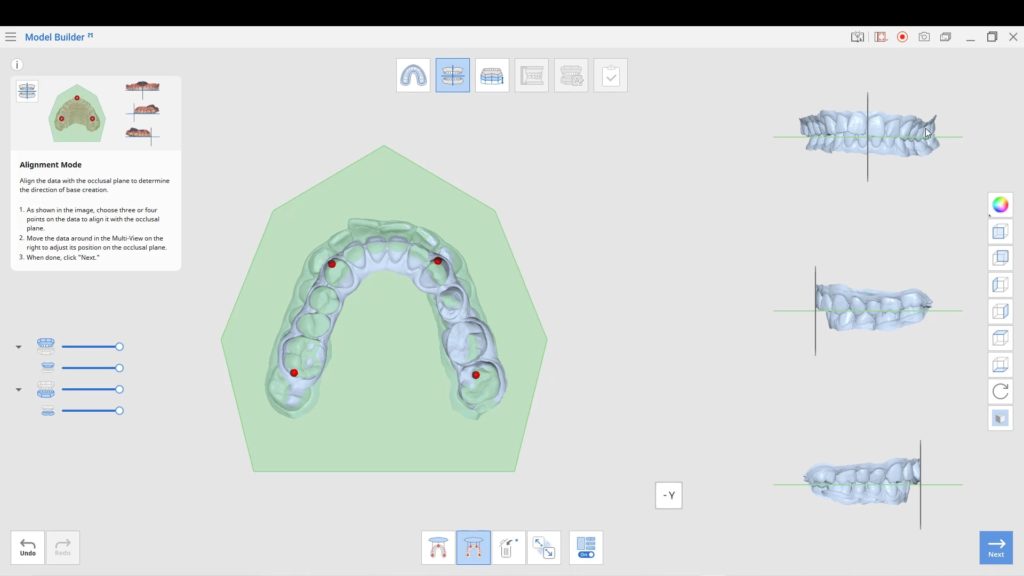
The following information is from the The American Board of Orthodontics. We preview how the Medit Ortho Simulation and Model Builder can satisfy their criteria...
Medit has many free applications, including Smile Analysis, Orthodontic Simulation, and now, Medit Model Builder Adding bases has been a feature for a while but as usual, Medit was quick...
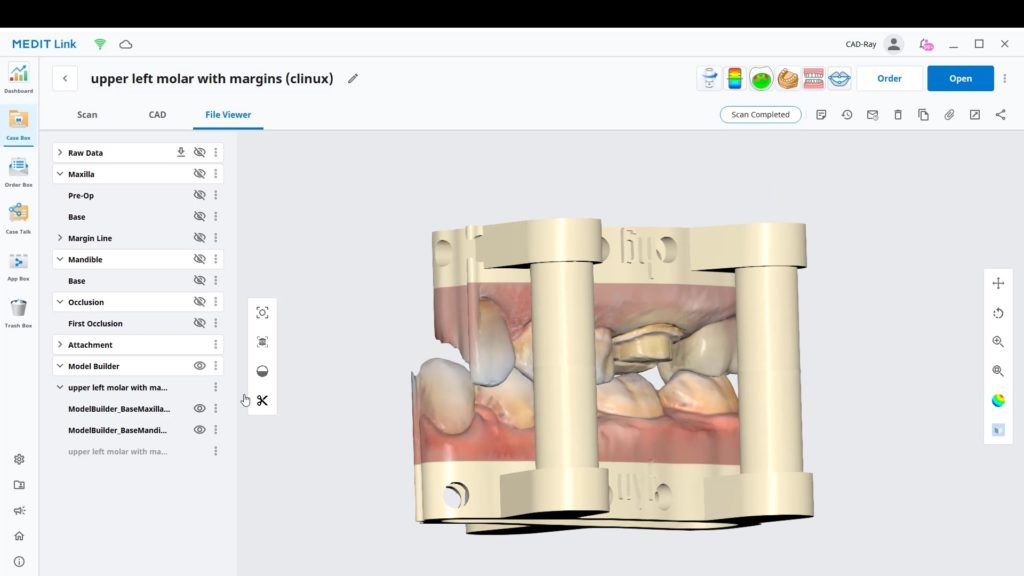
Here is why the Medit i700 is the best intra-oral scanner on the market if you do any kind of implant restorations. There are so many options and tools that...
This case shows how to relate models to each and maintain their relationships. It features the power of the Medit Compare app that lets you duplicate models, trim them, modify...


You must be logged in to post a comment.