Couldn't have had a better experience. The training was excellent, and they've been great to work with. I recently had an issue that required a warranty claim. The process was super easy, and completely hassle free. In fact, I'm still in shock at...read moreCouldn't have had a better experience. The training was excellent, and they've been great to work with. I recently had an issue that required a warranty claim. The process was super easy, and completely hassle free. In fact, I'm still in shock at how great they were about the whole thing. I would (and do) highly recommend this company.read less - 2/09/2021
Lauri Ann
I am about the worst person when it comes to technology. I decided to get a scanner and chose the Medit due to all the positive comments users had. I haven't used it much-the pandemic started right as I received it, however, the customer service has ...read moreI am about the worst person when it comes to technology. I decided to get a scanner and chose the Medit due to all the positive comments users had. I haven't used it much-the pandemic started right as I received it, however, the customer service has truly been amazing! I had an online training and a rep checked in with me several times to see if I needed help. I am going to do another online training soon as a refresher. I wouldn't hesitate to recommend this company and scanner to anyone!read less - 6/16/2020
jeremiah choi
Never had customer care like Cad-Ray, you can't go wrong purchasing through them. Trios is a great scanner. All the reps at Cad-Ray are very knowledgeable and helpful and will make sure you are up and running smoothly. Above and beyond customer serv...read moreNever had customer care like Cad-Ray, you can't go wrong purchasing through them. Trios is a great scanner. All the reps at Cad-Ray are very knowledgeable and helpful and will make sure you are up and running smoothly. Above and beyond customer service.read less - 8/27/2022
i purchased medit intraoral scanner a year ago, other than the scanner is great, the customer service is outstanding whenever j need help or have a question they are ready instantly to answer my questions, cant ask for better customer service. - 6/16/2020
Wes Buchman
Used CAD-Ray for my Medit scanner purchase, training, and assistance and have had zero problems. They are so quick to respond to inquiries and helping with any minor issues (which have been very minimal). Highly recommend working with this company - 8/27/2021
Kip Covington
Customer support! I've had handfuls of scanners over the years and support has always been the biggest variable. We recently had a scanner bought through and implant company and received limited to no support. Through recommendations from several fri...read moreCustomer support! I've had handfuls of scanners over the years and support has always been the biggest variable. We recently had a scanner bought through and implant company and received limited to no support. Through recommendations from several friends, I purchased a second scanner through cad-ray and had them transfer over our support for the first. I wish I would have done this years ago. Destaney, has been incredible helping us troubleshoot a hardware issue that came up. It was on 3-shapes side but not only did she run it up the ladder there and get us back up and running quickly, but she promptly answered all questions and continuously checked in to make sure things were moving along. I won't purchase from anyone else going forward.read less - 8/14/2024
Dado Dado
Frank DeLuca has been great since we bought the scanner! Always there for you and returns his calls asap. Thank you Frank! - 1/25/2023
Suresh Patel
Kaila Larson is absolutely the best support person I have ever used. She knows her stuff and is a pleasure to work with. Medit is only as good as the support and SHE MAKES CadRay and Medit an amazing experience! - 1/05/2023
Todd Haskin
The medit is one of the best scanners on the market with the best price. Cad ray's support and training is phenomenal and they are very quick to respond. We work with Laura. Highly recommend. - 12/16/2021
AMISH DESAI
Awesome! Great support. If you are planning on getting a scanner, make sure you have Cad-Ray on your side ! - 4/20/2022
Frank Gibbons
I just bought my first Intra-oral scanner (Medit I-700). I have demoed scanners from various companies in the past but have been less then thrilled with the applications, scanner ability, ease of use and overall user experience. I feel that now the...read moreI just bought my first Intra-oral scanner (Medit I-700). I have demoed scanners from various companies in the past but have been less then thrilled with the applications, scanner ability, ease of use and overall user experience. I feel that now the technology has caught up to where it should be and after reviewing many scanners on the market have decided to go with Medit. The Medit i-700 gives me all the functionality I could want, has an affordable price and works for all the procedures I need it for (scanning for ortho, dentures, partials, crowns, bridges, implants ect.). I love that they continually update their software and most importantly that those upgrades are free to the end users. Another huge plus is that when I have a question I get actually get someone on the phone!! For all these reasons I finally jumped in. I would recommend anyone else to do so as well!read less - 5/06/2021
Thomas Lim
Just updating my post to show my cart setup. Hope it can help for someone :) - 10/12/2019
We received our i700 scanner from CAD-Ray yesterday. It was an upgrade from our i500. The scanner is amazing and Laura was amazing in helping us get up and running in no time. Their support, professionalism, and expertise is unmatched. Thanks CAD-Ray...read moreWe received our i700 scanner from CAD-Ray yesterday. It was an upgrade from our i500. The scanner is amazing and Laura was amazing in helping us get up and running in no time. Their support, professionalism, and expertise is unmatched. Thanks CAD-Ray!- Helena from Elite Dentalread less - 12/23/2021
Jonathan Van Dyke
Cadray is excellent and their medit scanner is amazing! - 6/16/2020
Aaron Olson
This product is the best out there. Do the math and your ROI makes more sense than most products we purchase as dentists. Get on the digital train or you’ll be left behind. This is the best product to make the jump with. - 6/16/2020
Great staff and support when needed! There is a bit of a learning curve like with any new tech, but I highly recommend the Medit i500 and the Cad-Ray staff is great. Special thanks to Laura and Jeff for helping out! You guys rock. Great company and ...read moreGreat staff and support when needed! There is a bit of a learning curve like with any new tech, but I highly recommend the Medit i500 and the Cad-Ray staff is great. Special thanks to Laura and Jeff for helping out! You guys rock. Great company and product!read less - 11/11/2020
Micah Bickel
Great support services and training from Cad-Ray, they are always very helpful and responsive. I have been using the I500 in my offices for the last two years and loving it. - 11/01/2021
Needed help with scanner updates and Frank is the man! Once he was done the scanner was operating in hyper-drive!!thanks frankoffice of Glenmont Dental - 2/15/2022
Gwen Giannina
CAD-Ray is an amazing company. I purchased my scanner 3 years ago. Any small issue immediately resolved by calling them for help. I originally scanned with Cerec. The ROI doesn't even compare. The Medit was by far the best technology purchase of my ...read moreCAD-Ray is an amazing company. I purchased my scanner 3 years ago. Any small issue immediately resolved by calling them for help. I originally scanned with Cerec. The ROI doesn't even compare. The Medit was by far the best technology purchase of my 20 plus years in dentistry. I will upgrade at some point and will buy again from CAD-RAY!read less - 2/04/2022
Cooper Owens
I bought my Medit I-500 from them. Everything has been been first class, from the training to the customer support. I highly recommend buying through CAD RAY. - 6/16/2020
Chase Benson
New technology can be intimidating, but this i700 is user friendly and is everything you could ask for in regards to a great scanner. Cad-ray also made the transition easy and smooth. Customer support here is unreal. Telling all my dental buddies abo...read moreNew technology can be intimidating, but this i700 is user friendly and is everything you could ask for in regards to a great scanner. Cad-ray also made the transition easy and smooth. Customer support here is unreal. Telling all my dental buddies about these guys, and plan to make more purchases in the future.read less - 4/18/2022
Se ve muy bien, aunque yo le tengo, pánico, a los Dentistas, Sorry, pero tengo que ir, Ni modo - 2/25/2015
DERYCK PHAM
STOP SEARCHING NOW!
Best bang for your buck scanner on the market. we have been using out medit for 8 months now. love our crowns, margins are fantastic. almost no adjustments needed at all. maybe one in ten crowns might have to adjust mesial or...read moreSTOP SEARCHING NOW!
Best bang for your buck scanner on the market. we have been using out medit for 8 months now. love our crowns, margins are fantastic. almost no adjustments needed at all. maybe one in ten crowns might have to adjust mesial or distal to get crown to drop in. occlusion is always spot on. patients love the technology and WOW factor -"SOOO COOOLLL." customer service is great also! dont waste your money on anythign else. our lab even comments on how easy it is to deal with medit and how good the scans are. they recommend it to their other doctors now as well.read less - 10/09/2019
I purchased the Medit i500 from Cad-Ray December 2018. I couldn’t be happier with the scanner. The improvements Medit has made over the last 10 months are nothing short of astounding! I can’t imaging what they’ll come up with next.
As for Cad-Ray...read moreI purchased the Medit i500 from Cad-Ray December 2018. I couldn’t be happier with the scanner. The improvements Medit has made over the last 10 months are nothing short of astounding! I can’t imaging what they’ll come up with next.
As for Cad-Ray, their support has been second to none. Never have I experienced the kind of attention and help from any other company. Wether it’s with help installing, computer hardware issues or technical help they respond IMMEDIATELY!
Armen is also a huge reason why I chose Cad-Ray. No one selling a product has helped me more evolve my scanning technique. He’s quick to respond to questions and issues I feel his service is a huge reason why to buy from CAD-RAY.read less - 10/09/2019
only dental company that I have no complaints about - 11/03/2022
Aaron Sipos
CAD-RAY has the best customer service. They go above and beyond to make sure you have a good experience with your medit scanner. With most tech companies, the person that answers the phone has to put you on hold for who knows how long before getting ...read moreCAD-RAY has the best customer service. They go above and beyond to make sure you have a good experience with your medit scanner. With most tech companies, the person that answers the phone has to put you on hold for who knows how long before getting you in touch with someone to fix the issue. With CAD-RAY, I called and Heather answered the phone. Heather was able to remotely fix my issue within 30 minutes and have me back up and running. No holds, no waiting!!! I highly recommend.read less - 9/01/2022
Thomas Lim
5 stars for a great product and great service. After much research I knew I was set on the Medit 500. I considered some of my local equipment reps, as well as cad-ray. Cad-ray won out due to their efficiency, speed of service, and knowledge. The...read more5 stars for a great product and great service. After much research I knew I was set on the Medit 500. I considered some of my local equipment reps, as well as cad-ray. Cad-ray won out due to their efficiency, speed of service, and knowledge. Their online presence makes it easy to get help via messaging, social media, or phone.
The scanner itself works great, but make sure to contact them to get the minimum specs required for a laptop -- it will make a difference in how the scanner performs.
To make the scanner mobile, I purchased this cart from Staples: https://www.staples.com/Oklahoma-Sound-Premium-Audio-Visual-Presentation-Cart-40-1-2-H-x-18-W-x-30-D-Black-Ivory-Wood/product_932437.
Lastly, I purchased "3M Dual Lock Fastener" to keep the power module attached to the wand from falling off the cart. I carry the scanner between two offices, so I wanted something sturdy, but removable. (see in photos). The hockey puck shaped holder (comes with the scanner) works great for holding the wand itself.read less - 10/10/2019
I just purchased the CAD-Ray unit at Chicago Mid Winter meeting. We have used it for single crowns so far and have been very pleased. Nick was my sales contact and he has helped a great deal with some of our 'learning curve " issues. I looked at a nu...read moreI just purchased the CAD-Ray unit at Chicago Mid Winter meeting. We have used it for single crowns so far and have been very pleased. Nick was my sales contact and he has helped a great deal with some of our 'learning curve " issues. I looked at a number of scanners and felt CAD-Ray was the best-two of the labs I use also feel it is the best scanner.read less - 5/12/2020
Matt St George
I had 3 Cerec machines and switched to medit. It’s awesome and do not regret the switch one bit. This is the place to buy it bc Armen and Frank are a wealth of knowledge and Frank is awesome with support. He’s always there whenever I need him! - 10/10/2019
I have had excellent , prompt , customer service and support from the entire team . Especially from Frank DeLuca as I move along the learning curve. His patients and expertise is much appreciated - 1/24/2023
Oleg Eisenstein
Great products and services. Highly recommended - 6/16/2020
I bought I500 scanner two years ago. The scanner is great and the service is excellent. I have contacted Heather Gramley and Andy Nova about the updates of my scanner recently. They are absolutely amazing people. They go above and beyond. They repres...read moreI bought I500 scanner two years ago. The scanner is great and the service is excellent. I have contacted Heather Gramley and Andy Nova about the updates of my scanner recently. They are absolutely amazing people. They go above and beyond. They represent the company very well.read less - 7/05/2022
I always have enjoyed working with Cad-ray. Customer service is always on-point! - 5/25/2022
Andy M
It has been great to work with Laura and Heather. The purchase, financing, shipping, and training process has been smooth. The training was very comprehensive and not rushed at all. I love my Medit i-600 scanner, and I recommend CAD-RAY 100%! - 5/22/2024
Jim Ellis
I've only worked with this company for a short time but I have found them to be wonderful in every way. Call, emails, and texts are returned very quickly and the equipment that we have purchased works wonderfully. I would highly recommend. Dr Jim Ell...read moreI've only worked with this company for a short time but I have found them to be wonderful in every way. Call, emails, and texts are returned very quickly and the equipment that we have purchased works wonderfully. I would highly recommend. Dr Jim Ellisread less - 5/12/2020
Adam Bond
Purchased a Medit i500 from CAD-Ray earlier this year and I really like the scannner. It has great features at a great price point. And the support of the CAD-Ray team has been awesome. They have a great amount of online resources for the DIYers and ...read morePurchased a Medit i500 from CAD-Ray earlier this year and I really like the scannner. It has great features at a great price point. And the support of the CAD-Ray team has been awesome. They have a great amount of online resources for the DIYers and have helpful employees to help after the sale as well. I highly recommend them.read less - 6/16/2020
Sean Landgraf
Truly Great Service. Glad I purchased my scanner here. - 8/03/2023
Cody Boseman
Cad-ray has been amazing, not to mention they have an amazing product in the medit i500. Their training is great, customer service is quick and thorough, and follow up is consistent. I highly recommend using cad-ray for anything that you may need. - 6/19/2020
Brian Jaques
After weeks of research I purchased the i700 through Nick at cad-ray. My office has never used a scanner before and despite the great pricing, this was still a major purchase for me. Nick was incredibly helpful guiding me through the process while an...read moreAfter weeks of research I purchased the i700 through Nick at cad-ray. My office has never used a scanner before and despite the great pricing, this was still a major purchase for me. Nick was incredibly helpful guiding me through the process while answering my many questions. The customer service was very responsive and my friends who have purchased medit scanner were correct that this is the way to go. 5 Stars!read less - 5/08/2021
Ryan Crain
I love my Medit and Cad-Ray has been so easy to work with, both from a sales and support standpoint. - 7/16/2020
Frank and his team have always been ready and able to help us with any issue we’ve come across in the last 2 years since we purchased our mill and equipment from them. Today, Griffen went above and beyond to find a solution to our software issue. I w...read moreFrank and his team have always been ready and able to help us with any issue we’ve come across in the last 2 years since we purchased our mill and equipment from them. Today, Griffen went above and beyond to find a solution to our software issue. I was able to finish a project on time for a patient in pain because of his dedication. “We’ve never had a more helpful team for any of our equipment” was a quote from our head Doctor today. Excellent job Griffen and team!read less - 5/14/2025
John T
Frank and the CAD-Ray crew are awesome! They are always available for support with the technology you purchase from them. - 1/25/2023
W Timothy Brooks
Excellent fast color scanner. A great improvement over my old proprietary scanner. Easy to learn software and great free technical support. - 6/18/2020
Before working with cad-ray, I was hesitant to dive into digital dentistry due to the complexity of it. Working with Laura at cad-ray made all of my concerns go away. She was there to help me with my Exocad software installation, even outside of norm...read moreBefore working with cad-ray, I was hesitant to dive into digital dentistry due to the complexity of it. Working with Laura at cad-ray made all of my concerns go away. She was there to help me with my Exocad software installation, even outside of normal business hours - really hard to come by! I also purchased a Medit i500 and getting that setup and working in my clinic was seamless. I could not have asked for better support while navigating digital dentistry. My next purchase will be a 3D printer, and i know exactly where i will buy it from! Highly recommend these guys.read less - 11/20/2020
Trident Dental
Great help when you need it. Frank, Armen and team will take care of you. - 12/10/2021
Mark Sperling
Got a great deal in the medit i700 and the training was top notch. I had about 3 one hour sessions with Ryan at cadray and he was clear, concise and knowledgeable in both the software and hardware components of the computer/scanner and the detailed a...read moreGot a great deal in the medit i700 and the training was top notch. I had about 3 one hour sessions with Ryan at cadray and he was clear, concise and knowledgeable in both the software and hardware components of the computer/scanner and the detailed aspects of the dentistry itself. Got a direct line going forward and would recommend cad ray to anyoneread less - 8/17/2022
Linsay N Brandon Jarvis
As a lab we see a lot of scans. Great quality and easy to create great restorations from the Medit offices that send us work.- Jarvis dental lab - 1/29/2019
Chase Funk
This has been awesome, to be honest I have know idea how to use it but our team members have picked it up so easy!! - 6/16/2020
A Palmer
I'm a dentist in Maine and have been working remotely with CAD-RAY for about 5 years. They do all my implant planning and fabrication of surgical guides. I just send them a CBCT image and digital impressions and they take care of all the rest, it cou...read moreI'm a dentist in Maine and have been working remotely with CAD-RAY for about 5 years. They do all my implant planning and fabrication of surgical guides. I just send them a CBCT image and digital impressions and they take care of all the rest, it couldn't be smoother. I've only had good experiences with CAD-RAY, and am very grateful for this awesome service they offer.read less - 6/02/2019
Nolan Andrews
They all go absolutely above and beyond in all aspects. Whether it's tech support, products, CE, everything. Everyone I have dealt with has been wonderful. Love these guys! - 6/19/2020
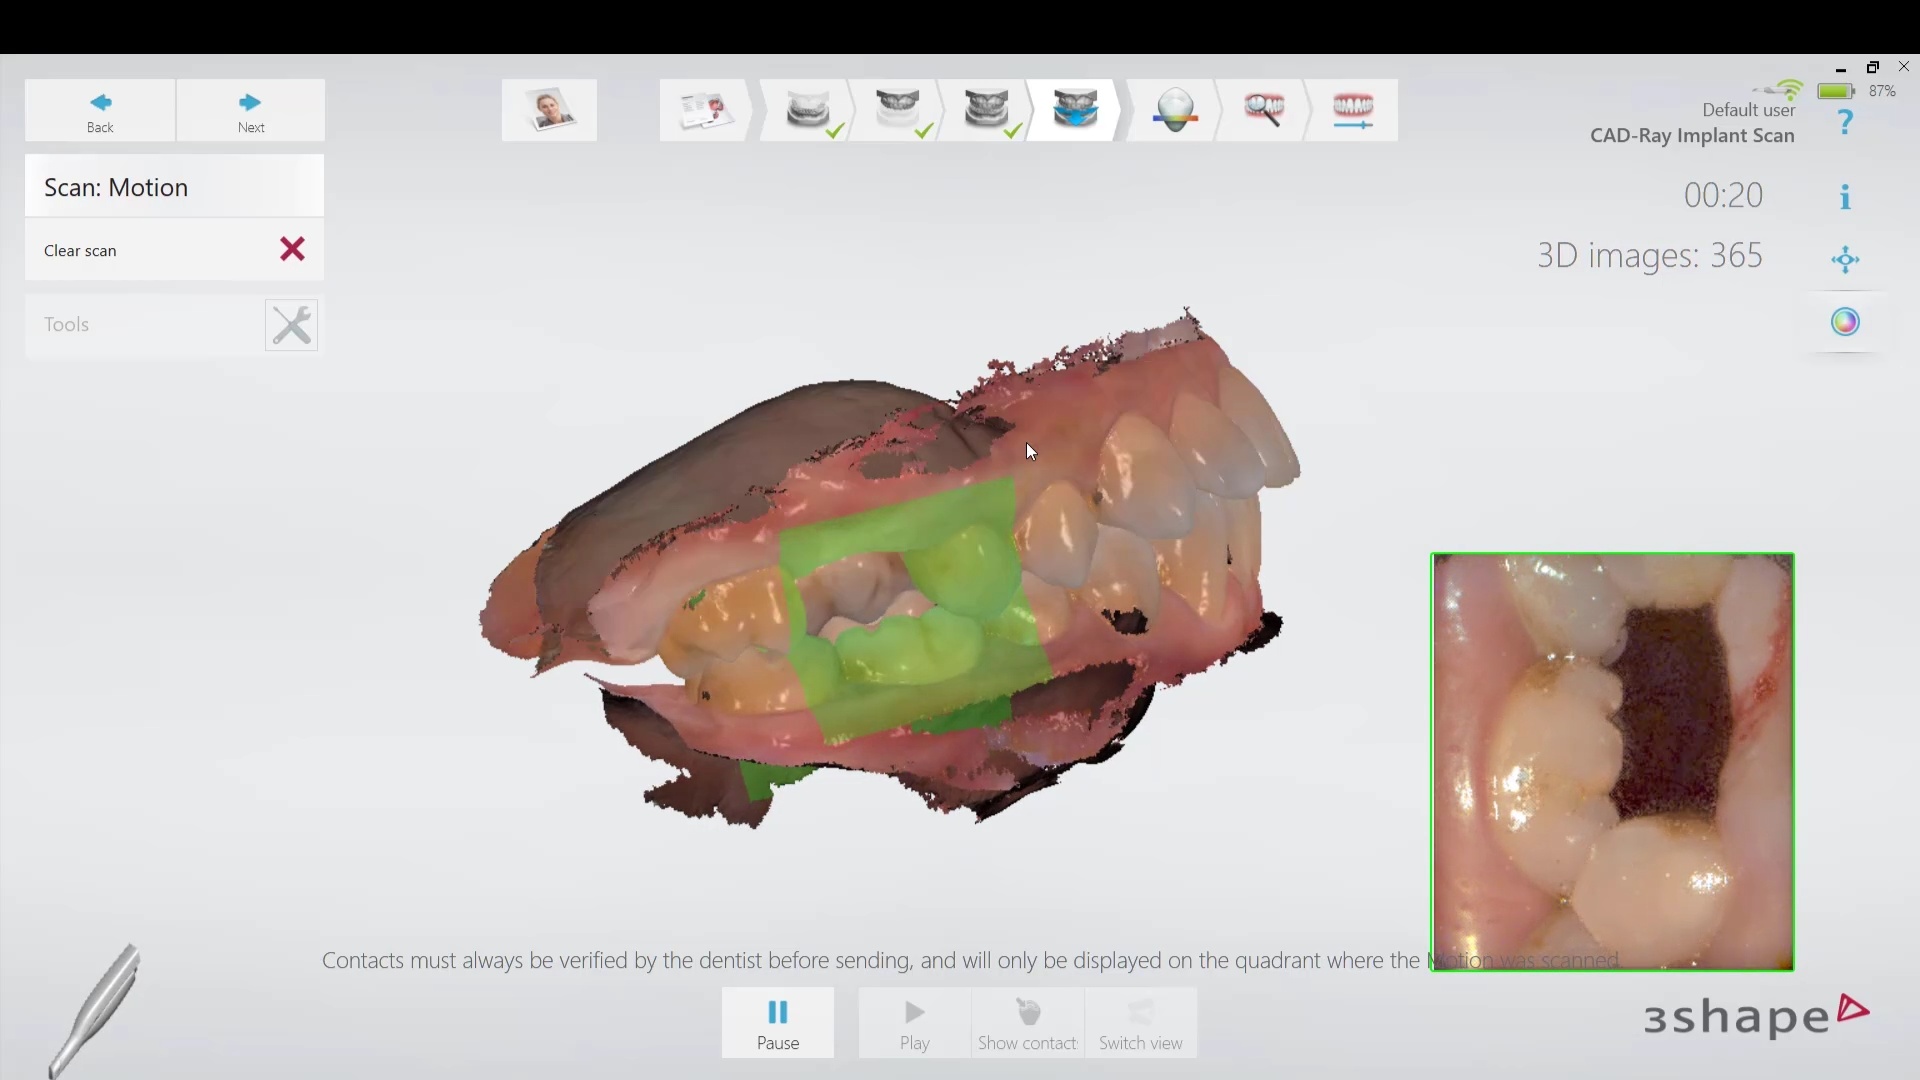
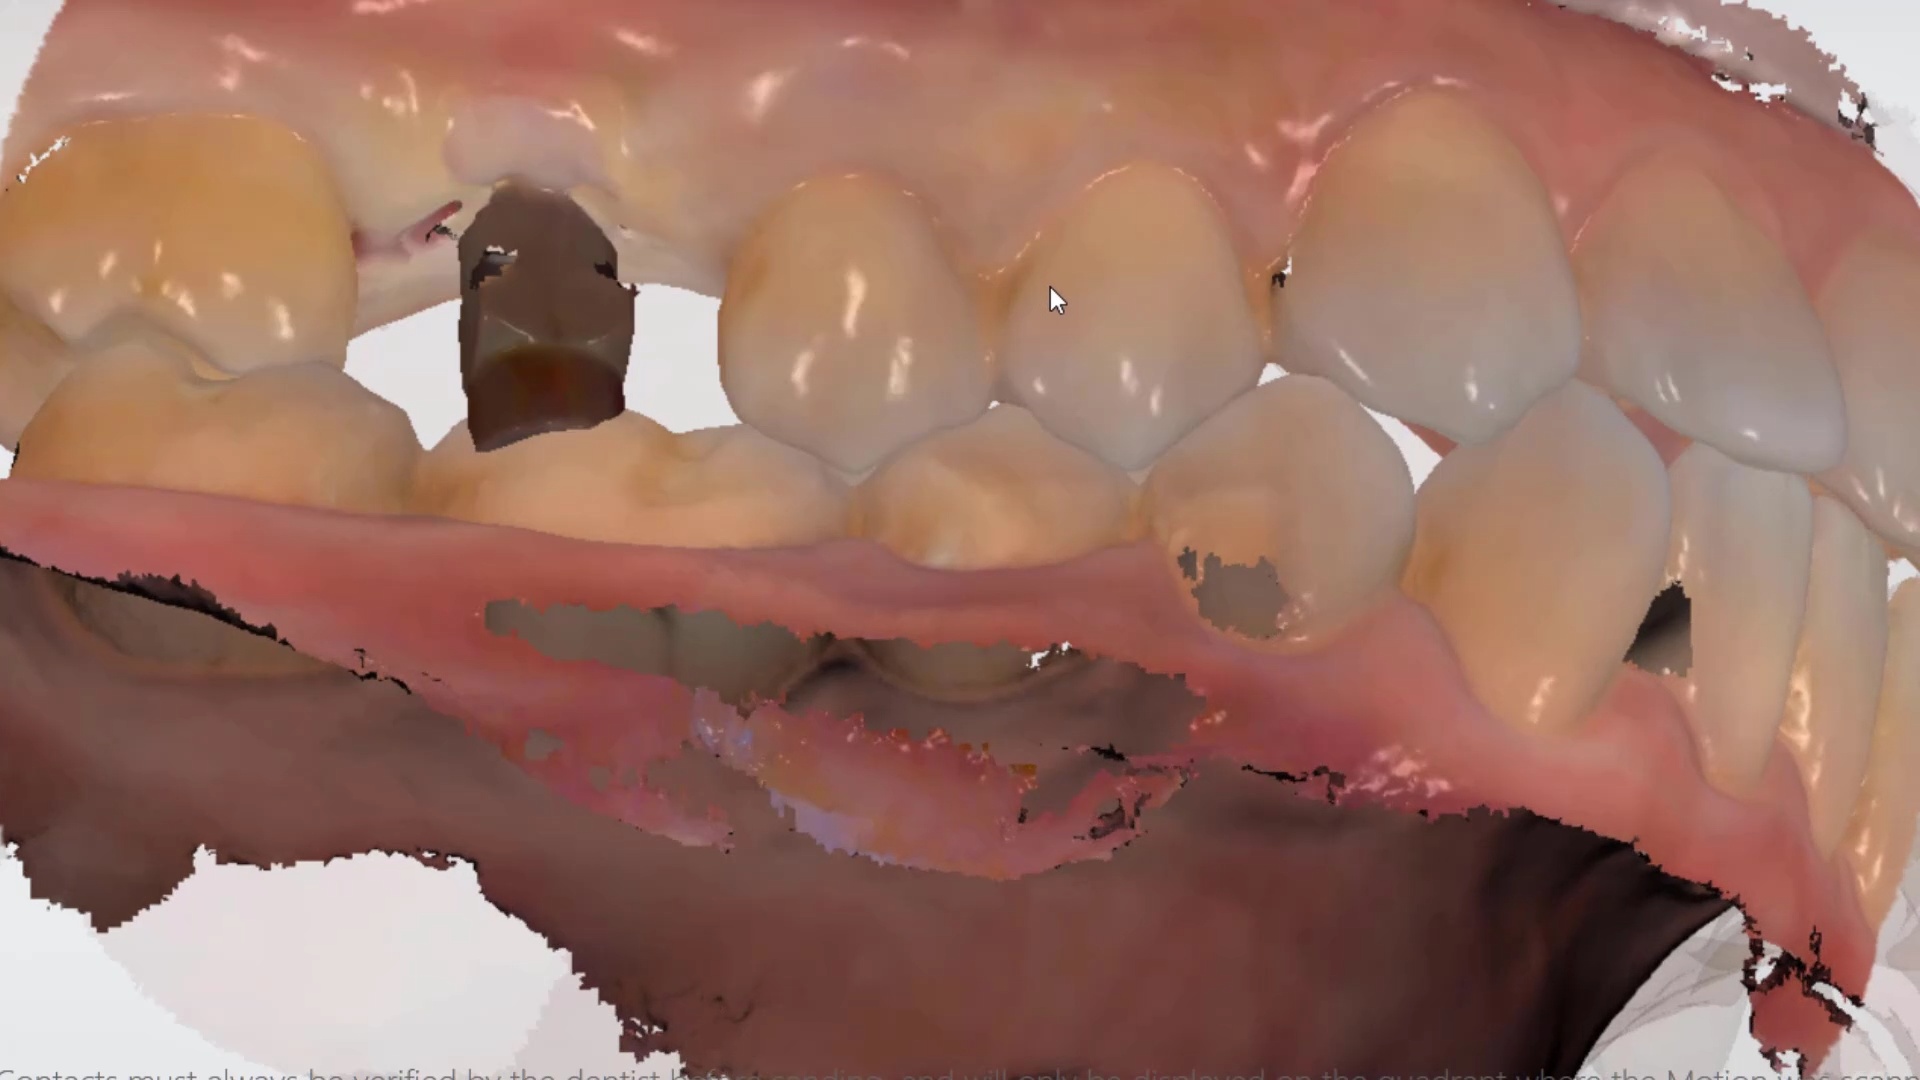
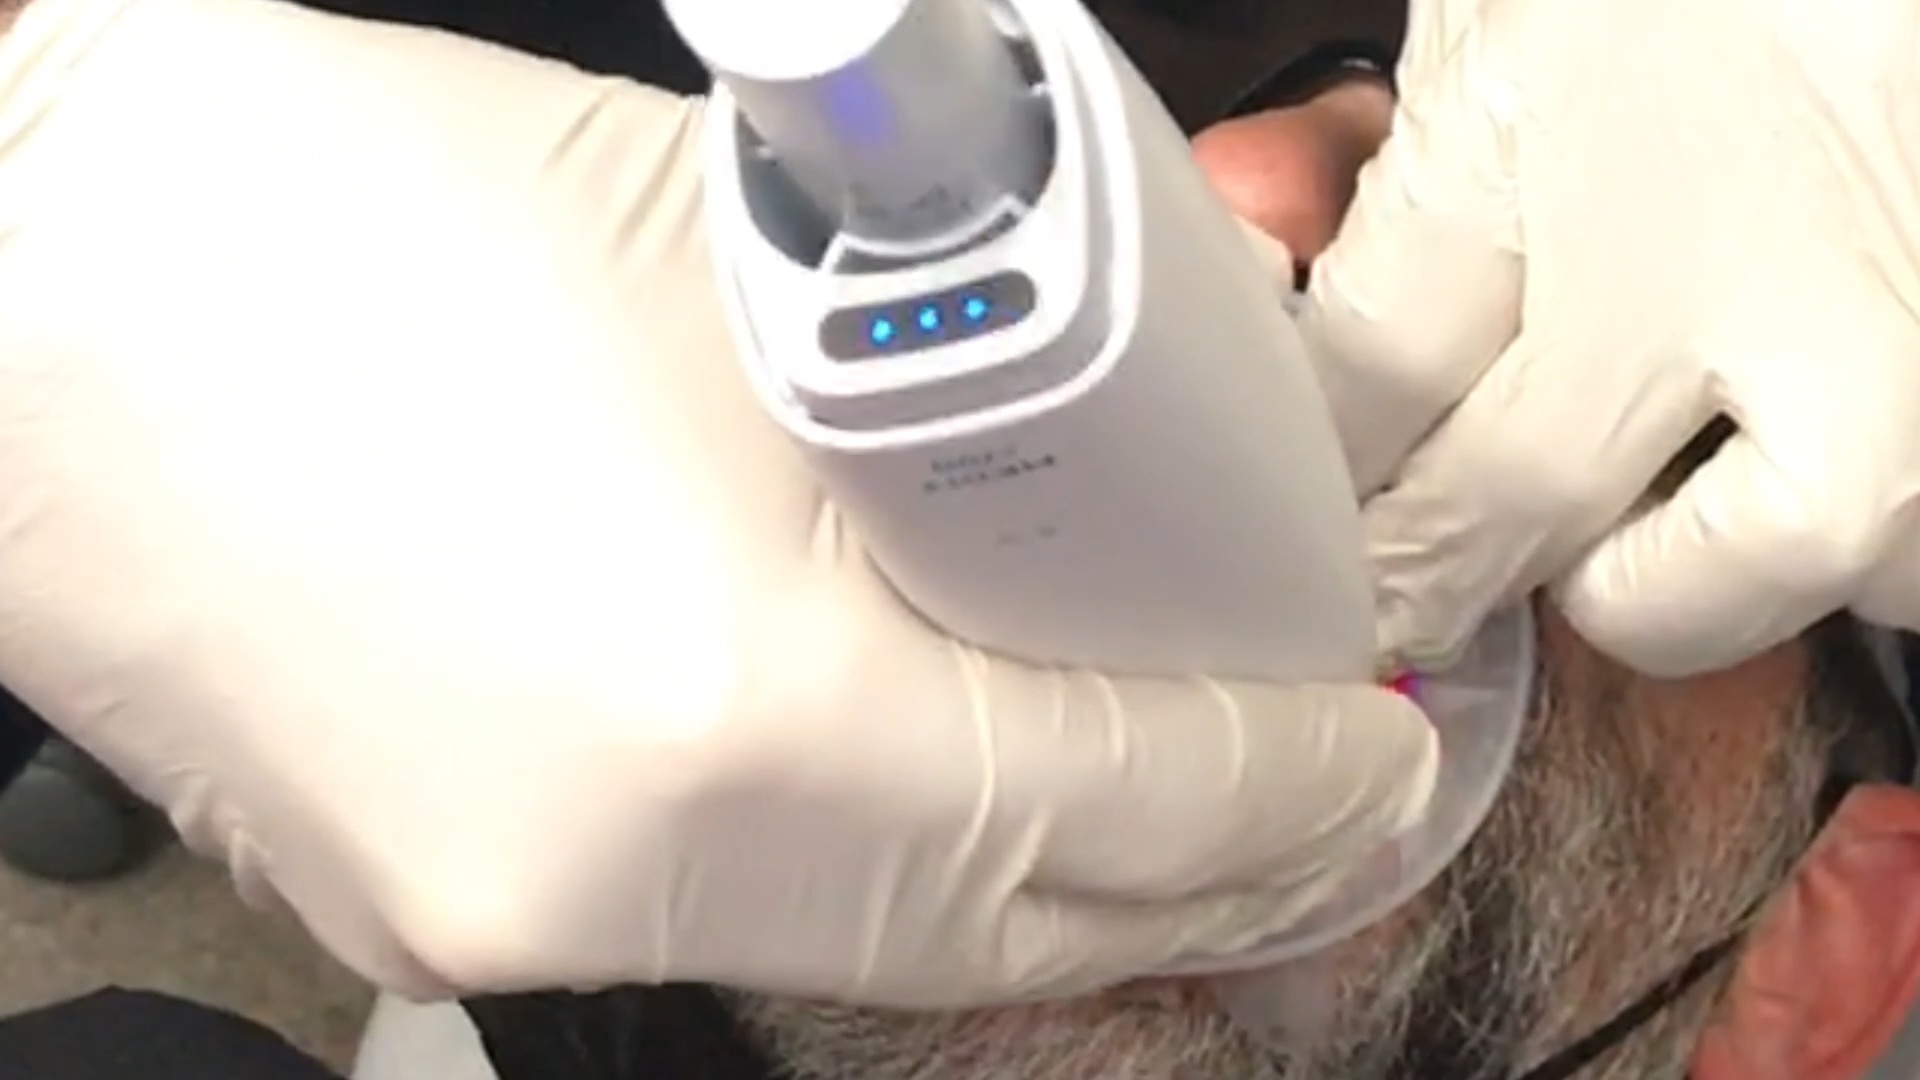
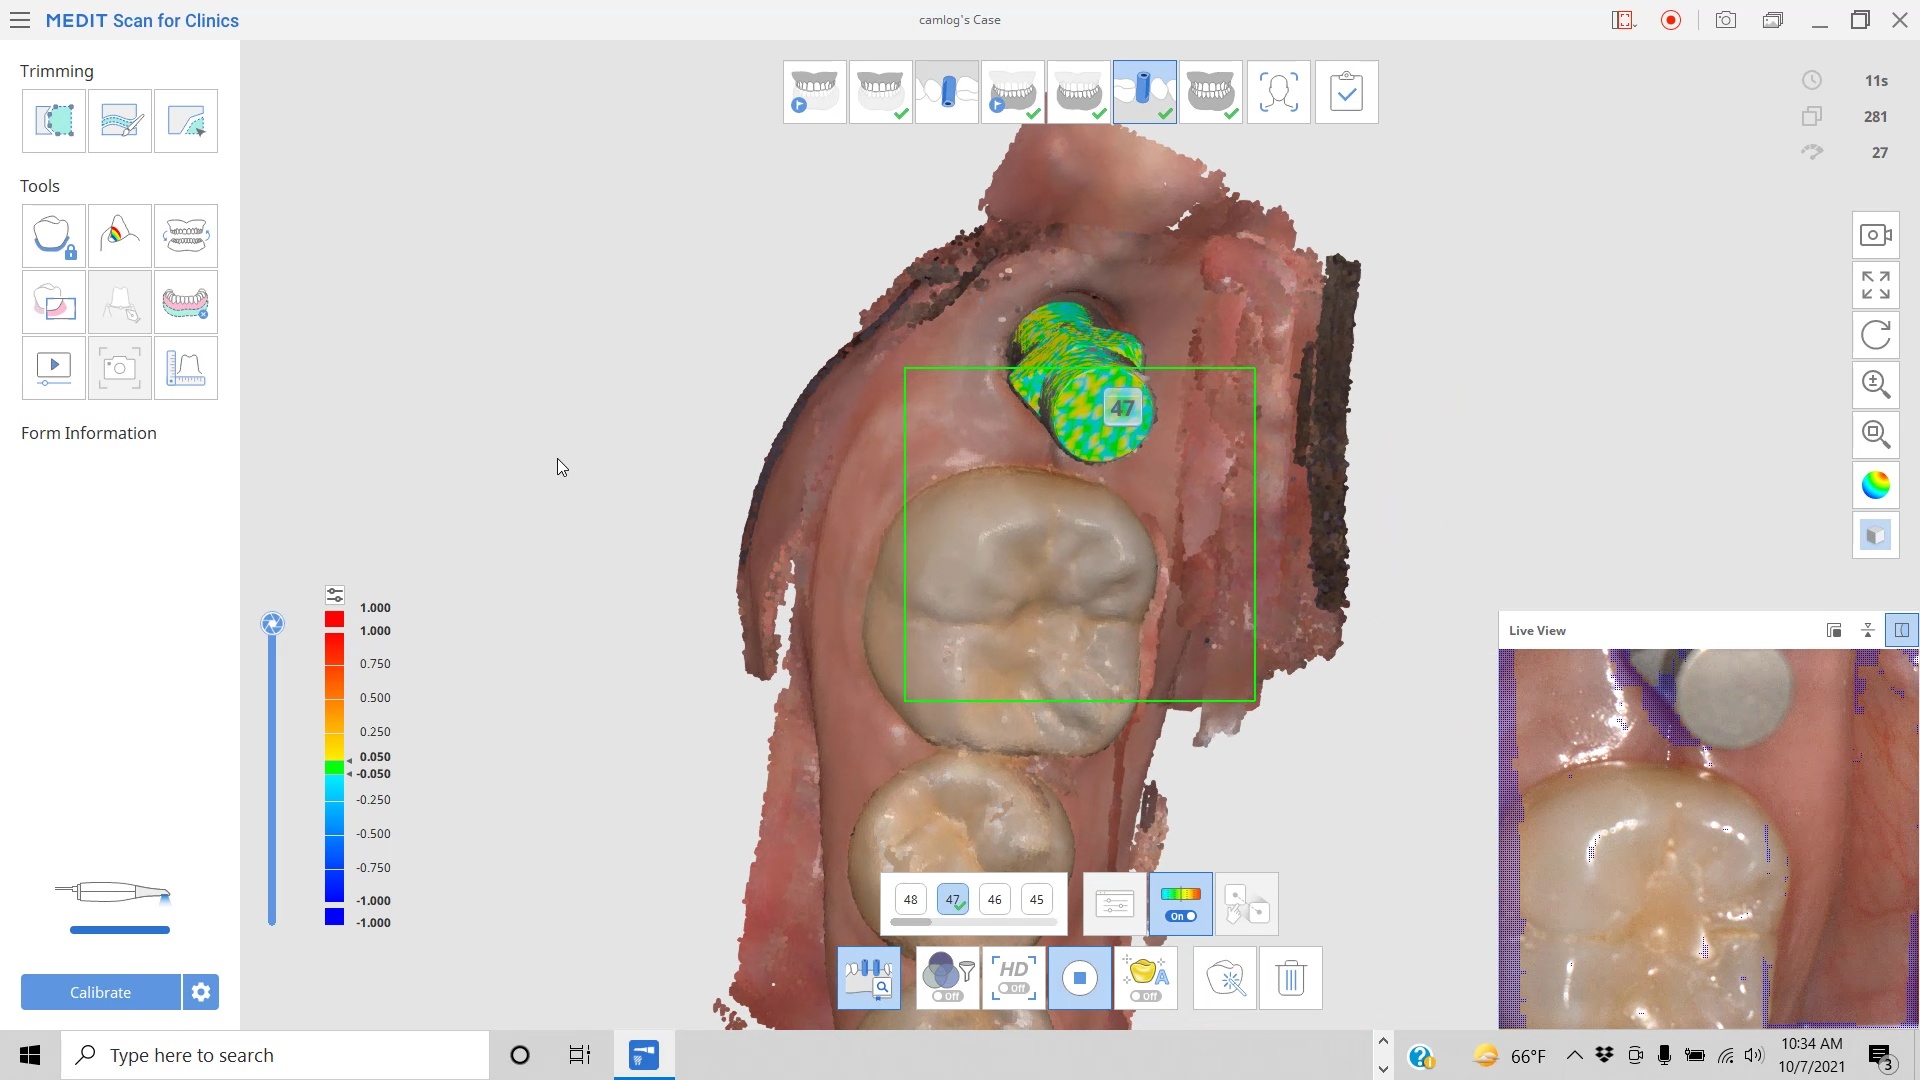
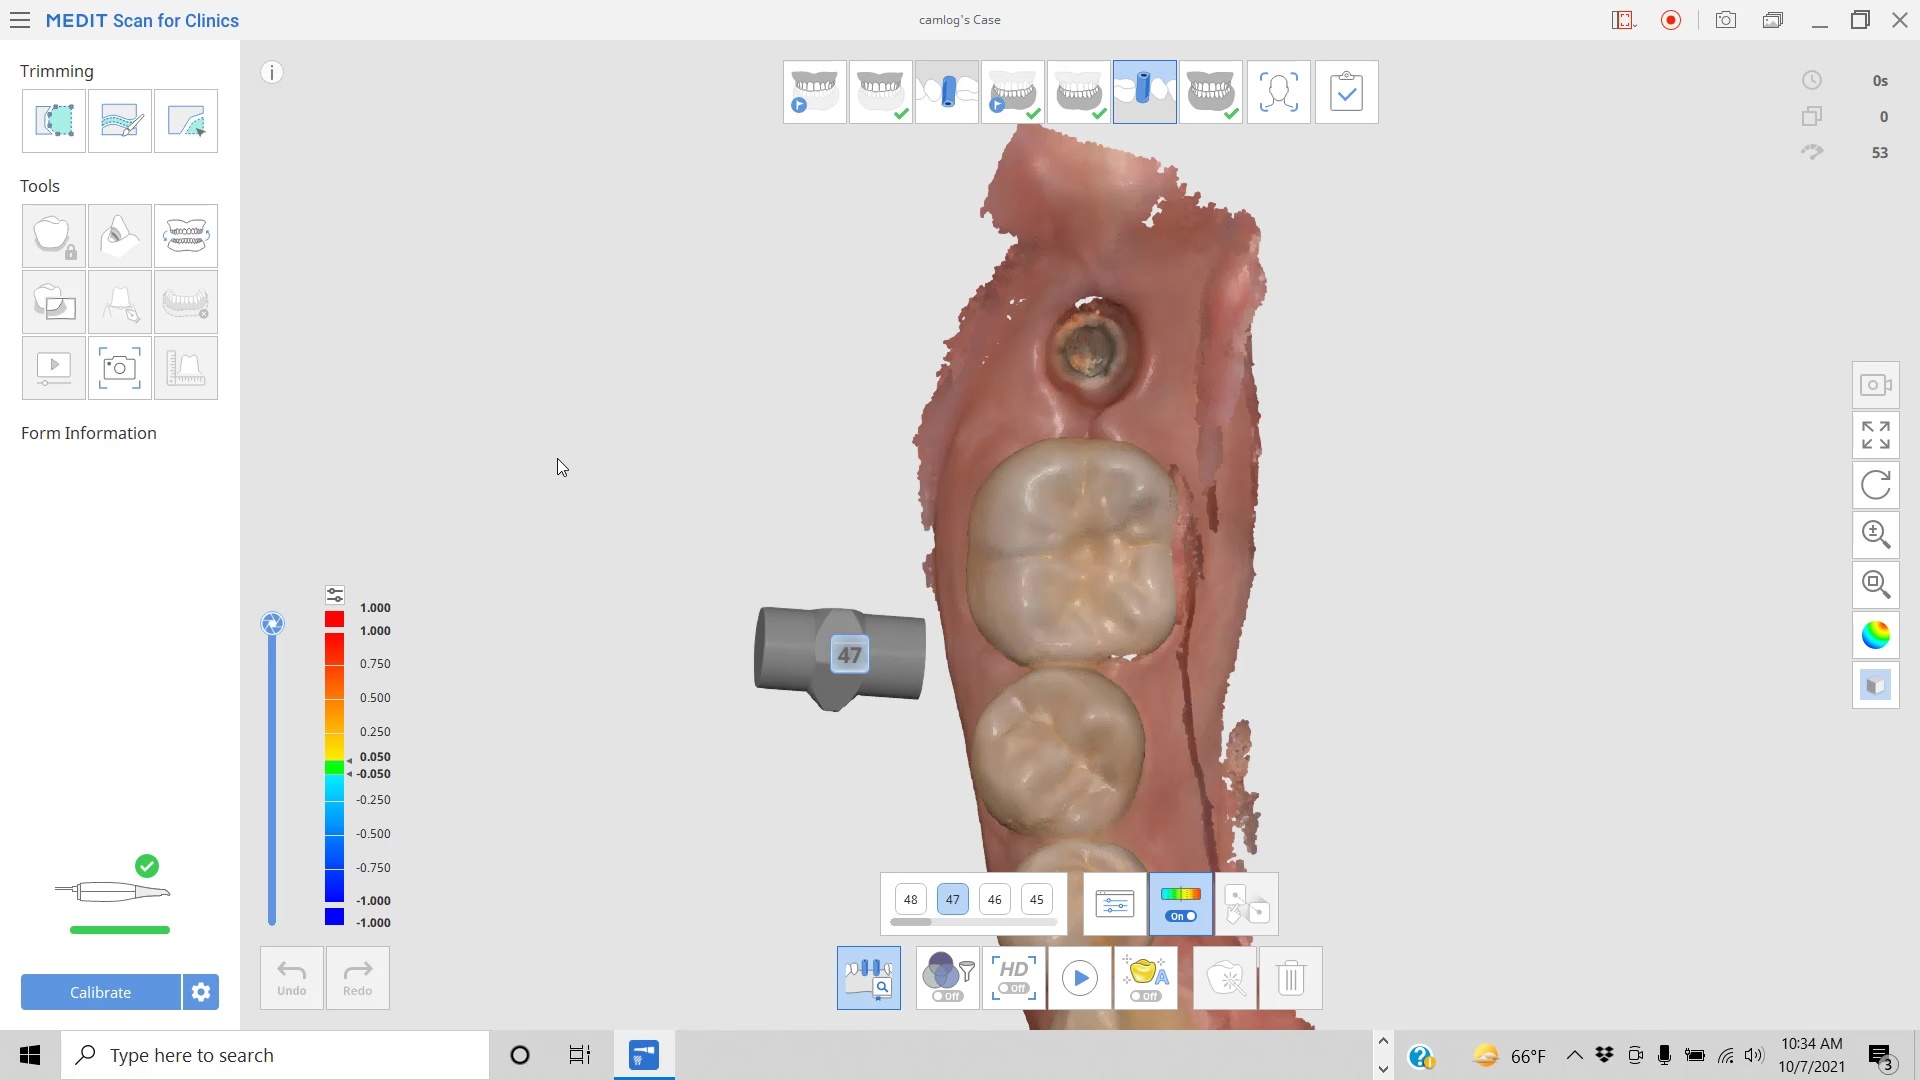
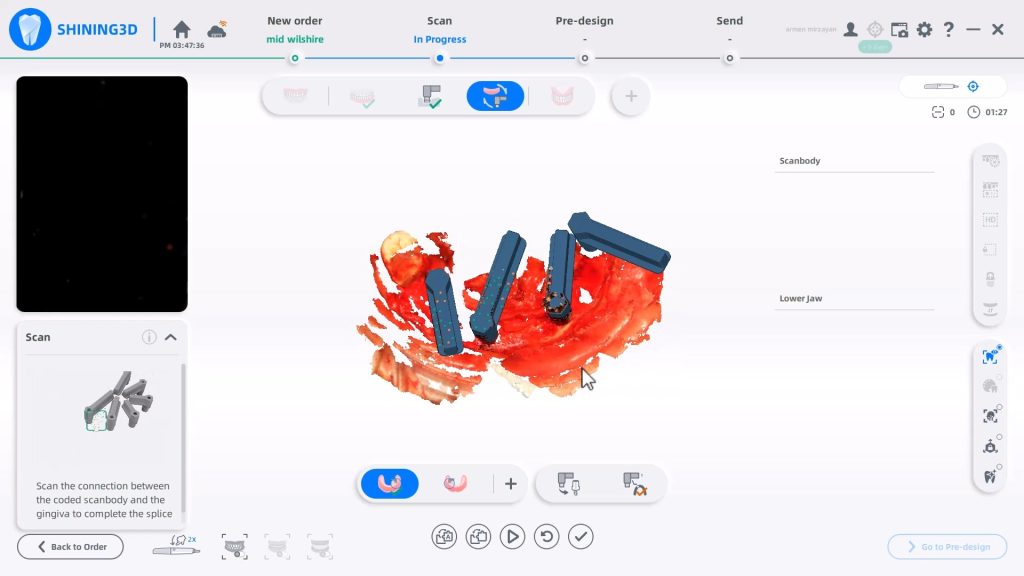
In this video we demonstrate for new and potential users of digital dentistry a implant restoration where the dynamic bite is captured. We initially imaged the upper and lower jaws with 2 bites. Then we captured the dynamic bite and the returned for the jaw scan with the scanbody. There are many ways to approach this but this sequence we have found to be easiest for new users to digest.
The scanbody was captured after the bite because it usually is taller than the adjacent teeth. There is a chance you may injure the patient if you don’t follow the proper sequence
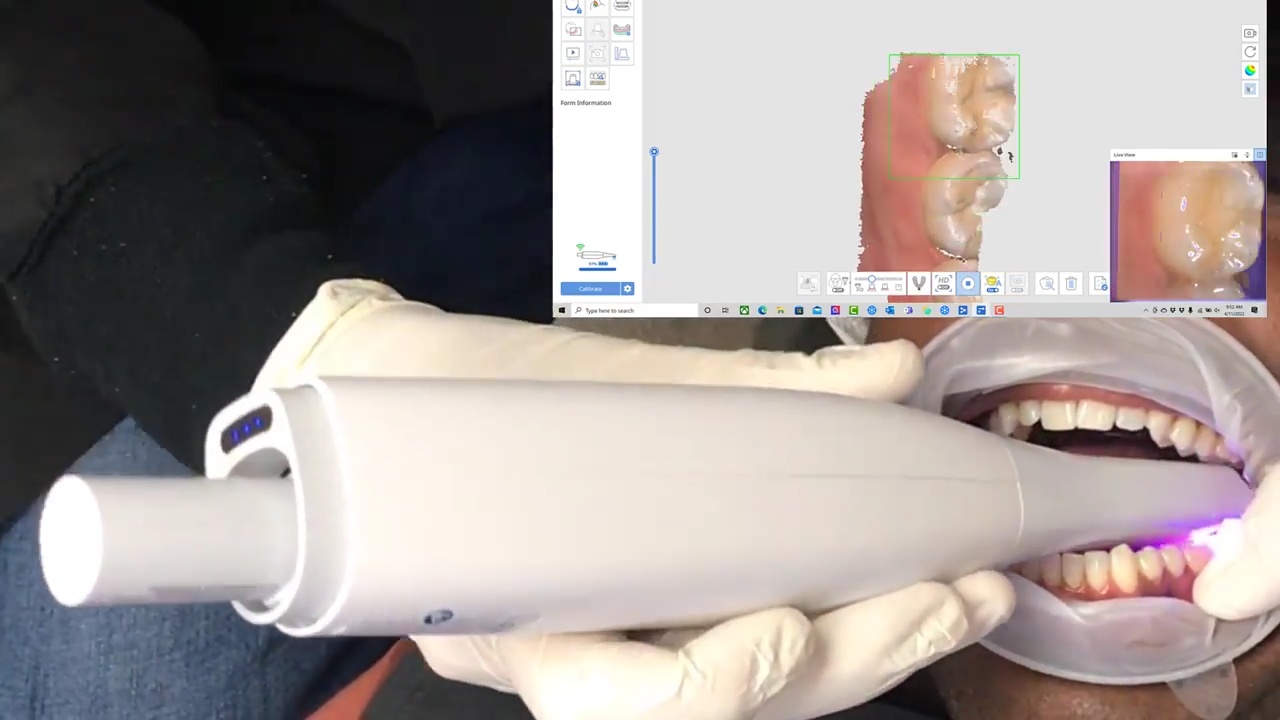
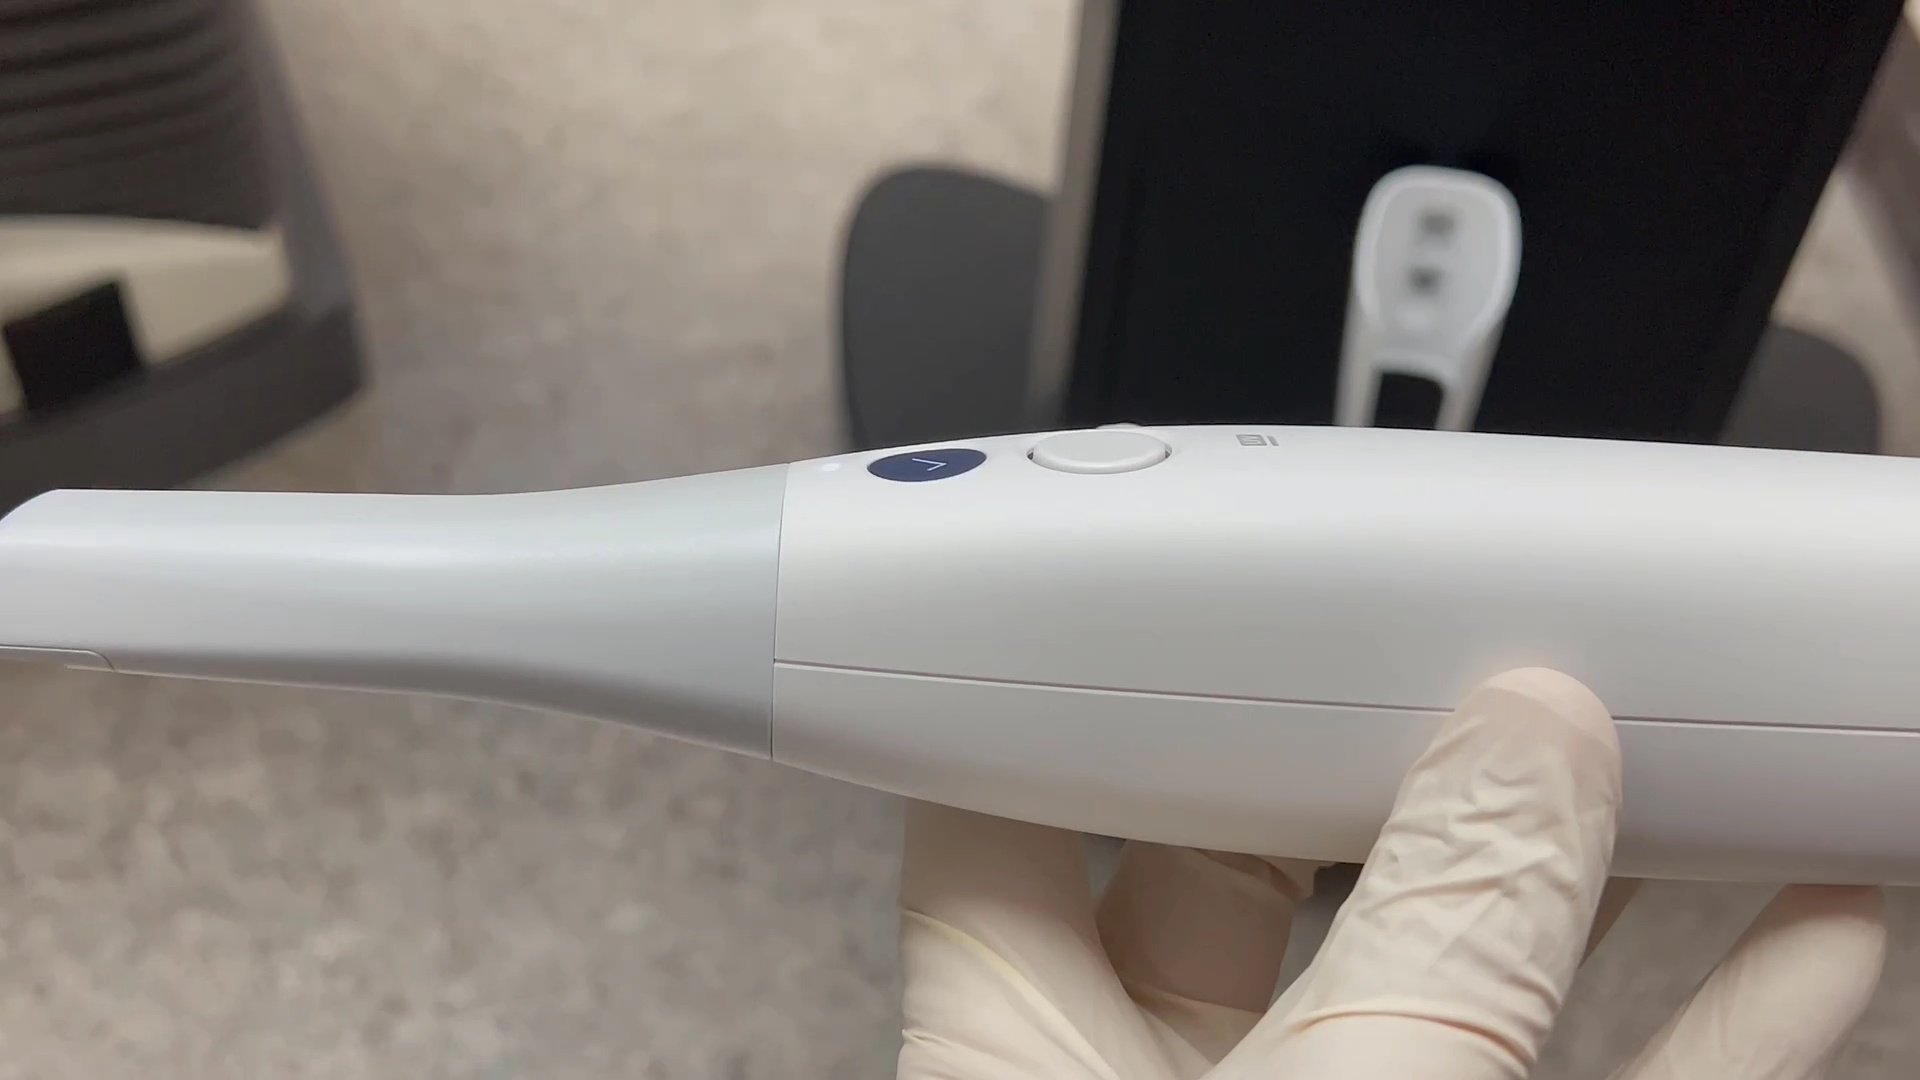
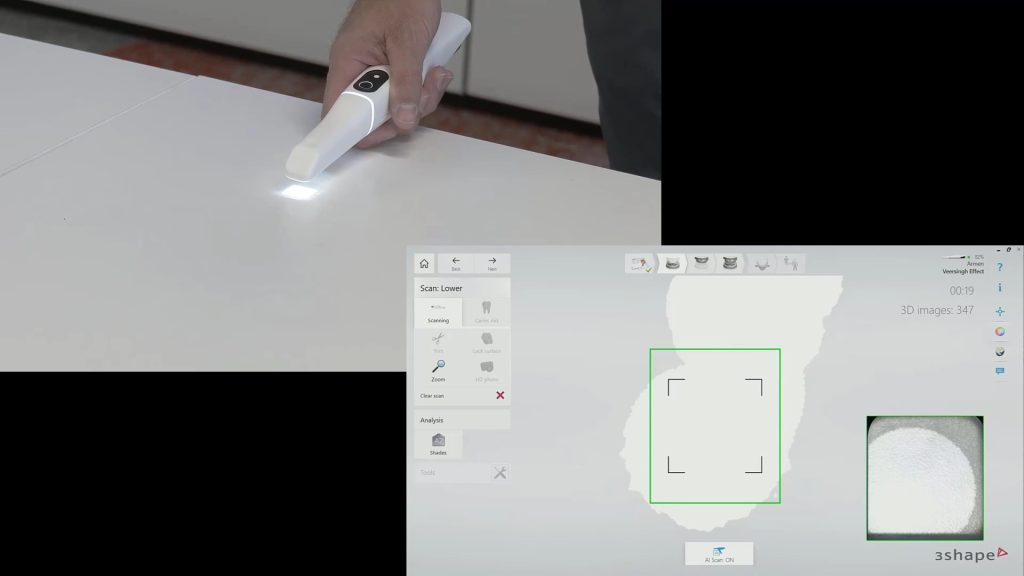
In April of 2022, Medit launched its wireless version of the i700 intra-oral scanner. We’ve been testing it ever since and are impressed with the range that it has. You want to be within 10 meters but more importantly you want to have clear line of site from the scanner to the hub. Much like anything else that is wireless, the further you are from the receiver the more difficult it is to maintain connection. In this video we demonstrate the distance at which you can maintain good connectivity.
After connectivity we tested its ergonomics. Some users get frustrated with tangled cords that are teathered to the laptop computer. This is a great solution and there is not much weight added to the device making it very easy to handle
In this video we show the layout of the battery pack, the scanner, and the dimensions of the battery pack. It is very easy to remove them and swap them with fully charged nodes.
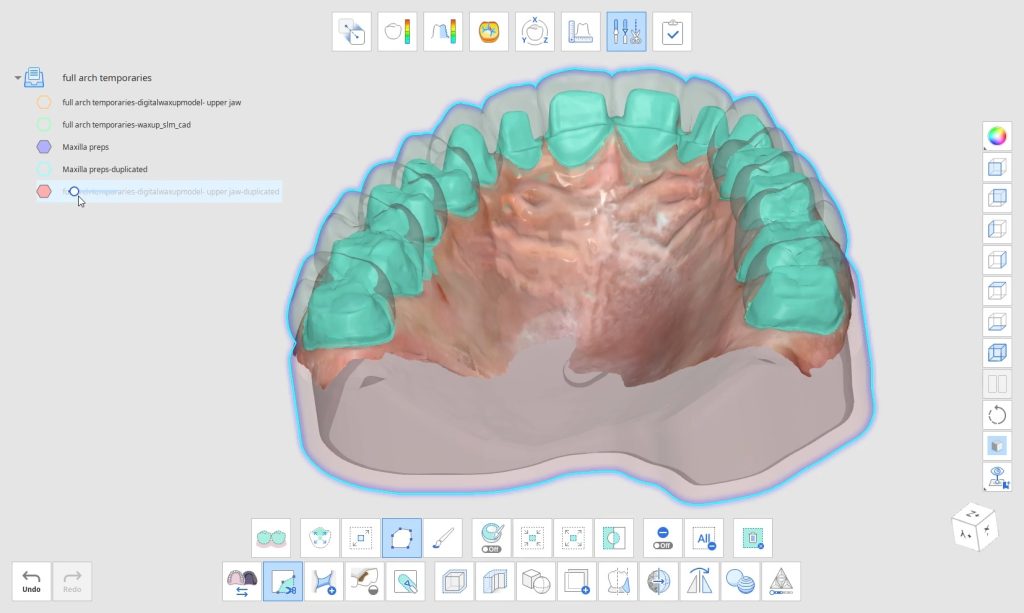
In this video we had the chance to scan a full set of upper and lower temporaries. You can see all the great features of the scanner in action where we capture the maxilla and mandible in little time.
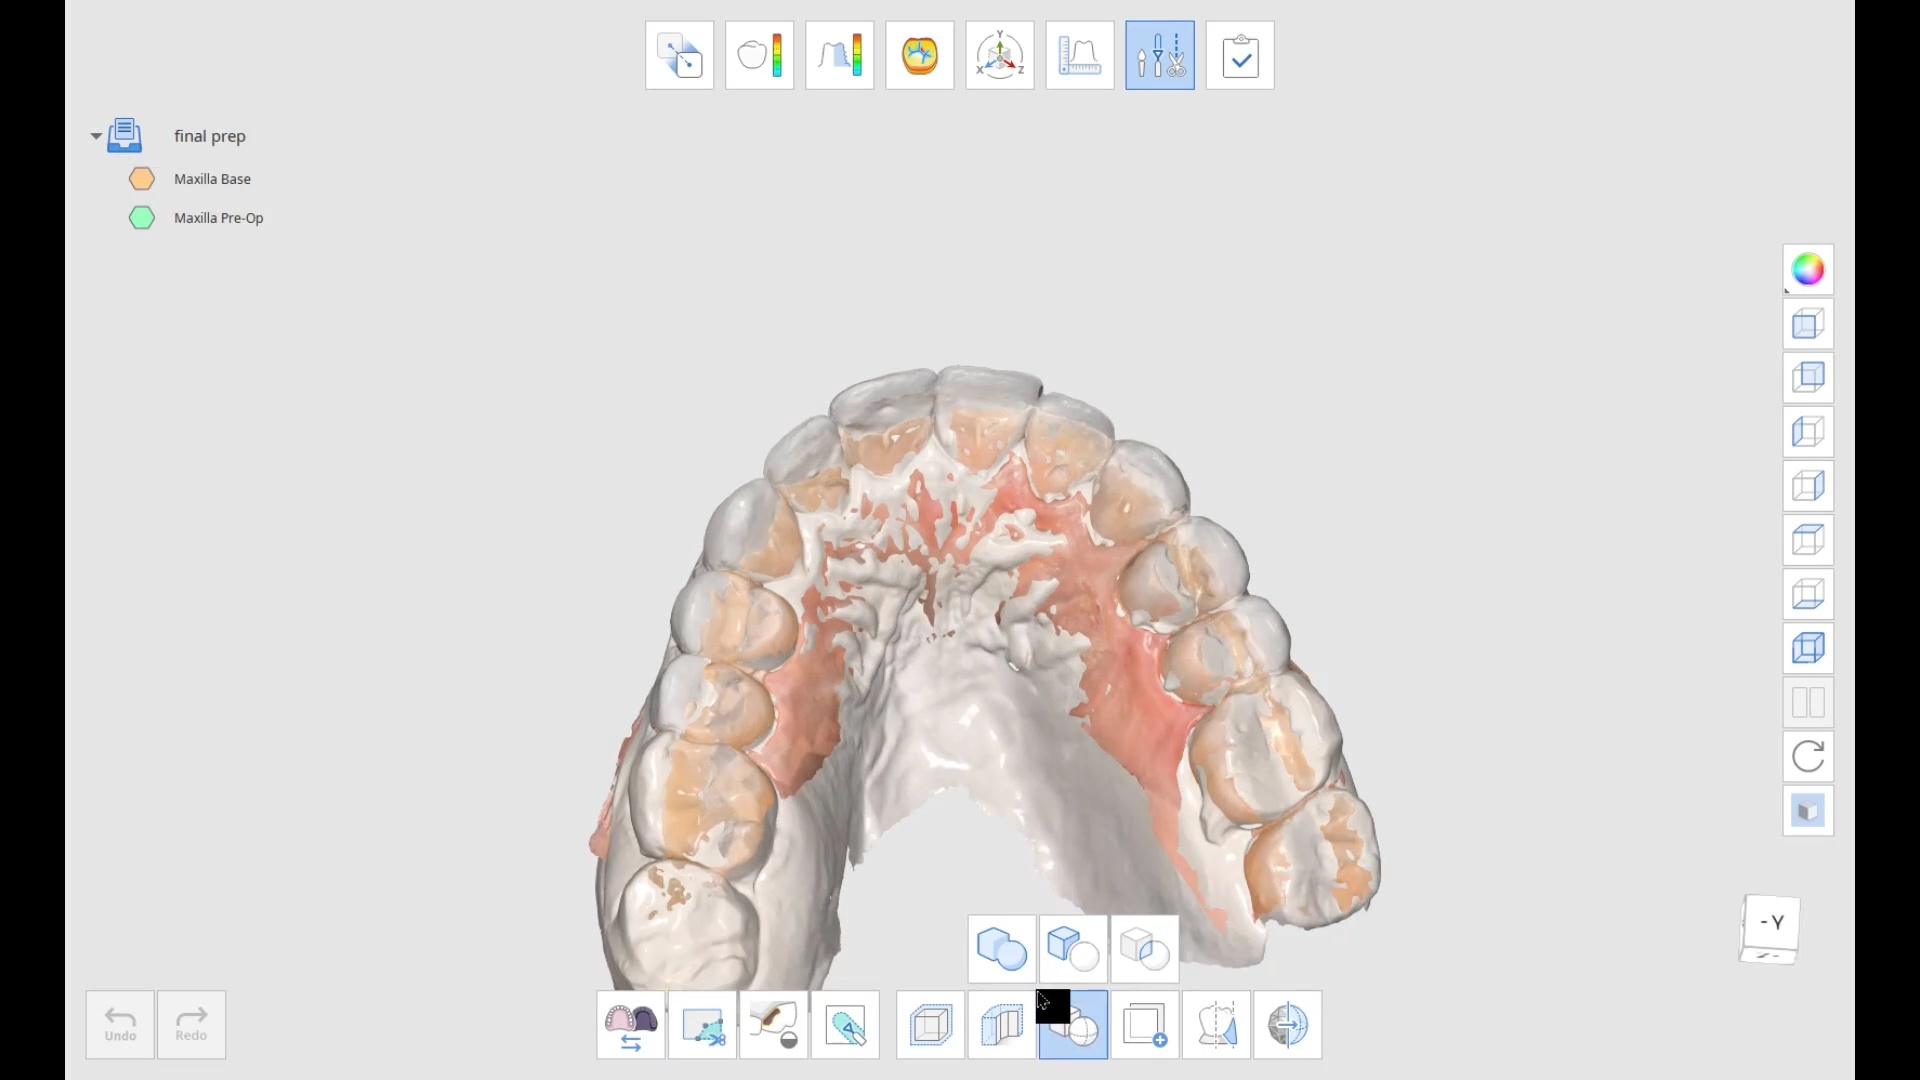
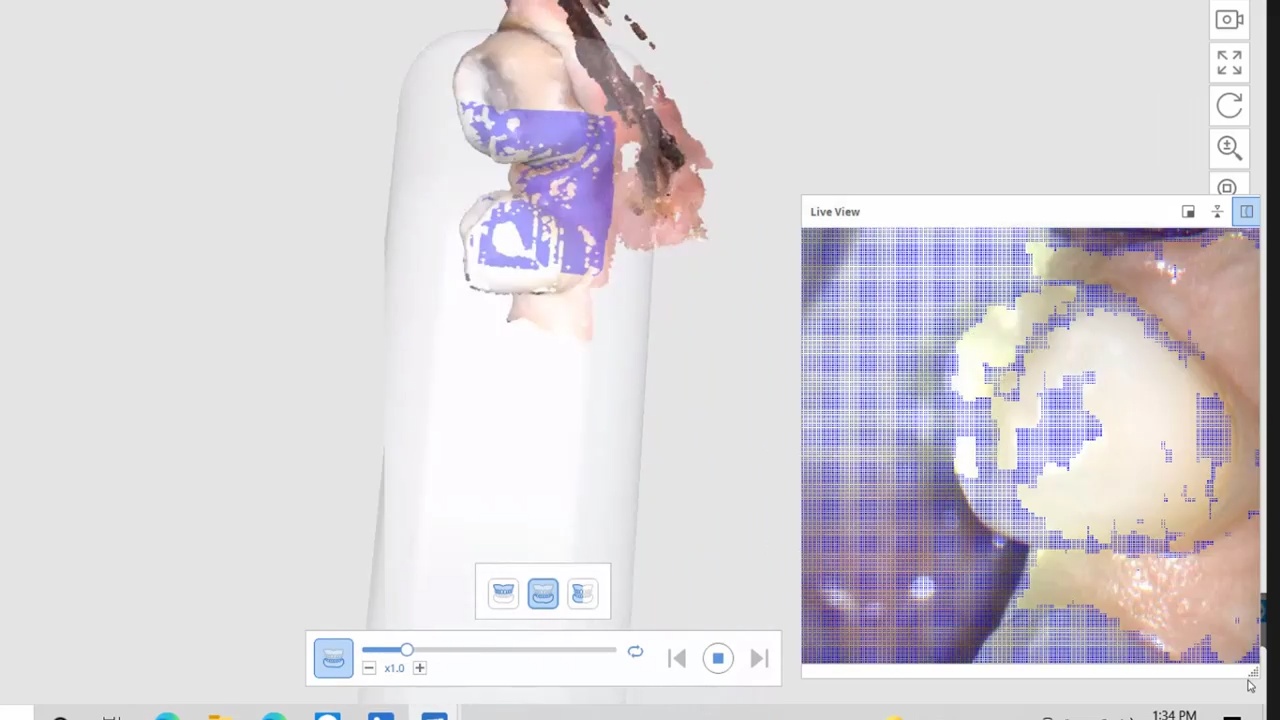
the patient was sedated and intubated for the case so we could not keep track of the bite. Instead, we imaged all 30 prepared teeth and used medit compare / design to digitally mount them to the wax ups. In the link provided you can download the models and relate them to each other […]
To access this page and view the premium content and support, you must either be a customer of CAD-Ray or purchase CAD-Ray Membership.
Medit Compare, now called Medit Design, now has a boolean cut feature that lets you extract a temporary shell model from wax up or mock up model and prep model for easy and quick designs without painful margin marking on multiple units
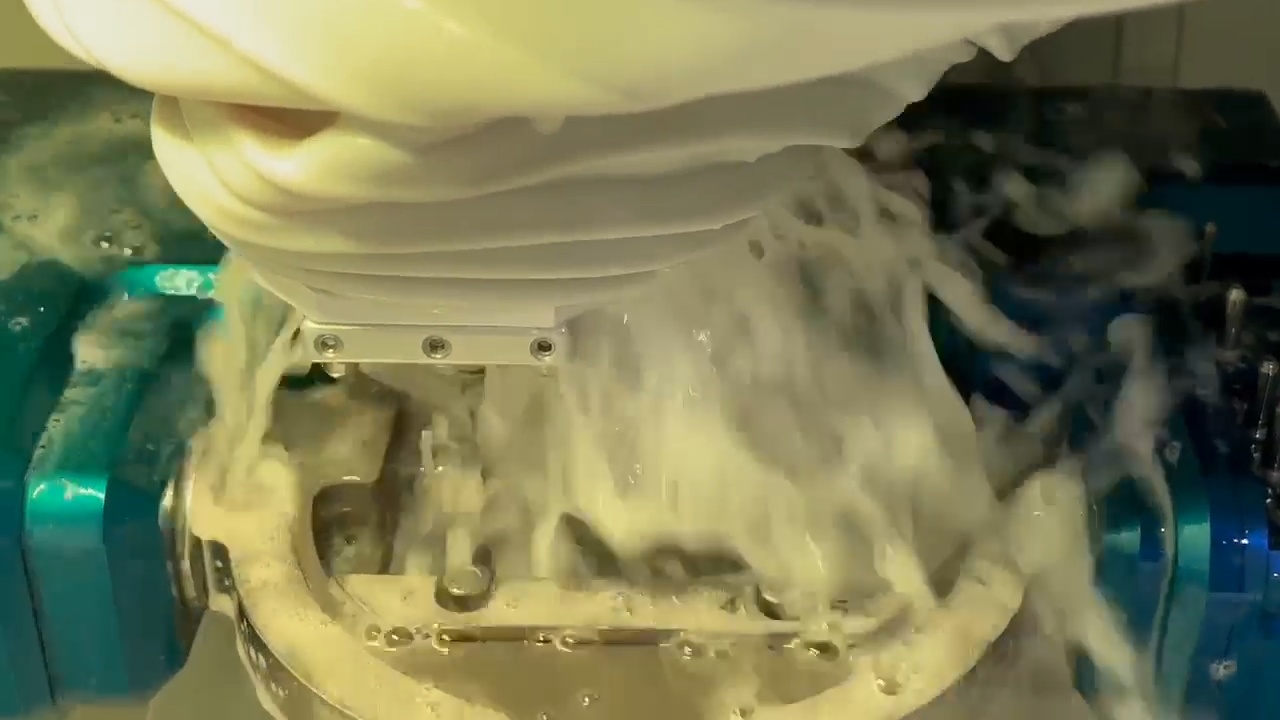
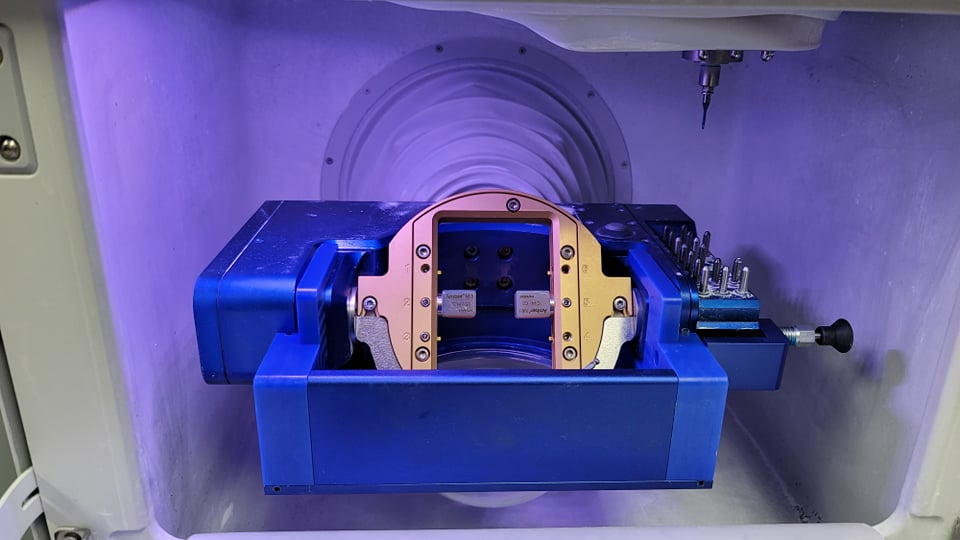
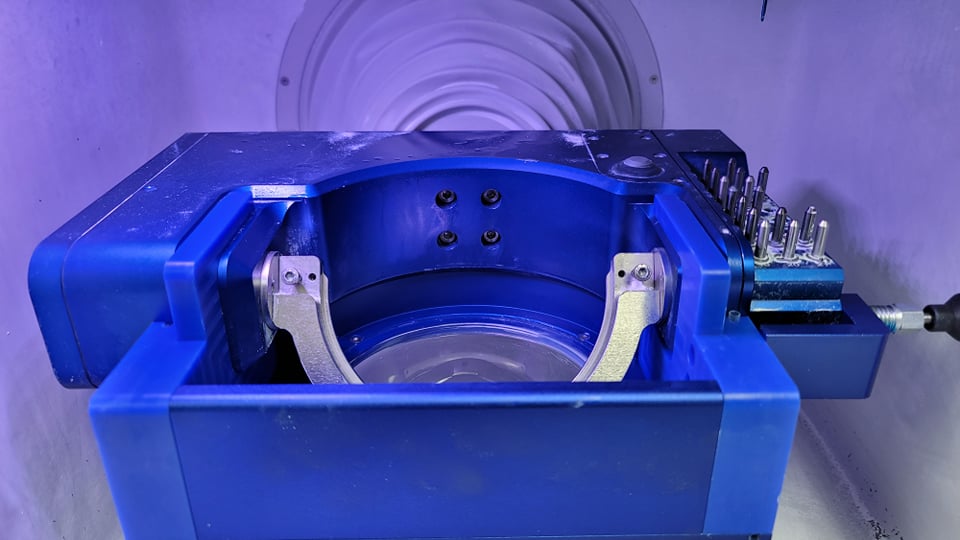
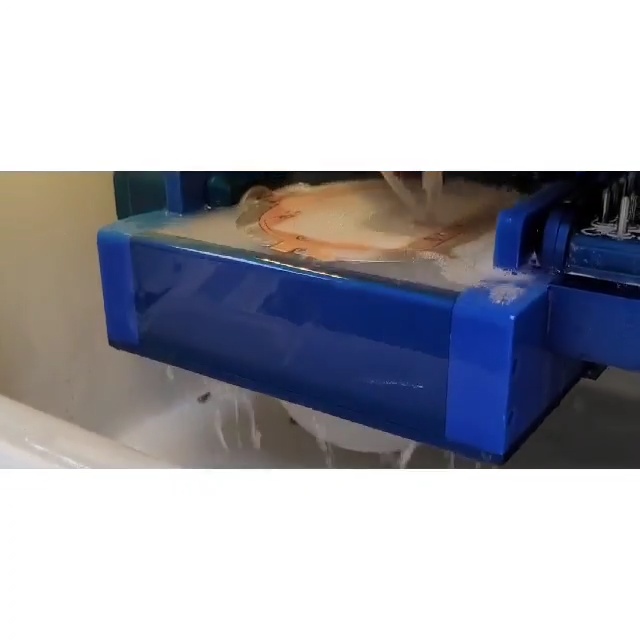
Most if not all milling machines do not adequately cool the tools or restoration while milling. At CAD-Ray we have developed augmenting tools that reduce or eliminate any dry milling of glass ceramic restorations. We can either run tubing from the holding tank or we can submerge the block for soaked milling
Much like conventional impressions, digital impressions can render ill-fitting restorations. It is imperative to figure out the source of the problem and to understand if it is a scanning or manufacturing issue. We have compiled the top reasons for such errors in this article:
If the restoration is manufactured on printed models, you should be alarmed! There are so many variables that can be introduced in additive manufacturing process that can lead to less than desired results. Printed models should only be used after restorations are milled to assess contacts or to dial back bulky material to the margin on they die.
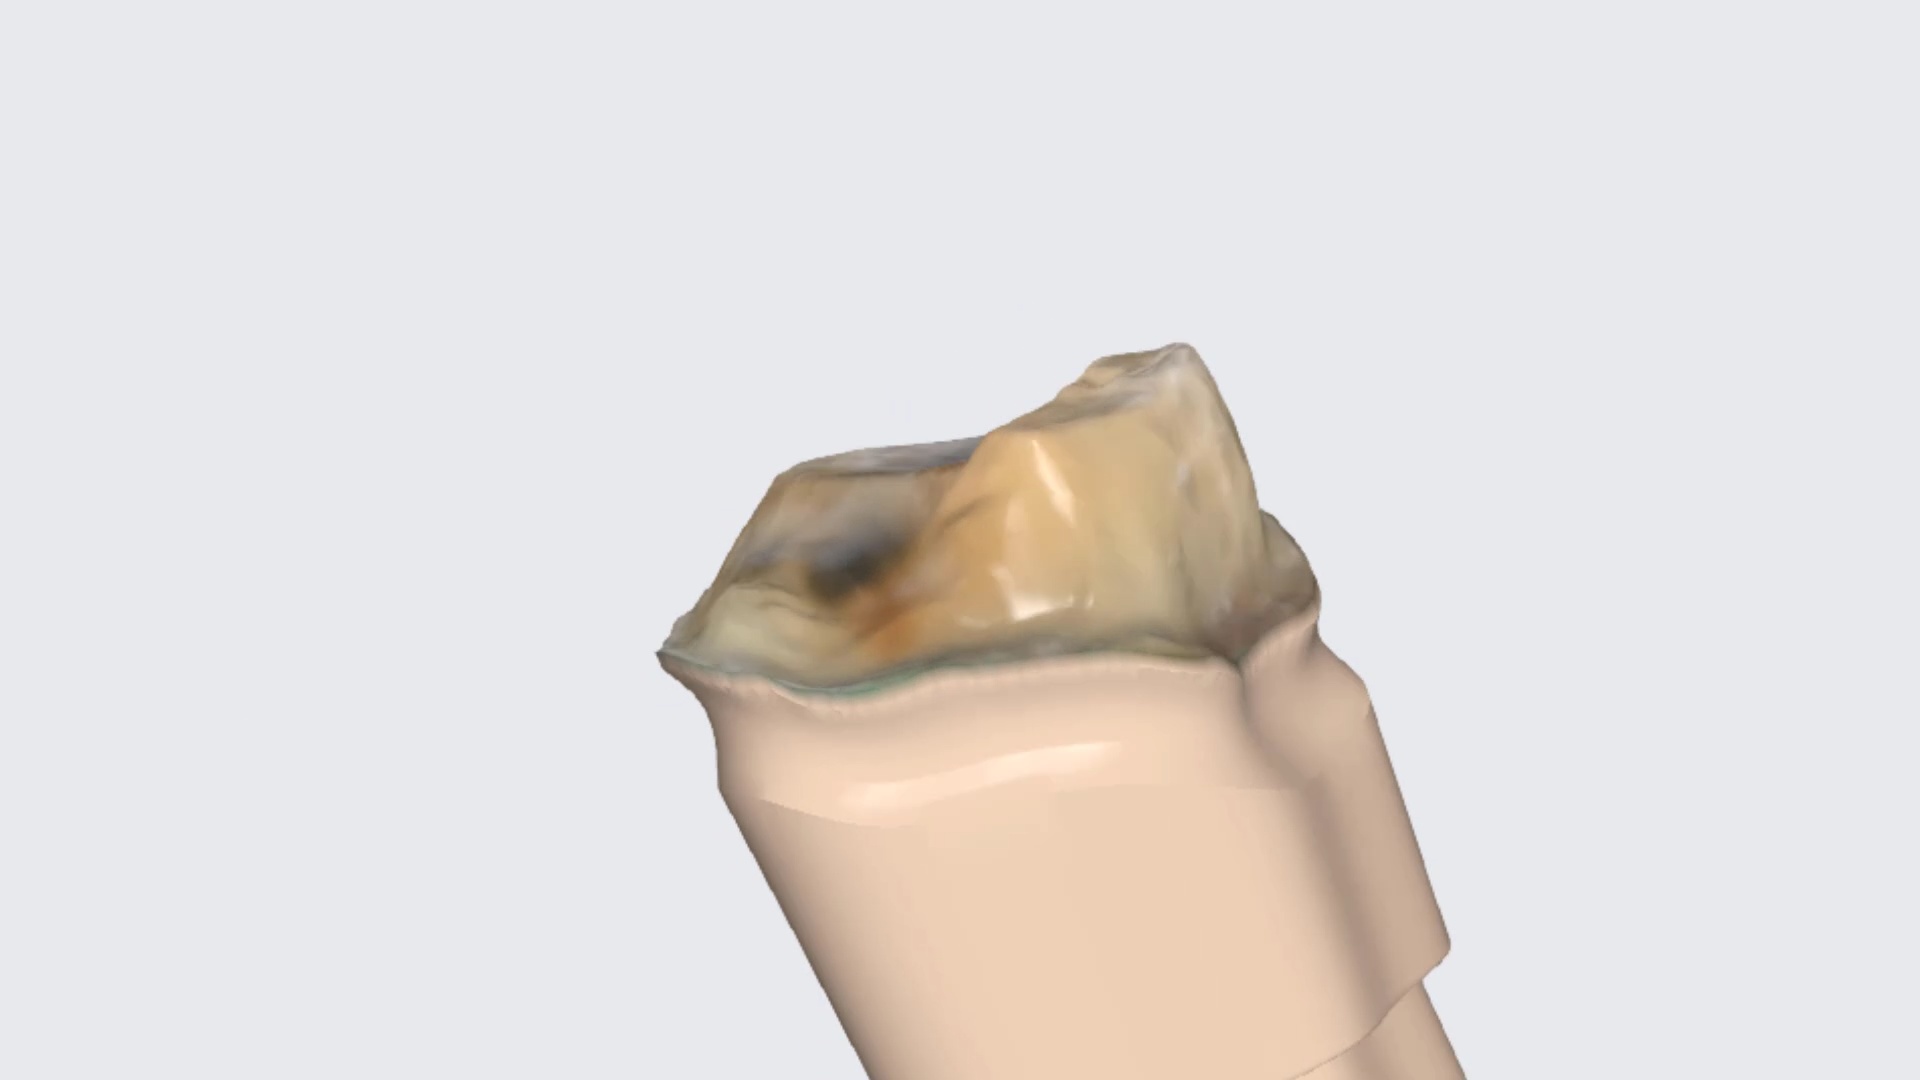
Translucent / transparent enamel can lead to inaccurate scans. This is most magnified when we work on conservative preparations made on enamel. See this article to understand the troubles that can be introduced while scanning glass. aa
3. We highly recommend that the clinician places his or her margins as soon as they image the preparation. Oftentimes, labs only work with STL models instead of color models and this leaves a lot of room for open interpretation and errors. Labs can then print the models to finish work like contacts and reducing margins they have bulked out to protect the material whilst milling.
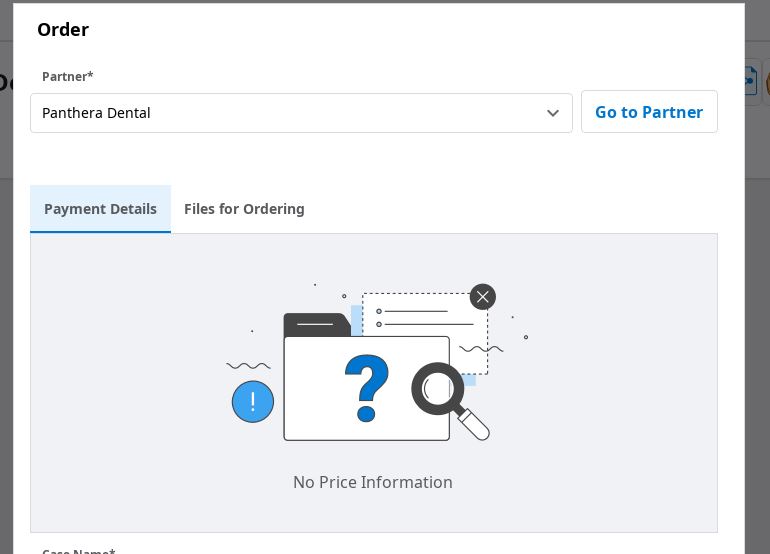
Until recently, when you submitted a case to Panthera Dental for a Obstructive Sleep Apnea Device, they would manufacture it and send it to one of their partner labs. This would delay the process and add other hurdles. You can now directly submit the cases through the meditlink portal. You must attach an Rx form and you must have an account with them.
if you modify your models to block out deep undercuts and capture the bite correctly you will have very little to no adjustments to make. We also recommend having the patient record your instructions so that you don’t have to repeat yourself. Most now do the titration remotely.
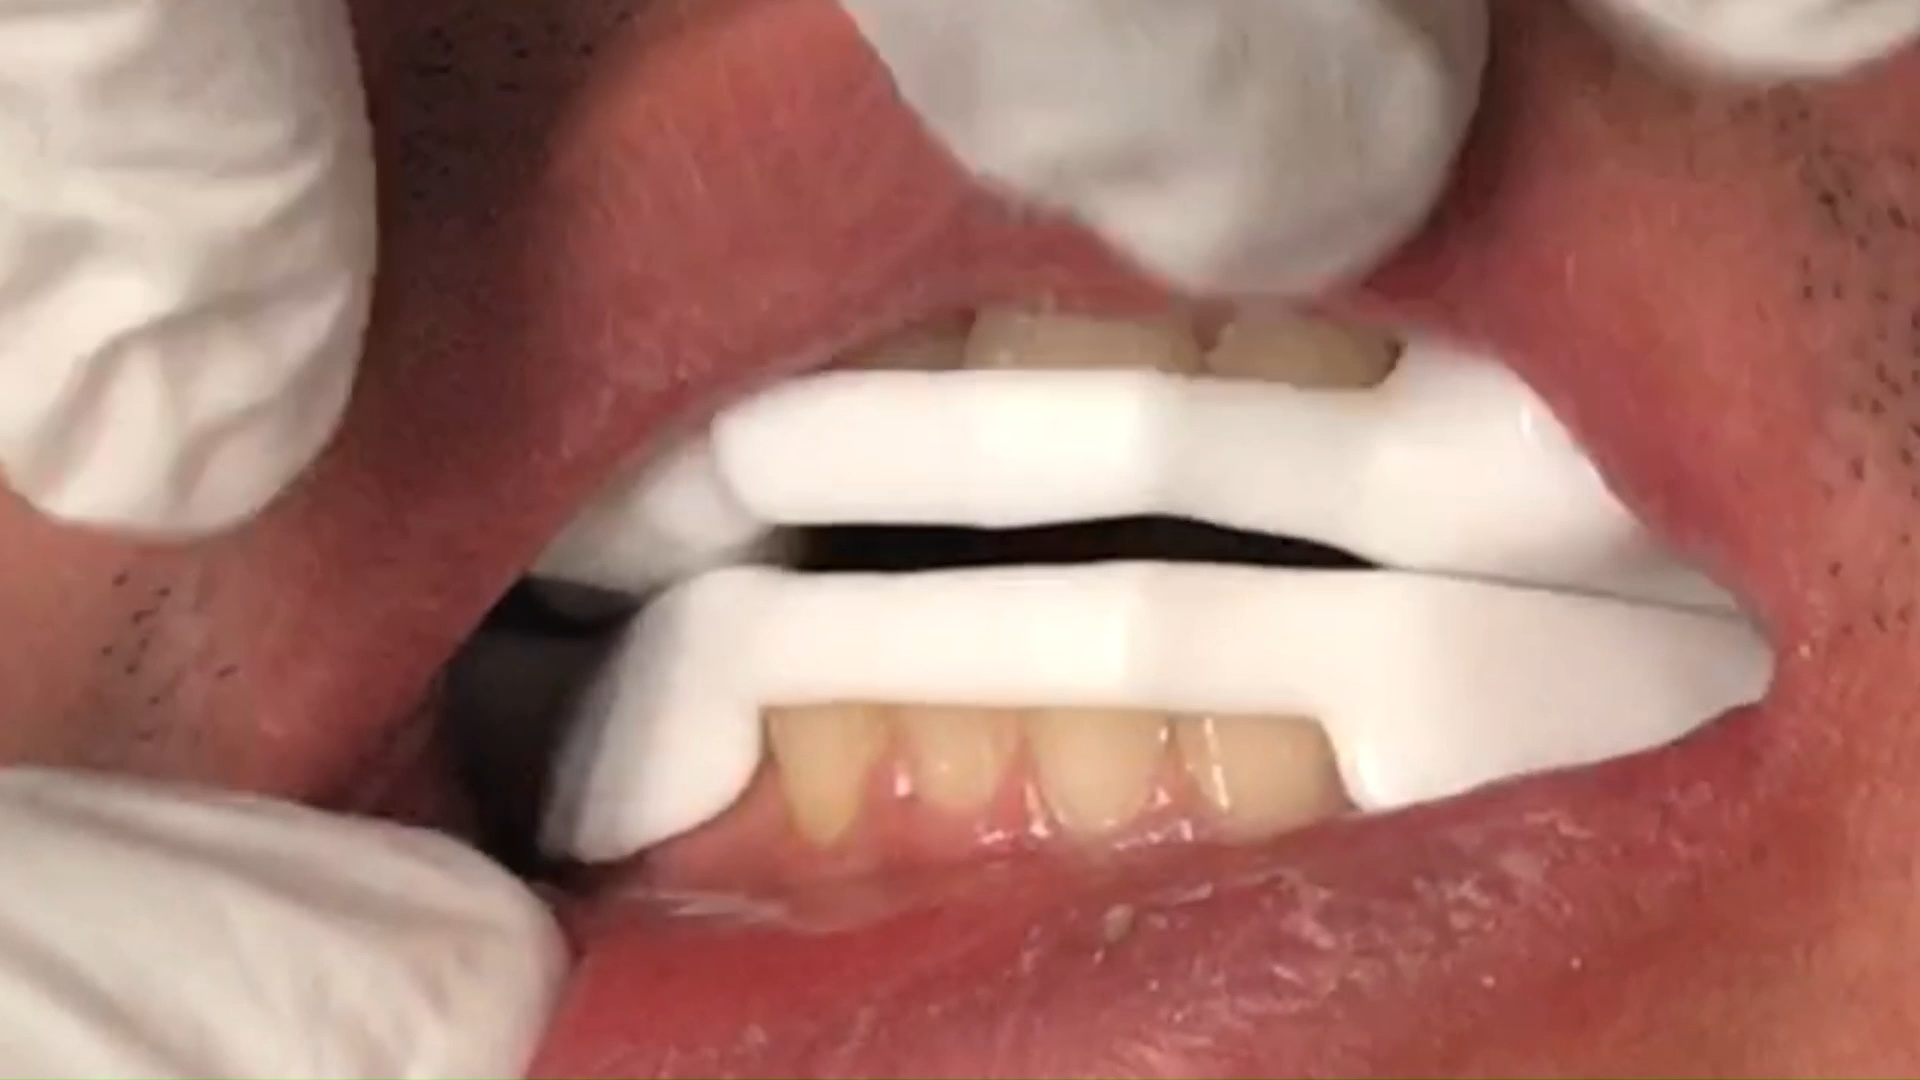
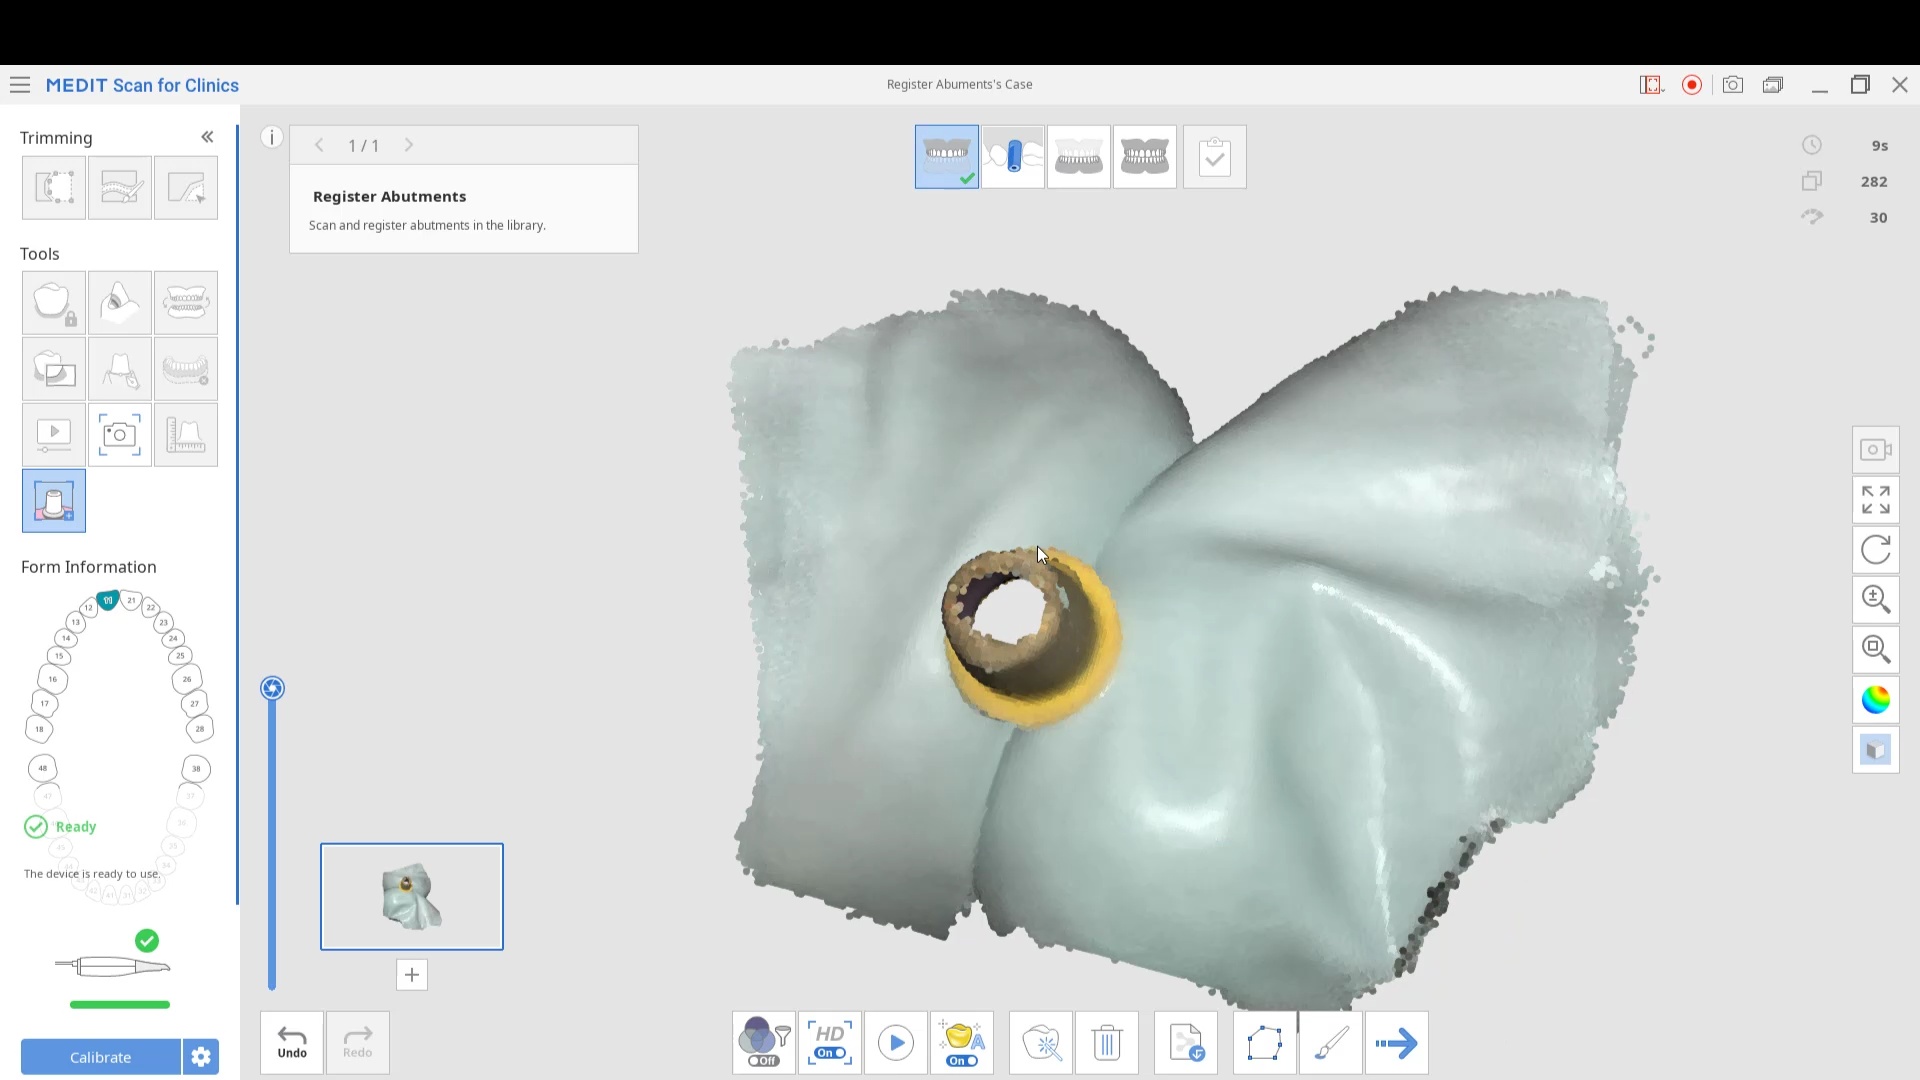
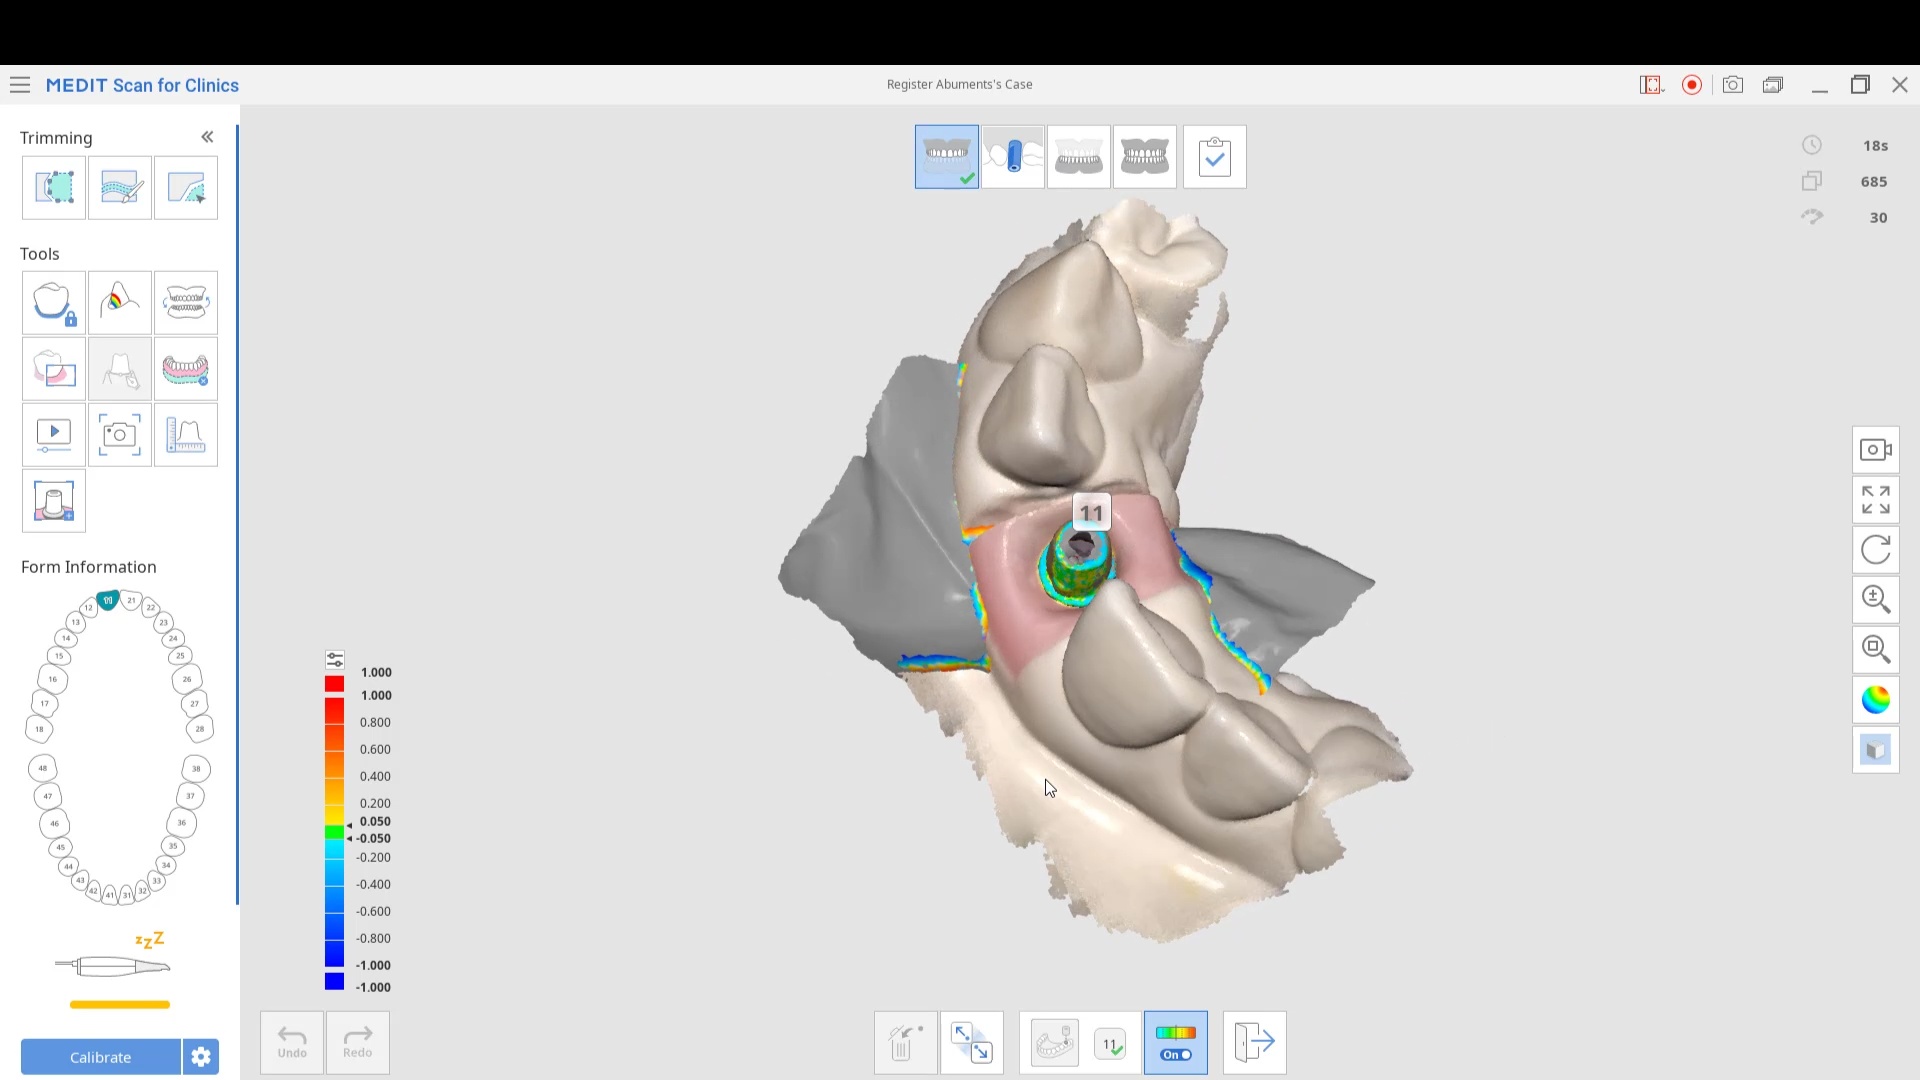
Medit’s software allows you to remove and pre-existing abutment and scan it outside the mouth. This allows you to find your margins without ever having to displace the tissue or reach hemostasis. Important matters to keep in mind with workflow
You must fill out the Rx form correctly and identify the abutment location
You must take the abutment scan at first in the right catalog box (upper jaw or lower jaw)
You must take the tibase / abutment outside the mouth and scan it under Abutment Registration Feature
In this video, we show how you to capture the healing abutment, the tissue profile after the abutment is removed, and then we image the scanbody while utilizing the AI feature of the Medit i700 to pick up all the data from the scanbody by matching the STL to the physical one during the scan
With second molars, you should always be on the look out for not just the jaw settling, if you remove the first point of contact, but also with the temporary step forcing the tooth to tip towards the distal, if there is no third molar to stop its tilting.
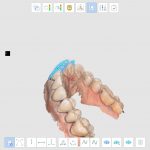
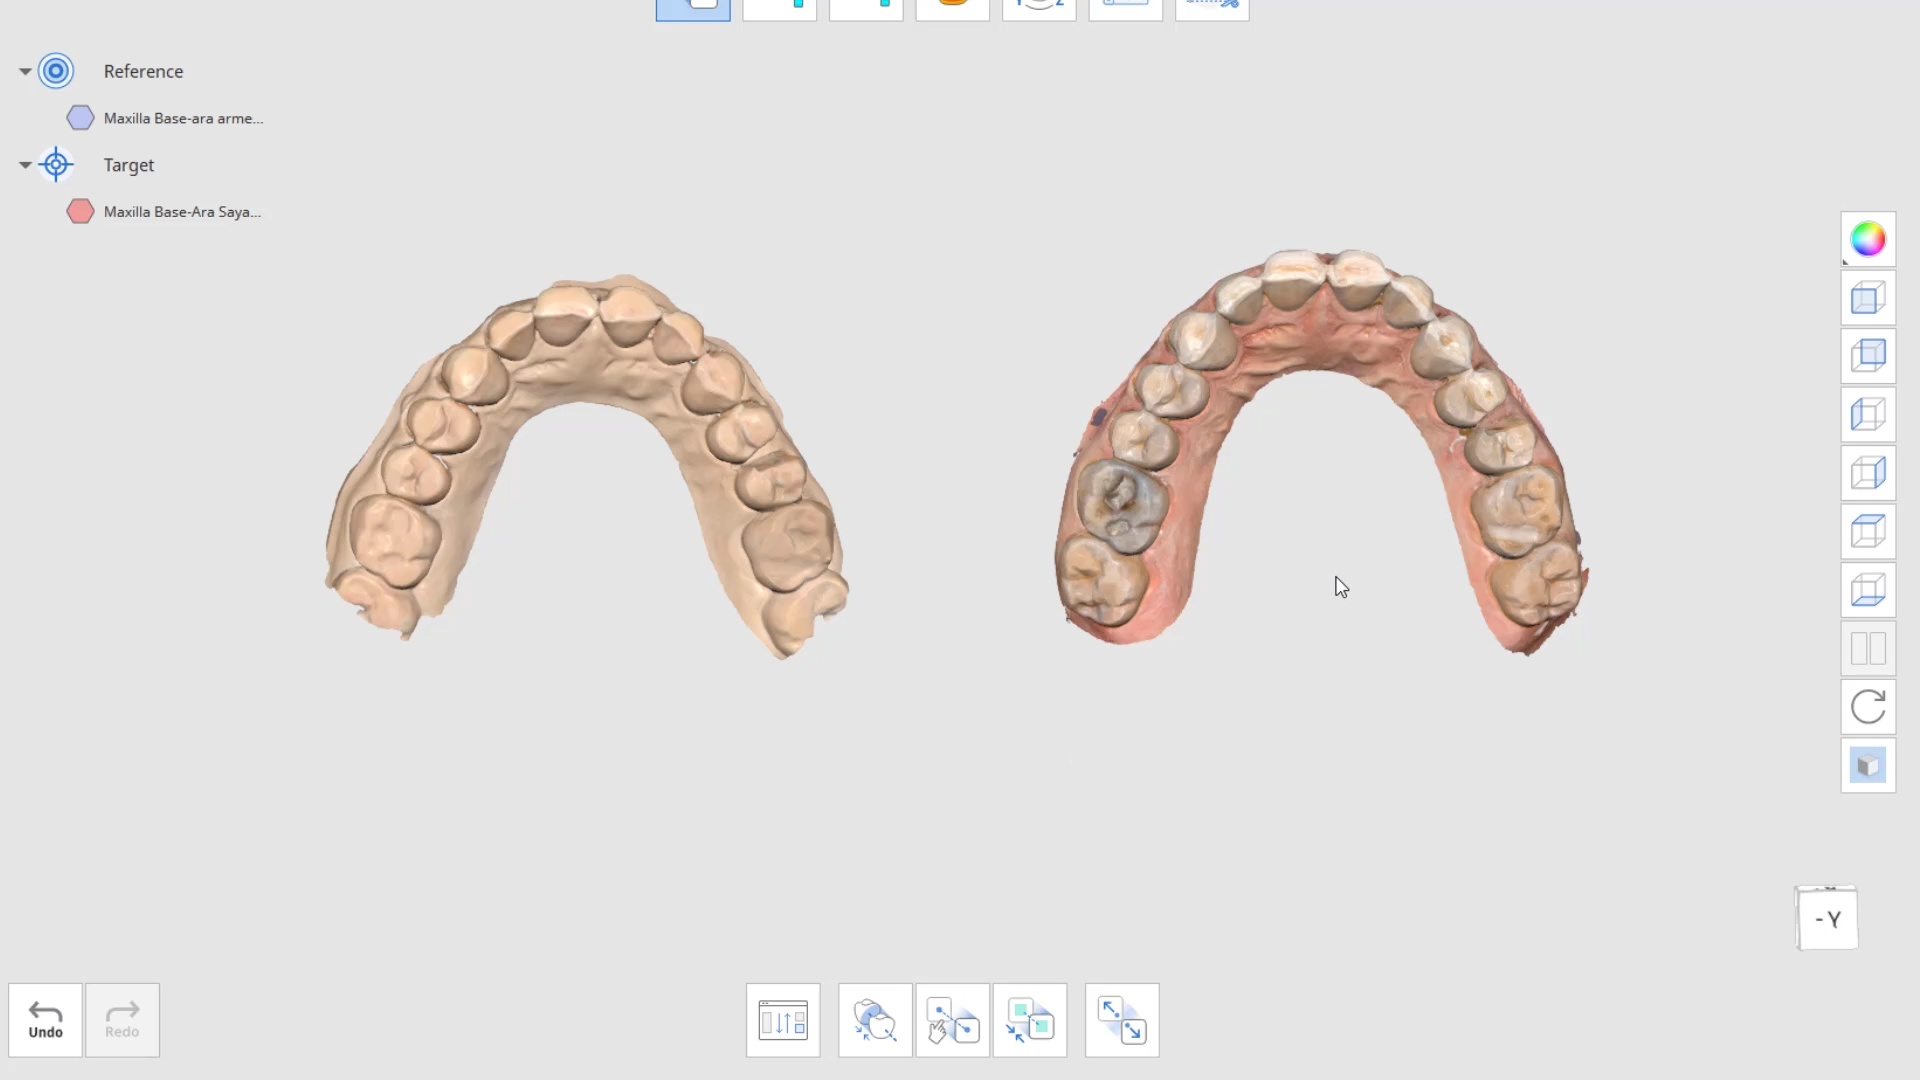
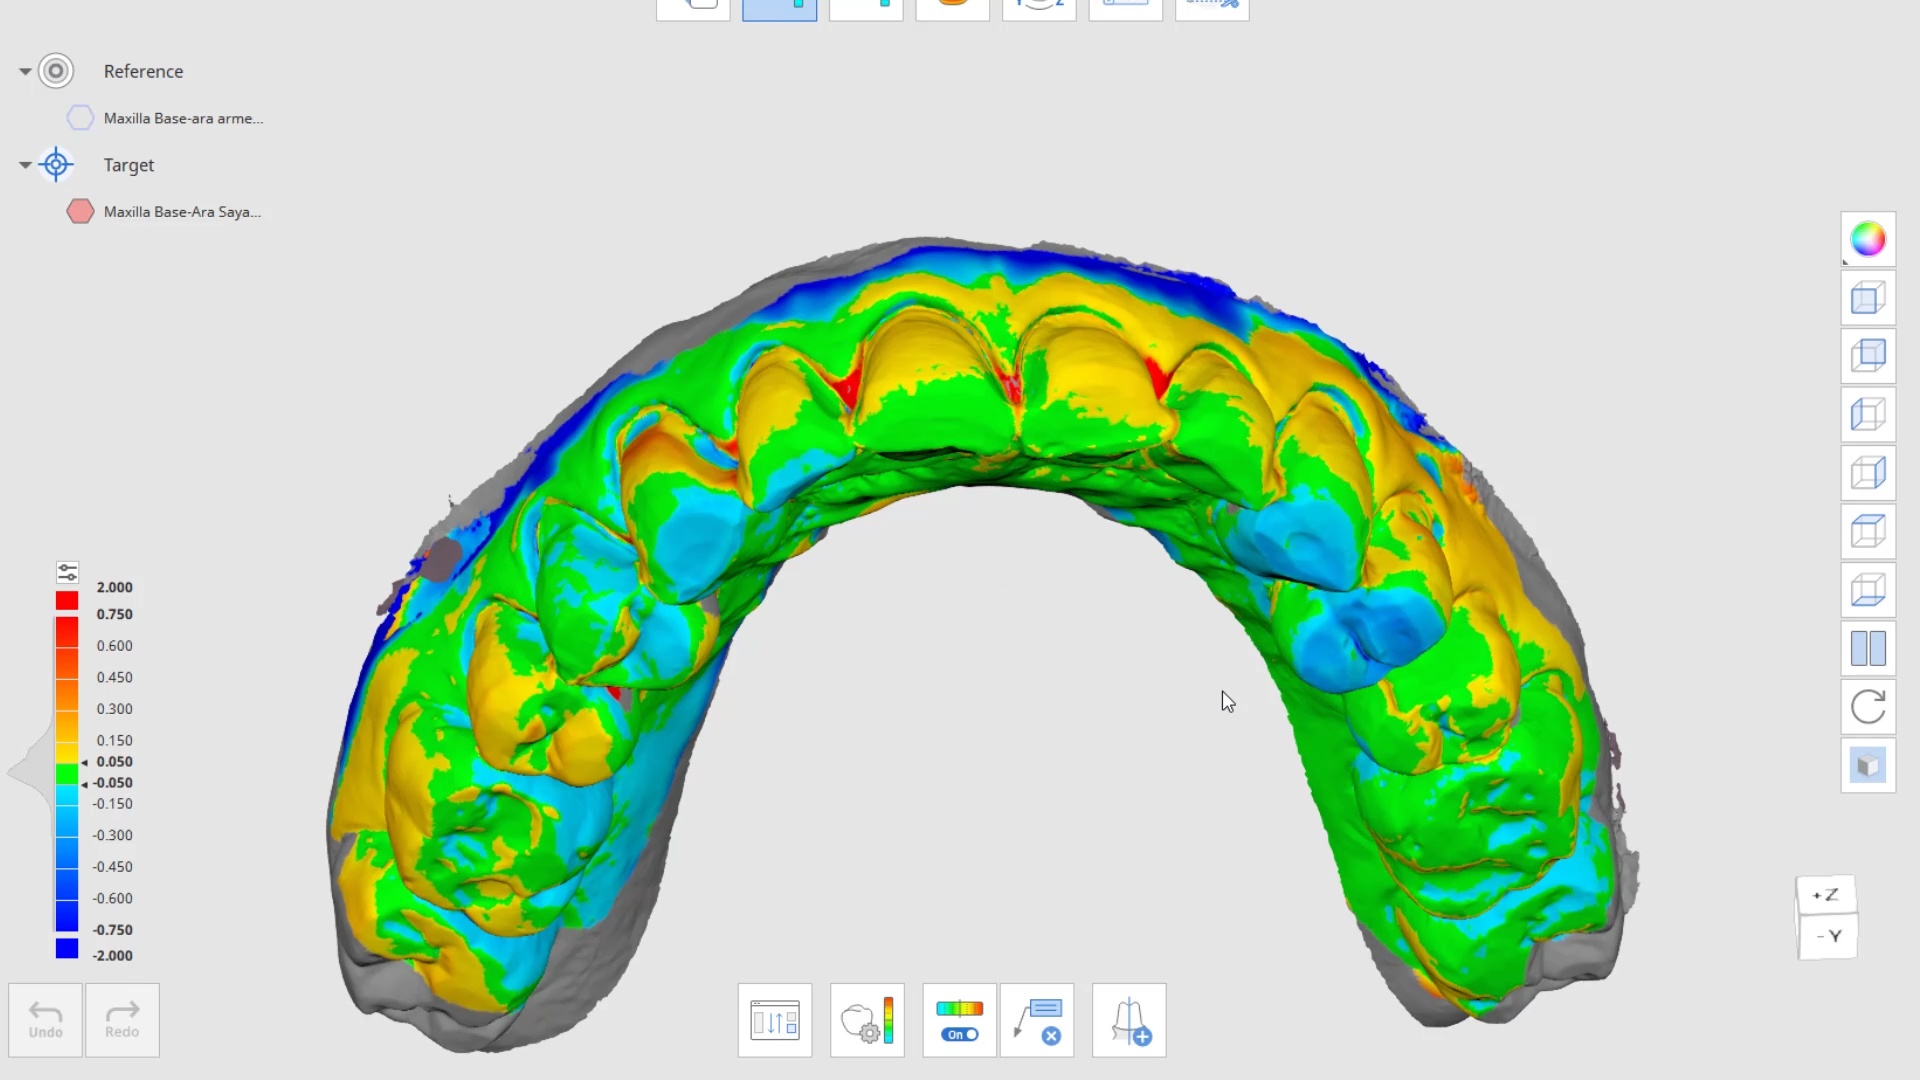
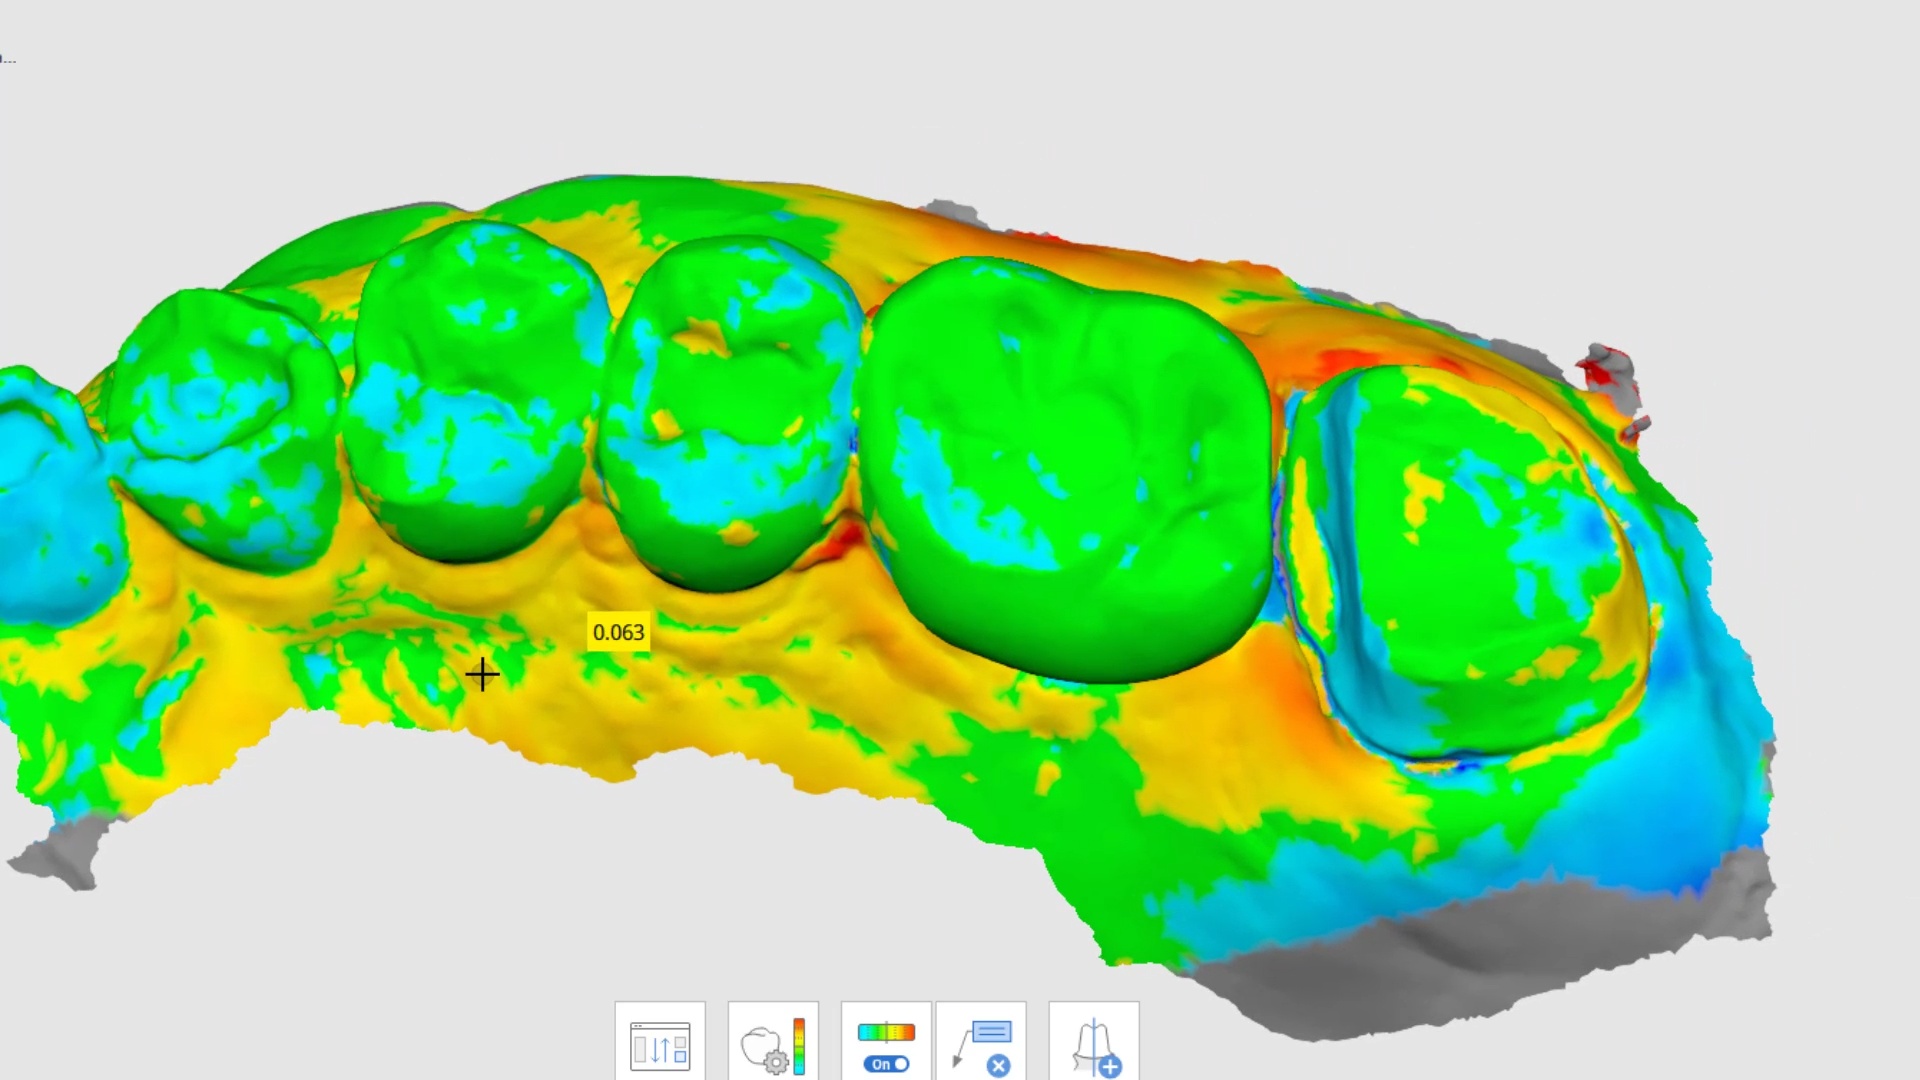
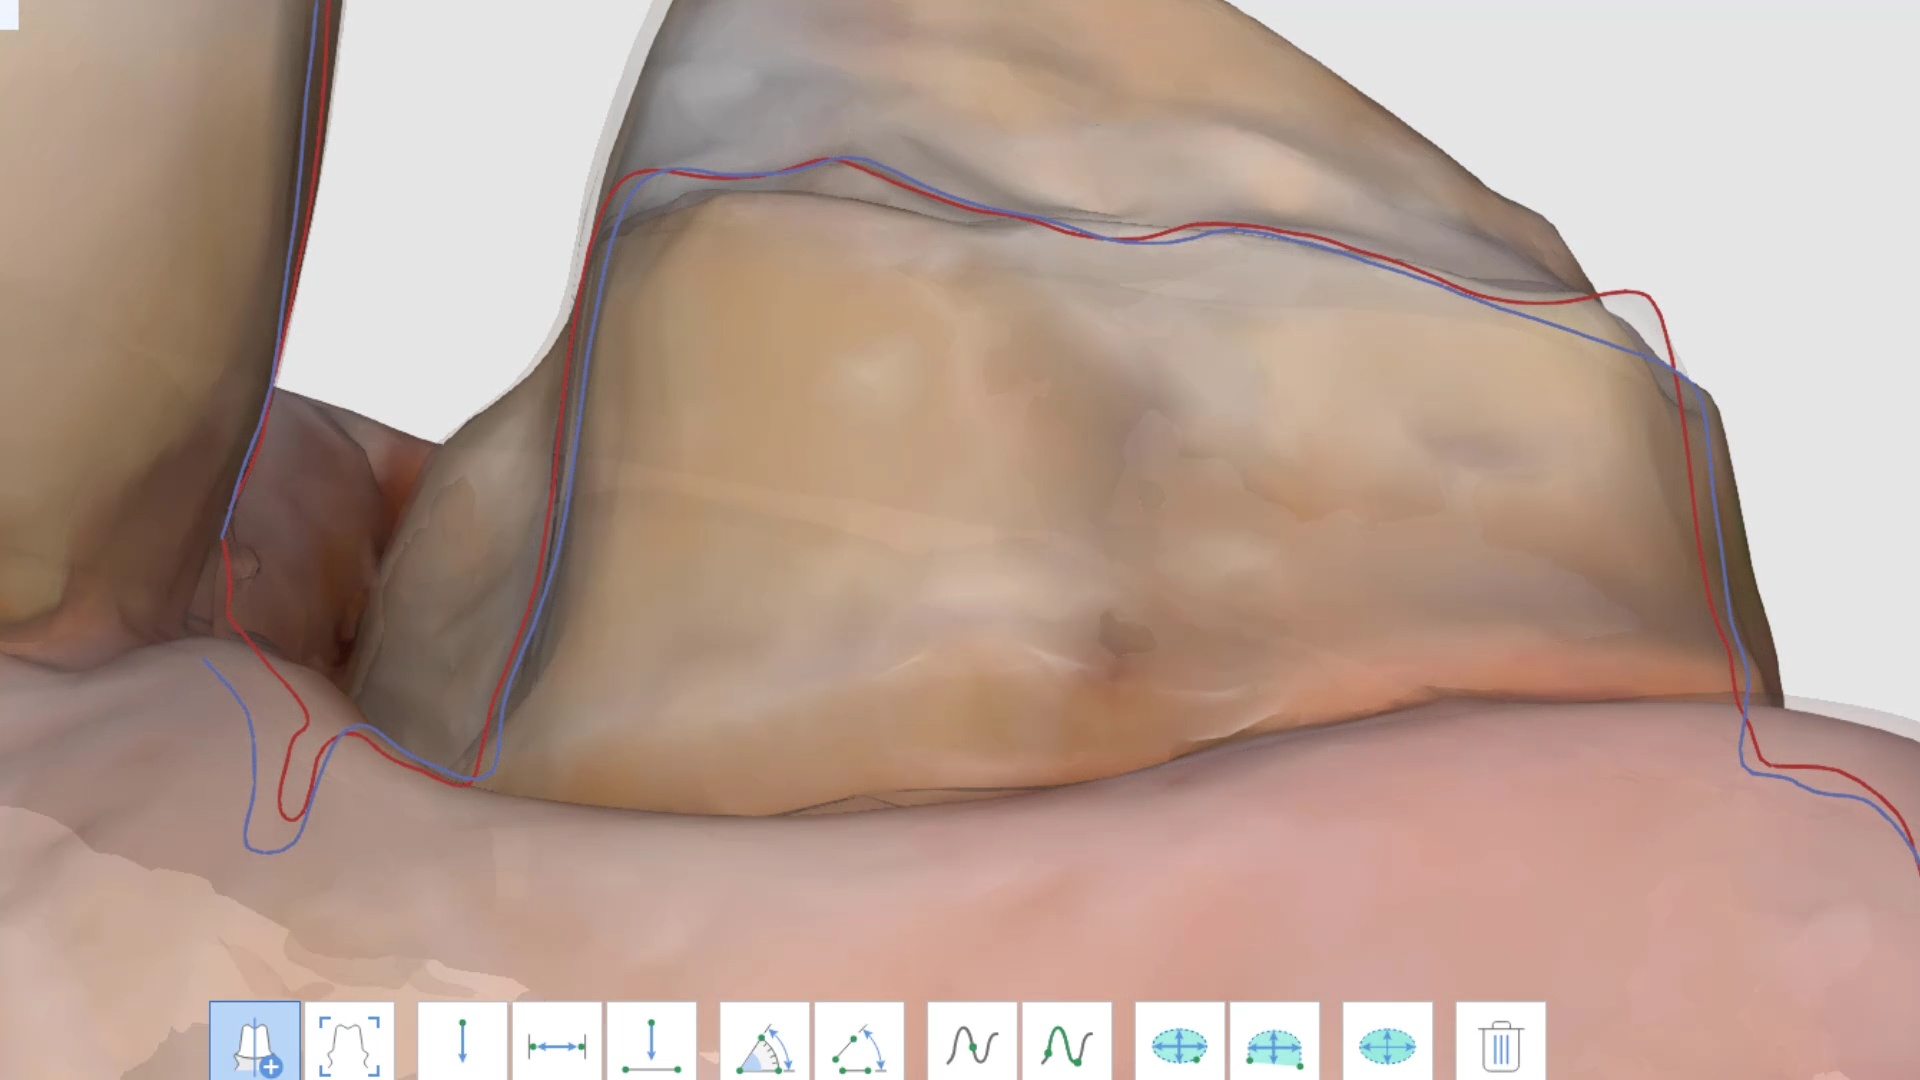
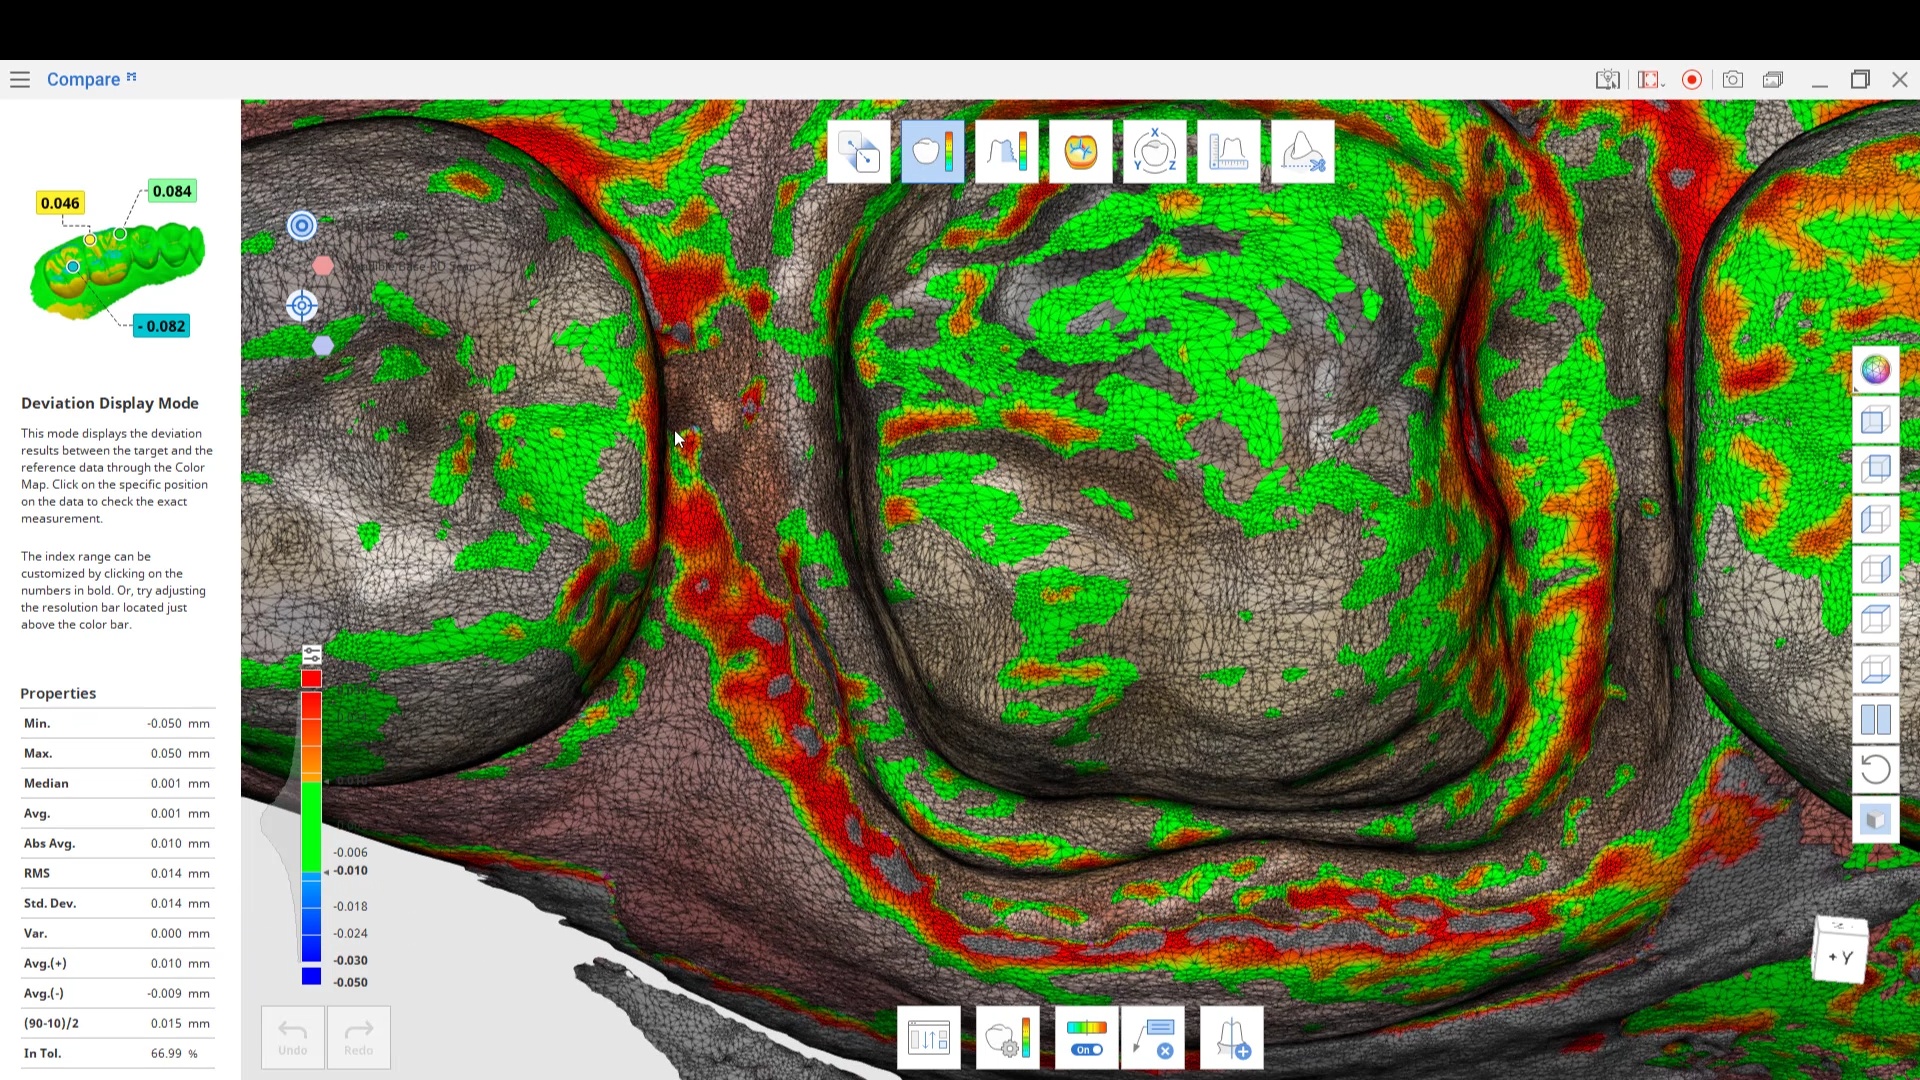
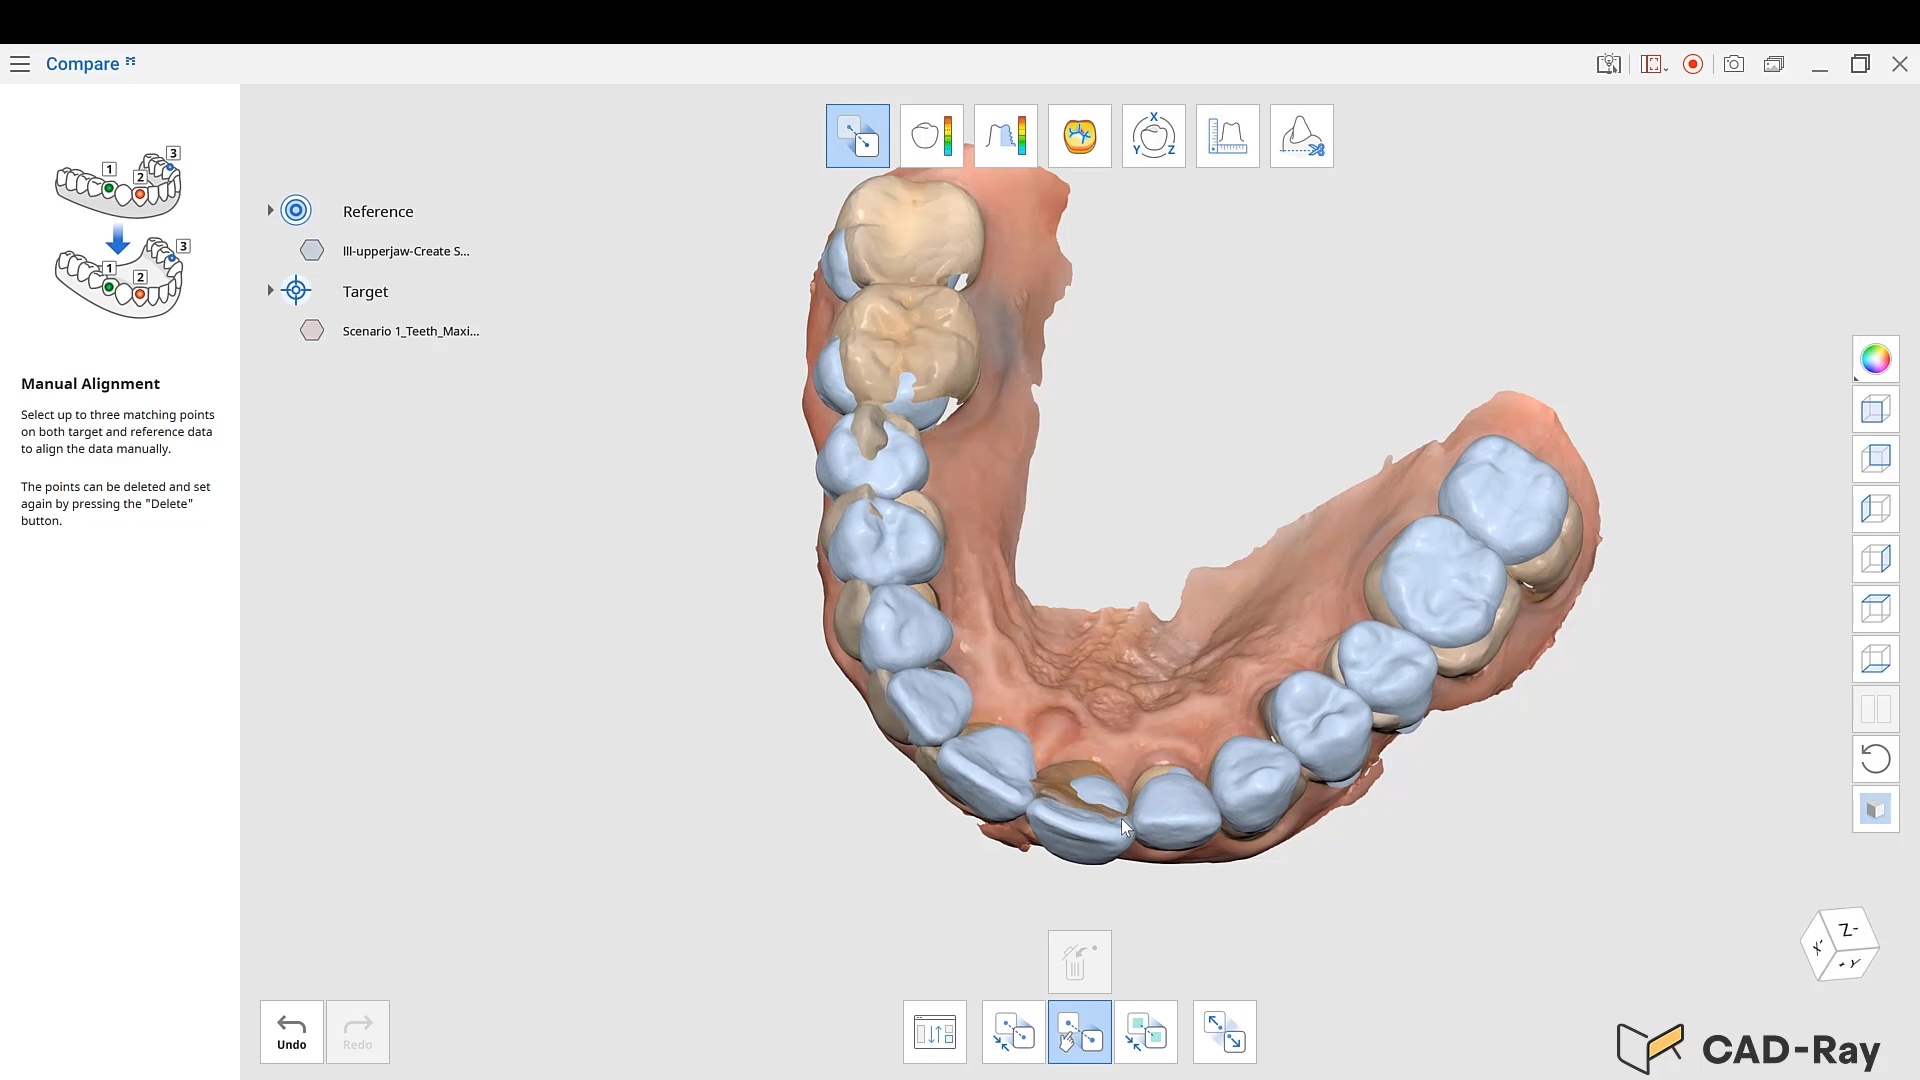
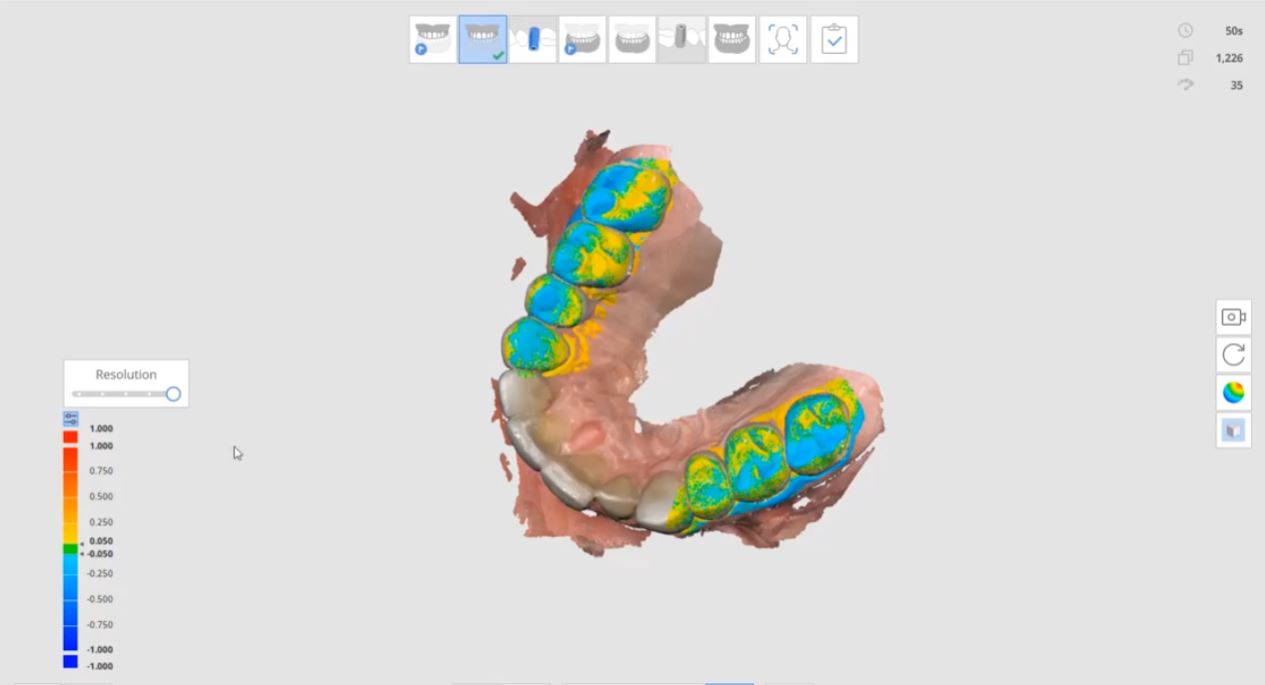
In this case, a doctor was trying to seat a second molar crown he had just prepped a few weeks prior. There was an open contact and he could not ascertain the reason for this. He did take a second impression digitally so we had the chance to merge the two models and look for discreptancies between the preps. This video shows how the comparison of those two steps in Medit Compare
The overhead light source can distort your models and impressions. This particular doctor had excellent preparations and retraction but the light source kept flooding the dentition resulting in ill-fitting restorations. Our crew at CAD-Ray remotely logged in through teamviewer and was able to review the logged video while scanning and instantly noted the source of the error.
The Medit software and scanner have a setting that can warn you if there is too much excessive ligthing.
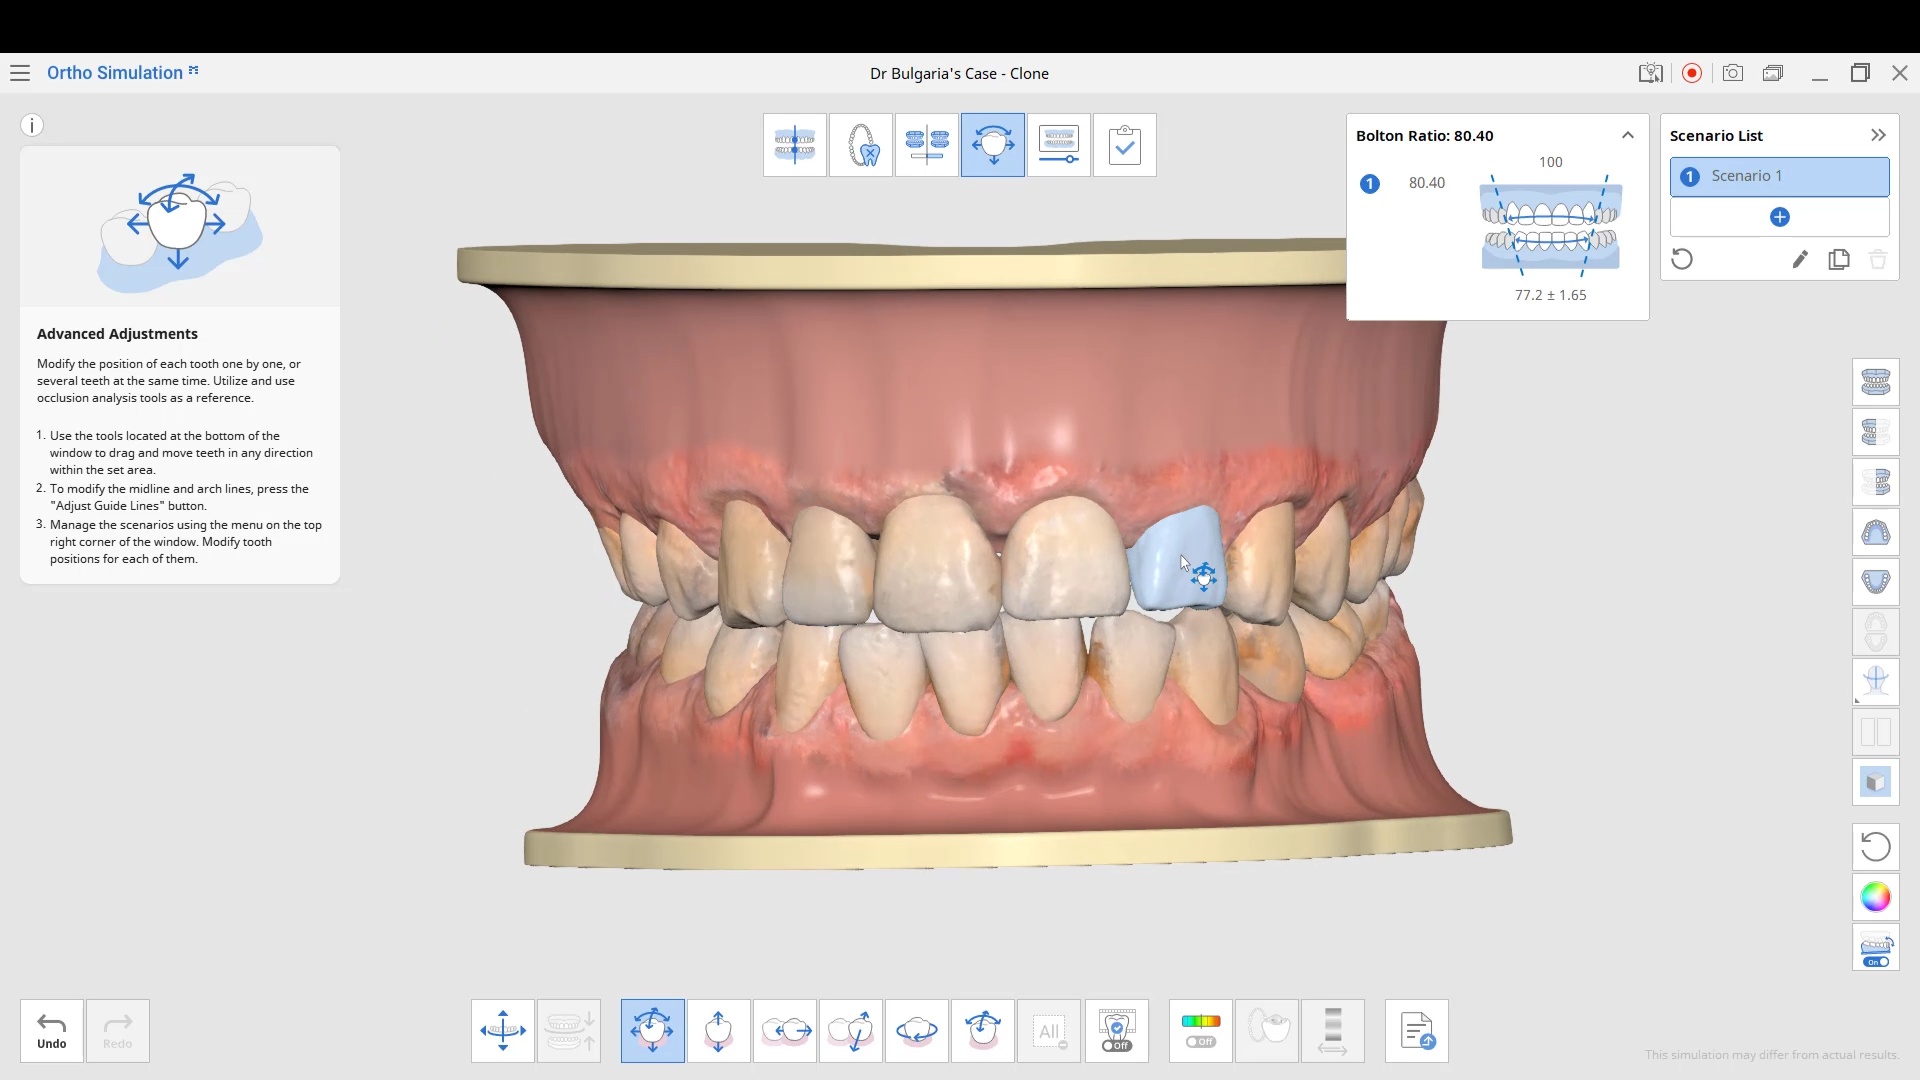
Medit Orthodontic Simulation application allows you to segment out individual teeth from patient scans into an stl format that you can use as a template for smile design wax-ups. You have to watch the vide for it to make sense
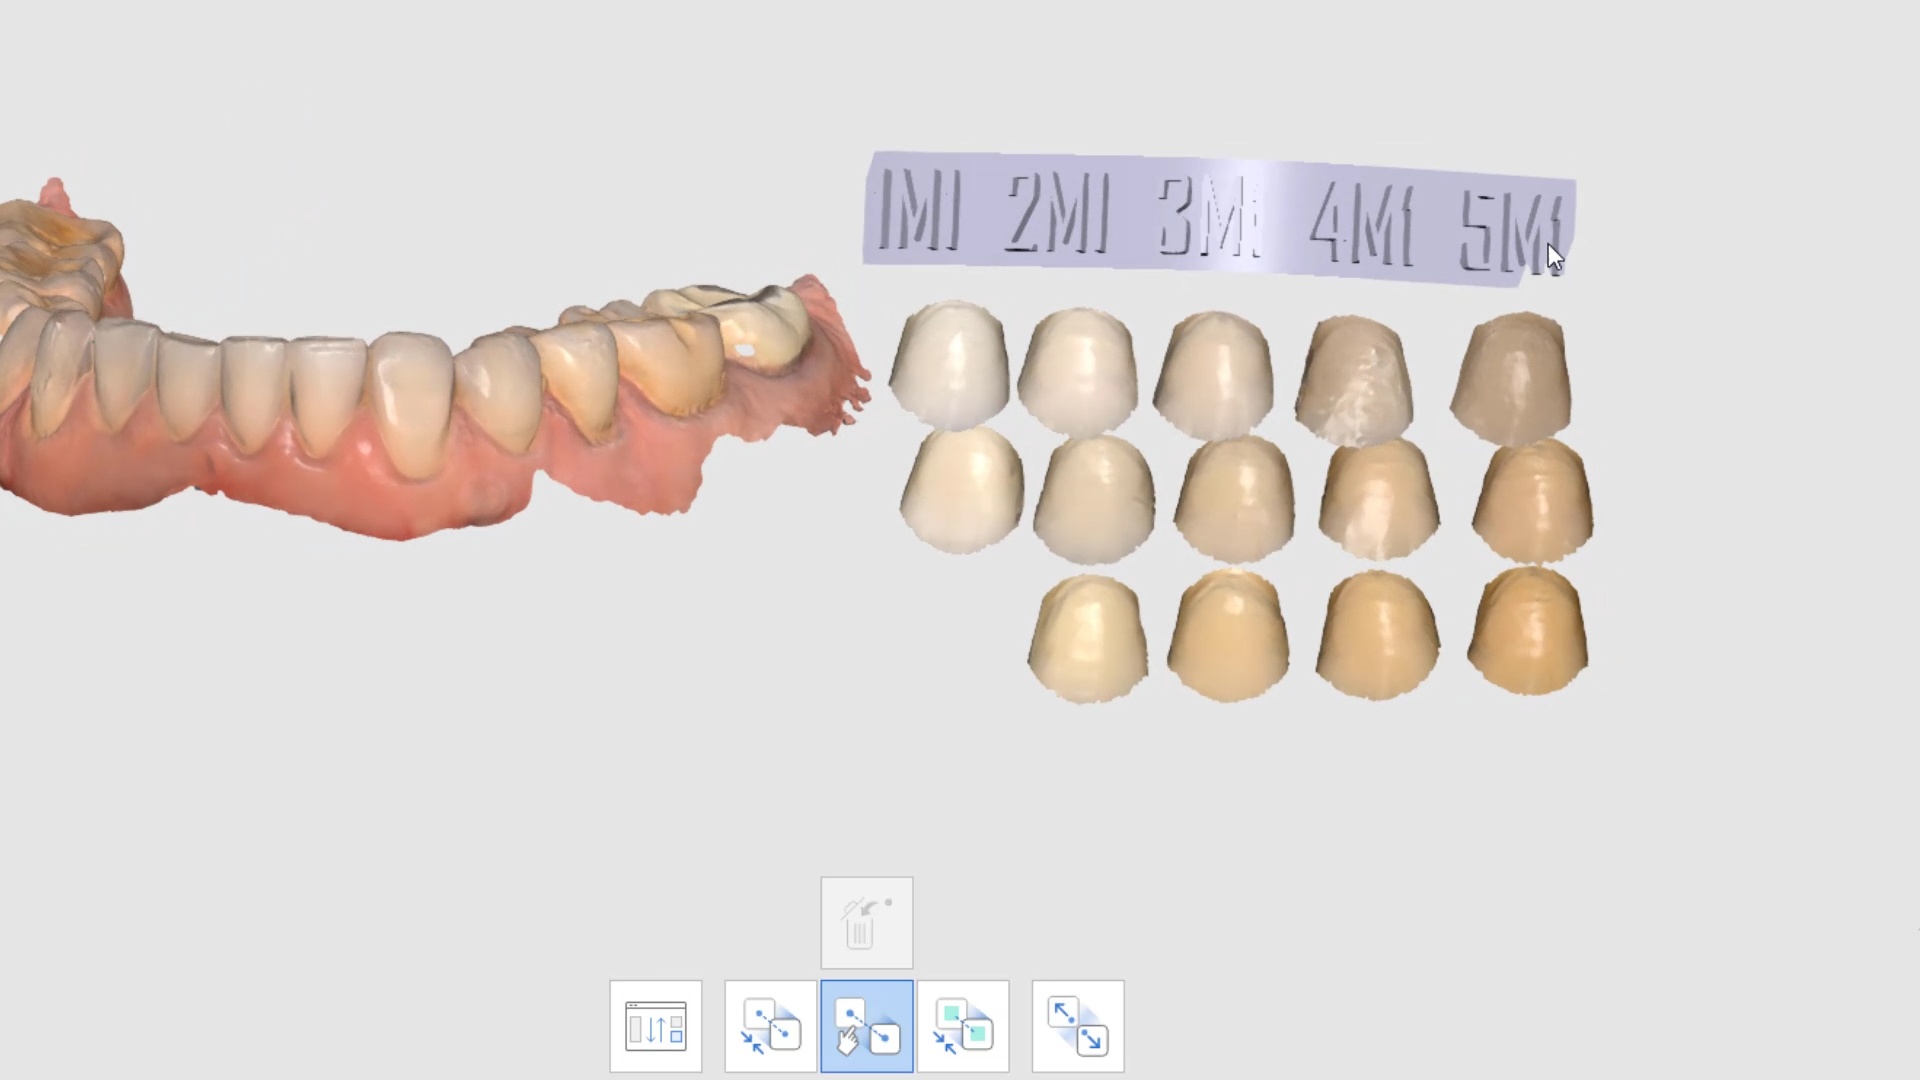
We’ve digitized the Vita 3D shade guide to help with color identification. The same Medit scanner was used to scan the tabs and then this digital file was created. the assumption is that the same camera and light will hit natural dentition and the net effect will be the same. Use at your own risk.
Still not a single article published that says Medit ios is a good scanner ! its just been user driven for 3 years now.
it’s a good thing, because the world just changed. it is irresponsible to extrapolate research done outside the mouth on stone models or impressions into clinical significance with intra-oral scanning. There are parameters that are impossible to quantify like focal distance throughout the scan (unlike desktop scanners with known focal distances), the codes use to do the algorithms, the scan patterns, and also how light is treated by enamel, dentin, and restored materials.
i can’t believe people still use terms like trueness and accuracy when they really don’t even exist when you scan intra-orally. Like analog impressions, it is impossible to judge digital impression accuracy LIVE while it is happening.
Enter Medit! There are a few distinct ways to demonstrate an accurate scan live while it is happening. One way is to import a geometric shape that doesn’t alter its form while models are being rendered. That’s what’s demonstrated here. To my knowledge no one has ever studied this approach because no other camera lets you do this. i did see some publications where the authors attached objects like radiographic markers and after it was processed, they could measure that object and see if it distorted or not, but nothing at this level.
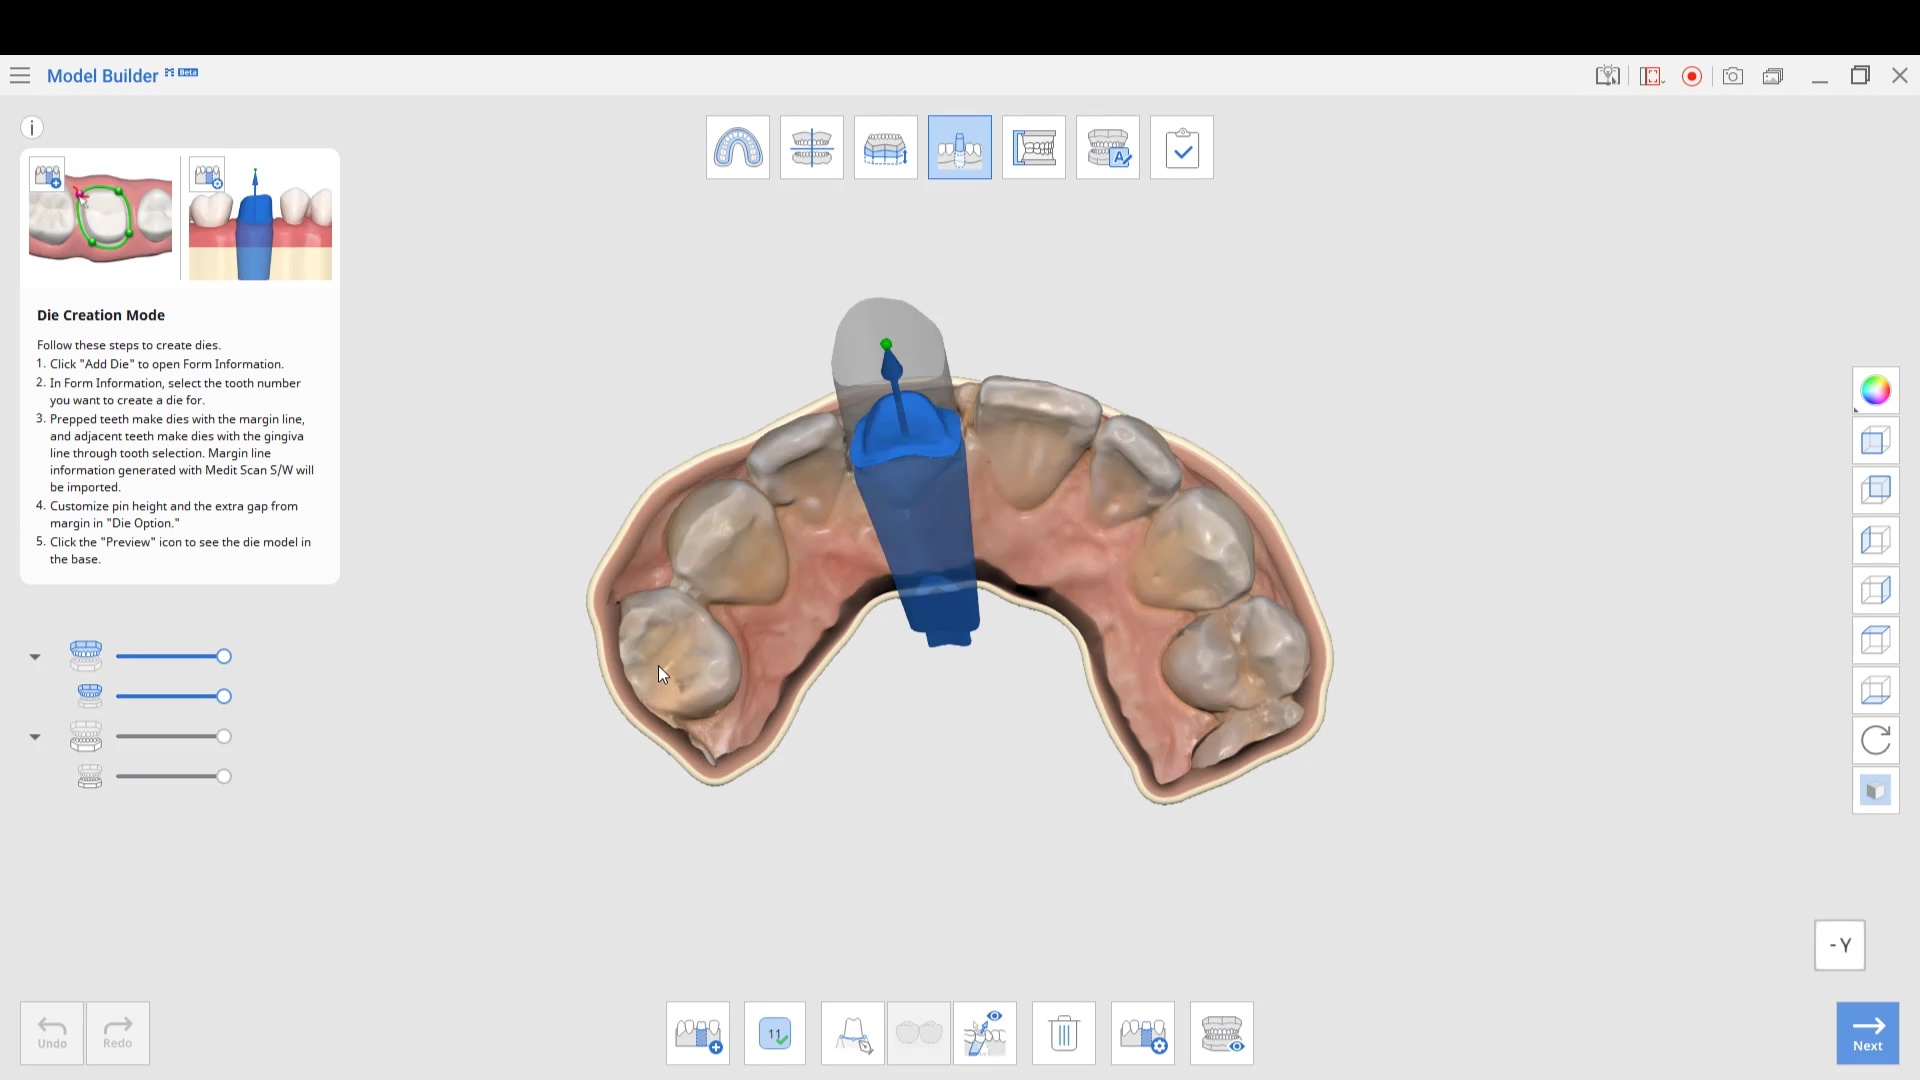
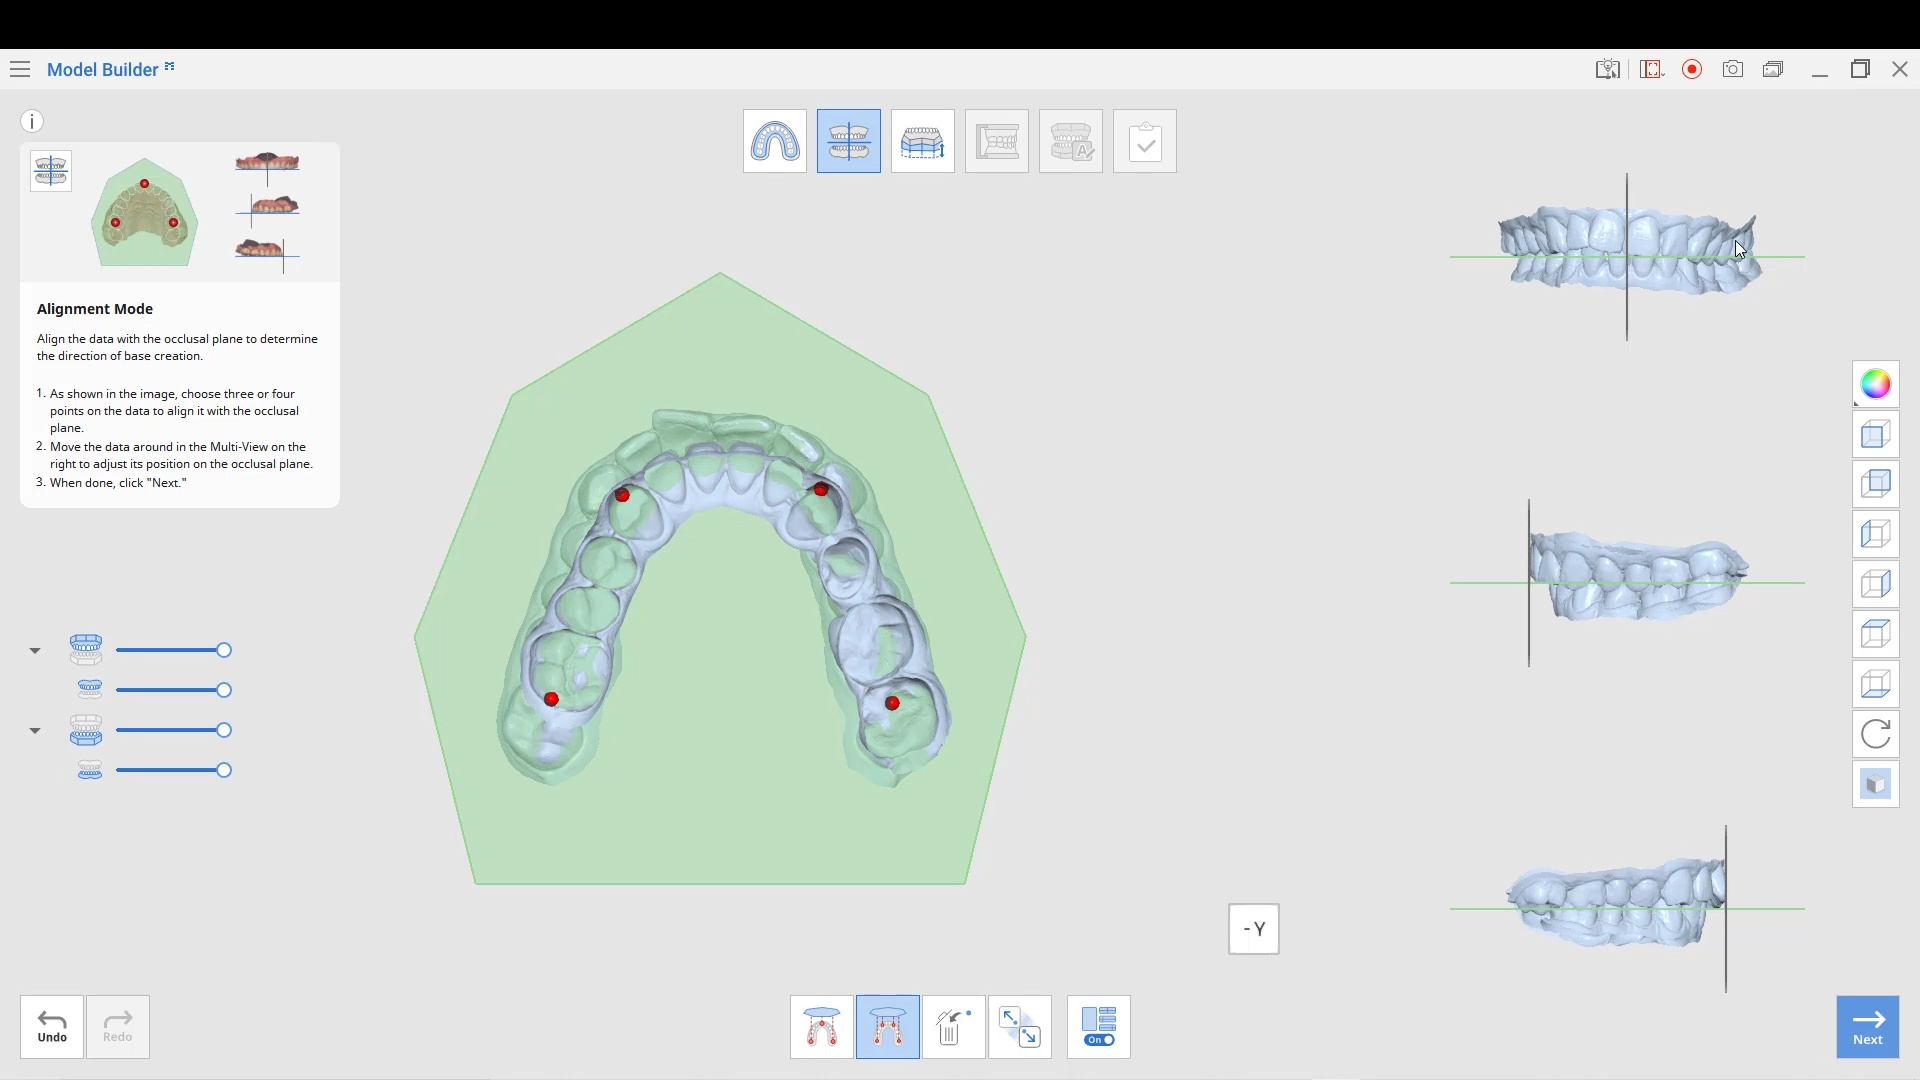
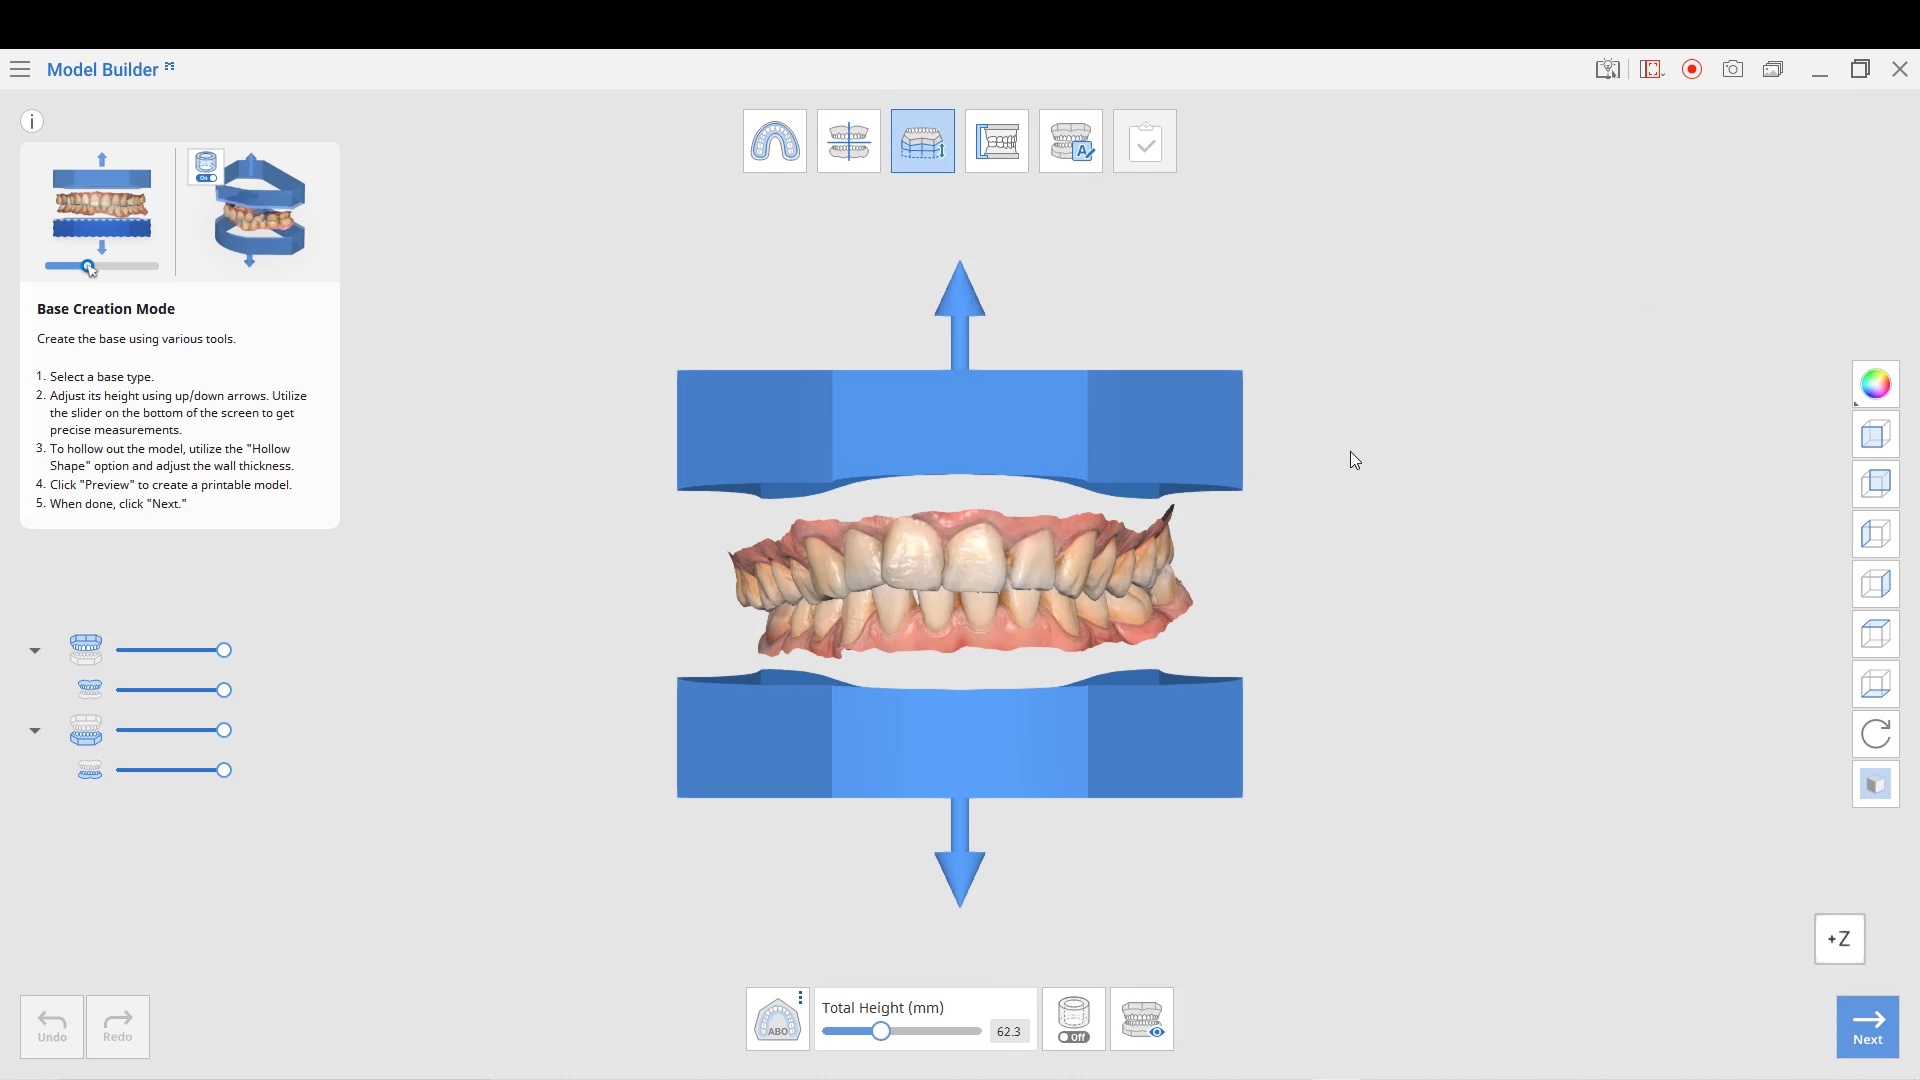
The following information is from the The American Board of Orthodontics. We preview how the Medit Ortho Simulation and Model Builder can satisfy their criteria
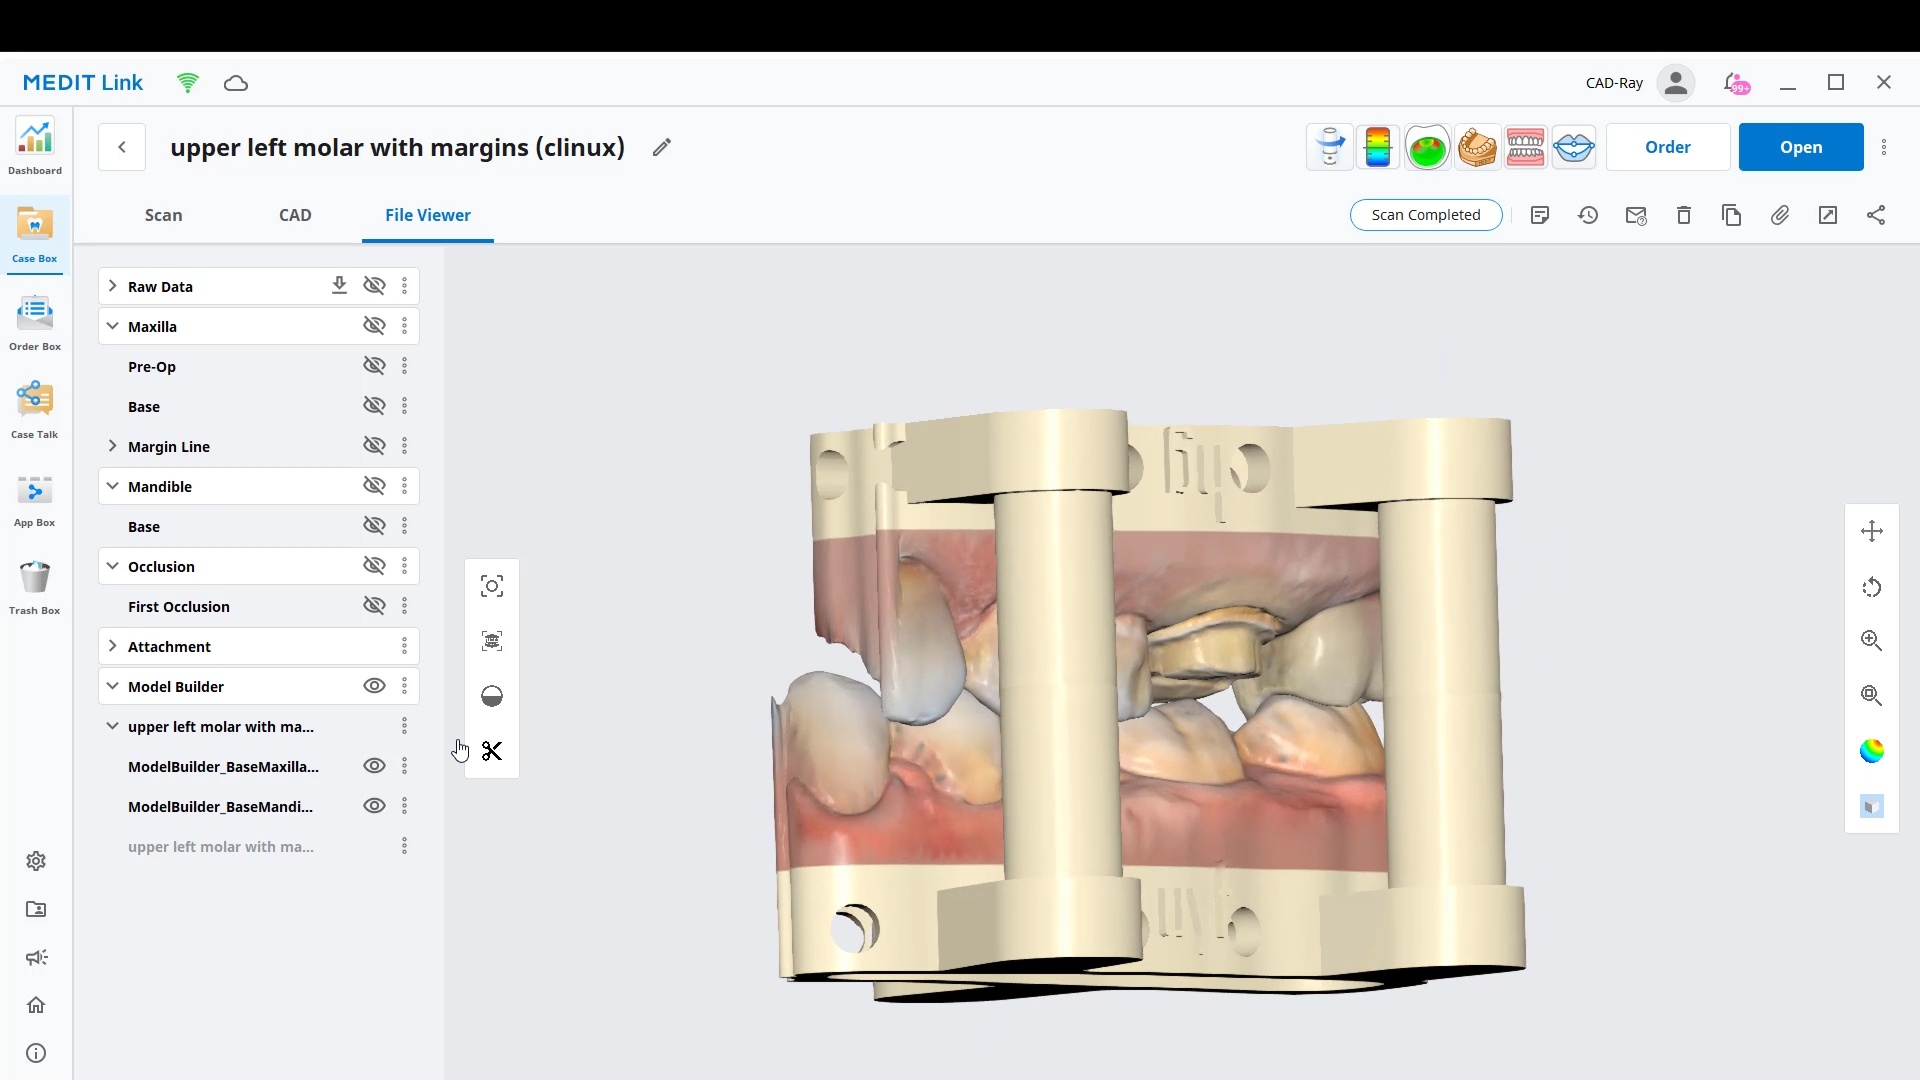
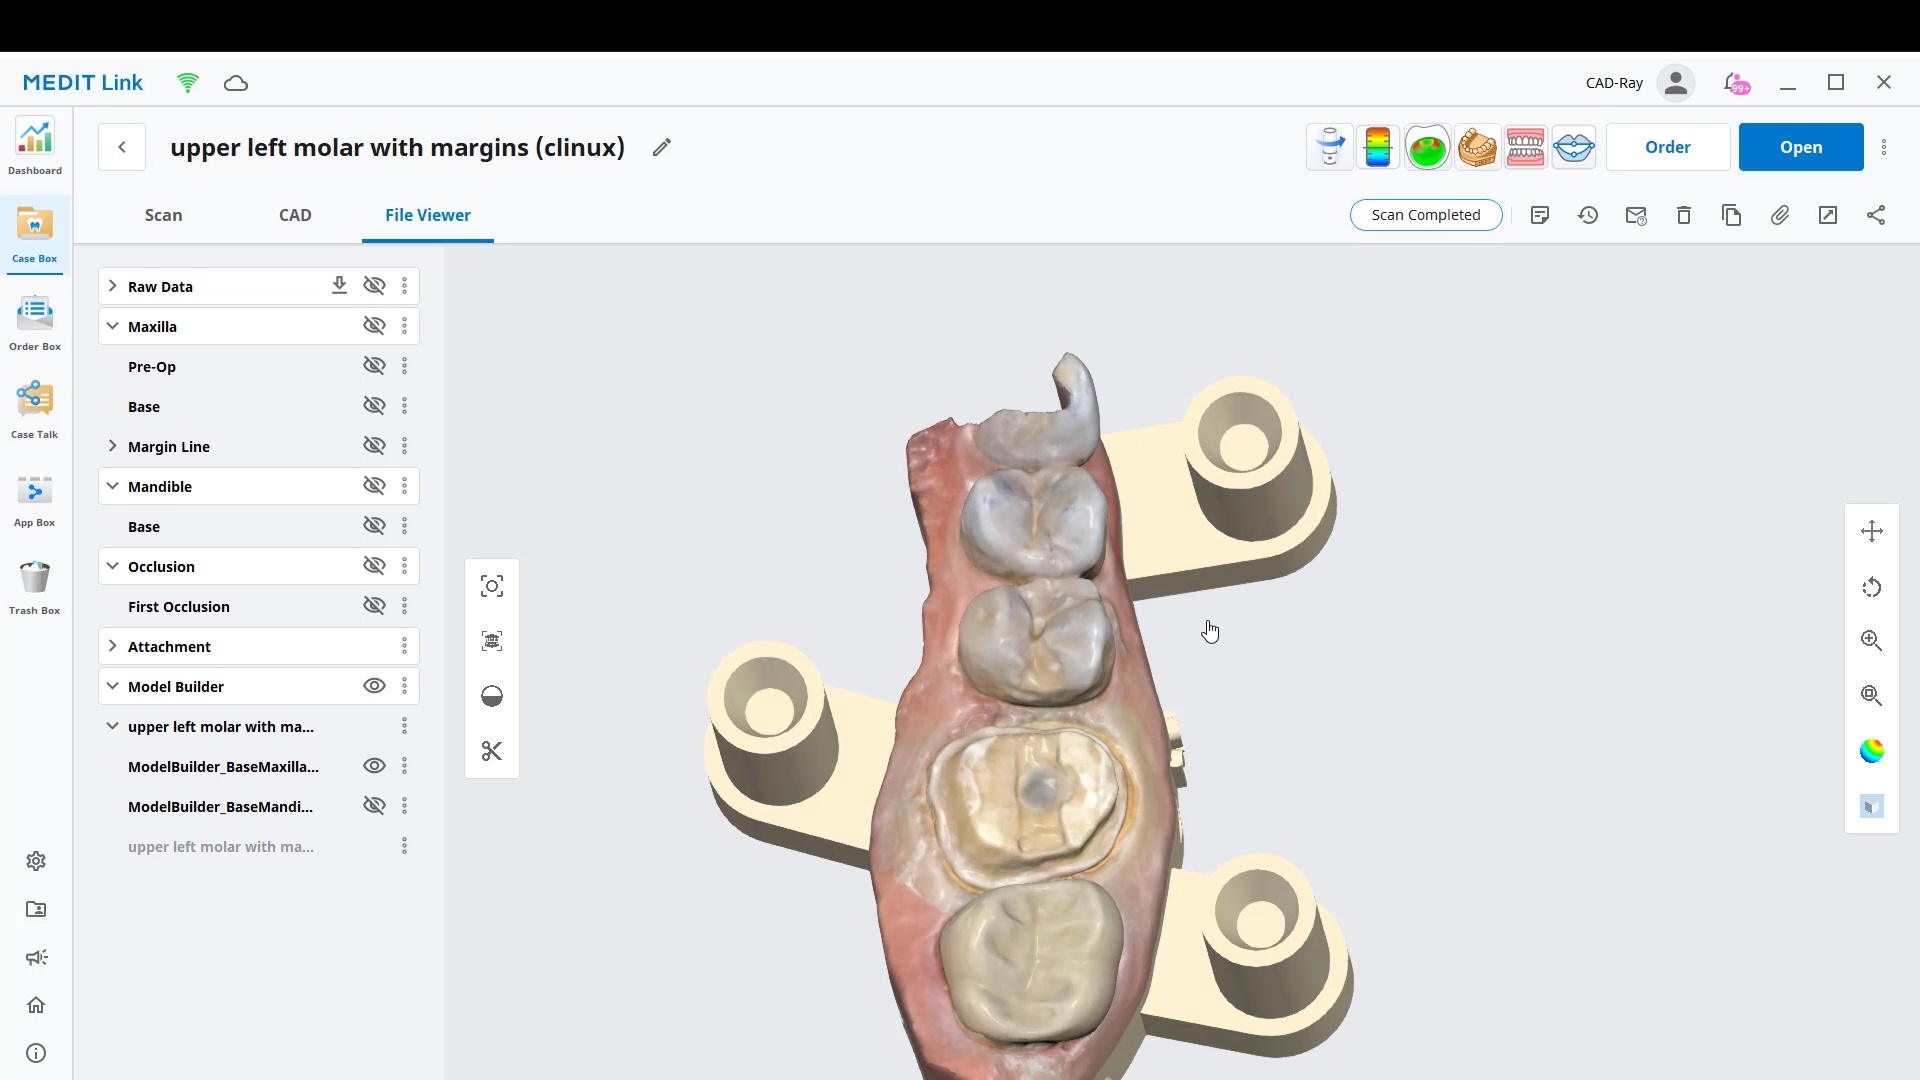
Medit has many free applications, including Smile Analysis, Orthodontic Simulation, and now, Medit Model Builder
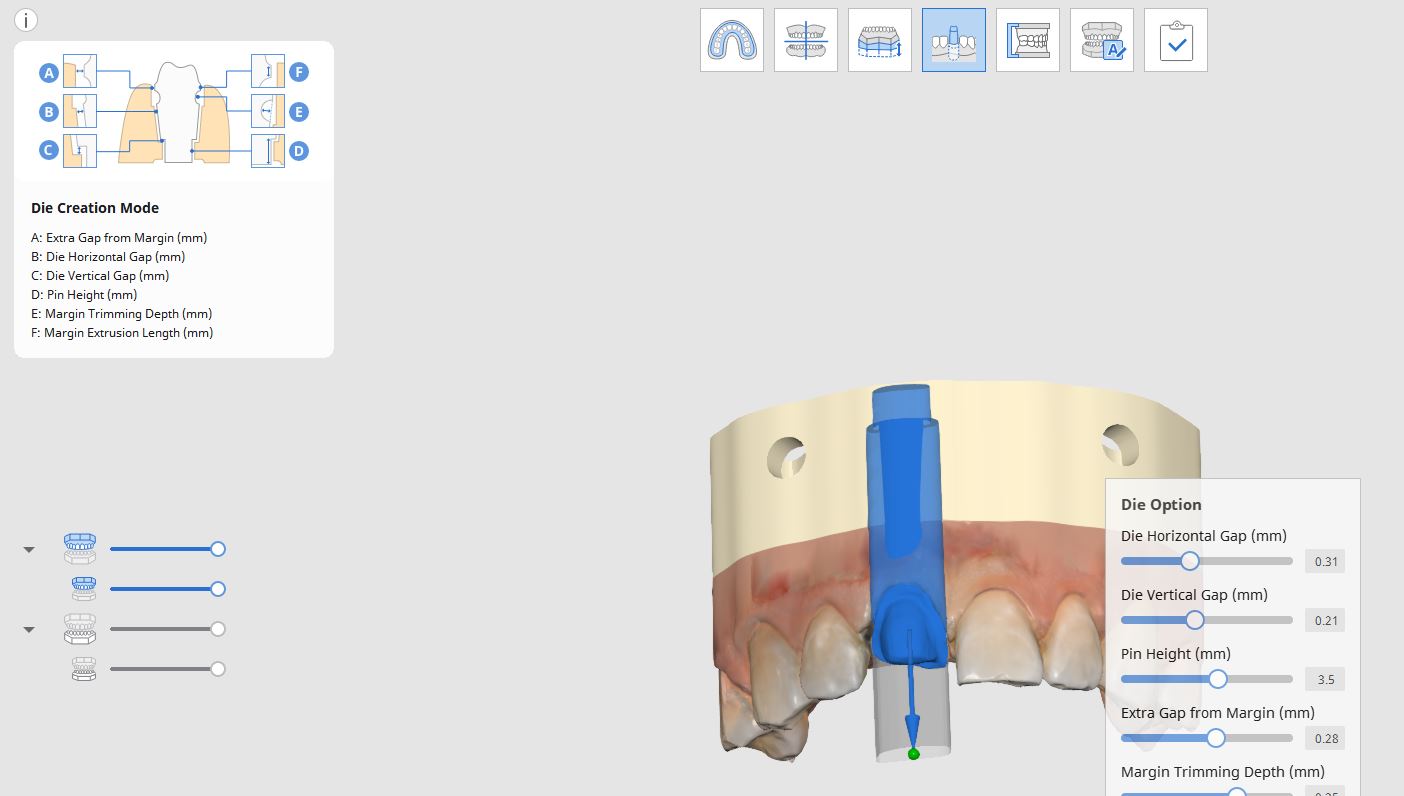
Adding bases has been a feature for a while but as usual, Medit was quick to respond to its users’ request by expanding the base to including holes for drainage in printing and by allowing us to add support pins to the models. Many people who have printers, whether labs or clinicians, easily lose the proper vertical relationship when they print the models. By adding these pins, it allows you to index the models properly for any finishing work someone may need to do.
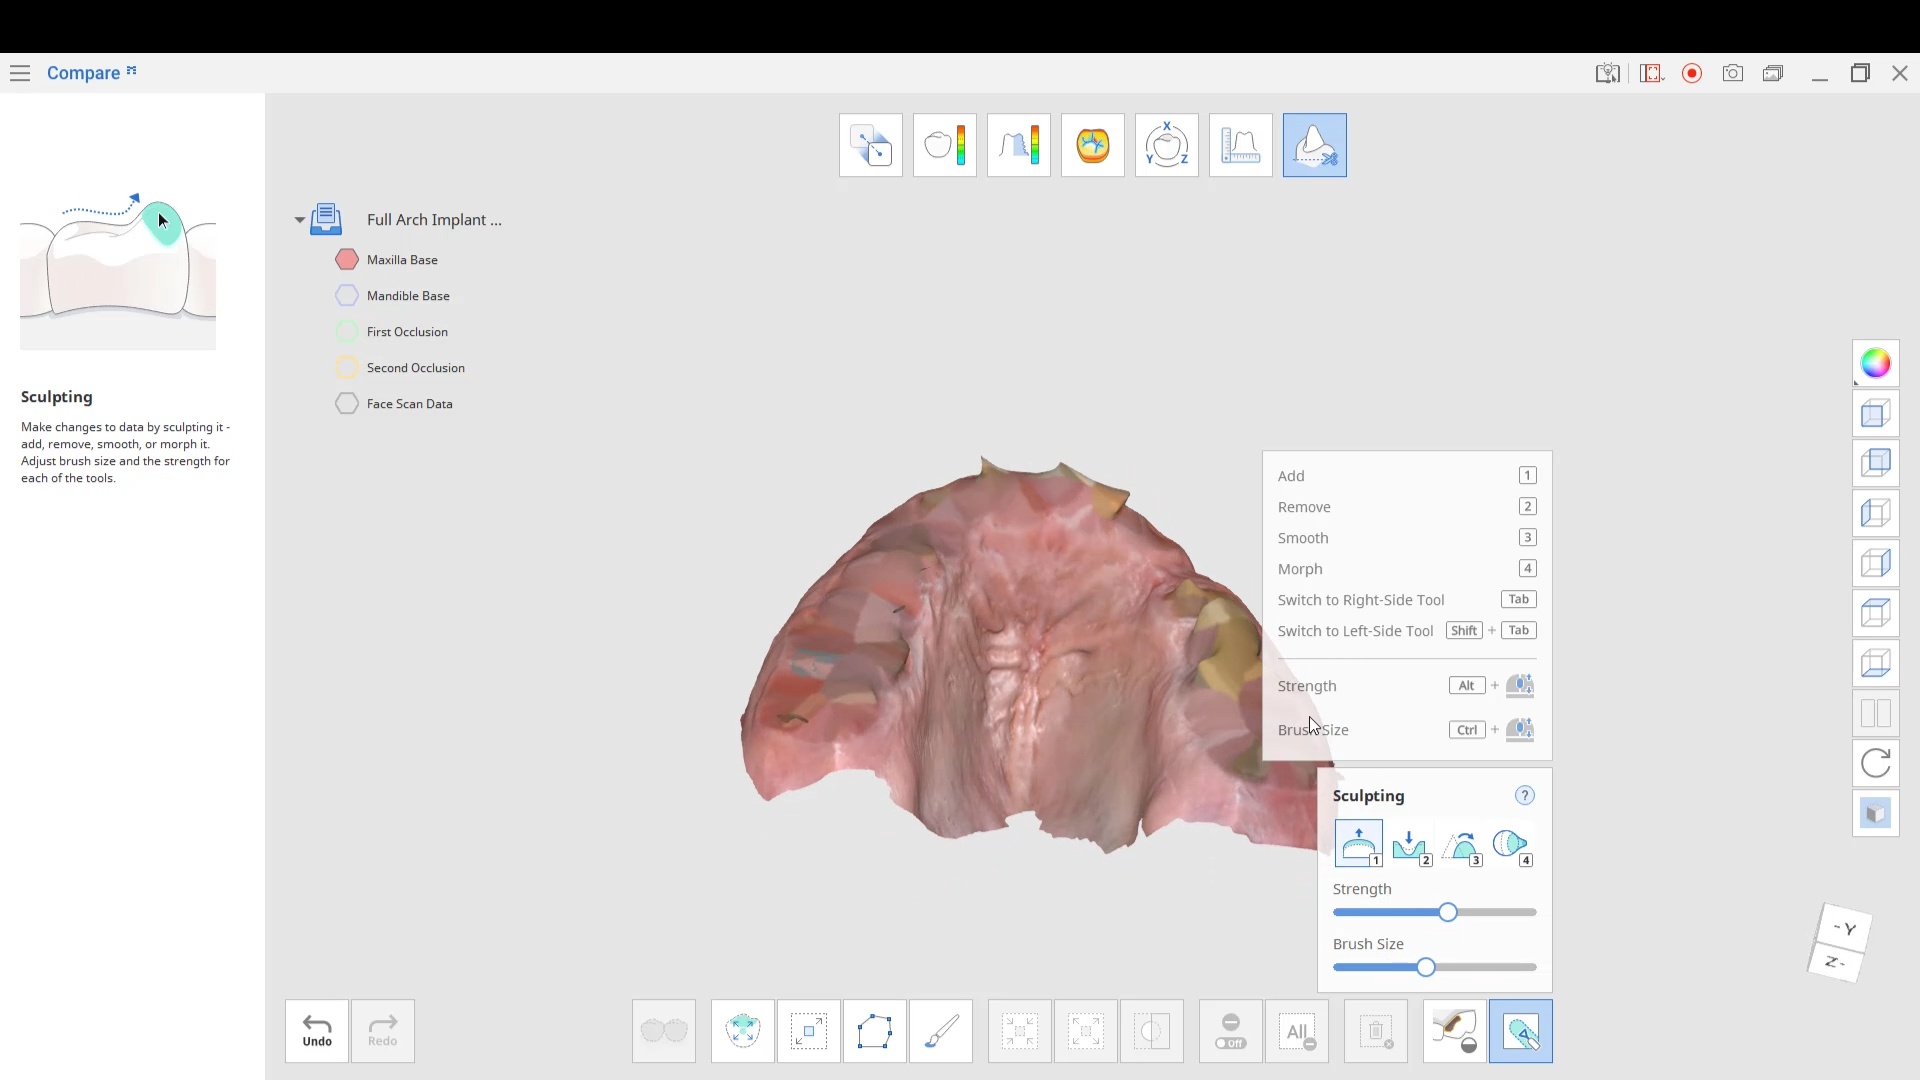
Advanced users are unlikely to use this feature for a single unit, but it comes in handy for oral appliances, particularly when they have advanced the jaw to open the airway. Oh, and this app is free and you can use it with models created by any scanner
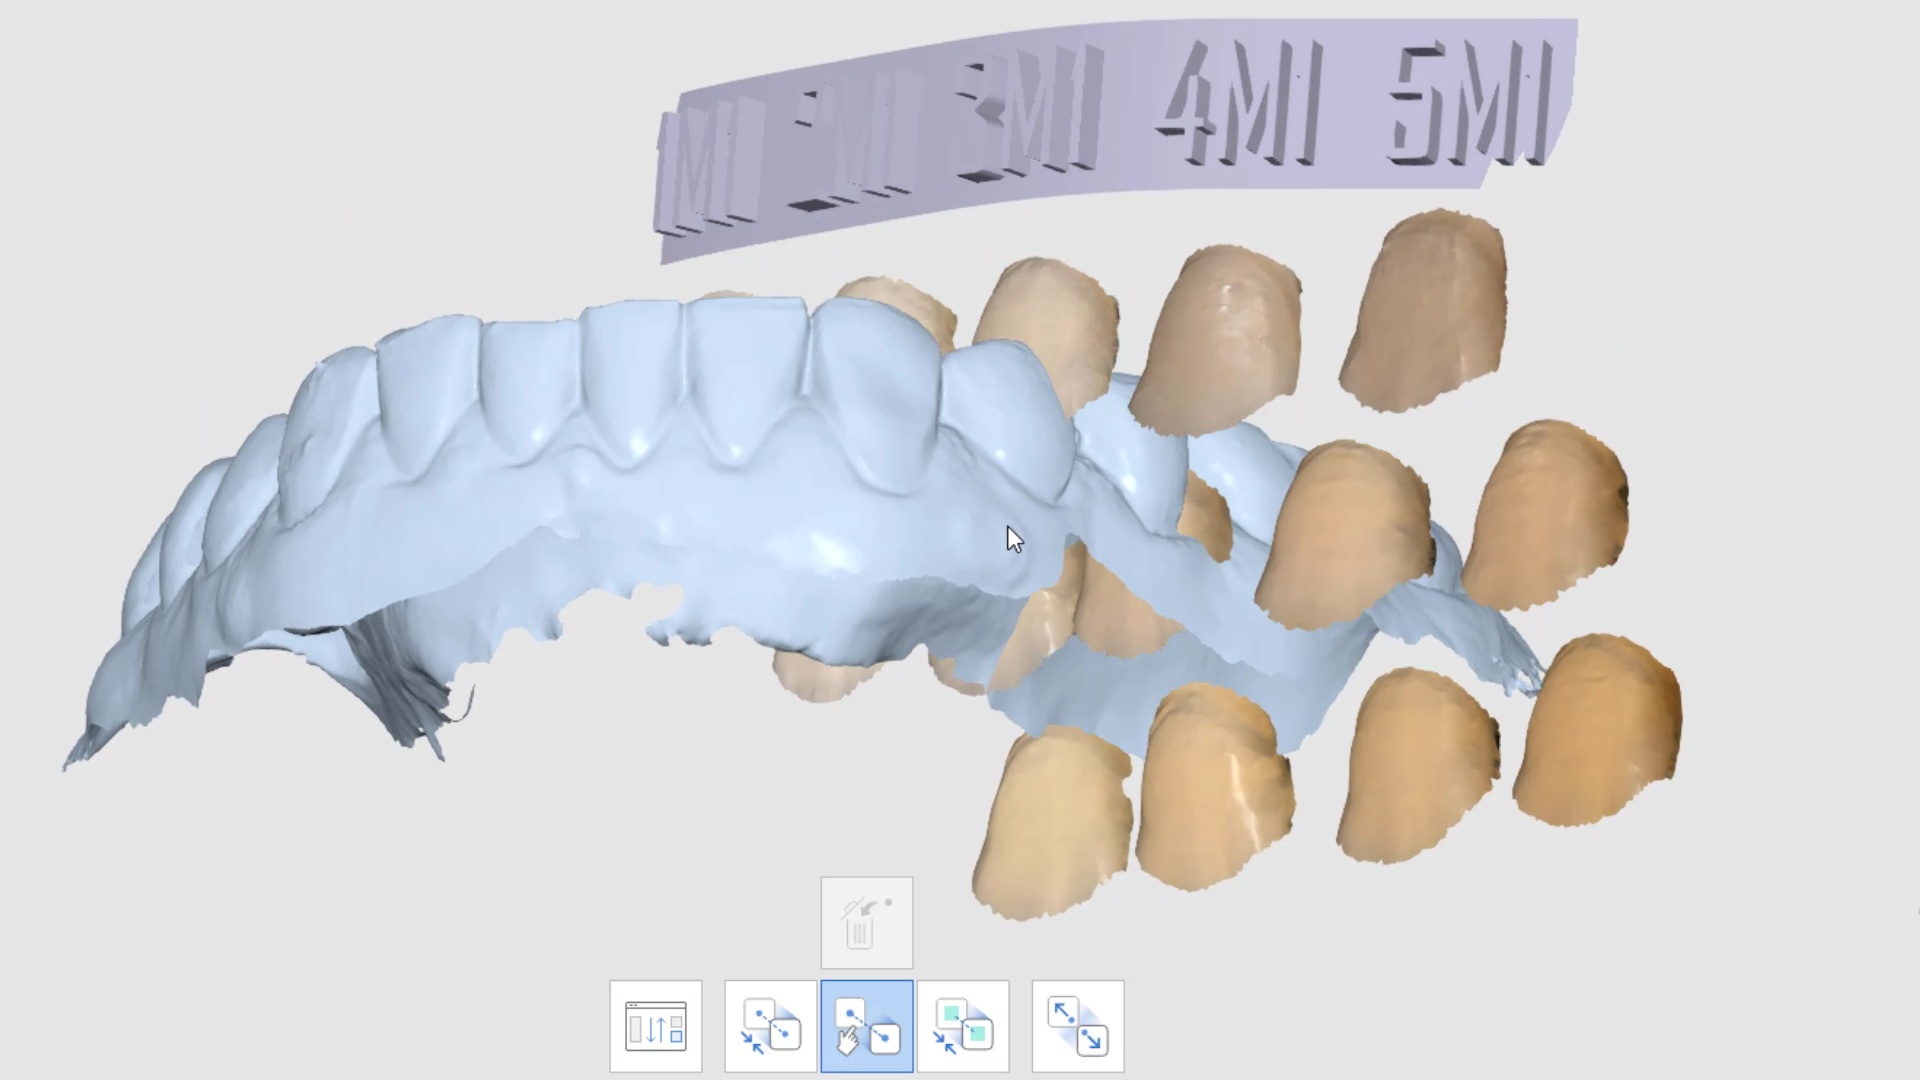
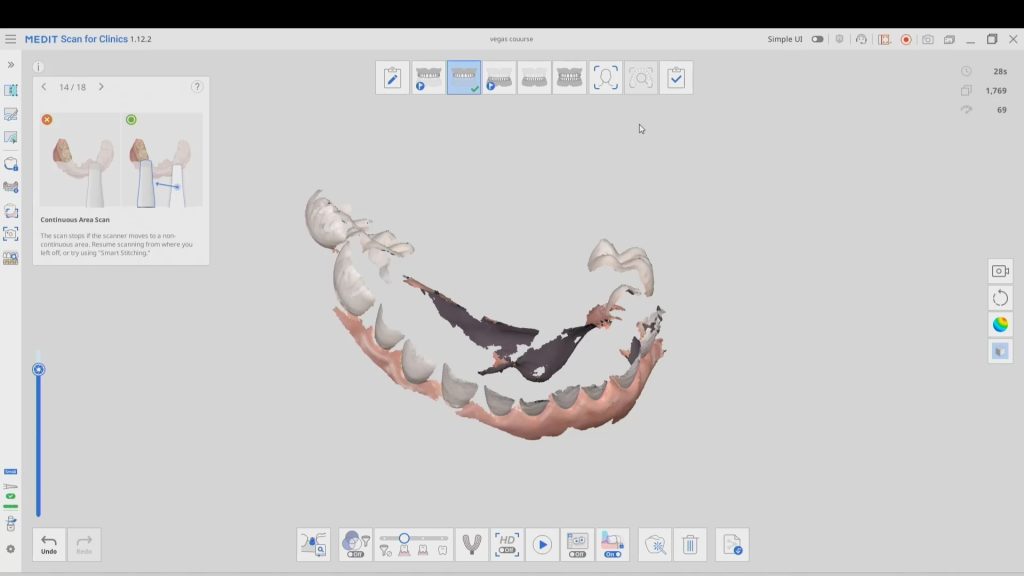
Stitching Abutments One of the most important things to keep in mind when imaging with scanner is to keep a stitching abutments in tact between various models. In dentate cases...
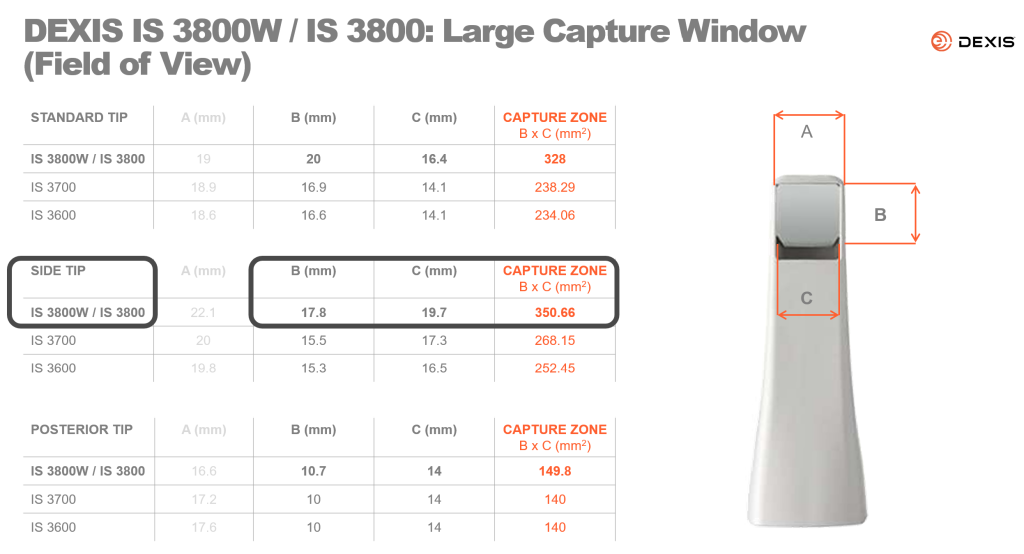
The field of view of or scan area is probably the most important factor to keep in mind with ios. i don’t know of a single study that discusses this...
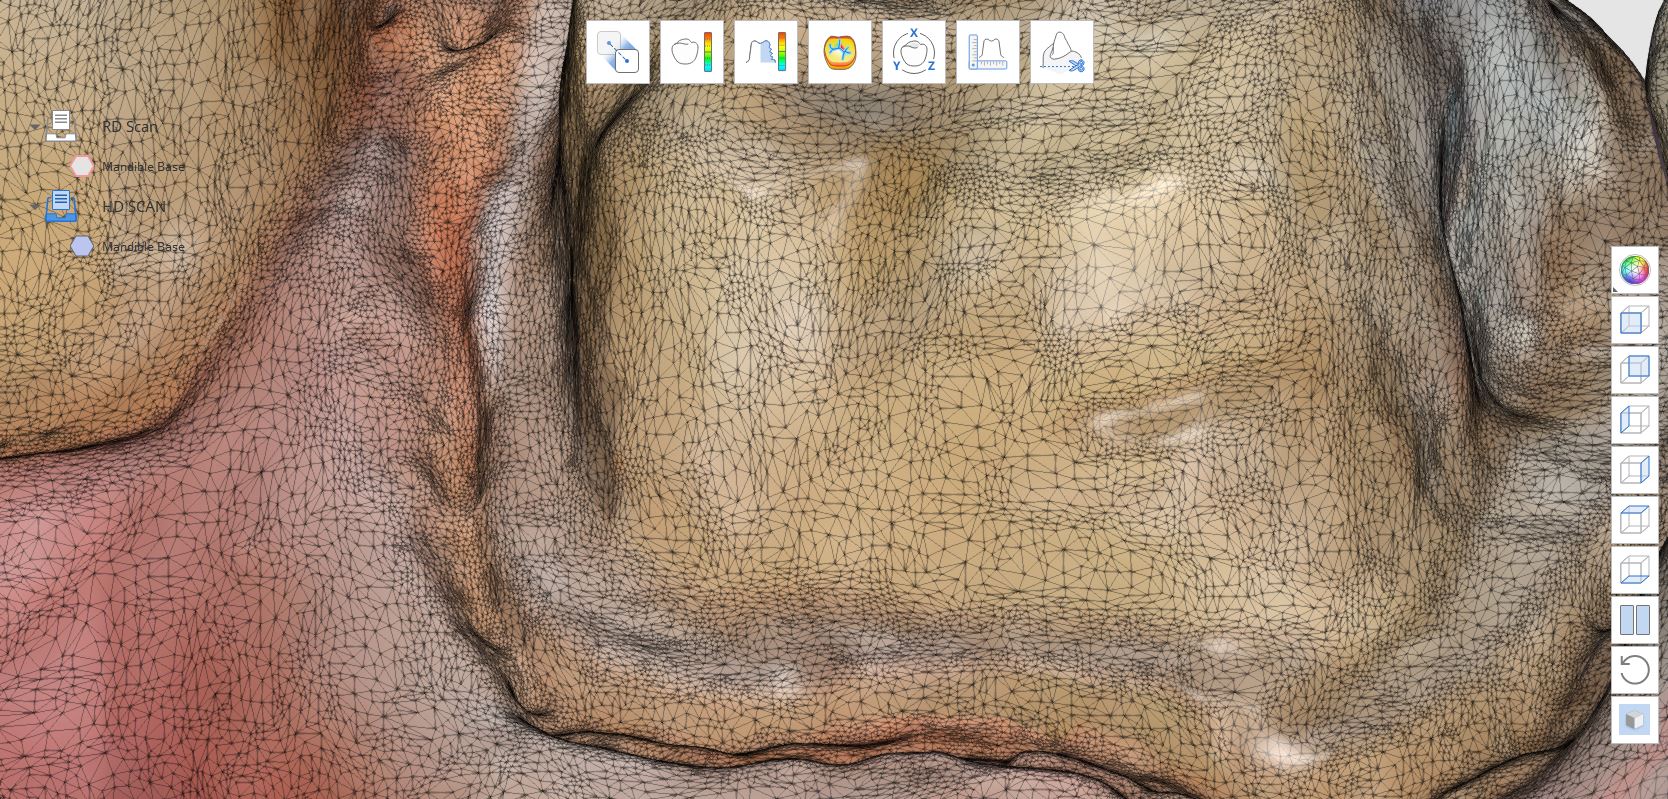
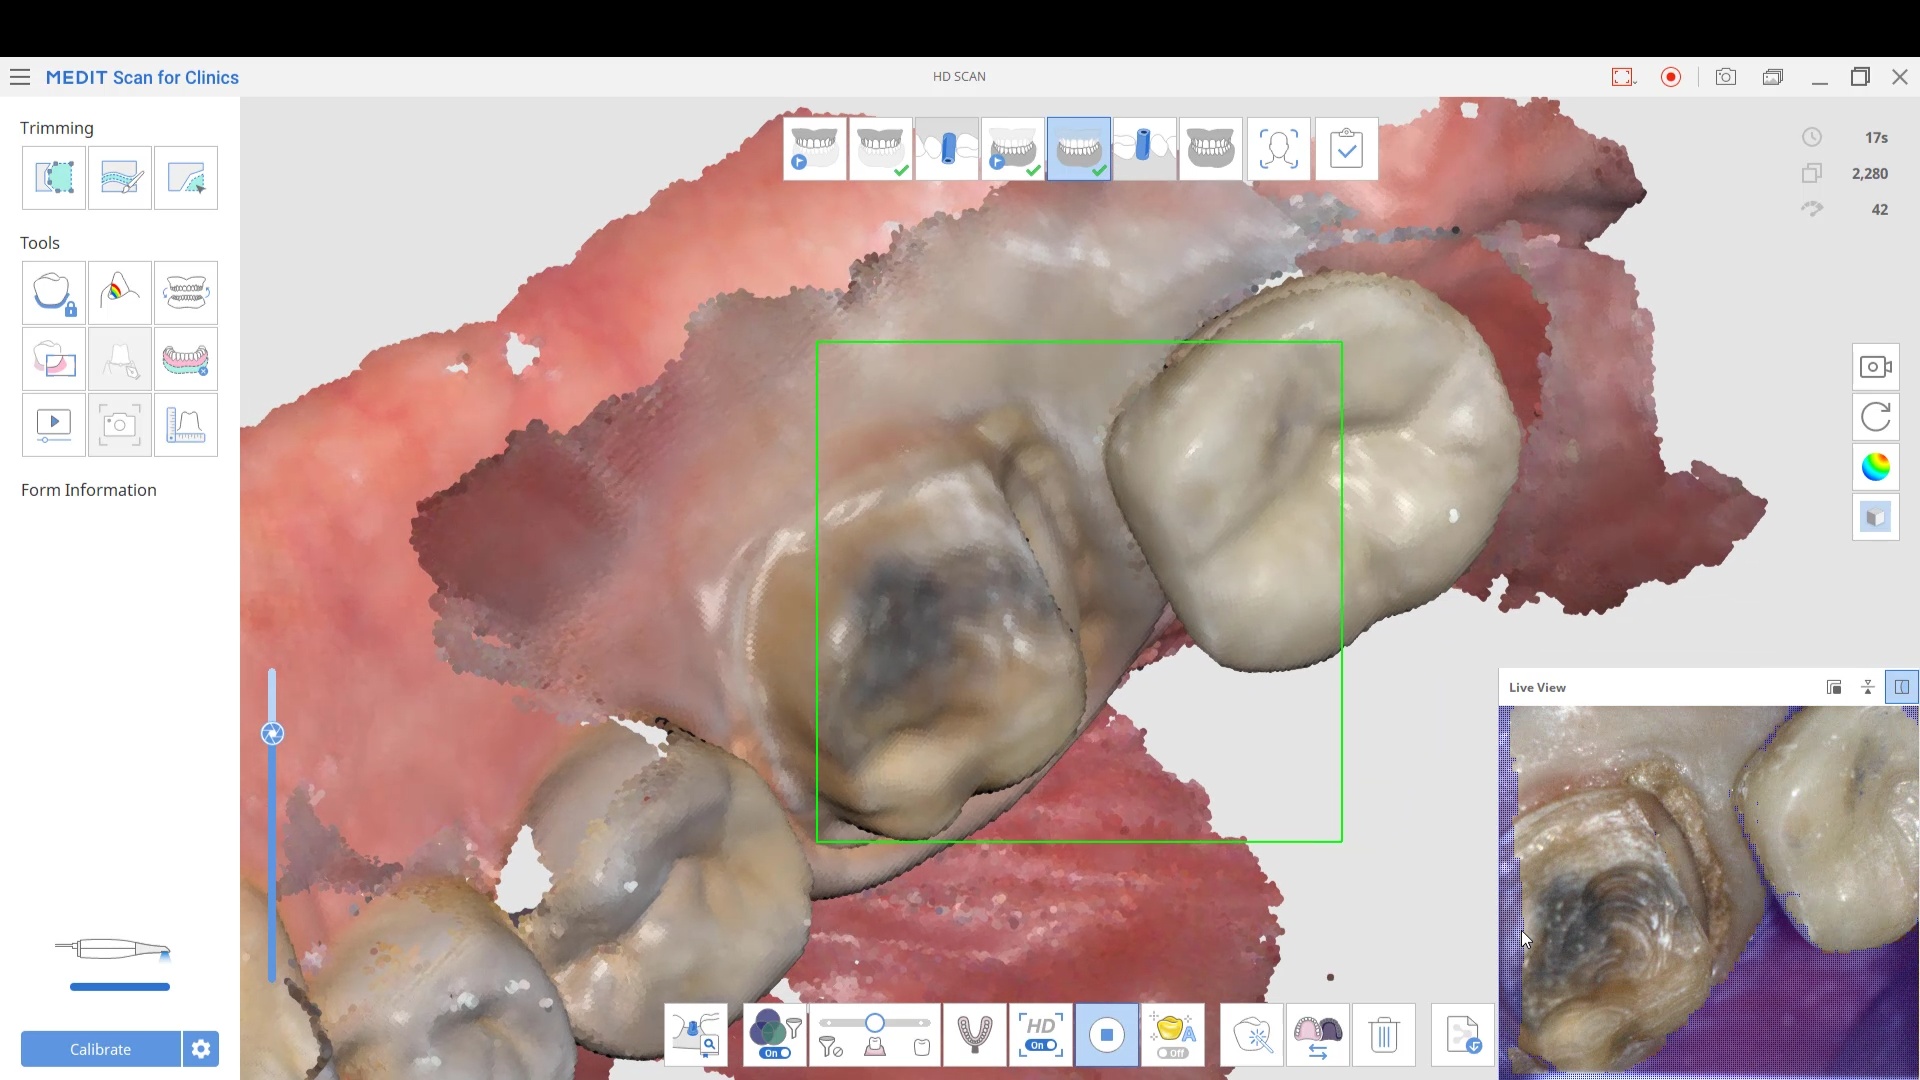
An often overlooked characteristics of an intra-oral scanner is the scan area / window. The larger the area, the more likely it is that your scanner will stay on track...
In the world of digital dental scanning, precision and accuracy are paramount. To shed light on the potential pitfalls and challenges faced by dental professionals, Dr. Armen Mirzayan of CAD-Ray...
DOWNLOAD THE CASE TO DESIGN ALONG One of the most challenging designs to do chairside is the design of a multi unit temporary that needs to be printed. This is...


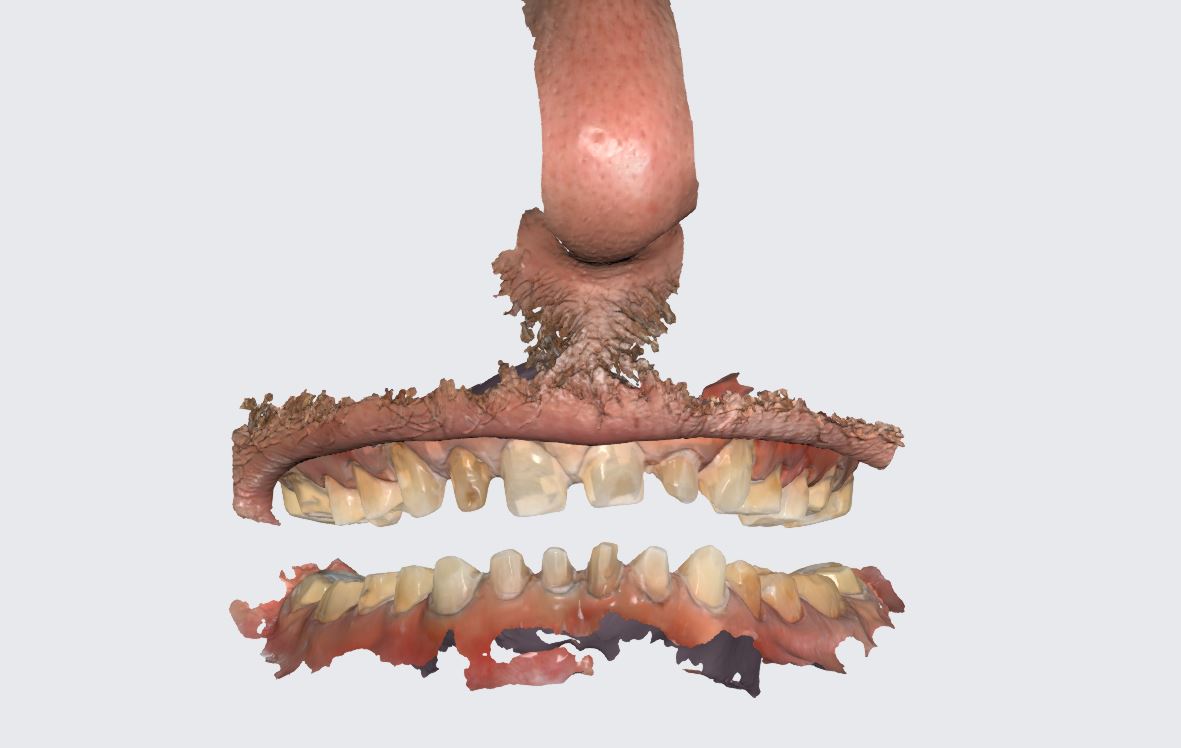 the patient was sedated and intubated for the case so we could not keep track of the bite. Instead, we imaged all 30 prepared teeth and used medit compare / design to digitally mount them to the wax ups. In the link provided you can download the models and relate them to each other […]
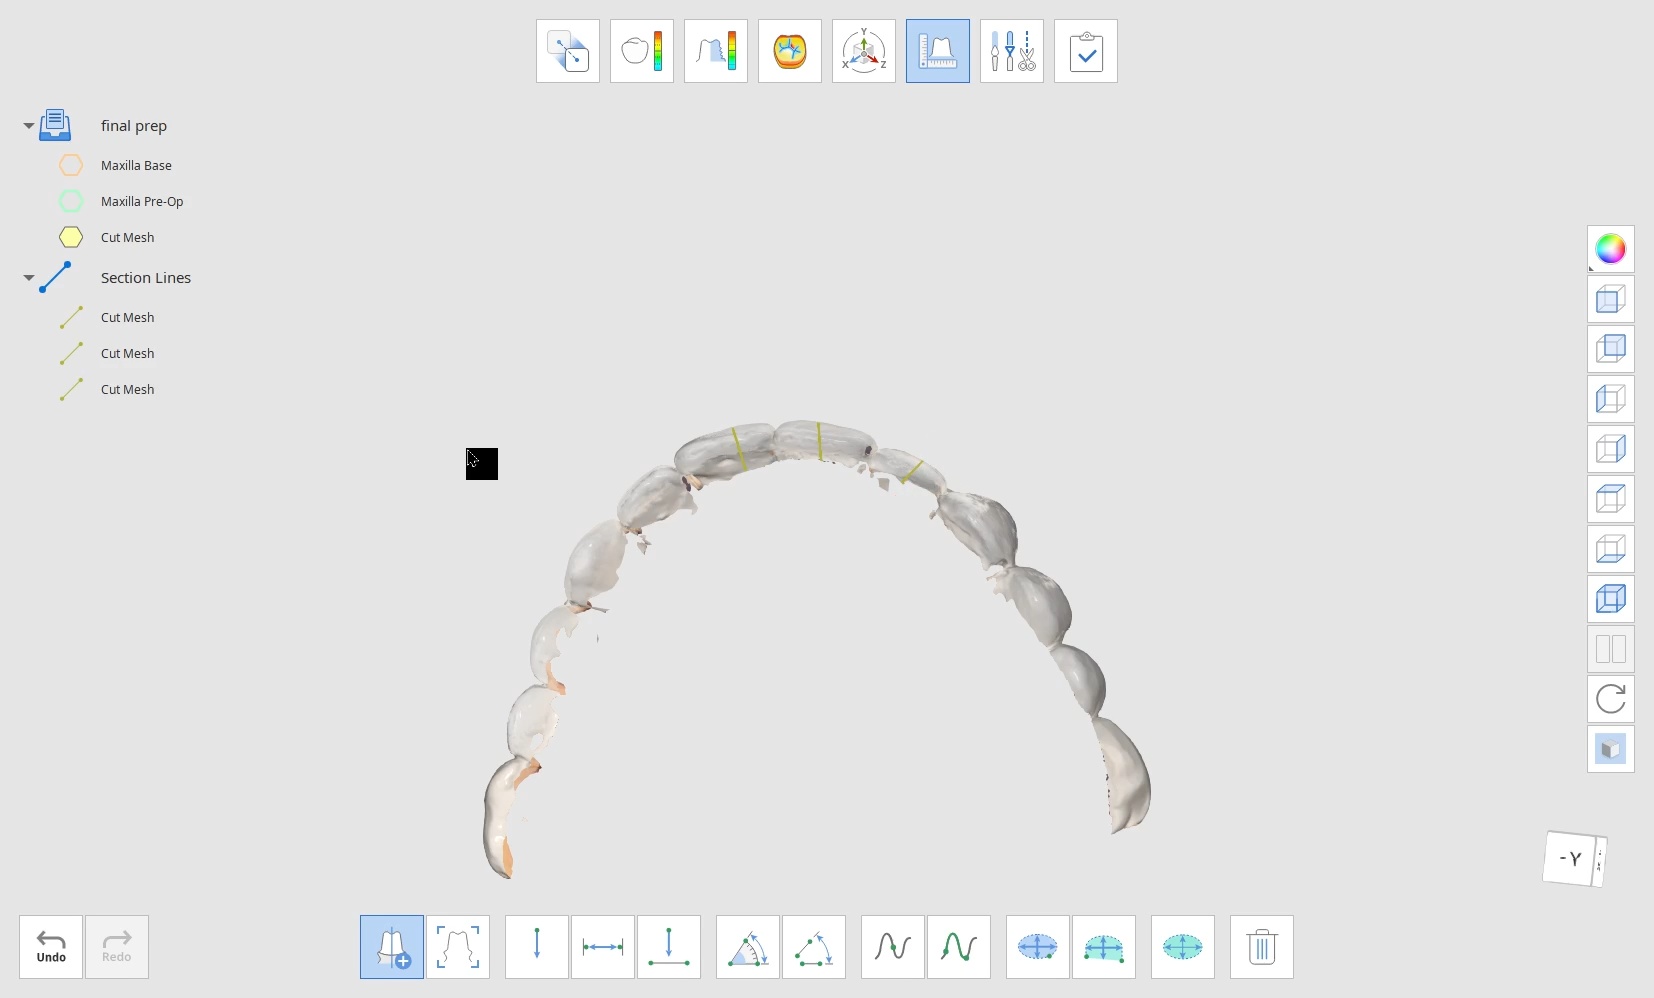


You must be logged in to post a comment.