Very pleased with the EXCELLENT support we have received from Frank DeLuca! Loving our new Medit so far, definitely more user friendly than our previous one. - 6/02/2022
Thuy Nguyen
CAD-Ray is amazing! Prompt replies, quick delivery, knowledgeable team! I had some cracks on my scanner that I read on their FB group may be a manufacturer's defect. My scanner was still covered under warranty. They overnighted a brand new one to me ...read moreCAD-Ray is amazing! Prompt replies, quick delivery, knowledgeable team! I had some cracks on my scanner that I read on their FB group may be a manufacturer's defect. My scanner was still covered under warranty. They overnighted a brand new one to me before I even knew they were going to replace it! That's how quick they are! Highly recommend them!!!read less - 12/23/2021
Mike Davis
I have been very happy with the Medit I purchased from Cad Ray. Everyone has been very helpful and quick to respond to my questions. They have an awesome video library for the medit, I am new to scanning and have really enjoyed the tutorial videos. - 6/16/2020
Linsay N Brandon Jarvis
As a lab we see a lot of scans. Great quality and easy to create great restorations from the Medit offices that send us work.- Jarvis dental lab - 1/29/2019
John Pisacane
I purchased my Medit scanner after the ADA meeting in 2018. I did it primarily on the personal recommendation of Armen Mirzayan, the owner of Cad-Ray. I have known Armen for over 15 years (we both were CEREC trainers) and he has always been unbeli...read moreI purchased my Medit scanner after the ADA meeting in 2018. I did it primarily on the personal recommendation of Armen Mirzayan, the owner of Cad-Ray. I have known Armen for over 15 years (we both were CEREC trainers) and he has always been unbelievably knowledgeable about dental technology and was always moving on the cutting edge.
When you see Armen's daily FB posts, it’s obvious that he is constantly pushing the envelope and exploring the limits of the Medit and the processes we use to idealize our push towards completely digital dentistry. Medit owners are fortunate to have Armen finding glitches and pushing for improvements in our scanner.
As far as after sale service, I can’t find a flaw with Cad-Ray. You won’t find a more supportive and dentist-centered company. Armen and Frank do everything to make purchasers happy and back up their sales.
I’ve heard of horror stories when people shopped elsewhere and only positive comments about Cad-Ray.
In summary, buy your Medit and other high tech equipment from Cad-Ray, you will be totally satisfied.
.read less - 10/08/2019
Our orthodontic office is new to scanning and printing, but CAD-Ray, Laura, Medit, and SprintRay have made the whole transition a huge win. Our first scan and print was cleaner than any traditional impression/pour up we've ever produced. On our first...read moreOur orthodontic office is new to scanning and printing, but CAD-Ray, Laura, Medit, and SprintRay have made the whole transition a huge win. Our first scan and print was cleaner than any traditional impression/pour up we've ever produced. On our first full clinic day, we scanned 14 arches and managed to stay on schedule! We were waiting for this technology to be affordable, fast, accurate, and reliable, and we can now say we are there. Thanks for all your help and ongoing support.read less - 6/25/2021
Update to CAD-Ray as this company has morphed into something even better and grander than it was previously. This is the company where you go to when you need a scanner or 3d printer. Their customer service is second to none and their training on sca...read moreUpdate to CAD-Ray as this company has morphed into something even better and grander than it was previously. This is the company where you go to when you need a scanner or 3d printer. Their customer service is second to none and their training on scanners is top level. Don't buy your scanners anywhere else because Cad-Ray is the only company who knows how to solve any of your problems and provides the best technical support. I recently had purchased a software to mill crowns from my medit to my MCXL. No body could get it to work.12 months in and I was resigned to it not working and not being able to mill in house. With Cad-Ray's tremendous hard work, we were able to get the milling unit synchronized to the inlab and inlab synchronized to clinux and clinux meshed to medit. I am now milling scanned crowns for the first time in about 12 months. Yay Cad-Ray, Thank you!!!!!read less - 3/06/2024
Jose Morales
Service is extremely quick and on point. Highly recommended to join the Cad Ray facebook group! - 6/01/2022
Daniel Eley
I just bought the new Medit i700. I placed the order on Friday, it shipped on Monday, and it arrived on Tuesday. So far it has been a great experience. They also provide a lot of quality videos for learning to use the scanner. - 5/05/2021
AJ Ganir
Cadray has great support and service! They are very responsive to questions. Love the new medit scanner! - 5/06/2021
David Weber
Much like dentistry is not a commodity, CAD-RAY's service is not a commodity. What CAD-RAY does so well is not just sell pieces of technology affordably and smoothly, but provides service, training, and insight so these tools can be used meaningfully...read moreMuch like dentistry is not a commodity, CAD-RAY's service is not a commodity. What CAD-RAY does so well is not just sell pieces of technology affordably and smoothly, but provides service, training, and insight so these tools can be used meaningfully and profitably.read less - 12/12/2022
Ma. Teresa Santana
Best support and customer service ever! My scanner is long past warranty and they still answer all my questions. When it's time to upgrade I'll be buying from them again. A friend bought same scanner from another vendor and got zero support. I had to...read moreBest support and customer service ever! My scanner is long past warranty and they still answer all my questions. When it's time to upgrade I'll be buying from them again. A friend bought same scanner from another vendor and got zero support. I had to help them. Told her next time buy from Cad Rayread less - 5/10/2024
All Clear
Great experience with CAD-Ray, specifically Damien, with purchasing and customer service with servicing a scanner that needed replacing under warranty. All around excellent service and I will definitely come back for future technology we'll eventuall...read moreGreat experience with CAD-Ray, specifically Damien, with purchasing and customer service with servicing a scanner that needed replacing under warranty. All around excellent service and I will definitely come back for future technology we'll eventually be adding to our practice.read less - 10/23/2024
John Pobanz
We had an outstanding experience purchasing two Medit scanners. The delivery was timely . The onboarding clean. Laura was dazzling with her acumen and quick solutions . We highly recommend the investment in Cad Ray .Pobanz Orthodontics , Ogden Utah :...read moreWe had an outstanding experience purchasing two Medit scanners. The delivery was timely . The onboarding clean. Laura was dazzling with her acumen and quick solutions . We highly recommend the investment in Cad Ray .Pobanz Orthodontics , Ogden Utah :)read less - 12/10/2021
Johnny Vredenburg III
Before working with cad-ray, I was hesitant to dive into digital dentistry due to the complexity of it. Working with Laura at cad-ray made all of my concerns go away. She was there to help me with my Exocad software installation, even outside of norm...read moreBefore working with cad-ray, I was hesitant to dive into digital dentistry due to the complexity of it. Working with Laura at cad-ray made all of my concerns go away. She was there to help me with my Exocad software installation, even outside of normal business hours - really hard to come by! I also purchased a Medit i500 and getting that setup and working in my clinic was seamless. I could not have asked for better support while navigating digital dentistry. My next purchase will be a 3D printer, and i know exactly where i will buy it from! Highly recommend these guys.read less - 11/20/2020
David Christensen
I purchased the Medit i500 from Cad-Ray December 2018. I couldn’t be happier with the scanner. The improvements Medit has made over the last 10 months are nothing short of astounding! I can’t imaging what they’ll come up with next.
As for Cad-Ray...read moreI purchased the Medit i500 from Cad-Ray December 2018. I couldn’t be happier with the scanner. The improvements Medit has made over the last 10 months are nothing short of astounding! I can’t imaging what they’ll come up with next.
As for Cad-Ray, their support has been second to none. Never have I experienced the kind of attention and help from any other company. Wether it’s with help installing, computer hardware issues or technical help they respond IMMEDIATELY!
Armen is also a huge reason why I chose Cad-Ray. No one selling a product has helped me more evolve my scanning technique. He’s quick to respond to questions and issues I feel his service is a huge reason why to buy from CAD-RAY.read less - 10/09/2019
Kaila Larson is the support specialist for our office and has been outstanding. She gets back to us quickly with any questions we have, and will log into the computer and fix issues so we don't even have to worry about them. She is extremely knowled...read moreKaila Larson is the support specialist for our office and has been outstanding. She gets back to us quickly with any questions we have, and will log into the computer and fix issues so we don't even have to worry about them. She is extremely knowledgeable about the MEDIT scanner and the supporting software. She responds to calls and texts or emails and will communicate with us in whatever way is most convenient for our office. She has saved us hours of time and headache by always being available to help.read less - 5/25/2022
Frank Gibbons
I just bought my first Intra-oral scanner (Medit I-700). I have demoed scanners from various companies in the past but have been less then thrilled with the applications, scanner ability, ease of use and overall user experience. I feel that now the...read moreI just bought my first Intra-oral scanner (Medit I-700). I have demoed scanners from various companies in the past but have been less then thrilled with the applications, scanner ability, ease of use and overall user experience. I feel that now the technology has caught up to where it should be and after reviewing many scanners on the market have decided to go with Medit. The Medit i-700 gives me all the functionality I could want, has an affordable price and works for all the procedures I need it for (scanning for ortho, dentures, partials, crowns, bridges, implants ect.). I love that they continually update their software and most importantly that those upgrades are free to the end users. Another huge plus is that when I have a question I get actually get someone on the phone!! For all these reasons I finally jumped in. I would recommend anyone else to do so as well!read less - 5/06/2021
Mark Gaches
Excellent company to work with. Best customer service and technology available. Can't recommend enough! - 5/05/2021
Kallen Wheeler
I always have enjoyed working with Cad-ray. Customer service is always on-point! - 5/25/2022
Ramin Goshtasbi
Great service even if you own a Primescan. Company is built on customer service. Thanks for the help guys…. - 1/05/2022
Steven Polasek
The cad ray team is the best! Jon and Nick offer first class service! I ordered a medit i500 from another supplier and had to cancel my order after it had not arrived within 3 weeks. Placed my order with Jon and Nick, had the scanner to me within 24 ...read moreThe cad ray team is the best! Jon and Nick offer first class service! I ordered a medit i500 from another supplier and had to cancel my order after it had not arrived within 3 weeks. Placed my order with Jon and Nick, had the scanner to me within 24 hours of purchase. I love my medit! Best scanner on the market!read less - 6/15/2020
We have been using the scanner for a few weeks now. It’s been a blast to use and they have made it easy to learn with video tutorials. We have yet to go to the training, but we are excited to continue learning and expanding our digital dentistry. - 6/19/2020
Lance Timmerman
Implant Planning Services Review I Am VERY experienced with "another system" but thought I would give CAD-Ray a try. At at LEAST 1/3 the fee, why not?
VERY happy. Fit GREAT, surgery was uneventful (the best kind) and I am a believer! This is a great company and great PEOPLE to...read moreI Am VERY experienced with "another system" but thought I would give CAD-Ray a try. At at LEAST 1/3 the fee, why not?
VERY happy. Fit GREAT, surgery was uneventful (the best kind) and I am a believer! This is a great company and great PEOPLE too! 5 stars aren't enough. Just like the Burj Al Arab, this is 7 star!read less - 3/03/2015
Jeff Johnston
Very Helpful, good company to work with. Always been there for me - 3/10/2017
Mark Geddes
Love my medit! Cad-ray has been awesome to work with and very educational in learning all things digital . Was doing a study club with 4 other dr's showing off the medit and the cerec dr who had just bought the newest kept saying, "mine doesn't do...read moreLove my medit! Cad-ray has been awesome to work with and very educational in learning all things digital . Was doing a study club with 4 other dr's showing off the medit and the cerec dr who had just bought the newest kept saying, "mine doesn't do that. No way! I wish mine could do that. For real? I paid 4 times as much."
Needless to say the medit is awesome.read less - 6/18/2020
Nothing but great things to say about Cad-Ray! Excellent customer support from Laura after the purchase of our Medit i500 and the cart from Damien. I’ve been very impressed with the Medit in restoring crown and bridge, as well as fixed hybrids, and...read moreNothing but great things to say about Cad-Ray! Excellent customer support from Laura after the purchase of our Medit i500 and the cart from Damien. I’ve been very impressed with the Medit in restoring crown and bridge, as well as fixed hybrids, and learning more of its capabilities each day. We have intentions to buy a second Medit shortly and will definitely be using Cad-ray again.read less - 12/13/2021
Cana Pasierb
Cad-Ray has been excellent with support and training. They respond promptly and have a vested interest in your success with the products that they supply. - 6/17/2020
I purchased a Medit Scanner from Cad Ray and the entire experience has been phenomenal. Their customer service is top notch and always accessible by text! I have FaceTimed Frank more than once during a hectic day to help me with my scanner. Thanks te...read moreI purchased a Medit Scanner from Cad Ray and the entire experience has been phenomenal. Their customer service is top notch and always accessible by text! I have FaceTimed Frank more than once during a hectic day to help me with my scanner. Thanks team!read less - 6/19/2020
Madhavi Chavda
Still beginner to use IO scanner. best customer service. Live training was very useful. Andy Nova was great in improving my skill for scanning and showing me all features. Thank you. - 5/19/2022
We purchased the Medit i700. With the help of CAD-Ray and their amazing support team the transition to digital scanning was simple. Laura Geney walked us through the purchase and guided us during our training with the help of Andy Nova. Laura has bee...read moreWe purchased the Medit i700. With the help of CAD-Ray and their amazing support team the transition to digital scanning was simple. Laura Geney walked us through the purchase and guided us during our training with the help of Andy Nova. Laura has been there every step of the way checking in weekly answering all of our questions. We highly recommend CAD-Ray and look forward to doing business with them in the future.read less - 7/24/2022
Roger Wilson
CAD-Ray provides the best support around. I started scanning with Medit i500 in 2018 and my dental practice immediately changed for the better.As a rookie, I had a lot of questions and I calledCAD-Ray a lot in the beginning. They were great!Jonathan...read moreCAD-Ray provides the best support around. I started scanning with Medit i500 in 2018 and my dental practice immediately changed for the better.As a rookie, I had a lot of questions and I calledCAD-Ray a lot in the beginning. They were great!Jonathan Acker helped me get set up. Frank Weinstein answered tons of questions. Laura Geney became an important source of information as I moved into scan bodies, AI library, and had hardware questions. I’ve attended classes in Dallas featuring Armen Mirzayan who is incredibly knowledgeable and will tell you the good, bad, and the ugly about digital workflow. The possibilities are endless with scanning technology. I also want to mention Nick Statly who has visited my Dallas office and is a wealth of information. I have to admit that I frequently view the CAD-Ray User Group Face Book page just to pick up a few pearls here and there.I highly recommend CAD-Ray because their support is by far the best in the IOS industry and because their people honestly care about the customer and are truly committed to your success.read less - 12/23/2021
Gabriel Joel
Medit i500 is an incredible scanner. I have experience with other types of scanners including IO and Desktop but this one is really impressive. It is blazing fast and takes beautiful scans. But more importantly is the company itself. Medit is an amaz...read moreMedit i500 is an incredible scanner. I have experience with other types of scanners including IO and Desktop but this one is really impressive. It is blazing fast and takes beautiful scans. But more importantly is the company itself. Medit is an amazing company and is constantly trying to improve. They are always on the cutting edge and releasing new improvements all the time. They are always LISTENING to the customers on how to improve the scanning experience and change accordingly. The customer service is second to none. I highly recommend this scanner but even more highly recommend considering buying the scanner as a result of the great company and PEOPLE that stand behind it.read less - 10/09/2019
I have had the wonderful experience of working with Ryan at Cad-Ray for the last several weeks and he has been very professional and informative on how to properly use the Medit I700 scanner with regard to the software. I would highly recommend using...read moreI have had the wonderful experience of working with Ryan at Cad-Ray for the last several weeks and he has been very professional and informative on how to properly use the Medit I700 scanner with regard to the software. I would highly recommend using Cad-Ray and contacting Ryan for any of your Medit needs.read less - 1/27/2023
Brandon Jones
Cad-Ray customer service is great! Super responsive and efficient. - 3/26/2024
Evan Bedell
Laura has always been so helpful with the medit when we needed assistance or resources. The training she provided the office was invaluable! She is quick to respond whenever we reach out. 13/10 - would recommend her to anyone looking to get a medit ...read moreLaura has always been so helpful with the medit when we needed assistance or resources. The training she provided the office was invaluable! She is quick to respond whenever we reach out. 13/10 - would recommend her to anyone looking to get a medit scanner.read less - 12/16/2021
Geoff Seuk
Best service and support. Period. The product I purchased (Medit i500) is fantastic, but integrating it into my practice has been super smooth because of the support from Cad-Ray. They not only answer the phone with REAL people, but those people ACTU...read moreBest service and support. Period. The product I purchased (Medit i500) is fantastic, but integrating it into my practice has been super smooth because of the support from Cad-Ray. They not only answer the phone with REAL people, but those people ACTUALLY want to help you. Kind of a novel concept in this day and age. Definitely the best customer service I've experienced from an equipment dealer, and I've purchased equipment from just about all the big companies. Will definitely purchase from them in the future. I highly recommend them.read less - 8/07/2022
Spark Dental
Just had a new i700 scanner.Service so far is great.Andy did our training, he was great in answering all our questions .loving the scanner so far .😊 - 9/01/2022
Dr. Terry Zervos, DDS,PA.
Today I had to order new tips and Laura was EXTREMELY helpful, Cad-Ray has all the products you need for digital dentistry and they do Education, if you buy Medit scanner from them they include 12 CE training course. Cant just buy a Lamborghini you h...read moreToday I had to order new tips and Laura was EXTREMELY helpful, Cad-Ray has all the products you need for digital dentistry and they do Education, if you buy Medit scanner from them they include 12 CE training course. Cant just buy a Lamborghini you have to learn how to drive it!read less - 7/02/2020
Dennis Wong
Best support ever. They are super responsive when a problem occurred, and immediately set up a support ticket with the vendor who contacted me within the hour to help me to solve the problem. - 7/27/2023
Laveen Smiles
CAD-Ray has the best customer service and support that you will ever receive from any dental company anywhere. I had an issue with a sintering oven I purchased from them. I needed immediate assistance, because I was in the middle of a case. The perso...read moreCAD-Ray has the best customer service and support that you will ever receive from any dental company anywhere. I had an issue with a sintering oven I purchased from them. I needed immediate assistance, because I was in the middle of a case. The person at CAD-RAY who had the knowledge to help me had just gotten into a car accident and was at the ER. Now most companies and people would have said “Sorry, we can’t help right now due to extenuating circumstances.” Not CAD-RAY! That person called me from the ER, in the middle of his personal problems, and gave me the needed information to solve my problem. Exceptional customer service and support is what you will get from CAD-RAY, and it won’t be for a limited time after your purchase. You won’t go wrong with a purchase from CAD-RAY.read less - 1/29/2023
Daniel Kim
CAD-Ray's online resources and customer support has made my Medit scanner implementation possible without the need for any hands on training. They are full of resources and have expert knowledge. - 7/01/2021
Yordanka Ivanova
I had been on the market for a scanner for a while and the i700 is my first intraoral scanner purchase. We are still new to the scanning world and its capabilities. Frank DeLuca was my main contact from the beginning and the person who did our traini...read moreI had been on the market for a scanner for a while and the i700 is my first intraoral scanner purchase. We are still new to the scanning world and its capabilities. Frank DeLuca was my main contact from the beginning and the person who did our training. The scanner is incredible and has surpassed our expectations even though we haven’t used it to its full potential yet. Frank has been amazing and always there to guide us every step of the way. Having such fabulous customer service and support from CAD-Ray was key for us when making this purchase decision. Thank you!read less - 6/23/2022
Rusty Fitton
Super happy with our purchase of the Medit i500 from Cad Ray. Overall its a work horse scanner that has handled anything weve thrown at it. The key to success with it is definitely taking the time to actually learn how to use it after purchase. Ca...read moreSuper happy with our purchase of the Medit i500 from Cad Ray. Overall its a work horse scanner that has handled anything weve thrown at it. The key to success with it is definitely taking the time to actually learn how to use it after purchase. Cad Ray has an immense library of straight forward education videos that are updated basically daily. I havent done the 2 day course but that is also included in the purchase. You really cant find that sort of service and education with any of the other scanners on the market. Id recommend them to anyone.read less - 6/26/2020
Robert Mabry
I don't scan in my practice my assist does. She says it's awesome. Better than the trios or cerecs we have had in the past. The image quality while designing cases is amazing. Haven't seated a restoration from it yet but expect it to be great as well...read moreI don't scan in my practice my assist does. She says it's awesome. Better than the trios or cerecs we have had in the past. The image quality while designing cases is amazing. Haven't seated a restoration from it yet but expect it to be great as well.read less - 6/16/2020
What can I say ! I have been extremely pleased with my scanner ! I recommend it to all my colleagues ! The support is the best , I bought the extended warranty and my scanner hada small crack and within one day they shipped my a new one ! I can’t wo...read moreWhat can I say ! I have been extremely pleased with my scanner ! I recommend it to all my colleagues ! The support is the best , I bought the extended warranty and my scanner hada small crack and within one day they shipped my a new one ! I can’t work without it ! Thank you !read less - 2/09/2022
Rodney Baier
Cad ray has been very nice to work with. Excellence service and support since I bought my Medit scanner - 6/16/2020
Dado Dado
Frank DeLuca has been great since we bought the scanner! Always there for you and returns his calls asap. Thank you Frank! - 1/25/2023
Reid Stone
I cannot say enough good things about Cad-Ray and the people involved with this organization. I have purchased equipment over the past few years from them and always been amazed at the non-pushy before the sale help and the after the sale support. ...read moreI cannot say enough good things about Cad-Ray and the people involved with this organization. I have purchased equipment over the past few years from them and always been amazed at the non-pushy before the sale help and the after the sale support. I have been deciding for the last 2 years to make a big purchase of a mill and sintering furnace and Jon has never made me feel like I was bothering him and never pushed me just to try to get a sale. It really is different from other sales experiences I've had with other companies/sales people.Jesse came out and installed and provided training for our new mill and sintering furnace. He went above and beyond what I was expecting to make sure myself and my team knew how everything works during the training. He has also been great with questions we have had since the installation. I just cannot say enough good things about my experience all around and will definitely be a Cad-Ray customer for many years to come. Thank you Cad-Ray!read less - 6/15/2022
Thomas Lim
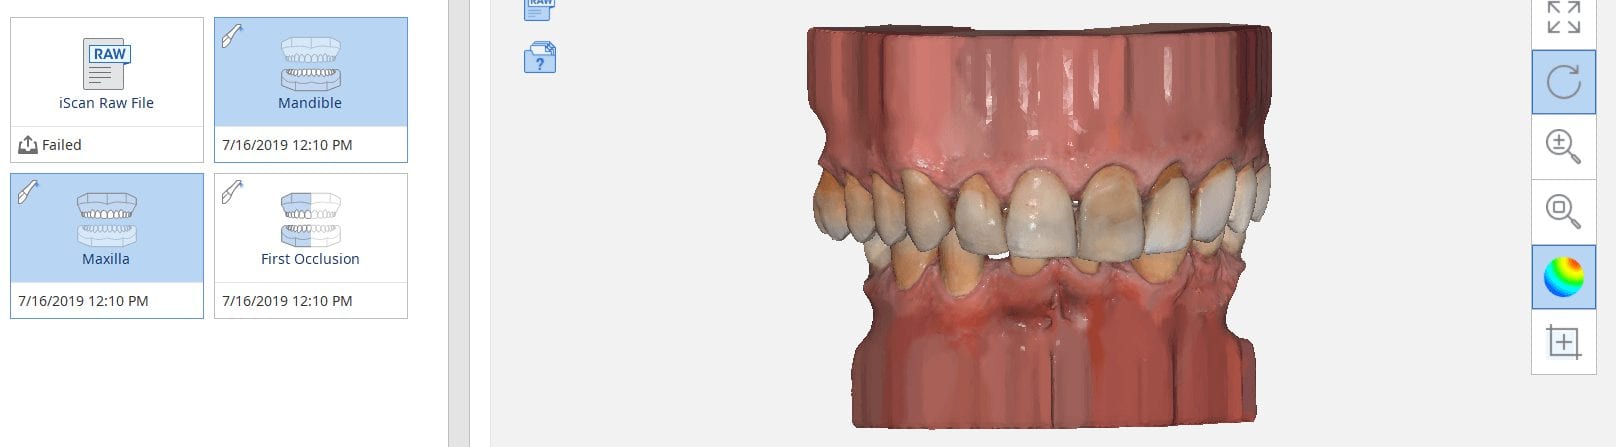
Just updating my post to show my cart setup. Hope it can help for someone :) - 10/12/2019
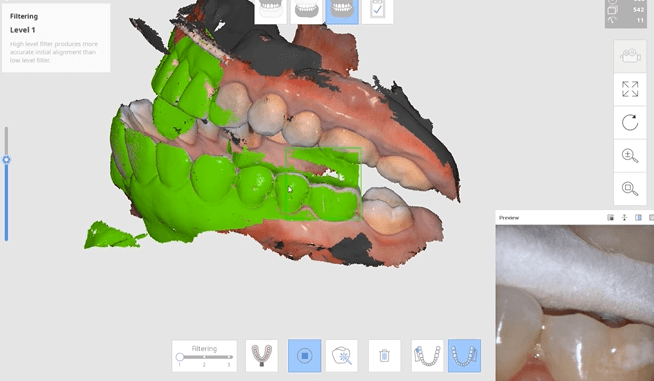
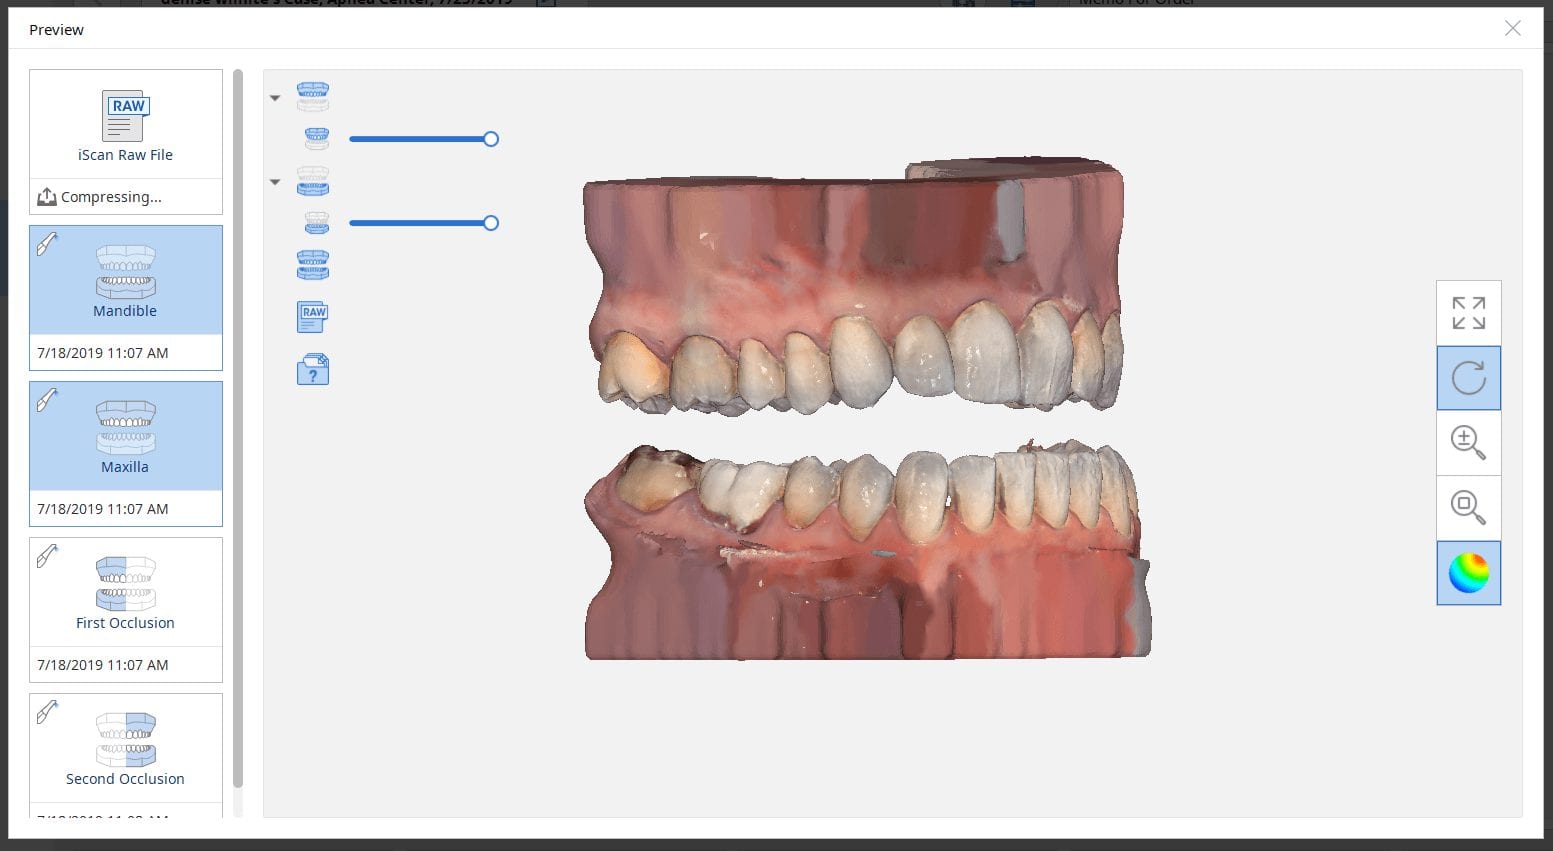
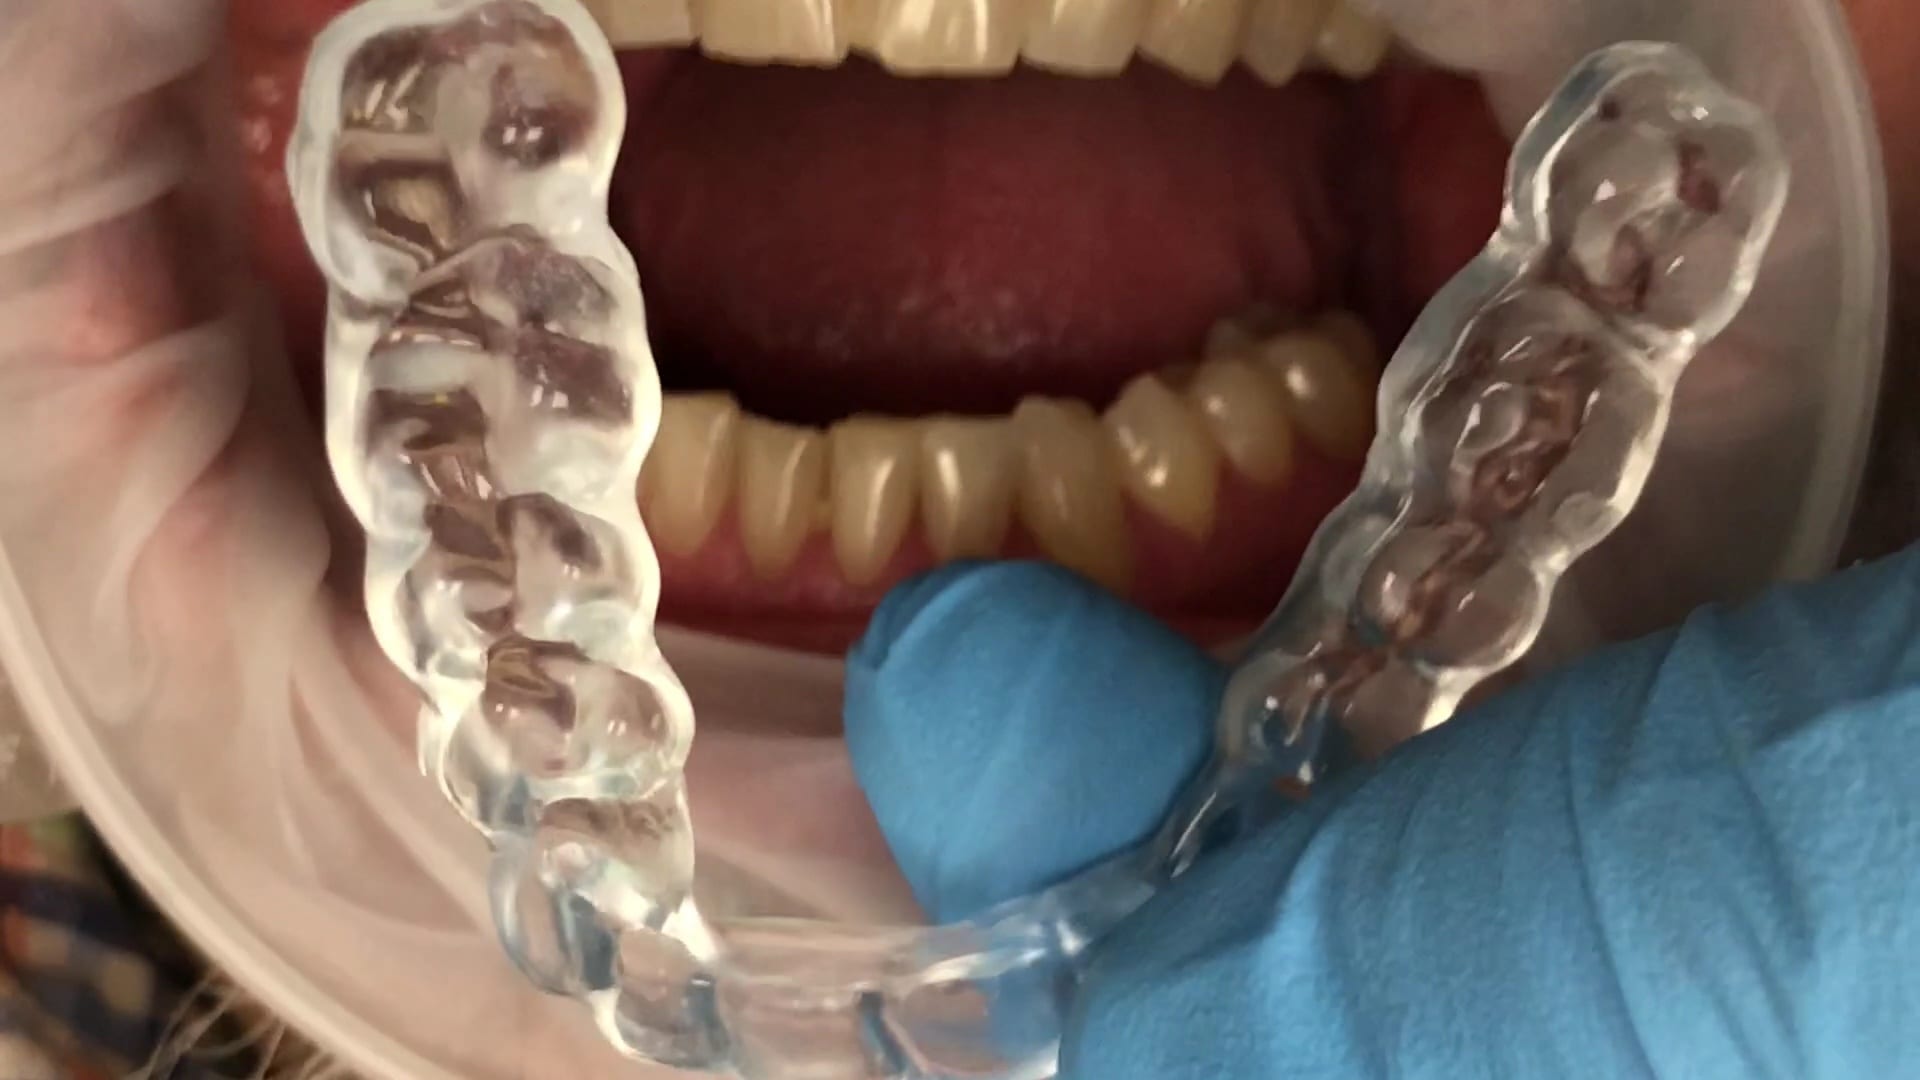
One of the biggest challenges of capturing a bite for an occlusal appliance is to properly tripod the upper arch to the lower arch. With PVS impressions we just send the impressions along with the patient’s bite registration in maximum intercuspation.
A unique advantage we have with digital impressions is that we can capture someone with an open bite while using their own mouth as the articulator. Moreover, with the following technique, you can rest assured you have little adjustments to make to the occlusal guard after it has been fabricated.
Now as we continue to image in the same catalog box, we can gauge if we are on track as the bite model turns green. Notice how when we move from the upper arch to the lower arch, across an open bite, and we maintain a green active box and green model formation, we can rest assured that our case is mounted correctly.
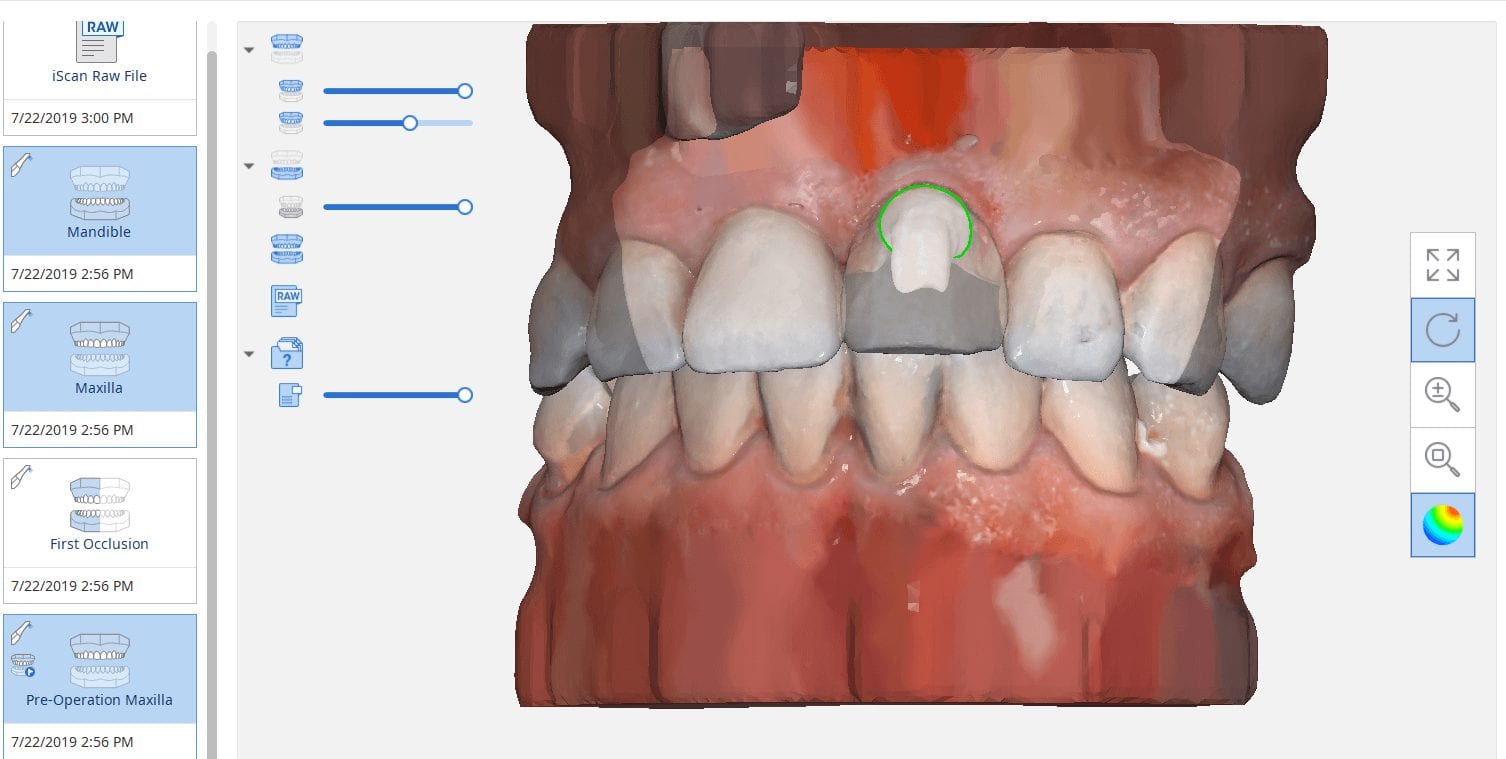
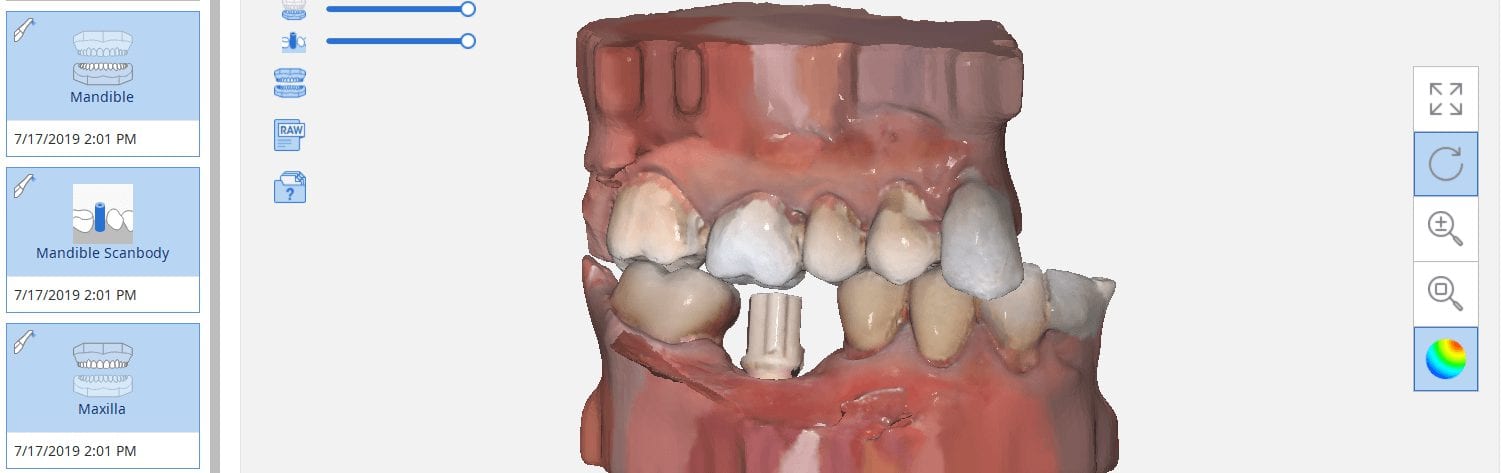
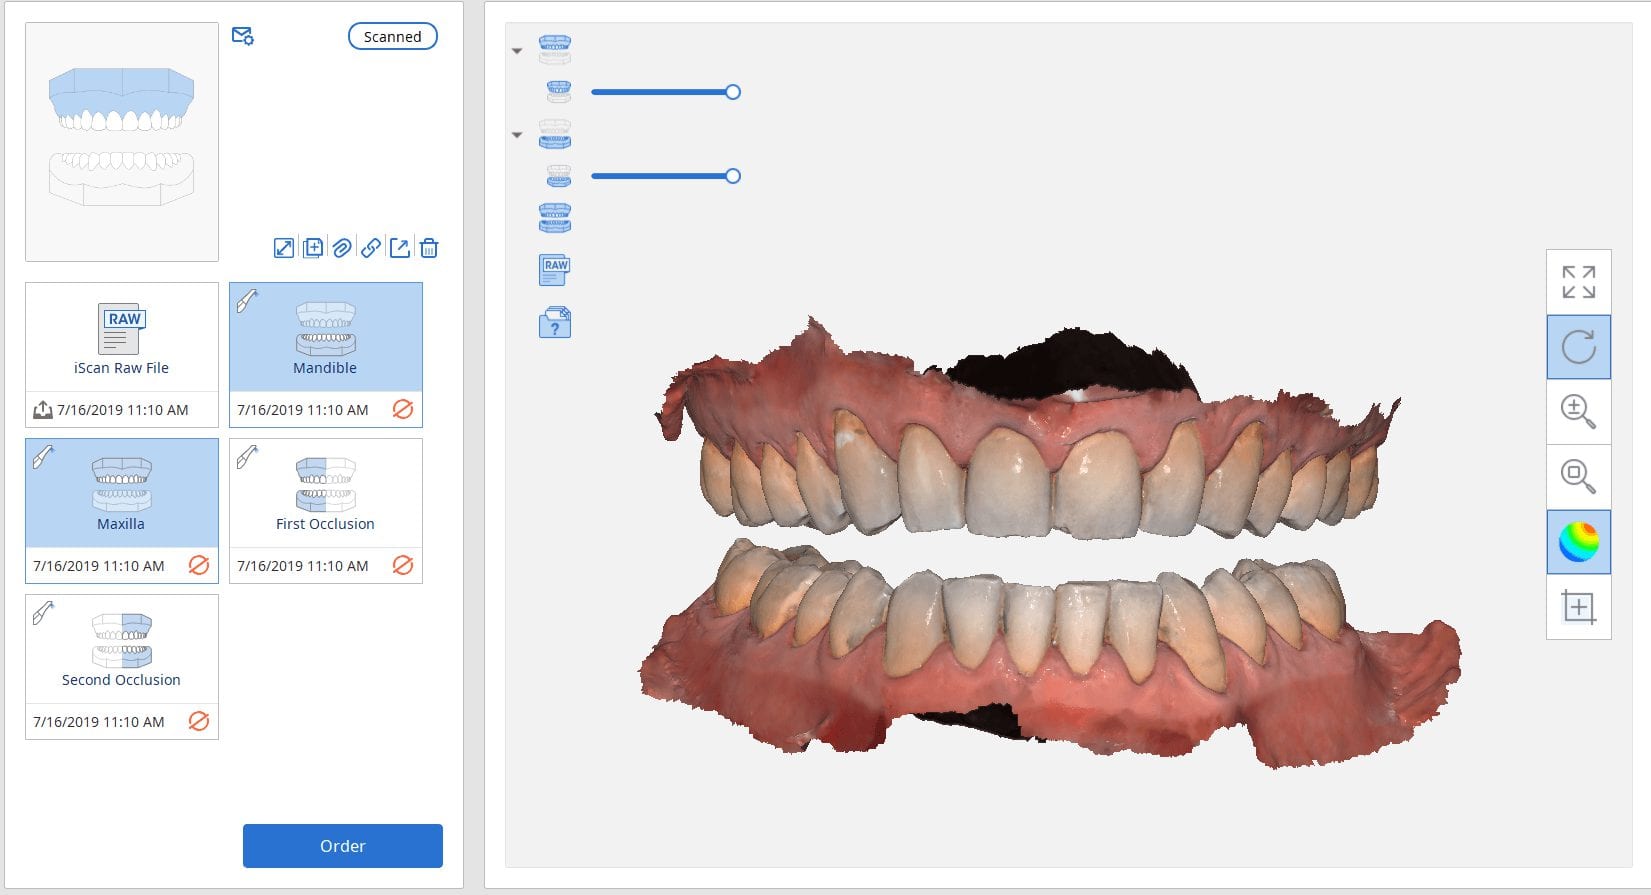
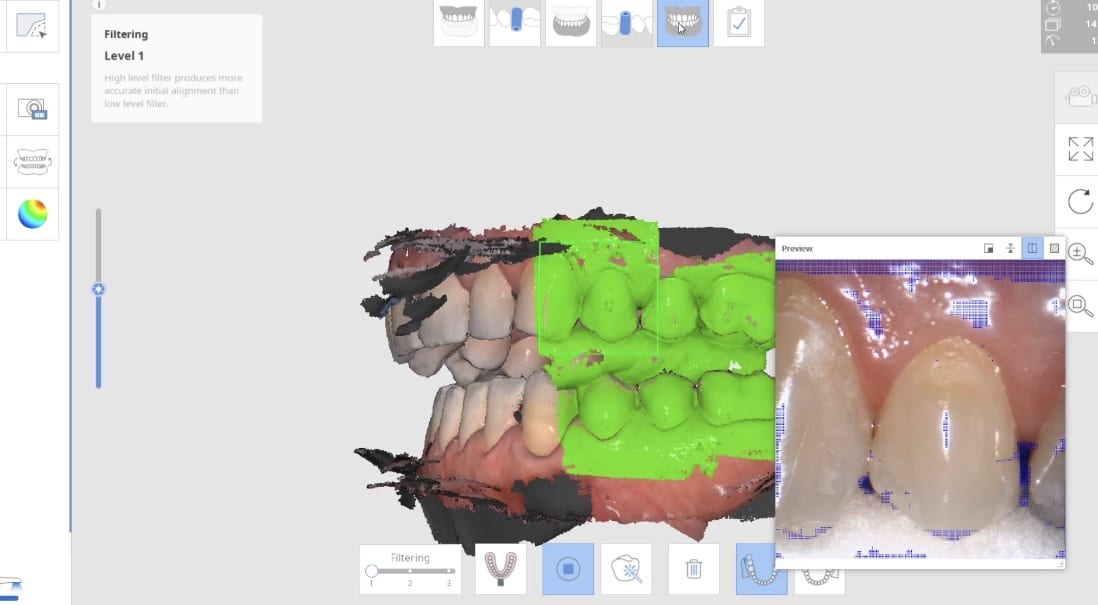
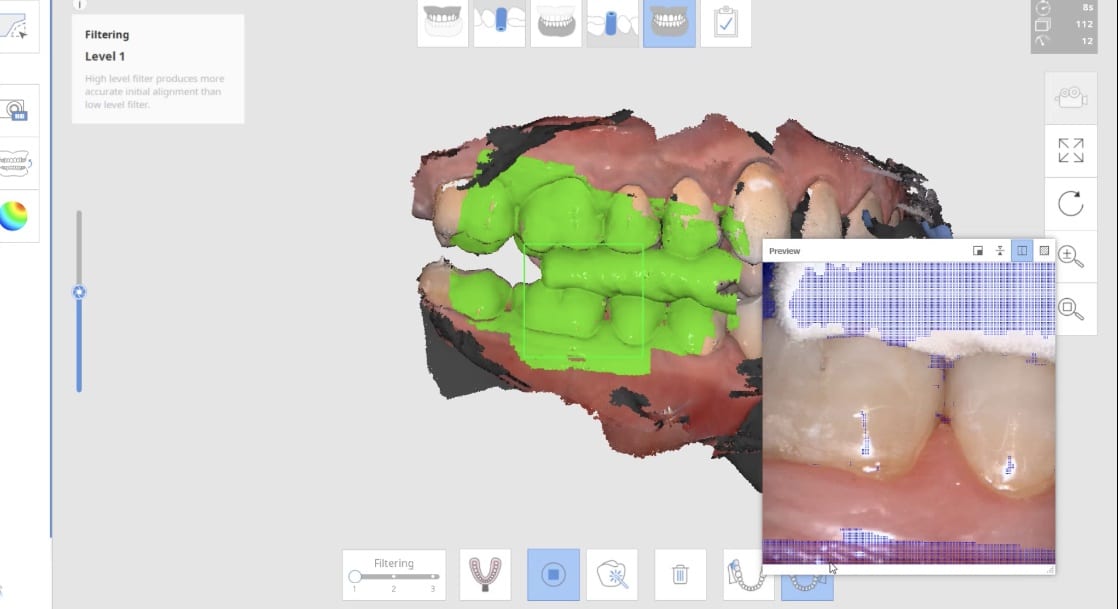
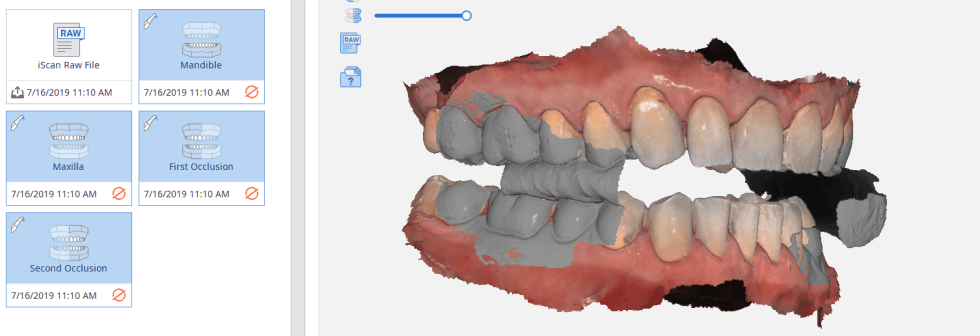
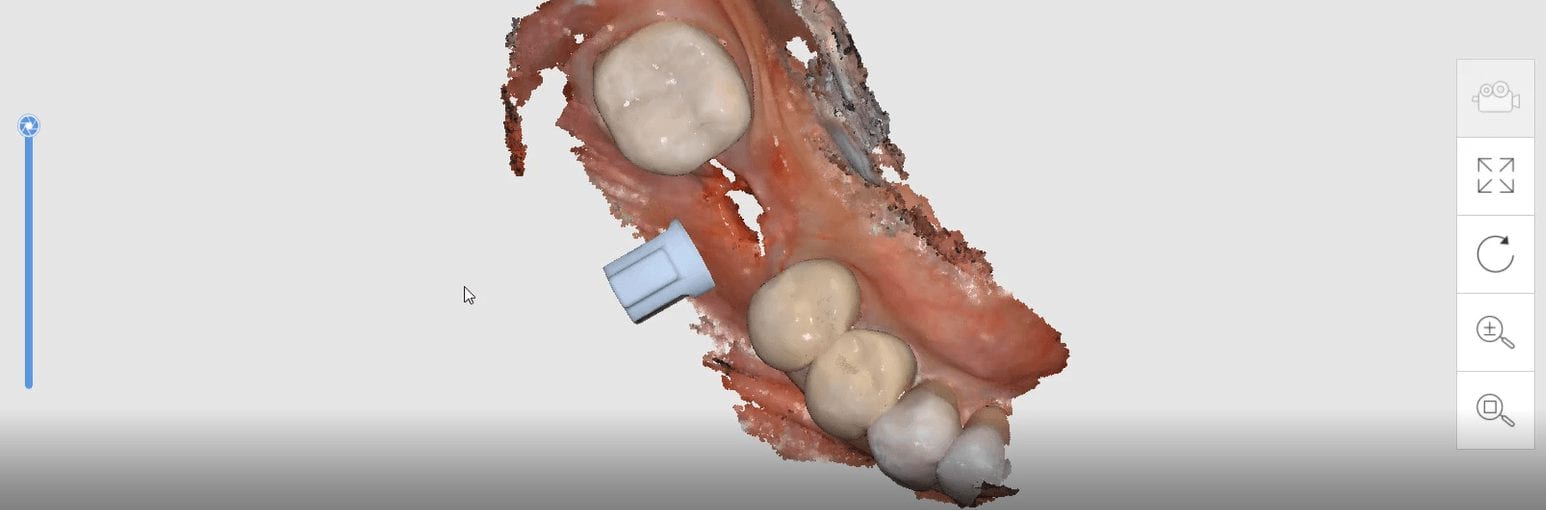
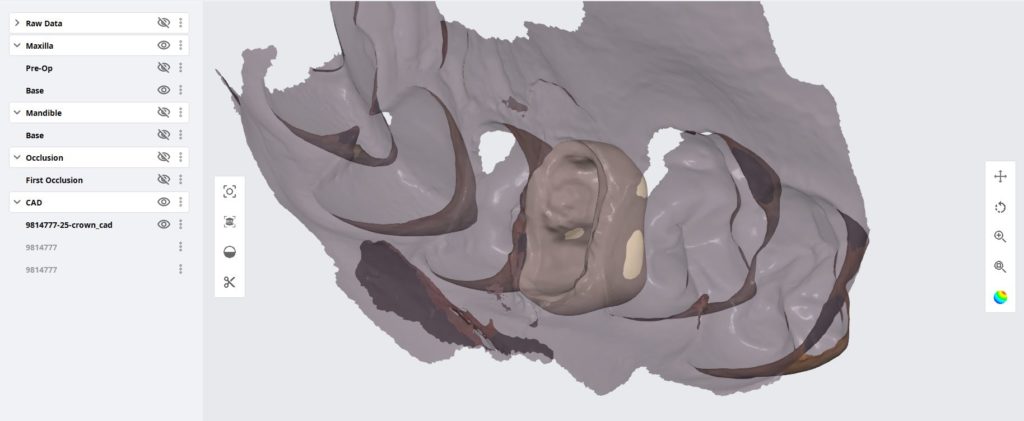
The new Medit i500 software will feature the ability to mark margins in the imaging step before you import the case into a CAD software or send it to the lab. In this article we showcase a case where a 12 year old implant crown needed replacement. The pre-op images were captured, along with the opposing and the bite.
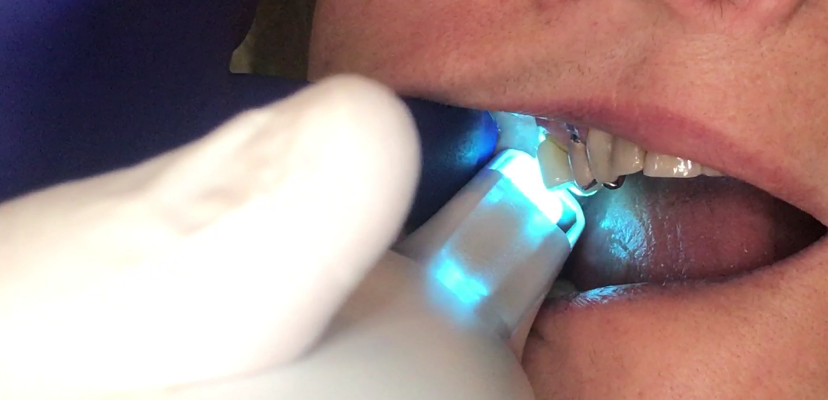
After the area was anesthetized and the crown was removed, expasyl was used to achieve hemostasis and tissue retraction. The margins of the abutment were imaged. Note how we used a feature in the Medit scanner to change the scan light from blue to white, which allows you to pick up red (blood and tissue) that is normally difficult to capture.
Once the margins were captured, we activated the margination tool. You highlight the area you want to address and the meshwork is calculated and processed locally, where you can then designate your margins that are exported to CAD software along with the jaw model, the opposing, the pre-op and the bite.
Alternatively, the traditional way would be to not place the margins in the native Medit software and to place it in the CAD software itself. As you can see both options are very viable and you do not lose any resolution of the scanned data between the imaging program or the design software.
There are multiple ways one can capture the bite for a patient. In this clinical case, we focus on the easiest way to capture two bites (one in maximum intercuspation and the other in an opened vertical dimension and in protrusive for a sleep apnea oral appliance).
The Medit iScan software allows you to capture two bites. Most people treat them as “Left Bite” and “Right Bite”, but the software doesn’t care if you follow this guideline. You can capture full arch bites in maximum intercuspation in one catalog box and then capture a full arch bite in the open / protrusive position in the second bite.
The next step is to clone or duplicate the case, where you set the first desired bite and process the case manually in maximum intercuspation and then in the second cloned case, you manually set the bite to the different occlusal scheme. As our users advance in their experience and knowledge level, they clone the same case multiple times so that they don’t have to re-image the upper and lower jaws multiple times and just capture different bites in all the different case files.
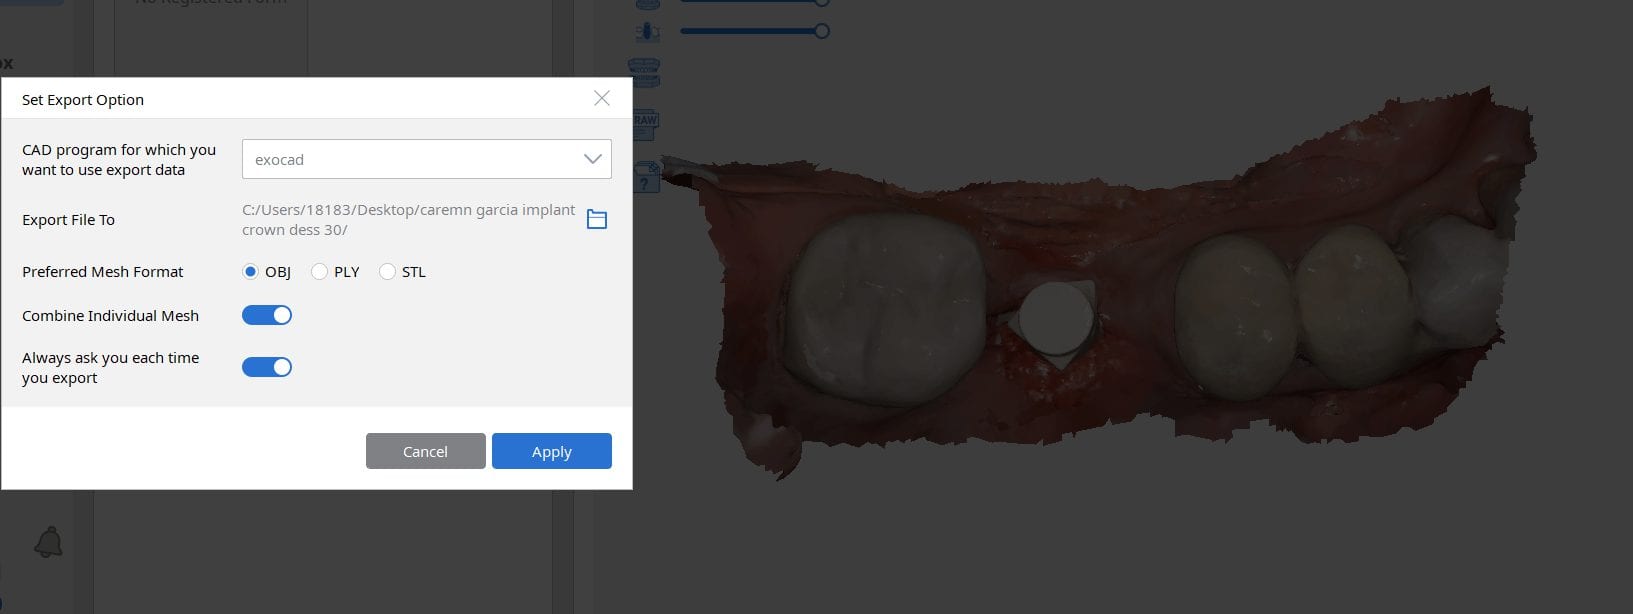
Our super advanced users image multiple bites in any folder they want, process it, and use that digital model to related the jaws together to any position they want in a CAD software like exocad.
The Medit i500 intra-oral scanner has two different software programs to operate, one is of which is geared towards clinical dentistry and the other is geared towards laboratories. Our advanced users are encouraged to use the lab version as it has a lot more functionality. One of them is to directly link to exocad software.
In this particular preview we show you the interface where you can launch the iScan program and define the work order and set all the parameters for your restorations.
Once all the settings are chosen, you launch the Medit scanner and image the case. Here, we defined the custom abutment for the crown and the opposing, which activated the catalog box for the antagonist, the arch, the scanbody, and the buccal bite. All respective images were captured.
Once the implant type is identified then you can design the abutment and crown with great control, where you can contour the underbelly of the abutment to help provide tissue support.
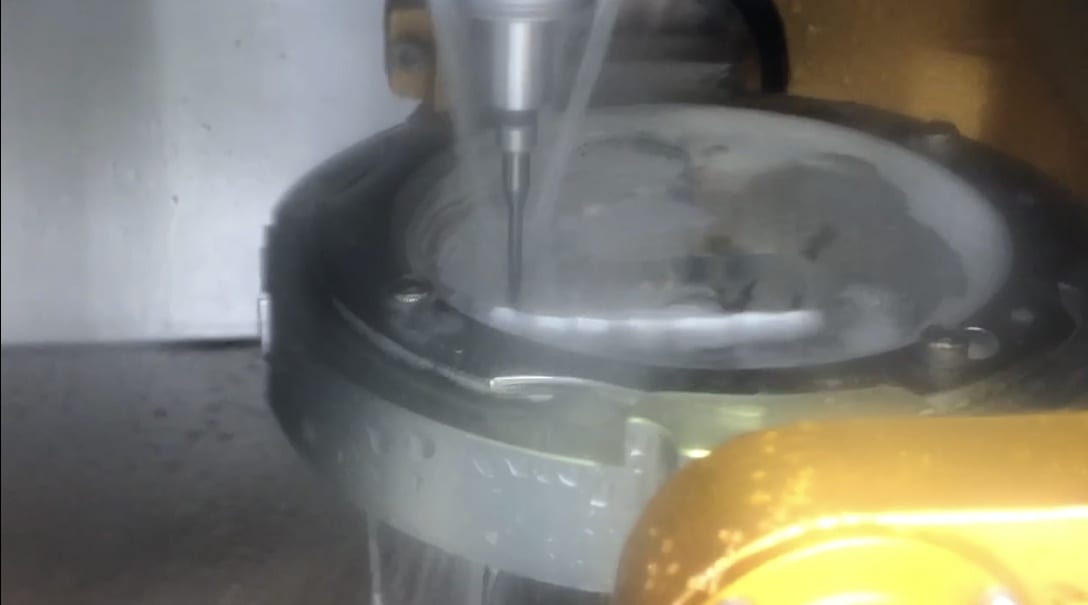
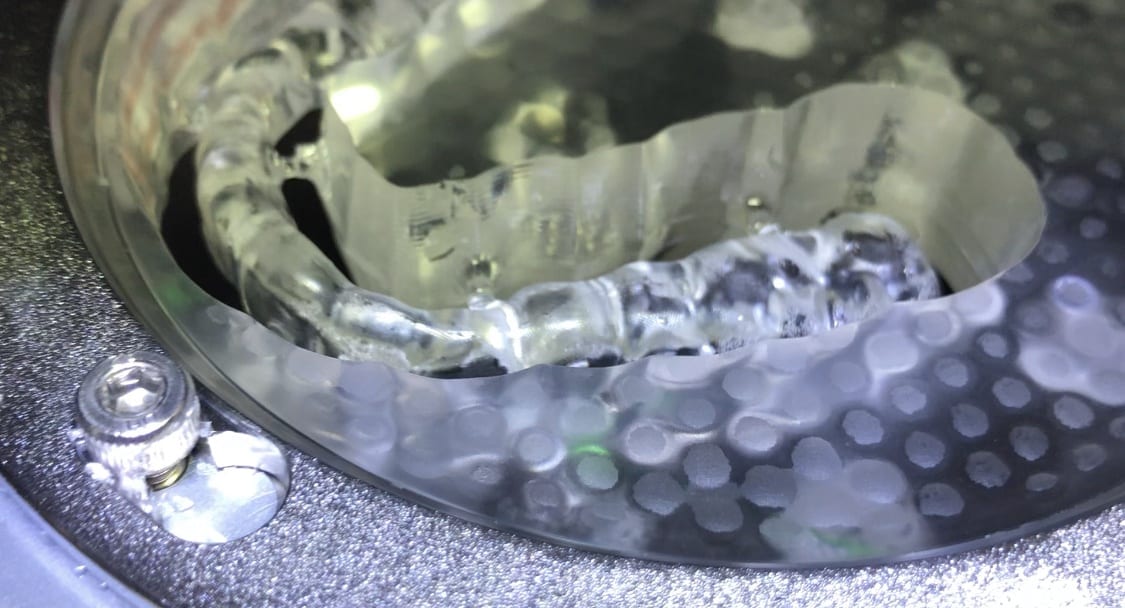
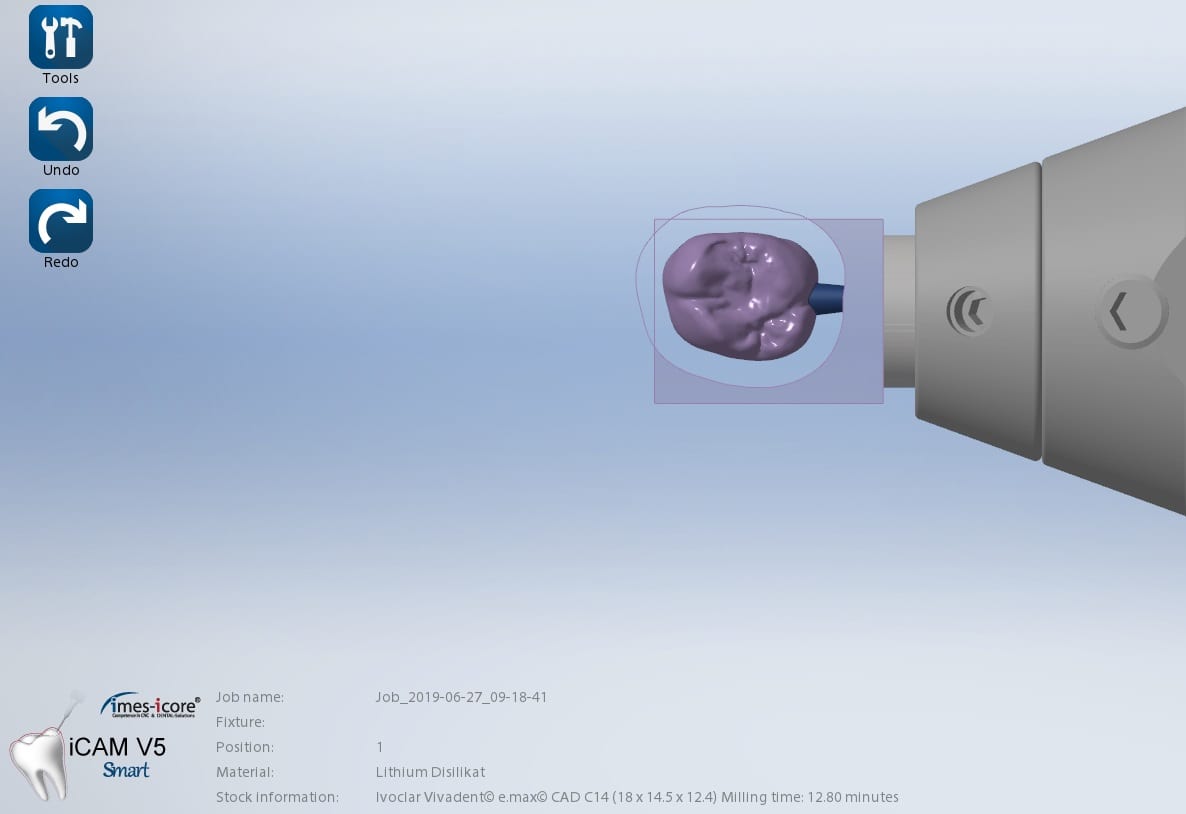
The design and the construction file is taken to the milling machine. Here, we used the CORiTEC ONE to mill the titanium abutment and then the Lithium Disilicate crown. You can see the great internal adaptation when the crown and the abutment are flipped around completely and the abutment does not fall out.
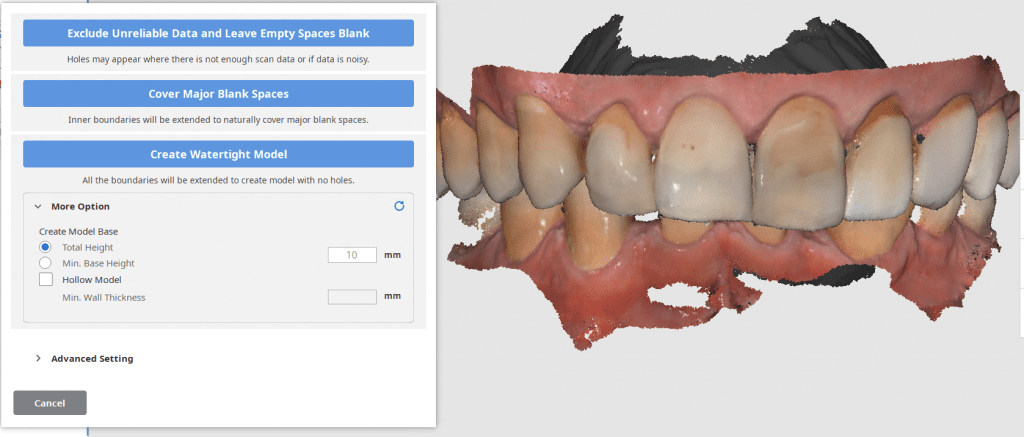
An exciting new feature in the Medit i500 v 2.1 is the ability to close holes in the model AND to create a base. For advanced users, this is not of great significance but for most new users, and particularly for labs new to digital, the option allows us to immediately send the case to a printer.
Most users like to fabricate the models and then restoration and verify the fit and the contacts after all the polishing and glazing is processed. There are lots choices for the height of the base and to make it hollow to save on the amount of resin it takes to fabricate the case.
Requests for adding support pins have already been submitted and are forthcoming.
Once the current dentition is digitized you can take it to any CAD software and design the case to your liking and fabricate temporary shells or even print/mill the model to make suck down stents or siltech matrix putties to adapt the new smile to the current dentition.
One of our favorite procedures to perform with digital dentistry are occlusal appliances where you open the vertical (for an occlusal guard for bruxism) or when you open the vertical and advance the jaw forward to create an airway passage for snoring and/or sleep appliances.
A method that is very simple that we use is to capture two buccal bites while the patient is biting on two cotton rolls on both sides. You place the cotton roll in such a manner so that the second molars and their clearance are clearly visible.
This allows you to asses the thickness you can achieve in the appliance and to assess the open bite in the anterior. It is very important to tell the patient you will be capturing the bite on both sides and that they should hold that position until you instruct them to otherwise. The cotton rolls give them the perfect tactile sensation to keep them in place without opening or closing their jaws. The best part of this is when the appliance is delivered, there is little to no adjustment to perform.
Preview of Upper and Lower Arches at Desired Vertical Dimension in Medit V2.1
Once the upper jaw and the lower jaw are imaged, the data is then transferred to CAD software, in this case exocad. You can see how we first edit the mesial contact of the first molar in anticipation of future dental work. We bulked out the area to accommodate any future dental work. The occlusal scheme is taken into consideration when designing the prosthesis which is then milled and delivered to the patient
We take a CT scan on all new patient exams and there are quite a lot of diagnostic information you can gather from that data set by itself, or for orthodontic measurements. Here, we merged the data sets and reveal how you can pick up on matters like a deviated septum and a mucous retention cyst. You can also utilize these data sets to view the head of the condyle at maximum intercuspation or with the appliance in place. The appliance did not need a single adjustment neither on the occlusal surface, nor in the intaglio
A lot of our users are migrating to SSD Drives which greatly speeds up processing and graphics rendering in intense software applications. When you are capturing scans with the Medit i500 you can quickly fill up your hard drive with law videos (which is technically a series of thousands of images) and when you process the case, the data is converted into small 30-50 MB size digital models
In previous versions of the software that data was only stored on your local machine, which meant you could not log into another computer to add or edit your live video images. You now can sync the data through the cloud so you can access it anywhere, or you can delete the raw footage from the preview screen. In previous versions you would have to search hidden folders to find this data, but now it is readily available and you can dump the data with one click. You do not delete your models in this situation.
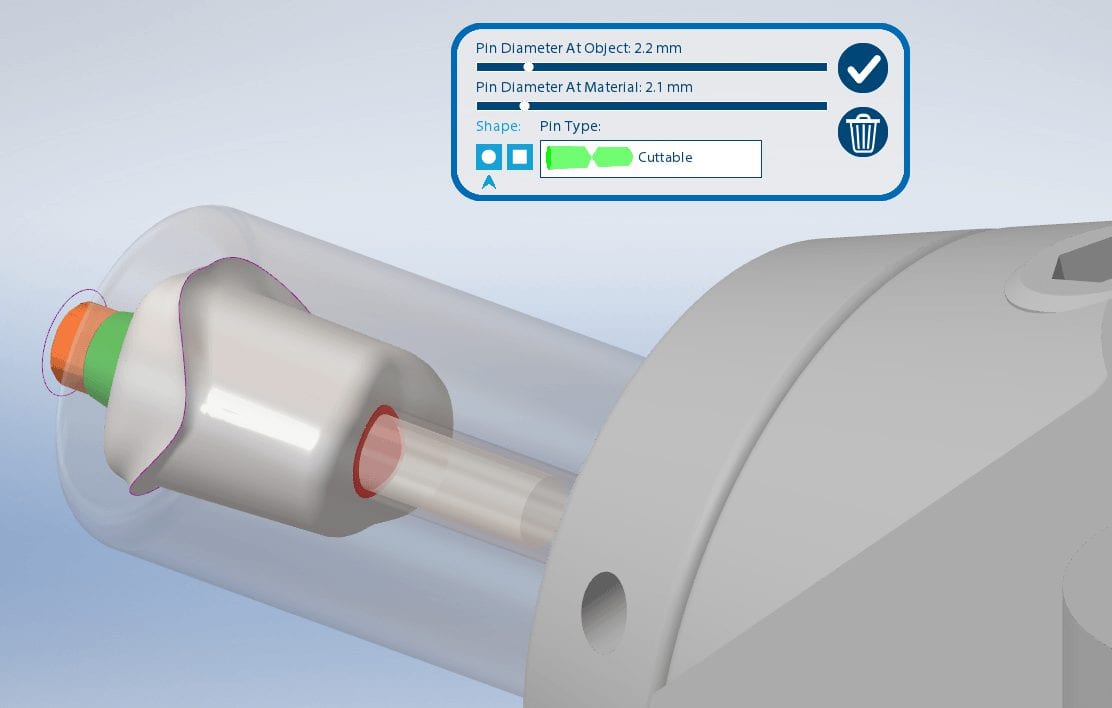
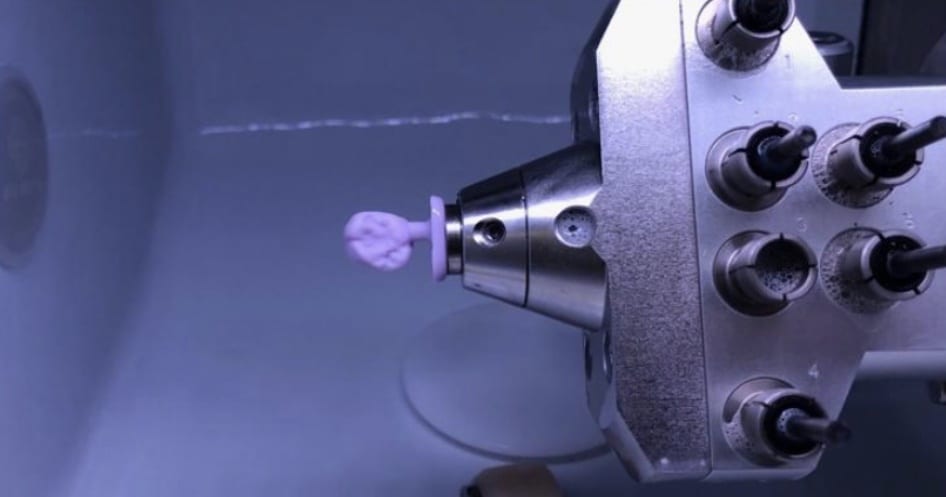
Titanium blanks are the hottest topic in digital dentistry in 2019. A lot of new milling machines can mill emax, zirconia, and custom metal abutments.
One of the parameters to keep in mind when milling them is the diameter of the screw access channel. Most CAM will carve them out but leave a lot of finishing processes remaining.
We’ve tested quite a lot of mills with the imes icore coritec one and the milbox cam software. If you set the settings to 2.5 mm’s , you can pee off the excess sprue material with just finger pressure, dramatically reducing the free hand work that you would have to do.
The pin diameter at object and at material under 2.5 mm’s will give you inconsistent results.
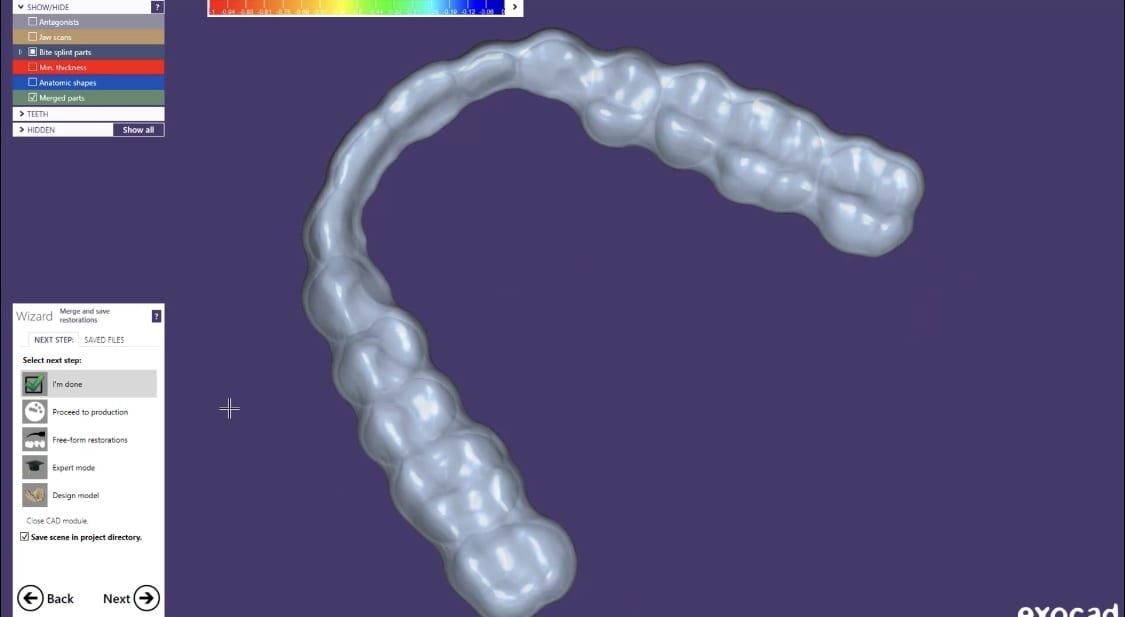
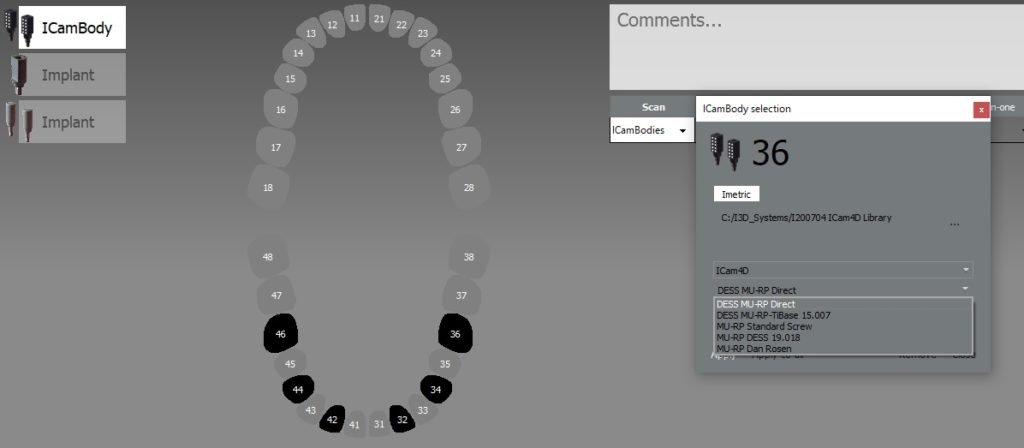
Most scanners will export the jaw model and the scanbody model separately but a new feature on the Medit upcoming software will let you export them as individual models or as a single merged model.
There are design advantages to both scenarios based on the practitioners skill level!
There are numerous ways to quickly check a model before taking it to a design software. Windows comes with at least 3 such free software. Another one to have handy is called 3dviewer.net to let you verify models really quickly
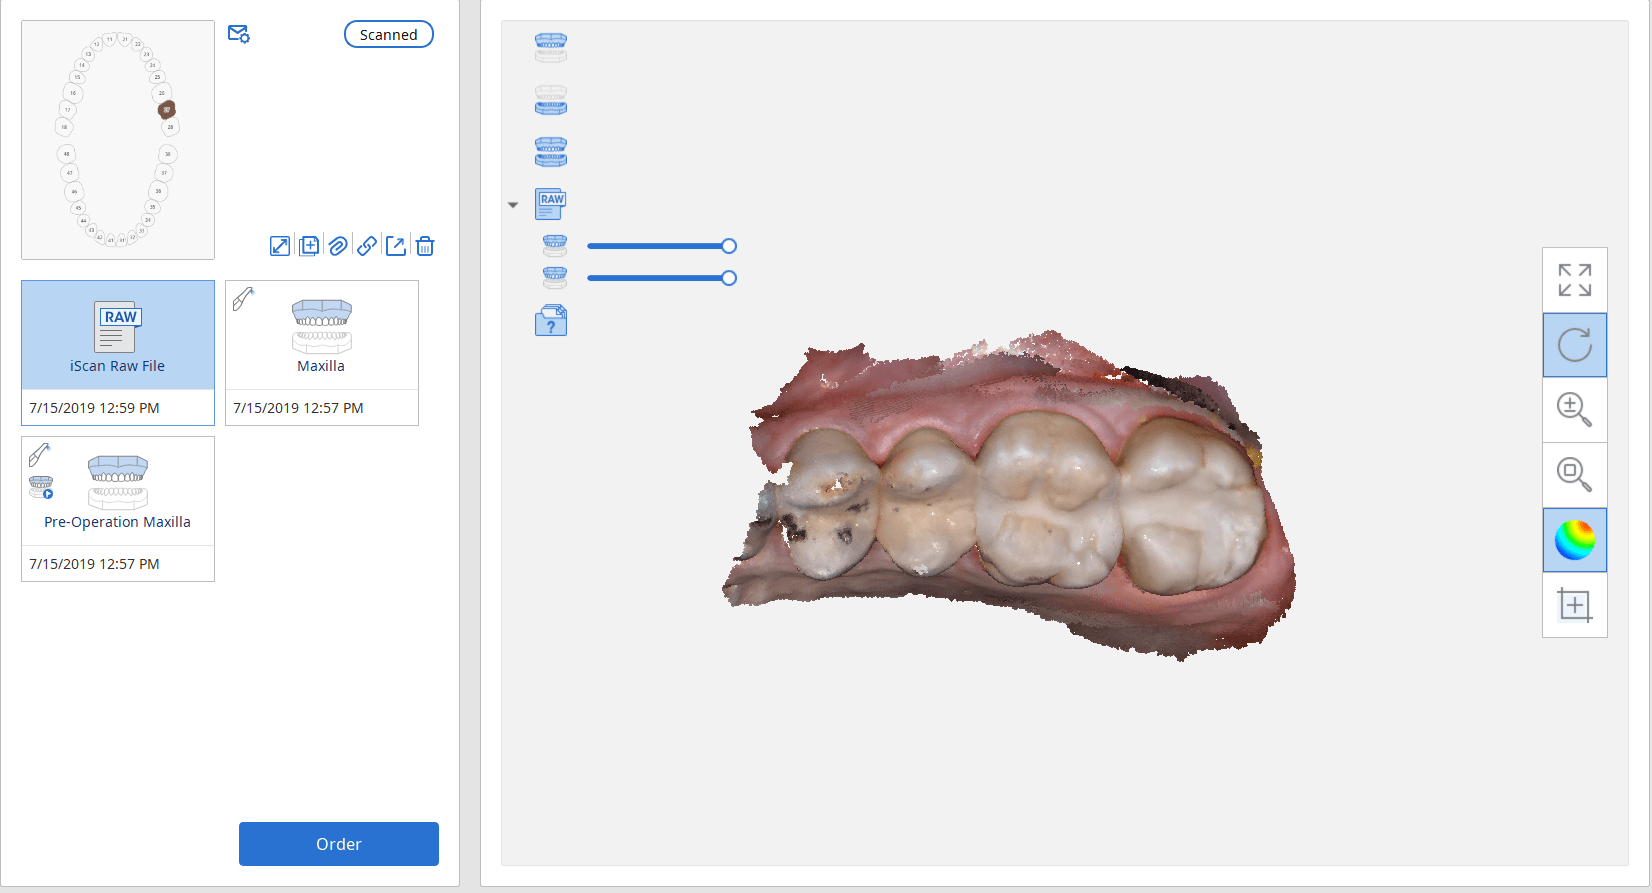
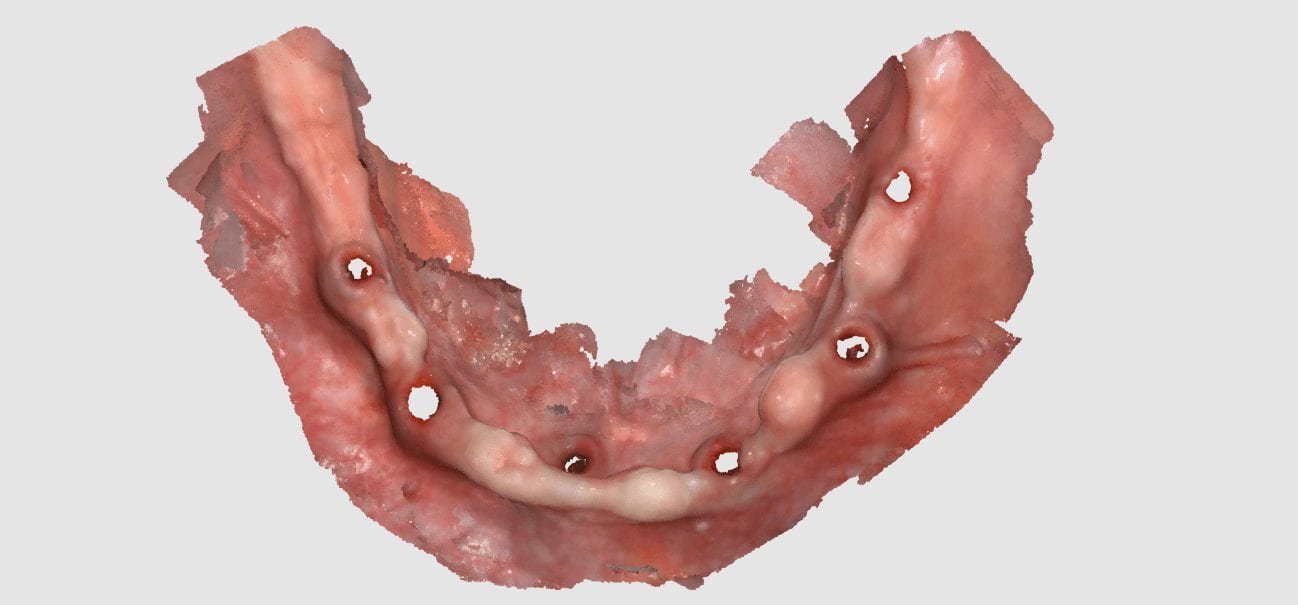
In this case presentation, we scan a patient with the medit i500 for implant planning and restorations in the upper left quadrant. At first, you will notice how the camera was slow to capture the arch due to water spots on the mirror of the camera tip. Once these water spots were removed, the imaging was rapid and the whole upper arch was imaged in just a minute.
Once the upper arch was digitize it was automatically merged with the dicom data from a ct scan in the blueskybio software. This automated step saves quite a lot of time and is rapidly becoming a reliable solution. It is imperative that you do NOT form a base or close holes in your intra-oral scans so that the software has an easier time to stitch the models together.
The implant case was designed and a surgical stent was fabricated for fully guided surgery. The lip line and the tooth position will be a challenge and the angulation will have to be corrected with an angled abutment
The Medit i500 software can now identify a scanbody and digitally place a virtual one in its location. This has a lot of ramifications. For starters, this great opportunity affords a dentist the ability to image multiple implants in long span edentulous areas, where you would have a clear indication of distortion or artifact introduced during challenging scans.
In this single unit case in the video below, we preview this feature. Once the patient is anesthetized, the isolite was placed to protect the airway and the edentulous area was scanned.
After uncovery of the fixture, the type of scanbody was identified in the menu and the location of the scanbody was identified on the digital model.
Once scanning was resumed, the digital scanbody was placed on top of the intra-oral one. As more data was captured you can appreciate how steadily the software tries to adapt the physical fixture to the digital one.
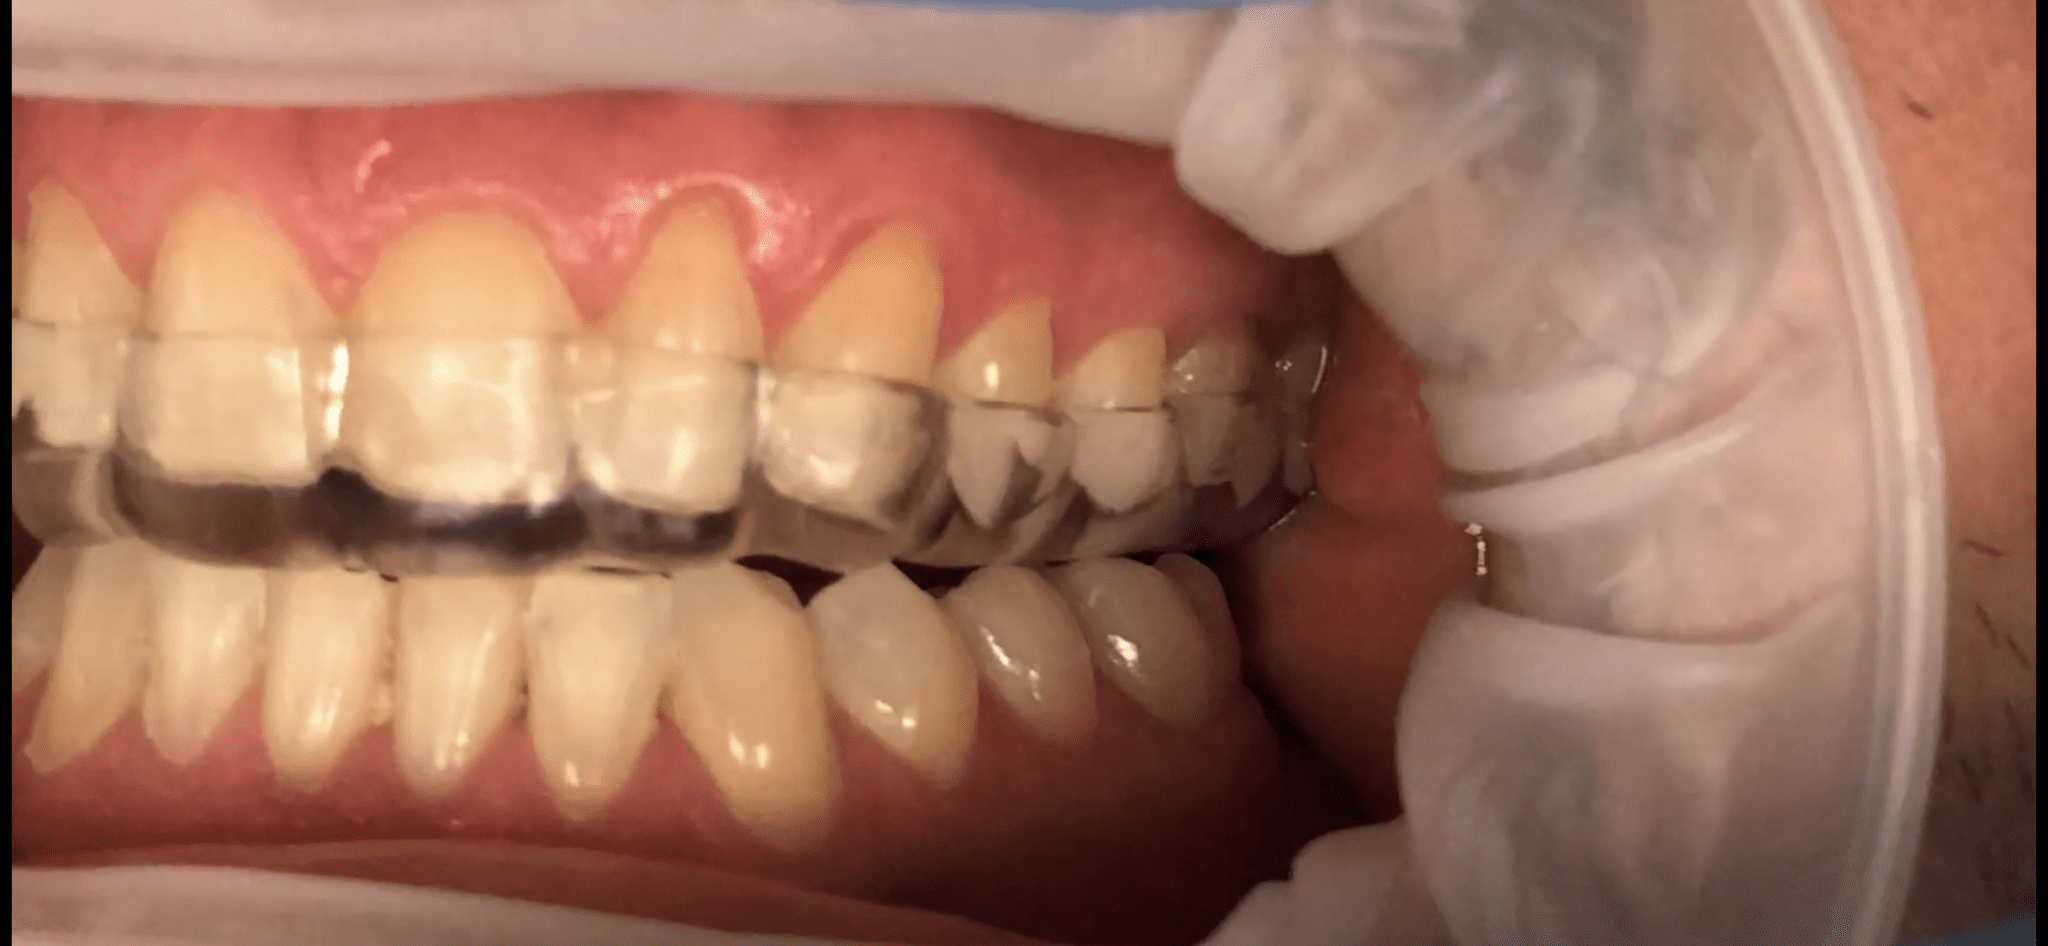
In this particular case, we designed an occlusal splint for a patient that is a heavy bruxer. We captured the bite by having the patient gently bite down on cotton rolls on both sides. The first purpose of this is to block out the tongue and the orophayrynx when imaging the buccal bite. But it can also help you find the proper vertical dimension and dramatically reduces the time it takes to deliver an appliance.
Ideally, you place the cotton rolls in such a manner so that you don’t obstruct your view of the second molars. This allows you to see and verify the proper clearance in the most critical area! If you take it one step further and design the guard to the opposing, your seat appointments are just a few minutes long.
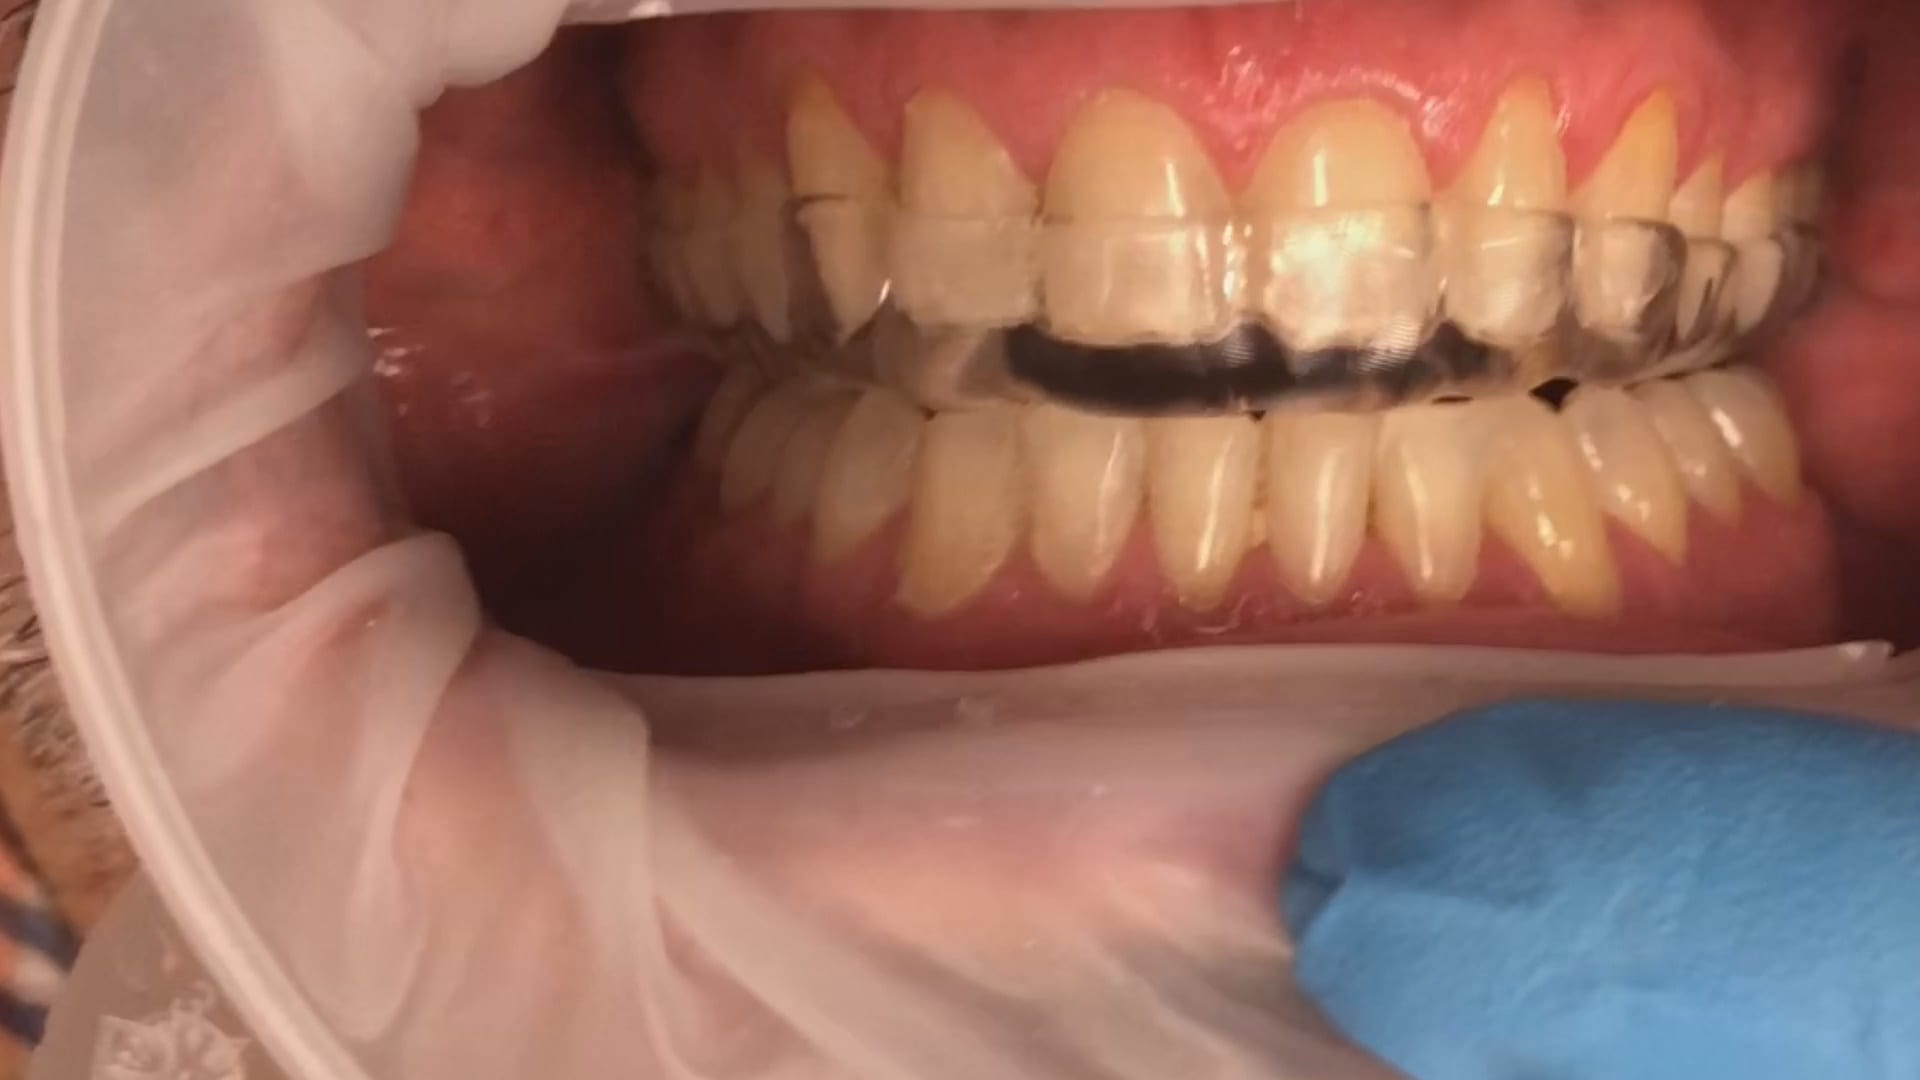
Once the upper jaw and the lower jaw are related to each other in the medit scan, and the clearance is verified, the models are brought into exocad’s Bite Splint Module. The case is designed in the CAD software and then milled with a 5 axis milling machine. This step should ideally be delegated to a lab as it is not practical to fabricate these in the office.
The delivery of the appliance is very predictable when you capture the bite with digital impression and you don’t have to grind away to get the jaws to close in the anterior, as the distance was taken into consideration during the design process.
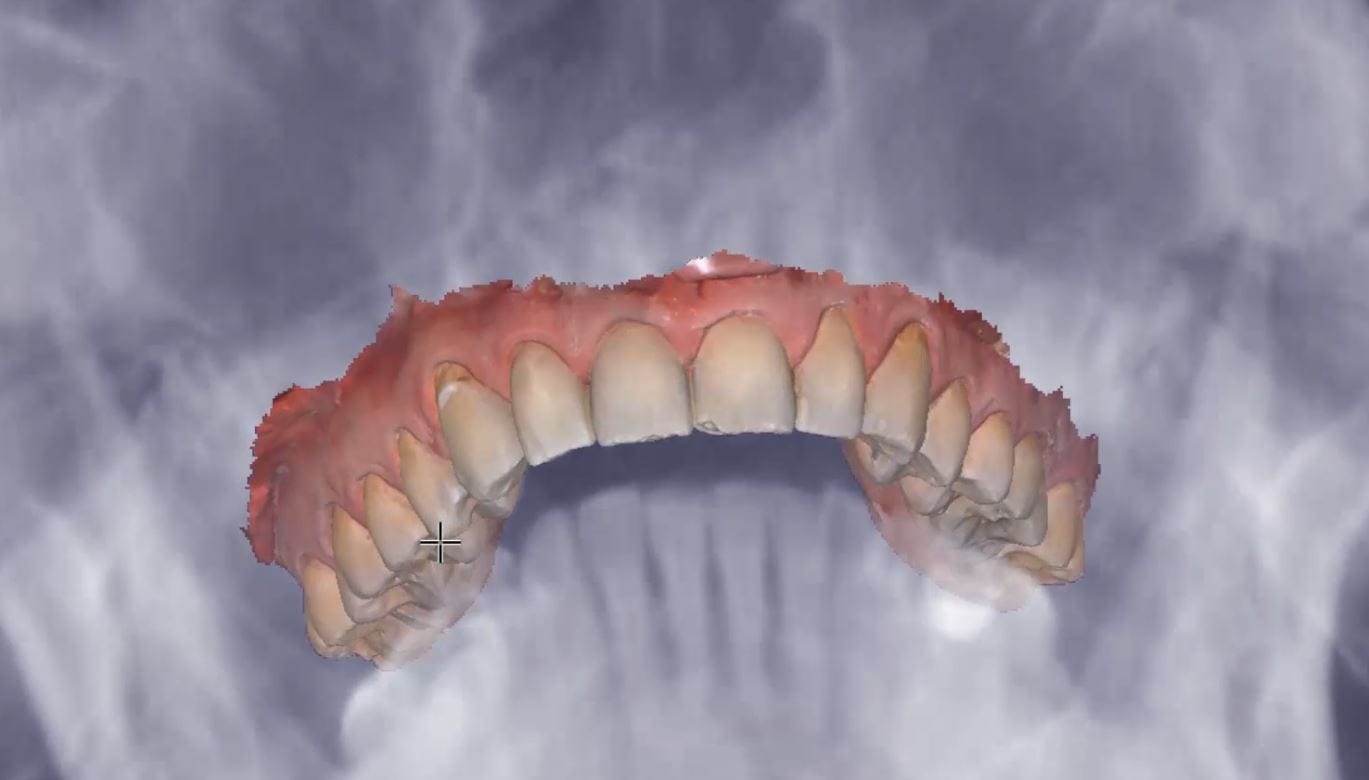
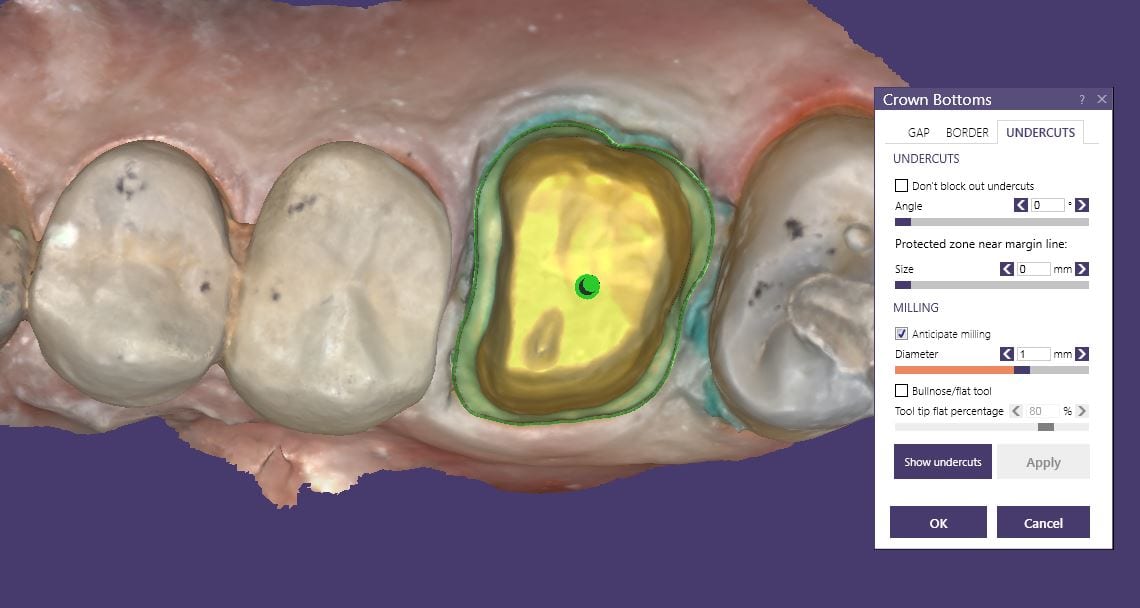
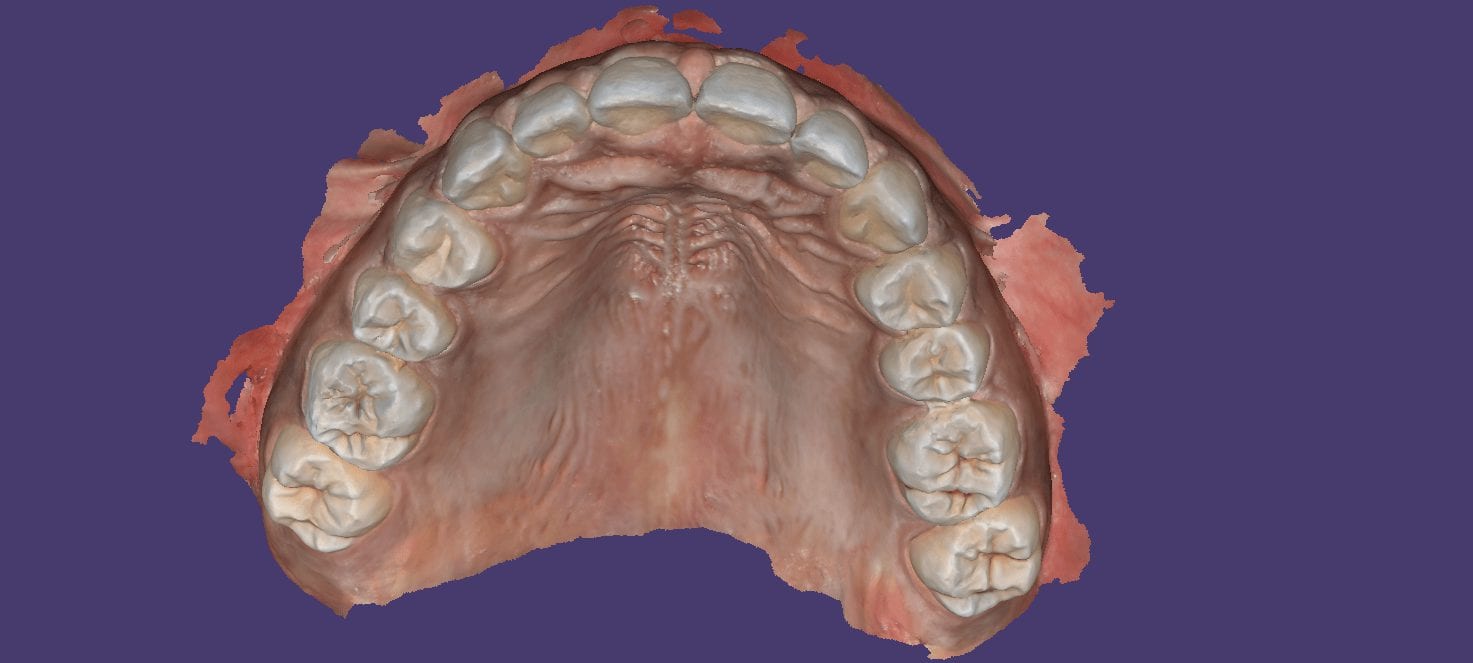
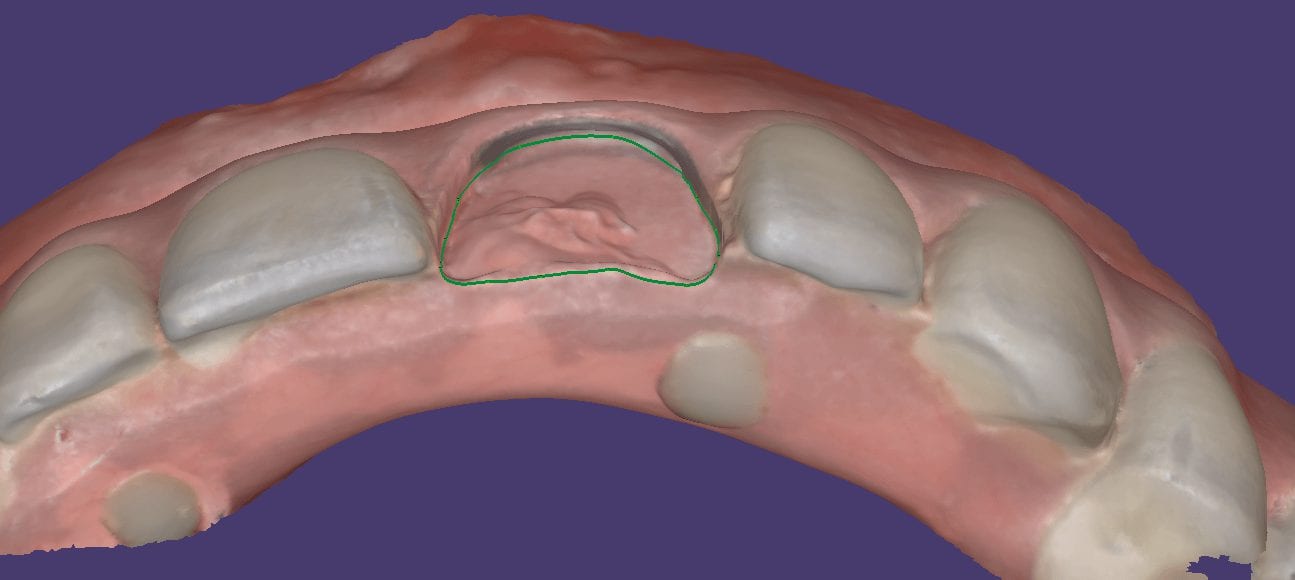
This case shows the amount of control one can have over the fit of a restoration. The upper right first molar was imaged with the Medit i500 and then imported into exocad design software. Once the margins are marked, the user can then define parameters that affect the fit of the restoration.
The diameter of the drill can be taken into consideration; in the design, 1.0 mm was chosen, but ultimately, we used the 0.6 mm bur to mill the intaglio of the emax restoration. The cement gap can be controlled as can the distance from the margin where it takes effect. The minimum thickness parameter also reinforces the material at the margins which will reduce the chances of chipping and ditching at deep chamfer margins. All of this translates into well fitting restorations with little space needed for the resin. That ultimately translates to easier clean up.
The case was milled using a few different materials and at varying speeds to see how thin the margins could be handled and how much detail the 0.6 mm burr can carve into emax and the glass ceramic material
Imaging the edentulous arch is one of the hardest procedures to capture in digital dentistry. In this first video of the Medit i500 we replay the video capture in live color mode to show you how the model is developed. We then change the view to the reliability map that shows you how we use the conversion of the red data to green reliable data and advance the camera forward with the appropriate pace.
Here is how the arch was captured; as advanced users we deliberately image in the reliability mode and watch the images being formed to verify that the data is accurate before advancing the camera forward.
If you wanted to capture the relationship of the one edentulous arch to another, there is a very simple technique you can use with your Medit i500.
WHAT ABOUT THE BITE?
WHAT IF YOU WANT TO DO THIS OUTSIDE THE MOUTH?
There are two advanced techniques that can help you manage the relationship of the jaws to each other and to image the edentulous arch outside the mouth, which is always easier!
You can scam the opposing (here the upper hybrid was being repaired as the left central incisor had fallen off), scan the denture in place of the appropriate arch, and then you can take the buccal bite.
You can then take the prosthesis out of the mouth and continue imaging it and roll over to the intaglio and capture that information.
You can even reline the prosthesis to get the best adaptation possible, scan that, clone the case, and then use the edit tool to crop out everything but the intaglio. What remains is the edentulous ridge that is properly mounted to the opposing arch where you can start designing the desired final restoration.
Intra-oral scanning for immediate extractions and immediate denture fabrication. Upper and Lower dentition were digitally extracted. The Vertical Dimension and tooth position was preserved for the lab to design the prosthesis.
So easy to manage this situation for immediates as opposed to taking a physical impression and hoping not to inadvertently extract mobile teeth. Plus, the lab knows how to mount the case properly.
Repairing hybrids can be a nightmare. At CAD-Ray, we recommend that you fabricate two sets of the prosthesis so you can swap them out at recall for repair work, or so do you don’t have to ask a patient to part ways with it when a part breaks off from long term function.
Here, we repaired it by milling a restoration that is a mirror of the Right Central Incisor.
In our 2 day hands-on course, we make sure our doctors get comfortable with full arch scans in speedy and accurate fashion. One of the greatest feature of the Medit iScan software is the reliability map. Watch how we image this full arch; every camera position and movement serves a specific purpose, which is to plot as much data on the X, Y, and Z plane so that the camera and software can always recognize where it is in reference to previous data captured.
Note how we move the camera back to a position in the arch to reinforce the fact that it is “on track”. The more data it recognizes the more accurate it can be in full arch imaging. This is true for all intra-oral scanners and the same principle can be applied to all of them. This should also explain to you why imaging an edentulous area is harder to do with all scanners- there is less data (or no data) on a vertical plane for it to recognize and to use a reference frame.
A fracture and worn overdenture greater than 10 years old was duplicated digitally where the lab was able to follow the vertical dimension and tooth position from digital impressions taken...
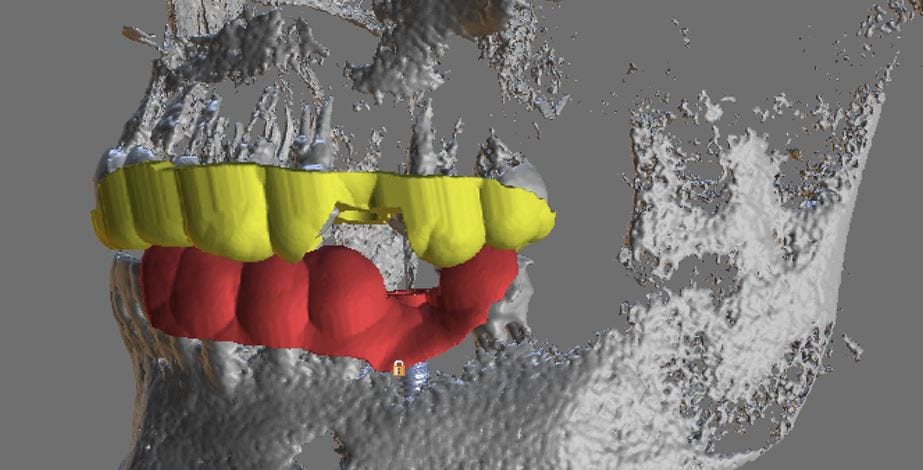
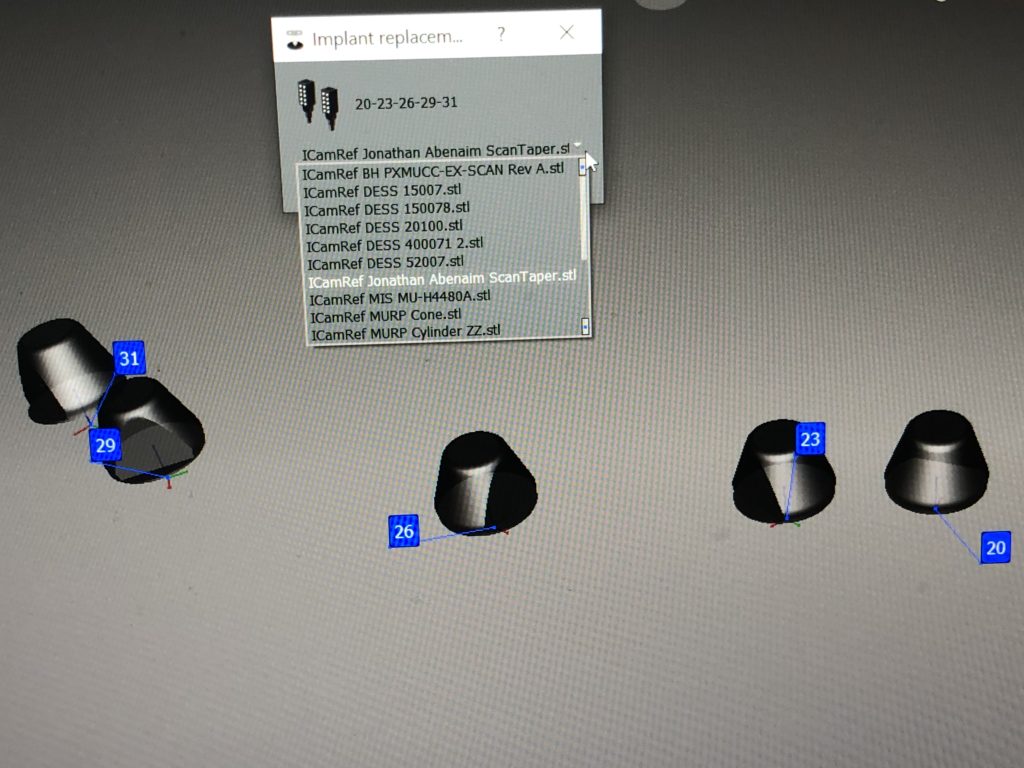
There is a lot of focus nowadays on the connection between the screw and the MUA and top clinicians are recognizing this to be the most vulnerable part of full...
When setting up case in photogrammetry, you can select the type of screw you will be using for the prosthesis so that it gets incorporated into the design of the...
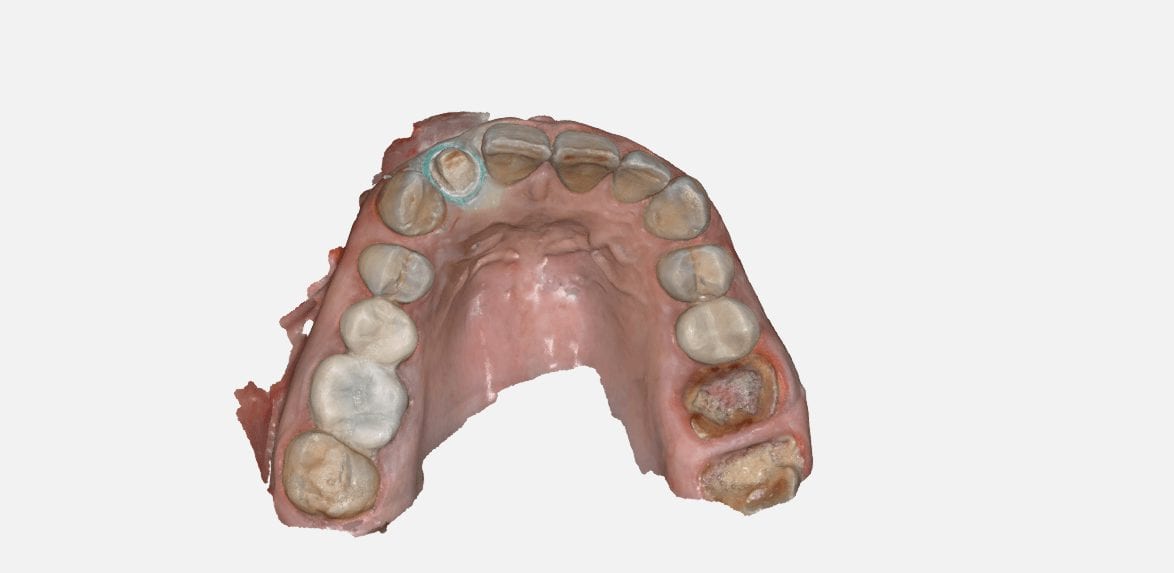
In this video we demonstrate how to use the color extraction feature of the Medit i500 scanner to displace and ignore the pesky tissue and the coronoid process that are...


You must be logged in to post a comment.